Android周末 第一周-图灵聊天对话机器人小项目
Android周末 第一周-图灵聊天对话机器人小项目
- 1.获取api
- 2.准备工作
- 1.添加权限
- 2.更改网络安全配置
- 3.添加依赖
- 3.布局文件
- 1.主界面
- 2.左聊天框
- 3.右聊天框
- 4.java逻辑代码
- 1.圆形图片类-CircleImageView
- 2.时间格式化工具类-DataUtil
- 3.消息实体类-ChatMessager
- 4.IntentCode类-IntentCode
- 5.http的配置信息类 -HttpRrequest
- 6.适配器-ChatAdater
- 7.MainActivity
- 5.源码
运行如下
1.获取api
图灵机器人的 api 是 http://www.tuling123.com/openapi/api
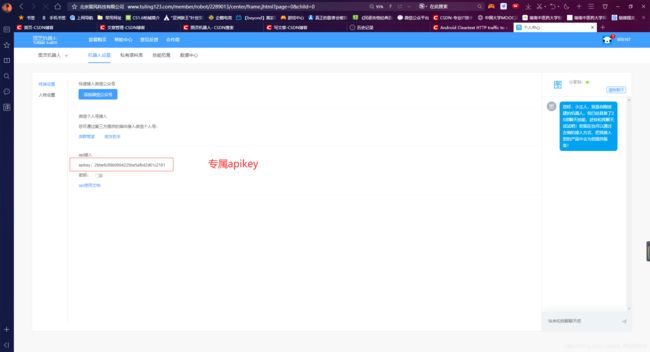
我们需要获取的是专属的 apikey
图灵机器人官网:http://www.turingapi.com/
第一步,打开网址,然后注册并且登录

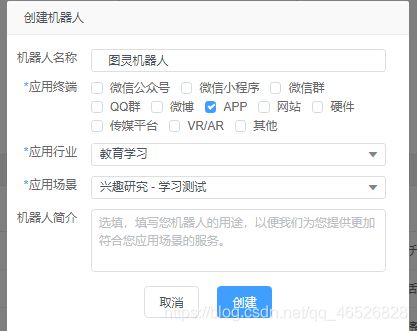
第二步,创建机器人

编辑好机器人信息以后,点击创建
这里就拿到了apikey
2.准备工作
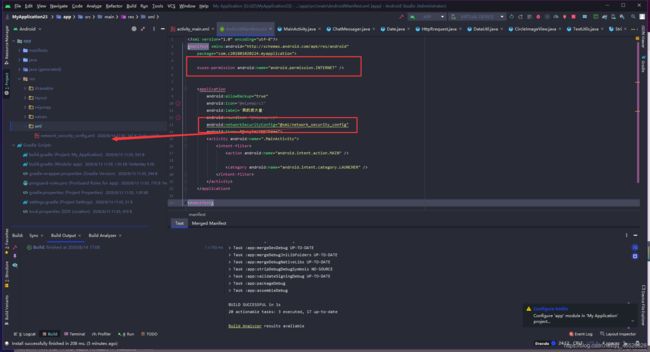
1.添加权限
这里只需要添加一个权限,网络的权限就ok
<uses-permission android:name="android.permission.INTERNET" />
2.更改网络安全配置
补充:一开始我没有加的时候,在模拟器上可以正常运行,但是在真机上却不可以,最后找到的原因是真机的版本高的原因,因此 使用HttpUrlConnection进行http请求会出现以下异常
W/System.err: java.io.IOException: Cleartext HTTP traffic to www.tuling123.com not permitted
解决办法就是更改网络安全配置
原文
1.在res文件夹下创建一个xml文件夹,然后创建一个network_security_config.xml文件,文件内容如下:
<?xml version="1.0" encoding="utf-8"?>
<network-security-config>
    <base-config cleartextTrafficPermitted="true" />
</network-security-config>
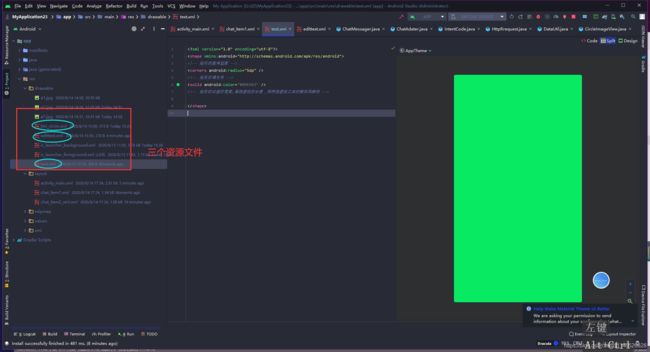
2.然后在 mainifests 的 在build.gradle下添加依赖 这里需要用到三个布局文件,一个是主界面用来聊天,然后就是两个聊天框的布局,左边一个右边一个 第一个,主界面 activity_main.xml listview补充: 在drawable目录下创建 shape 图片资源文件 edittext.xml 按钮样式 然后图片资源的话需要自行准备 我们再创建一个layout布局文件 chat_item1.xml 用作聊天左聊天框 文字样式 圆形图片请看这
我们在布局文件下用到了圆形图片 ,所以需要创建一个自定义的圆形图片类 我们在每次发消息 都会获取系统时间 这里我们需要创建一个时间的格式化工具类 DataUtil 用于json解析数据创建的实体类 用于与网络进行交互的有(反应服务端映射的结果类) 用于网络请求,把发的消息发到服务器,再从服务器获取返回的信息, 需要创建一个适配器来给listview填充数据,然后通过type来加载不同布局,也就是聊天框 源码下载地址 声明:图灵机器人demo项目博主原文 因为一开始对这个项目很感兴趣,然后就找相关文章,最后这位博主的文章帮我搞定,原文博主讲的比较详细,我也是看了以后才做出来的(基本上就是复制粘贴),谢谢博主分享,在此声明。 我觉得每次在学一个项目制作的时候,对于像我这样的初学者,在参照了前人的代码以后,应该在完成以后再去反复推敲一下代码,熟能生巧,理解了才能掌握的更牢固,这样以后对敲代码的技能会更能提高,路漫漫其修远兮,加油吧。 android:networkSecurityConfig="@xml/network_security_config"
3.添加依赖
implementation 'com.google.code.gson:gson:2.8.6'
3.布局文件
1.主界面
<?xml version="1.0" encoding="utf-8"?>
<androidx.constraintlayout.widget.ConstraintLayout xmlns:android="http://schemas.android.com/apk/res/android"
    xmlns:app="http://schemas.android.com/apk/res-auto"
    xmlns:tools="http://schemas.android.com/tools"
    android:layout_width="match_parent"
    android:layout_height="match_parent"
    android:background="@drawable/a7">


    <TextView
        android:id="@+id/text"
        android:layout_width="match_parent"
        android:layout_height="0dp"
        android:gravity="center"
        android:text="派大星"
        android:textColor="#ffffff"
        android:textSize="24dp"
        app:layout_constraintBottom_toBottomOf="@+id/view2"
        app:layout_constraintTop_toTopOf="parent" />

    <View
        android:id="@+id/view2"
        android:layout_width="match_parent"
        android:layout_height="1dp"
        android:background="#3BD63384"
        app:layout_constraintBottom_toBottomOf="parent"
        app:layout_constraintTop_toTopOf="parent"
        app:layout_constraintVertical_bias="0.056" />

    <ListView
        android:id="@+id/listview"
        android:layout_width="match_parent"
        android:layout_height="0dp"
        android:transcriptMode="alwaysScroll"
        app:layout_constraintBottom_toTopOf="@id/editTextTextPersonName2"
        app:layout_constraintTop_toBottomOf="@id/text"
        android:divider="@null"
        android:listSelector="@android:color/transparent"
        />

    <EditText
        android:id="@+id/editTextTextPersonName2"
        android:layout_width="0dp"
        android:layout_height="wrap_content"
        android:layout_marginStart="5dp"
        android:layout_marginLeft="5dp"
        android:layout_marginEnd="10dp"
        android:layout_marginRight="10dp"
        android:padding="5dp"
        android:background="@drawable/edittext"
        android:ems="10"
        android:hint=" 请输入消息"
        android:inputType="textPersonName"
        app:layout_constraintBottom_toBottomOf="@id/button_send"
        app:layout_constraintEnd_toStartOf="@+id/button_send"
        app:layout_constraintStart_toStartOf="parent"
        app:layout_constraintTop_toTopOf="@id/button_send" />

    <Button
        android:id="@+id/button_send"
        android:layout_width="wrap_content"
        android:layout_height="wrap_content"
        android:layout_marginEnd="10dp"
        android:layout_marginRight="10dp"
        android:layout_marginBottom="20dp"
        android:background="@drawable/btn_circle"
        android:text="发送"
        app:layout_constraintBottom_toBottomOf="parent"
        app:layout_constraintEnd_toEndOf="parent"
        app:layout_constraintTop_toBottomOf="@id/listview" />

</androidx.constraintlayout.widget.ConstraintLayout>
android:transcriptMode="alwaysScroll" -------自动滚动到底部
android:divider="@null" -------去掉分界线
android:listSelector="@android:color/transparent" ------隐藏了点击效果
<?xml version="1.0" encoding="UTF-8"?>
<shape xmlns:android="http://schemas.android.com/apk/res/android">
    <solid android:color="#FFFFFF" />

    <corners android:radius="5dip"/>

    <stroke
        android:width="1dip"
        android:color="#7013CCE4" />
</shape>
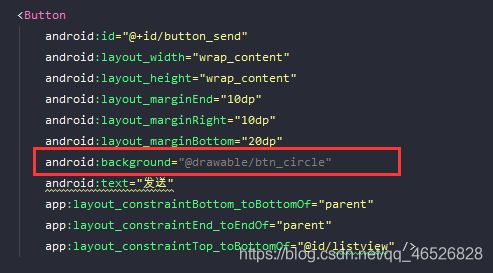
同理, 在drawable目录下创建 shape 图片资源文件 btn_circle.xml<?xml version="1.0" encoding="UTF-8"?>
<shape xmlns:android="http://schemas.android.com/apk/res/android">
<solid android:color="#FFFFFF" />
<corners android:radius="5dip"/>
<stroke
android:width="1dip"
android:color="#7013CCE4" />
</shape>
2.左聊天框
<?xml version="1.0" encoding="utf-8"?>
<androidx.constraintlayout.widget.ConstraintLayout xmlns:android="http://schemas.android.com/apk/res/android"
    xmlns:app="http://schemas.android.com/apk/res-auto"
    xmlns:tools="http://schemas.android.com/tools"
    android:layout_width="match_parent"
    android:layout_height="match_parent" >

    <TextView
        android:id="@+id/data1"
        android:layout_width="match_parent"
        android:layout_height="25dp"
        android:gravity="center"

        app:layout_constraintTop_toTopOf="parent"
       />


    <com.c201801020224.myapplication.CircleImageView
        android:id="@+id/haed1"
        android:layout_width="50dp"
        android:layout_height="50dp"
        android:src="@drawable/a1"
        android:layout_marginLeft="10dp"
        app:layout_constraintStart_toStartOf="parent"
        app:layout_constraintTop_toBottomOf="@id/data1" />

    <TextView
        android:layout_width="wrap_content"
        android:layout_height="wrap_content"
        android:text="派大星"
        android:layout_marginTop="2dp"
        app:layout_constraintEnd_toEndOf="@+id/haed1"
        app:layout_constraintStart_toStartOf="@+id/haed1"
        app:layout_constraintTop_toBottomOf="@id/haed1" />


    <TextView
        android:id="@+id/message1"
        android:layout_width="wrap_content"
        android:layout_height="wrap_content"
        android:layout_gravity="center"
        android:layout_marginStart="10dp"
        android:layout_marginLeft="10dp"
        android:gravity="center"
        android:padding="7dp"
        android:text="hello"
        android:background="@drawable/text"
        app:layout_constraintBottom_toBottomOf="@+id/haed1"
        app:layout_constraintStart_toEndOf="@+id/haed1"
        app:layout_constraintTop_toTopOf="@+id/haed1" />


</androidx.constraintlayout.widget.ConstraintLayout>
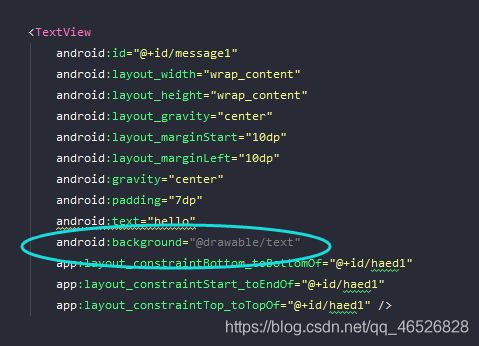
这里聊天的文本用了一个带背景的样式,也是在drawable下创建资源文件 text.xml<?xml version="1.0" encoding="utf-8"?>
<shape xmlns:android="http://schemas.android.com/apk/res/android">
<!-- 矩形的圆角弧度 -->
<corners android:radius="5dp" />
<!-- 矩形的填充色 -->
<solid android:color="#09EA63" />
<!-- 矩形的边框的宽度,每段虚线的长度,和两段虚线之间的颜色和颜色 -->
</shape>
3.右聊天框
<?xml version="1.0" encoding="utf-8"?>
<androidx.constraintlayout.widget.ConstraintLayout xmlns:android="http://schemas.android.com/apk/res/android"
    xmlns:app="http://schemas.android.com/apk/res-auto"
    xmlns:tools="http://schemas.android.com/tools"
    android:layout_width="match_parent"
    android:layout_height="match_parent" >

    <TextView
        android:id="@+id/data2"
        android:layout_width="match_parent"
        android:layout_height="25dp"
        android:gravity="center"
        app:layout_constraintTop_toTopOf="parent"/>


    <com.c201801020224.myapplication.CircleImageView
        android:id="@+id/head2"
        android:layout_width="50dp"
        android:layout_height="50dp"
        android:src="@drawable/a2"
        android:layout_marginRight="10dp"
        app:layout_constraintTop_toBottomOf="@id/data2"
        app:layout_constraintEnd_toEndOf="parent" />

    <TextView
        android:layout_width="wrap_content"
        android:layout_height="wrap_content"
        android:text="海绵宝宝"
        android:layout_marginTop="2dp"
        app:layout_constraintEnd_toEndOf="@+id/head2"
        app:layout_constraintStart_toStartOf="@+id/head2"
        app:layout_constraintTop_toBottomOf="@id/head2" />


    <TextView
        android:id="@+id/message2"
        android:layout_width="wrap_content"
        android:layout_height="wrap_content"
        android:layout_gravity="center"
        android:gravity="center"
        android:text="hello"
        android:padding="7dp"
        android:background="@drawable/text"
        android:layout_marginRight="10dp"
        app:layout_constraintBottom_toBottomOf="@+id/head2"
        app:layout_constraintEnd_toStartOf="@+id/head2"
        app:layout_constraintTop_toTopOf="@+id/head2" />


</androidx.constraintlayout.widget.ConstraintLayout>
4.java逻辑代码
1.圆形图片类-CircleImageView
public class CircleImageView extends androidx.appcompat.widget.AppCompatImageView {

    //画笔
    private Paint mPaint;
    //圆形图片的半径
    private int mRadius;
    //图片的宿放比例
    private float mScale;

    public CircleImageView(Context context) {
        super(context);
    }

    public CircleImageView(Context context, @Nullable AttributeSet attrs) {
        super(context, attrs);
    }

    public CircleImageView(Context context, @Nullable AttributeSet attrs, int defStyleAttr) {
        super(context, attrs, defStyleAttr);
    }

    @Override
    protected void onMeasure(int widthMeasureSpec, int heightMeasureSpec) {
        super.onMeasure(widthMeasureSpec, heightMeasureSpec);
        //由于是圆形,宽高应保持一致
        int size = Math.min(getMeasuredWidth(), getMeasuredHeight());
        mRadius = size / 2;
        setMeasuredDimension(size, size);
    }

    @SuppressLint("DrawAllocation")
    @Override
    protected void onDraw(Canvas canvas) {

        mPaint = new Paint();

        Drawable drawable = getDrawable();

        if (null != drawable) {
            Bitmap bitmap = ((BitmapDrawable) drawable).getBitmap();

            //初始化BitmapShader,传入bitmap对象
            BitmapShader bitmapShader = new BitmapShader(bitmap, Shader.TileMode.CLAMP, Shader.TileMode.CLAMP);
            //计算缩放比例
            mScale = (mRadius * 1.8f) / Math.min(bitmap.getHeight(), bitmap.getWidth());

            Matrix matrix = new Matrix();
            matrix.setScale(mScale, mScale);
            bitmapShader.setLocalMatrix(matrix);
            mPaint.setShader(bitmapShader);
            //画圆形,指定好坐标,半径,画笔
            canvas.drawCircle(mRadius, mRadius, mRadius, mPaint);
        } else {
            super.onDraw(canvas);
        }
    }

}
2.时间格式化工具类-DataUtil
/**
 * 时间格式化工具类
 * */
public class DataUtil {
    @SuppressLint("SimpleDateFormat")
    public static String getDataString(Date date) {

        SimpleDateFormat sd = new SimpleDateFormat("yyyy-MM-dd HH:mm:ss");

        return sd.format(date);

    }
}
3.消息实体类-ChatMessager
public class ChatMessager {
    private String messager;// 消息
    private Date date;// 时间
    private Type type;// 类型:发送者.0 接受者.1

    public ChatMessager() {
    }

    public ChatMessager(String messager, Date date, Type type) {
        super();
        this.messager = messager;
        this.date = date;
        this.type = type;
    }

    public String getMessager() {
        return messager;
    }

    public void setMessager(String messager) {
        this.messager = messager;
    }

    public Date getDate() {
        return date;
    }

    public void setData(Date date) {
        this.date = date;
    }

    public Type getType() {
        return type;
    }

    public void setType(Type type) {
        this.type = type;
    }

    public enum Type {
        INCOUNT, OUTCOUNT
    }
}
4.IntentCode类-IntentCode
1、code码(code是用另一个词、数字或标志来置换一个词或短语,达到隐藏原来的词或短语的目的,它主要起到置换的作用。)
2、网络返回的信息textpublic class IntentCode {
private int code;// code码
private String text;// 消息
public int getCode() {
return code;
}
public void setCode(int code) {
this.code = code;
}
public String getMessage() {
return text;
}
public void setMessage( String text) {
this.text = text;
}
}
5.http的配置信息类 -HttpRrequest
public class HttpRrequest {
    public static final String URL_KEY = "http://www.tuling123.com/openapi/api";

    public static final String APP_KEY = "99edfad993a14bb8b8ae0415f8674a09";

    /**
     * 设置参数 返回url
     * */
    private static String grtUrl(String message) {
        String url = "";
        try {
            url = HttpRrequest.URL_KEY + "?" + "key=" + HttpRrequest.APP_KEY
                    + "&info=" + URLEncoder.encode(message, "UTF-8");
        } catch (UnsupportedEncodingException e) {
            e.printStackTrace();
        }
        return url;
    }
    /**
     * 请求方式:get
     *
     * @return: 返回发送的数据
     * */
    public static String toGet(String message) {
        String result = "";
        String utils = grtUrl(message);
        InputStream is = null;
        ByteArrayOutputStream ba = null;
        try {
            URL urls = new URL(utils);
            HttpURLConnection connection = (HttpURLConnection) urls.openConnection();
            // 超时时间
            connection.setReadTimeout(5 * 1000);
            connection.setConnectTimeout(5 * 1000);
            connection.setRequestMethod("GET");
            is = connection.getInputStream();
            ba = new ByteArrayOutputStream();
            int len = -1;
            byte[] buff = new byte[1024];
            while ((len = is.read(buff)) != -1) {
                ba.write(buff, 0, len);
            }

            // 确保数据写入
            ba.flush();
            // 将信息传给返回值
            result = new String(ba.toByteArray());

        } catch (Exception e) {
            // TODO Auto-generated catch block
            e.printStackTrace();
        } finally {
            // 关闭相应的流
            if (is != null) {
                try {
                    is.close();
                } catch (IOException e) {
                    // TODO Auto-generated catch block
                    e.printStackTrace();
                }
            }
            if (ba != null) {
                try {
                    ba.close();
                } catch (IOException e) {
                    // TODO Auto-generated catch block
                    e.printStackTrace();
                }
            }
        }
        return result;
    }
    /**
     * 将获取到的消息数据进行处理
     *
     * @param messager
     * @return 消息
     */
    public static ChatMessager sendMassager(String messager) {
        ChatMessager chatMessager = new ChatMessager();
        String toresult = toGet(messager);
        Gson gs = new Gson();
        IntentCode result = null;
        if (toresult != null) {
            try {
                // Java 对象转成一个将JSON 字符串
                result = gs.fromJson(toresult, IntentCode.class);
                chatMessager.setMessager(result.getMessage());

            } catch (Exception e) {

                chatMessager.setMessager("服务器繁忙,请稍候再试...");
            }
        }
        chatMessager.setData(new Date());
        chatMessager.setType(ChatMessager.Type.INCOUNT);
        return chatMessager;
    }
}
6.适配器-ChatAdater
public class ChatAdater extends BaseAdapter {
    private List<ChatMessager> list;

    public int getCount() {
        return list.isEmpty() ? 0 : list.size();

    }

    public ChatAdater(List<ChatMessager> list) {
        super();
        this.list = list;
    }

    @Override
    public Object getItem(int position) {

        return list.get(position);
    }

    @Override
    public long getItemId(int position) {
        return position;
    }

    /**
     * 返回消息类型:0、接受 1、发送
     *
     * */
    public int getItemViewType(int position) {
        ChatMessager chatMessager = list.get(position);
        if (chatMessager.getType() == ChatMessager.Type.INCOUNT) {
            return 0;
        }
        return 1;
    }

    public int getViewTypeCount() {
        return 2;

    }

    /**
     * 根据type加载不同布局
     * */
    public View getView(int position, View convertView, ViewGroup parent) {
        ChatMessager chatMessager = list.get(position);
        if (convertView == null) {
            ViewHolder viewHolder = null;
            if (getItemViewType(position) == 0) {
                System.out.println("type" + getItemViewType(position));
                convertView = LayoutInflater.from(parent.getContext()).inflate(R.layout.chat_item1, null);
                viewHolder = new ViewHolder();
                viewHolder.time = (TextView) convertView.findViewById(R.id.data1);
                viewHolder.message = (TextView) convertView.findViewById(R.id.message1);

            } else {
                System.out.println("type2" + getItemViewType(position));
                if (convertView == null) {
                    convertView = LayoutInflater.from(parent.getContext()).inflate(R.layout.chat_item2_xml, null);
                }

                viewHolder = new ViewHolder();
                viewHolder.time = (TextView) convertView.findViewById(R.id.data2);
                viewHolder.message = (TextView) convertView.findViewById(R.id.message2);

            }
            convertView.setTag(viewHolder);
        }
        ViewHolder vh = (ViewHolder) convertView.getTag();
        vh.time.setText(DataUtil.getDataString(chatMessager.getDate()));
        System.out.println("time" + DataUtil.getDataString(chatMessager.getDate()));
        vh.message.setText(chatMessager.getMessager());
        System.out.println("text" + chatMessager.getMessager());
        return convertView;
    }

    private class ViewHolder {
        private TextView time, message;
    }
7.MainActivity
public class MainActivity extends AppCompatActivity {
     List<ChatMessager> list;
    ListView ch_list;
     Button mButton;
     EditText mEditText;
     ChatAdater mChatAdater;
     ChatMessager chatMessager = null;
     HttpRrequest HttpUtils;


    protected void onCreate(Bundle savedInstanceState) {
        super.onCreate(savedInstanceState);
        requestWindowFeature(Window.FEATURE_NO_TITLE);
        setContentView(R.layout.activity_main);
        initview();
        initListener();
        initdata();
        mEditTextStyle();


    }

    private void mEditTextStyle() {
        //设置EditText的显示方式为多行文本输入
        mEditText.setInputType(InputType.TYPE_TEXT_FLAG_MULTI_LINE);
        //文本显示的位置在EditText的最上方
        mEditText.setGravity(Gravity.TOP);
        //改变默认的单行模式
        mEditText.setSingleLine(false);
        //水平滚动设置为False
        mEditText.setHorizontallyScrolling(false);
    }

    // 获取控件id,初始视图
    private void initview() {
        ch_list=findViewById(R.id.listview);
        mEditText = (EditText) findViewById(R.id.editTextTextPersonName2);
        mButton = (Button) findViewById(R.id.button_send);
    }

    // 设置监听事件
    private void initListener() {


        mButton.setOnClickListener(new View.OnClickListener() {
            @Override
            public void onClick(View v) {
                if (v.getId() == R.id.button_send) {

                    chat();

                }


            }
        });
    }


    // 初始化数据
    private void initdata() {
        list = new ArrayList<ChatMessager>();
        list.add(new ChatMessager("海绵宝宝,你终于来了", new Date(), ChatMessager.Type.INCOUNT));
        // list.add(new ChatMessager("小桃子为你服务", new Date(), Type.OUTCOUNT));
        mChatAdater = new ChatAdater(list);
        ch_list.setAdapter(mChatAdater);
        // 刷新数据
        mChatAdater.notifyDataSetChanged();


    }

    private void chat() {
        final String send_message = mEditText.getText().toString().trim();
        if (TextUtils.isEmpty(send_message)) {
            Toast.makeText(MainActivity.this, "海绵宝宝,你还没发消息呢", Toast.LENGTH_SHORT).show();
            return;
        }
        ChatMessager messager = new ChatMessager();
        messager.setMessager(send_message);
        messager.setData(new Date());
        messager.setType(ChatMessager.Type.OUTCOUNT);
        list.add(messager);
        mChatAdater.notifyDataSetChanged();
        mEditText.setText("");

        new Thread() {
            public void run() {
                ChatMessager chat = HttpUtils.sendMassager(send_message);
                Message message = new Message();
                // 0*1十六进制的一个标识
                message.what = 0x1;
                message.obj = chat;
                handler.sendMessage(message);
            };
        }.start();
    }

    // handler创建在主线程之中
    private Handler handler = new Handler() {

        @SuppressLint("HandlerLeak")
        public void handleMessage(android.os.Message msg) {
            if (msg.what == 0x1) {
                if (msg.obj != null) {
                    chatMessager = (ChatMessager) msg.obj;
                }
                // 添加数据到list中,更新数据
                list.add(chatMessager);
                mChatAdater.notifyDataSetChanged();
            }
        };
    };

}
5.源码
