Apk安装之——安装确认页面的初始化
APK的安装场景主要有以下几种:
- 通过adb命令安装:adb 命令包括adb push/install,没有安装界面
- 用户下载的Apk,通过系统安装器packageinstaller安装该Apk。packageinstaller是系统内置的应用程序,用于安装和卸载应用程序,有安装界面。
- 系统开机时安装系统应用,没有安装界面。
- 电脑或者手机上的应用商店自动安装,没有安装界面。
apk的四种安装方式,最终都会通过PMS的sanPackageTracedLI(),scanPackageLI(),scanPackageDirtyLI()方法来完成。
作为开发者,我们平时安装apk都是点击AS上的按钮进行安装的,当然也有通过adb install/push 命令行进行安装的。下面以点击"RUN"安装的方式进行安装为例来阐述,apk安装的过程。一般点击"RUN"按钮,会对项目进行编译,打包会生成一个apk文件,在推送到手机上。下图就是点击AS的"RUN"按钮后的as执行的安装命令

通过命令行的命令可以看出,显示通过adb push 命令将pc端的apk推到手机上,然后通过pm工具进行安装。
通过指定路径安装apk到手机中(与adb install不同的是adb install安装的.apk是在你的电脑上,而pm install安装的apk是存储在你的手机中)
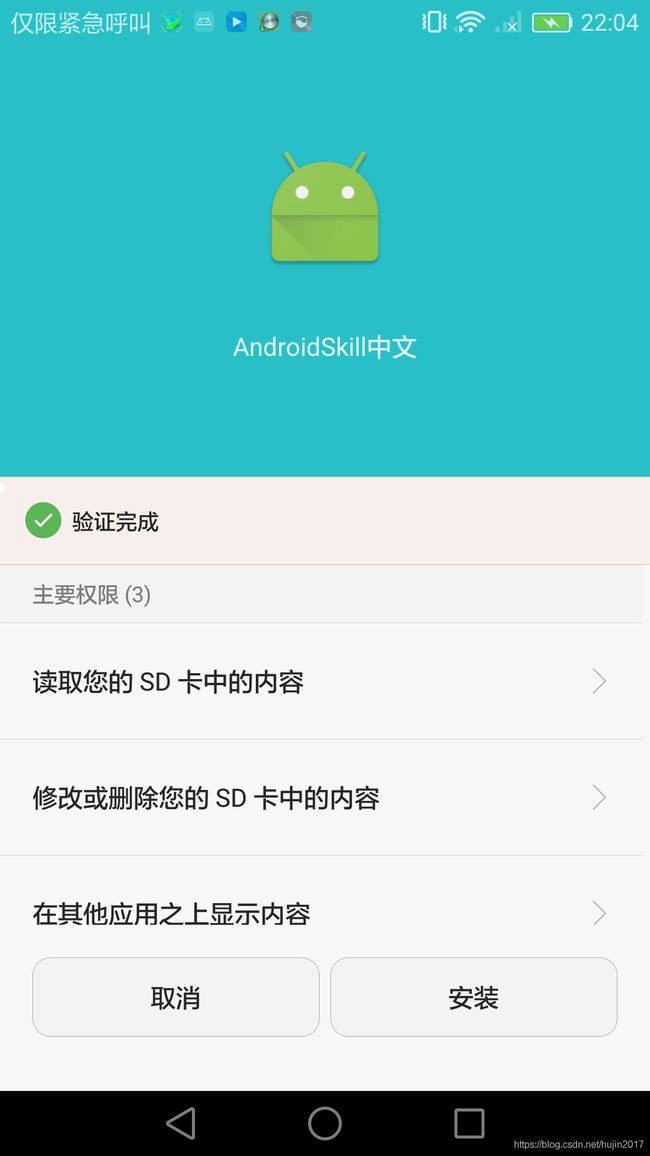
当执行完pm install命令后,就会在手机上显示安装确认页面,如下图:
这个过程是通过Android系统的packageinstaller应用程序进行安装。packageinstaller这个系统内置的应用的入口在7.0之前是PackageInstallerActivity,在8.0及以后的入口是InstallStart。下面是按照在9.0系统上安装apk,所以,packageinstaller这个应用程序的入口是InstallStart这个Activity,下面看看这个Activity的onCreate方法:
http://androidxref.com/9.0.0_r3/xref/packages/apps/PackageInstaller/src/com/android/packageinstaller/InstallStart.java

@Override
protected void onCreate(@Nullable Bundle savedInstanceState) {
    super.onCreate(savedInstanceState);
    mIPackageManager = AppGlobals.getPackageManager();
    Intent intent = getIntent();
    String callingPackage = getCallingPackage();

    //...

    Intent nextActivity = new Intent(intent);
    nextActivity.setFlags(Intent.FLAG_ACTIVITY_FORWARD_RESULT);

    // ...

    if (PackageInstaller.ACTION_CONFIRM_PERMISSIONS.equals(intent.getAction())) {
        nextActivity.setClass(this, PackageInstallerActivity.class);
    } else {
        Uri packageUri = intent.getData();

        if (packageUri != null && (packageUri.getScheme().equals(ContentResolver.SCHEME_FILE)
                || packageUri.getScheme().equals(ContentResolver.SCHEME_CONTENT))) {
            // Copy file to prevent it from being changed underneath this process
	    //关键代码1
            nextActivity.setClass(this, InstallStaging.class);
        } else if (packageUri != null && packageUri.getScheme().equals(
                PackageInstallerActivity.SCHEME_PACKAGE)) {
            nextActivity.setClass(this, PackageInstallerActivity.class);
        } else {
            Intent result = new Intent();
            result.putExtra(Intent.EXTRA_INSTALL_RESULT,
                    PackageManager.INSTALL_FAILED_INVALID_URI);
            setResult(RESULT_FIRST_USER, result);

            nextActivity = null;
        }
    }

    if (nextActivity != null) {
	//关键代码2
        startActivity(nextActivity);
    }
    finish();
}
由于本案例是在9.0系统上安装apk,8.0及以后的系统,在StrictMode下,api是禁止应用程序将file://uri暴露给另外一个应用程序,否则就会报FileUriException异常,所以需要使用FileContentProvider来将file://uri替换成content://uri,所以,packageUri.getScheme().equals(ContentResolver.SCHEME_CONTENT))这个判断是成立的,这样就走关键代码1处的逻辑。在关键代码1处,nextActivity设置的Class是InstallStaging.class,
在关键代码2处,启动InstallStaging这个Activity,这时,代码跳转到InstallStaging类中,下面看看InstallStaging的onResume方法:
http://androidxref.com/9.0.0_r3/xref/packages/apps/PackageInstaller/src/com/android/packageinstaller/InstallStaging.java

@Override
protected void onResume() {
    super.onResume();

    // This is the first onResume in a single life of the activity
    if (mStagingTask == null) {
        // File does not exist, or became invalid
        if (mStagedFile == null) {
            // Create file delayed to be able to show error
            try {
                mStagedFile = TemporaryFileManager.getStagedFile(this);
            } catch (IOException e) {
                showError();
                return;
            }
        }
	//关键代码1
        mStagingTask = new StagingAsyncTask();
        mStagingTask.execute(getIntent().getData());
    }
}


private final class StagingAsyncTask extends AsyncTask {
        @Override
        protected Boolean doInBackground(Uri... params) {
            if (params == null || params.length <= 0) {
                return false;
            }
            Uri packageUri = params[0];
            try (InputStream in = getContentResolver().openInputStream(packageUri)) {
                // Despite the comments in ContentResolver#openInputStream the returned stream can
                // be null.
                if (in == null) {
                    return false;
                }

                try (OutputStream out = new FileOutputStream(mStagedFile)) {
                    byte[] buffer = new byte[1024 * 1024];
                    int bytesRead;
                    while ((bytesRead = in.read(buffer)) >= 0) {
                        // Be nice and respond to a cancellation
                        if (isCancelled()) {
                            return false;
                        }
                        out.write(buffer, 0, bytesRead);
                    }
                }
            } catch (IOException | SecurityException | IllegalStateException e) {
                Log.w(LOG_TAG, "Error staging apk from content URI", e);
                return false;
            }
            return true;
        }

        @Override
        protected void onPostExecute(Boolean success) {
            if (success) {
                // Now start the installation again from a file
                Intent installIntent = new Intent(getIntent());
		//关键代码2
                installIntent.setClass(InstallStaging.this, DeleteStagedFileOnResult.class);
                installIntent.setData(Uri.fromFile(mStagedFile));

                if (installIntent.getBooleanExtra(Intent.EXTRA_RETURN_RESULT, false)) {
                    installIntent.addFlags(Intent.FLAG_ACTIVITY_FORWARD_RESULT);
                }

                installIntent.addFlags(Intent.FLAG_ACTIVITY_NO_ANIMATION);
                startActivity(installIntent);

                InstallStaging.this.finish();
            } else {
                showError();
            }
        }
}
在InstallStaging的onResume方法中,会创建一个StagingAsyncTask,并执行其execute方法,这个StagingAsyncTask内部,将apk文件临时存储起来,然后跳转到DeleteStagedFileOnResult这个Activity,并结束当前页面,下面看DeleteStagedFileOnResult的onCreatea方法
http://androidxref.com/9.0.0_r3/xref/packages/apps/PackageInstaller/src/com/android/packageinstaller/DeleteStagedFileOnResult.java
public class DeleteStagedFileOnResult extends Activity {
    @Override
    protected void onCreate(@Nullable Bundle savedInstanceState) {
        super.onCreate(savedInstanceState);

        if (savedInstanceState == null) {
            Intent installIntent = new Intent(getIntent());
            installIntent.setClass(this, PackageInstallerActivity.class);

            installIntent.setFlags(Intent.FLAG_ACTIVITY_NO_ANIMATION);
            startActivityForResult(installIntent, 0);
        }
    }

    @Override
    protected void onActivityResult(int requestCode, int resultCode, Intent data) {
        File sourceFile = new File(getIntent().getData().getPath());
        sourceFile.delete();

        setResult(resultCode, data);
        finish();
    }
}
这个方法内部,跳转到PackageInstallerActivity,并等待PackageInstallerActivity的返回结果。在onActivityResult方法中,根据不论返回结果是成功还是失败,都删除InstallStaging这个Activity中保存的临时apk文件。这个过程,其实就是将Uri协议转换成File协议,这样后续的流程就和8.0之前的一致了,下面看PackageInstallerActivity类的onCreate方法
http://androidxref.com/9.0.0_r3/xref/packages/apps/PackageInstaller/src/com/android/packageinstaller/PackageInstallerActivity.java

@Override
protected void onCreate(Bundle icicle) {
    super.onCreate(null);

    if (icicle != null) {
        mAllowUnknownSources = icicle.getBoolean(ALLOW_UNKNOWN_SOURCES_KEY);
    }

    ...
    //关键代码1
    boolean wasSetUp = processPackageUri(packageUri);
    if (!wasSetUp) {
        return;
    }

    // load dummy layout with OK button disabled until we override this layout in
    // startInstallConfirm
    bindUi(R.layout.install_confirm, false);
    //关键代码2
    checkIfAllowedAndInitiateInstall();
}
先看关键代码1处的processPackageUri方法,这个方法的具体实现是:
http://androidxref.com/9.0.0_r3/xref/packages/apps/PackageInstaller/src/com/android/packageinstaller/PackageInstallerActivity.java

private boolean processPackageUri(final Uri packageUri) {
    mPackageURI = packageUri;

    final String scheme = packageUri.getScheme();

    switch (scheme) {
        case SCHEME_PACKAGE: {
            ...
        } break;

        case ContentResolver.SCHEME_FILE: {
	    //关键代码
            File sourceFile = new File(packageUri.getPath());
            PackageParser.Package parsed = PackageUtil.getPackageInfo(this, sourceFile);

            // Check for parse errors
            if (parsed == null) {
                Log.w(TAG, "Parse error when parsing manifest. Discontinuing installation");
                showDialogInner(DLG_PACKAGE_ERROR);
                setPmResult(PackageManager.INSTALL_FAILED_INVALID_APK);
                return false;
            }
            mPkgInfo = PackageParser.generatePackageInfo(parsed, null,
                    PackageManager.GET_PERMISSIONS, 0, 0, null,
                    new PackageUserState());
            mAppSnippet = PackageUtil.getAppSnippet(this, mPkgInfo.applicationInfo, sourceFile);
        } break;

        default: {
            throw new IllegalArgumentException("Unexpected URI scheme " + packageUri);
        }
    }

    return true;
}
这个方法内部,会先获取scheme,由于之前在InstallStaging这个Activity中,已经将content://uri协议转成了file://uri协议,所以,这里的scheme就是ContentResolver.SCHEME_FILE,在关键代码处这个case中,主要是根据apk文件创建一个PackageParser.Package对象,在根据这个PackageParser.Package对象创建一个PackageInfo对象。到此,PackageInstallerActivity类的processPackageUri()方法分析完毕,接着看PackageInstallerActivity类的onCreate方法的关键代码2处
http://androidxref.com/9.0.0_r3/xref/packages/apps/PackageInstaller/src/com/android/packageinstaller/PackageInstallerActivity.java

@Override
protected void onCreate(Bundle icicle) {
    super.onCreate(null);

    if (icicle != null) {
        mAllowUnknownSources = icicle.getBoolean(ALLOW_UNKNOWN_SOURCES_KEY);
    }

    ...
    //关键代码1
    boolean wasSetUp = processPackageUri(packageUri);
    if (!wasSetUp) {
        return;
    }

    // load dummy layout with OK button disabled until we override this layout in
    // startInstallConfirm
    bindUi(R.layout.install_confirm, false);
    //关键代码2
    checkIfAllowedAndInitiateInstall();
}

private void checkIfAllowedAndInitiateInstall() {
    // Check for install apps user restriction first.
    ...
    // 关键代码1
    if (mAllowUnknownSources || !isInstallRequestFromUnknownSource(getIntent())) {
        initiateInstall();
    } else {
        // Check for unknown sources restriction
        final int unknownSourcesRestrictionSource = mUserManager.getUserRestrictionSource(
                UserManager.DISALLOW_INSTALL_UNKNOWN_SOURCES, Process.myUserHandle());
        if ((unknownSourcesRestrictionSource & UserManager.RESTRICTION_SOURCE_SYSTEM) != 0) {
            showDialogInner(DLG_UNKNOWN_SOURCES_RESTRICTED_FOR_USER);
        } else if (unknownSourcesRestrictionSource != UserManager.RESTRICTION_NOT_SET) {
            startActivity(new Intent(Settings.ACTION_SHOW_ADMIN_SUPPORT_DETAILS));
            finish();
        } else {
            handleUnknownSources();
        }
    }
}
在checkIfAllowedAndInitiateInstall方法内部,会先做个判断,如果是允许未知来源的apk或者apk是非未知来源的,就直接调用initiateInstall()方法进行初始化安装。否则,就执行else分支,else分支中,会判断,如果是管理员限制来自未知来源的安装,则弹出提示框或者调整到设置页面,否则就执行handleUnknownSources()方法安装未知来源的apk。下面先看initiateInstall()方法:
http://androidxref.com/9.0.0_r3/xref/packages/apps/PackageInstaller/src/com/android/packageinstaller/PackageInstallerActivity.java
private void initiateInstall() {
    String pkgName = mPkgInfo.packageName;
    // Check if there is already a package on the device with this name
    // but it has been renamed to something else.
    String[] oldName = mPm.canonicalToCurrentPackageNames(new String[] { pkgName });
    if (oldName != null && oldName.length > 0 && oldName[0] != null) {
        pkgName = oldName[0];
        mPkgInfo.packageName = pkgName;
        mPkgInfo.applicationInfo.packageName = pkgName;
    }
    // Check if package is already installed. display confirmation dialog if replacing pkg
    try {
        // This is a little convoluted because we want to get all uninstalled
        // apps, but this may include apps with just data, and if it is just
        // data we still want to count it as "installed".
        mAppInfo = mPm.getApplicationInfo(pkgName,
                PackageManager.MATCH_UNINSTALLED_PACKAGES);
        if ((mAppInfo.flags&ApplicationInfo.FLAG_INSTALLED) == 0) {
            mAppInfo = null;
        }
    } catch (NameNotFoundException e) {
        mAppInfo = null;
    }

    startInstallConfirm();
}


private void startInstallConfirm() {
        // We might need to show permissions, load layout with permissions
        if (mAppInfo != null) {
            bindUi(R.layout.install_confirm_perm_update, true);
        } else {
            bindUi(R.layout.install_confirm_perm, true);
        }

        ...

        AppSecurityPermissions perms = new AppSecurityPermissions(this, mPkgInfo);
        final int N = perms.getPermissionCount(AppSecurityPermissions.WHICH_ALL);
        if (mAppInfo != null) {
            msg = (mAppInfo.flags & ApplicationInfo.FLAG_SYSTEM) != 0
                    ? R.string.install_confirm_question_update_system
                    : R.string.install_confirm_question_update;
            mScrollView = new CaffeinatedScrollView(this);
            mScrollView.setFillViewport(true);
            boolean newPermissionsFound = false;
            if (!supportsRuntimePermissions) {
                newPermissionsFound =
                        (perms.getPermissionCount(AppSecurityPermissions.WHICH_NEW) > 0);
                if (newPermissionsFound) {
                    permVisible = true;
                    mScrollView.addView(perms.getPermissionsView(
                            AppSecurityPermissions.WHICH_NEW));
                }
            }
            if (!supportsRuntimePermissions && !newPermissionsFound) {
                LayoutInflater inflater = (LayoutInflater)getSystemService(
                        Context.LAYOUT_INFLATER_SERVICE);
                TextView label = (TextView)inflater.inflate(R.layout.label, null);
                label.setText(R.string.no_new_perms);
                mScrollView.addView(label);
            }
            adapter.addTab(tabHost.newTabSpec(TAB_ID_NEW).setIndicator(
                    getText(R.string.newPerms)), mScrollView);
        }
        if (!supportsRuntimePermissions && N > 0) {
            permVisible = true;
            LayoutInflater inflater = (LayoutInflater)getSystemService(
                    Context.LAYOUT_INFLATER_SERVICE);
            View root = inflater.inflate(R.layout.permissions_list, null);
            if (mScrollView == null) {
                mScrollView = (CaffeinatedScrollView)root.findViewById(R.id.scrollview);
            }
            ((ViewGroup)root.findViewById(R.id.permission_list)).addView(
                        perms.getPermissionsView(AppSecurityPermissions.WHICH_ALL));
            adapter.addTab(tabHost.newTabSpec(TAB_ID_ALL).setIndicator(
                    getText(R.string.allPerms)), root);
        }
        if (!permVisible) {
            if (mAppInfo != null) {
                // This is an update to an application, but there are no
                // permissions at all.
                msg = (mAppInfo.flags & ApplicationInfo.FLAG_SYSTEM) != 0
                        ? R.string.install_confirm_question_update_system_no_perms
                        : R.string.install_confirm_question_update_no_perms;
            } else {
                // This is a new application with no permissions.
                msg = R.string.install_confirm_question_no_perms;
            }

            // We do not need to show any permissions, load layout without permissions
            bindUi(R.layout.install_confirm, true);
            mScrollView = null;
        }
	...
}
initiateInstall方法内部,给PackageInfo的packageName和PackageInfo.ApplicationInfo的packageName赋值,并调用startInstallConfirm方法,初始化安装确认页面,并将应用需要的权限都展示出来,并显示确定和取消按钮。分析完允许安装未知来源或者应用是非未知来源的apk后,接着分析安装未知来源的apk安装未知来源的apk是在PackageInstallerActivity类的handleUnknownSources()方法中完成的
http://androidxref.com/9.0.0_r3/xref/packages/apps/PackageInstaller/src/com/android/packageinstaller/PackageInstallerActivity.java
private void handleUnknownSources() {
    if (mOriginatingPackage == null) {
        Log.i(TAG, "No source found for package " + mPkgInfo.packageName);
        showDialogInner(DLG_ANONYMOUS_SOURCE);
        return;
    }
    // Shouldn't use static constant directly, see b/65534401.
    final int appOpCode =
            AppOpsManager.permissionToOpCode(Manifest.permission.REQUEST_INSTALL_PACKAGES);
    final int appOpMode = mAppOpsManager.noteOpNoThrow(appOpCode,
            mOriginatingUid, mOriginatingPackage);
    switch (appOpMode) {
        case AppOpsManager.MODE_DEFAULT:
            try {
                int result = mIpm.checkUidPermission(
                        Manifest.permission.REQUEST_INSTALL_PACKAGES, mOriginatingUid);
                if (result == PackageManager.PERMISSION_GRANTED) {
                    initiateInstall();
                    break;
                }
            } catch (RemoteException exc) {
                Log.e(TAG, "Unable to talk to package manager");
            }
            mAppOpsManager.setMode(appOpCode, mOriginatingUid,
                    mOriginatingPackage, AppOpsManager.MODE_ERRORED);
            // fall through
        case AppOpsManager.MODE_ERRORED:
            showDialogInner(DLG_EXTERNAL_SOURCE_BLOCKED);
            break;
        case AppOpsManager.MODE_ALLOWED:
            initiateInstall();
            break;
        default:
            Log.e(TAG, "Invalid app op mode " + appOpMode
                    + " for OP_REQUEST_INSTALL_PACKAGES found for uid " + mOriginatingUid);
            finish();
            break;
    }
}
由于是第一次安装,并且是未知来源的,如果要安装的应用未声明REQUEST_INSTALL_PACKAGES权限,则
会走AppOpsManager.MODE_ALLOWED这个case,弹出对话框,提示用户如果要安装的应用声明了REQUEST_INSTALL_PACKAGES权限,会走AppOpsManager.MODE_DEFAULT 这个case分支,接着会检测用户是否授予了REQUEST_INSTALL_PACKAGES权限,如果授予了,则走initiateInstall()方法,初始化安装确认页面,还有一个case,是升级安装未知来源的apk时,就直接执行initiateInstall()方法,显示升级安装确认页面。
以上便是,点击AS的"RUN"按钮显示安装确认页面的过程分析。
总结:packageinstaller在安装应用时,如果系统版本是8.0及以上,会启动InstallStart这个Activity作为packageinstaller安装程序的入口,如果是8.0以下版本,则会将PackageInstallerActivity作为packageinstaller安装程序的入口。根据scheme协议的不同,如果是content协议,则跳转到InstallStaging这个Activity中,复制文件,将content协议转换成file协议,然后在次跳转到DeleteStagedFileOnResult这个Activity中,DeleteStagedFileOnResult这个Activity中,其实直接跳转到PackageInstallerActivity,并等待安装结果,不论安装成功还是失败,都将在InstallStaging这个Activity中复制文件删除。后续的安装逻辑其实还是8.0以前的一致。都是通过判断要安装的apk是否允许安装未知来源的apk,或者安装的apk是非未知来源的,如果满足这个条件,就直接启动安装确认页面,并初始化这个页面,将需要的权限信息,确认,取消按钮,app的icon,app名称等信息显示出来。如果是管理员限制了未知来源的apk,则会弹出提示框,或者跳转到设置页面。如果管理员未限制未知来源的apk安装,则就安装未知来源的apk,安装过程中,也会检测这个未知来源的apk中是否声明了REQUEST_INSTALL_PACKAGES权限,如果未声明,则弹出提示框。如果声明了REQUEST_INSTALL_PACKAGES权限,则检查用户是否授予了这个权限,如果未授予,则安装失败,如果授予了,则和安装非未知来源的逻辑一致,显示安装确认页面。还有一种情况是,是升级安装未知来源的apk时,就直接执行initiateInstall()方法,显示升级安装确认页面。