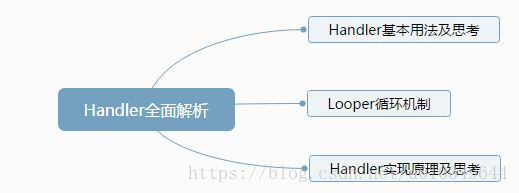
Handler全面解析
一、简介
有一定Android开发经验的从业者,相信大家都了解Android应用程序是通过消息来驱动的,系统为每一个应用程序维护一个消息队例,应用程序的主线程不断地从这个消息队例中获取消息(Looper),然后对这些消息进行处理(Handler)。本篇文章的目的就是要全方位的了解Android的消息处理机制,首先从最基本的使用出发,层层递进,带着思考,从源码层面上弄明白Handler的实现原理。本篇文字大致内容如下:
二、Handler基本用法及思考
在我们初学Android的时候,抛开Java,Android为我们提供了两种线程间的通信机制,分别为Handler和AsyncTask,其实本质上也就一种,AsyncTask内部也是Handler来实现的,它是基于Handler的封装,让开发者在使用时更方遍,同时还提供线程池等等。
在开发过程中,无论是在书本上或是网络的博客上都一致提示我们对于耗时操作应当在子线程中完成,更新UI需要放到主线程中完成,那么我们有没有真正去思考一个问题呢,耗时操作放在子线程中完成这很容易理解。
但是为什么更新UI要在主线程中完成呢?就不能再子线程中更新UI吗?下面我们一起来分析分析。
xml布局文件比较简单,此处就不在列出,主要就是一个Button和一个TextView,当点击Button,在子线程中去更新TextView中的内容。
- HandlerTestActivity.java
public class HandlerTestActivity extends AppCompatActivity {

    private static final String TAG = "HandlerTestActivity";

    private TextView tvShowInfo;

    public static void startActivity(Context context){
        Intent intent = new Intent(context, HandlerTestActivity.class);
        context.startActivity(intent);
    }

    @Override
    protected void onCreate(Bundle savedInstanceState) {
        super.onCreate(savedInstanceState);
        setContentView(R.layout.activity_handler_test);

        initView();
    }

    private void initView(){
        this.tvShowInfo = (TextView) findViewById(R.id.tv_show_info);

        findViewById(R.id.btn_update_ui).setOnClickListener(new View.OnClickListener() {
            @Override
            public void onClick(View v) {
                updateUiInThread();
            }
        });

    }

    private void updateUiInThread(){
        new Thread(new Runnable() {
            @Override
            public void run() {
                Log.i(TAG, "sendMsg--run()-->"+Thread.currentThread().getName());
                String text = "i am from thread";
                tvShowInfo.setText(text);
            }
        }).start();
    }

}
当点击按钮,发现APP崩溃,出现如下错误:
AndroidRuntime: FATAL EXCEPTION: Thread-136
    Process: com.example.androidqunyinhui, PID: 2681
    android.view.ViewRootImpl$CalledFromWrongThreadException: Only the original thread that created a view hierarchy can touch its views.
        at android.view.ViewRootImpl.checkThread(ViewRootImpl.java:6024)
        at android.view.ViewRootImpl.requestLayout(ViewRootImpl.java:820)
        at android.view.View.requestLayout(View.java:16431)
        at android.view.View.requestLayout(View.java:16431)
        at android.view.View.requestLayout(View.java:16431)
        at android.view.View.requestLayout(View.java:16431)
        at android.view.View.requestLayout(View.java:16431)
        at android.view.View.requestLayout(View.java:16431)
        at android.view.View.requestLayout(View.java:16431)
        at android.widget.TextView.checkForRelayout(TextView.java:6600)
        at android.widget.TextView.setText(TextView.java:3813)
        at android.widget.TextView.setText(TextView.java:3671)
        at android.widget.TextView.setText(TextView.java:3646)
        at com.example.androidqunyinhui.android.handler.HandlerTestActivity$3.run(HandlerTestActivity.java:67)
        at java.lang.Thread.run(Thread.java:841)
通过错误,可以看到具体的报错位置是在ViewRootImpl的requestLayout中,下面看看具体代码:
@Override
public void requestLayout() {
    if (!mHandlingLayoutInLayoutRequest) {
        checkThread();
        mLayoutRequested = true;
        scheduleTraversals();
    }
}

void checkThread() {
    if (mThread != Thread.currentThread()) {
        throw new CalledFromWrongThreadException(
                "Only the original thread that created a view hierarchy can touch its views.");
    }
}
可以看到,源码中对requestLayout函数的执行做了检查,由于ViewRootImpl的初始化是在主线程中完成的(此处不在深入探讨),因为mThread表示的是主线程,当我们在子线程中更新UI时,源码告诉我们这是不允许的,除非ViewRootImpl的初始化也是在子线程中完成。
1)Handler的基本使用
回到最开始的地方,Handler是如何使用的呢?请看下面Demo。
xml布局文件依然省略,同样是一个Button按钮和一个TextView用来显示信息。
- HandlerTestActivity
public class HandlerTestActivity extends AppCompatActivity {

    private static final String TAG = "HandlerTestActivity";

    private TextView tvShowInfo;

    private MyHandler myHandler;

    public static void startActivity(Context context){
        Intent intent = new Intent(context, HandlerTestActivity.class);
        context.startActivity(intent);
    }

    @Override
    protected void onCreate(Bundle savedInstanceState) {
        super.onCreate(savedInstanceState);
        setContentView(R.layout.activity_handler_test);

        initData();
        initView();
    }

    private void initData(){
        myHandler = new MyHandler();
    }

    private void initView(){
        this.tvShowInfo = (TextView) findViewById(R.id.tv_show_info);

        findViewById(R.id.btn_send_info).setOnClickListener(new View.OnClickListener() {
            @Override
            public void onClick(View v) {
                sendMsg();
            }
        });
    }

    private void sendMsg(){

        new Thread(new Runnable() {
            @Override
            public void run() {
                Log.i(TAG, "sendMsg--run()-->"+Thread.currentThread().getName());
                try {
                    Thread.sleep(2000);
                } catch (InterruptedException e) {
                    e.printStackTrace();
                }
                Message msg = new Message();
                msg.arg1 = 1001;
                Bundle bundle = new Bundle();
                bundle.putString("mydata", "hello, i'am from handler");
                msg.setData(bundle);
                myHandler.sendMessage(msg);
            }
        }).start();


    }

    class MyHandler extends Handler{

        public MyHandler() {
        }

        public MyHandler(Looper L) {
            super(L);
        }

        @Override
        public void handleMessage(Message msg) {
            super.handleMessage(msg);
            Log.i(TAG, "MyHandler--handleMessage()-->"+Thread.currentThread().getName());
            Bundle bundle = msg.getData();
            String info = bundle.getString("mydata");
            tvShowInfo.setText(info);
        }
    }
}
当我们点击按钮发送消息,TextView如实更新数据, 输出log如下:
I/HandlerTestActivity: sendMsg--run()-->Thread-141
I/HandlerTestActivity: MyHandler--handleMessage()-->main
以上的实例在实际开发中是不值得借鉴的,并没有考虑内存泄漏等问题,只是为了方便接下来的分析。安全的使用方法可以参考
如何使用AsyncTask防止内存泄漏(Handler同理)这篇文章。
看到Handler如此精湛的实现,它是如何实现线程间的通信的,这让我甚是好奇。
1、我们在子线程中通过Handler对象发送一个消息,它是如何能够在主线程中去处理消息的?也就是说如何做到线程的切换的?
2、示例中是在主线程中创建的Handler对象,那如果是在子线程中创建Handler对象,能有同样的效果吗?
三、Looper循环机制
在解答上面两个问题时,我们必须要对Looper循环有一定的了解。
首先借用网上的一张总概图:
Handler发送消息到消息队列,消息循环Looper从消息队列中取出消息,分发到各个Handler中去让其处理具体的消息。
在如上示例中,我们只是new了一个Handler对象和Message对象,那么MessageQueue和Looper又是在哪里创建和初始化的呢?那么只有一探Handler的源码了。
// Handler类
public Handler() {
    this(null, false);
}

public Handler(Callback callback, boolean async) {

    ......

    mLooper = Looper.myLooper();
    if (mLooper == null) {
        throw new RuntimeException(
            "Can't create handler inside thread that has not called Looper.prepare()");
    }
    mQueue = mLooper.mQueue;
    mCallback = callback;
    mAsynchronous = async;
}
通过如上代码可以知道,Looper对象是通过Looper.myLooper()获取到,消息队列是从Looper对象获取到。
接着继续看看Looper.myLooper()
// Looper类
static final ThreadLocal sThreadLocal = new ThreadLocal();

public static @Nullable Looper myLooper() {
    return sThreadLocal.get();
}
何为ThreadLocal?
ThreadLocal是一个线程内部的数据存储类,通过它可以在指定的线程中存储数据,数据存储以后,只有在指定线程中可以获取到存储的数据,对于其它线程来说无法获取到数据。具体可以参考Android的消息机制之ThreadLocal的工作原理
通过上面代码可以知道Looper.myLooper()获取的是当前线程中的Looper对象,当前线程即为主线程。
通过线程的全局变量ThreadLocal来获取来获取Looper对象,那么我们还是有一个疑问,这个Looper对象到底是在哪里进行创建初始化的?
回答这个问题,就要回到应用程序的启动过程了,此处不再讲解应用程序启动过程,相信大家都知道应用程序进程在启动的时候会加载ActivityThread类,并且执行这个类的main函数。
public static void main(String[] args) {
    ......
    Looper.prepareMainLooper();

    ActivityThread thread = new ActivityThread();
    thread.attach(false);


    ......
    Looper.loop();

    throw new RuntimeException("Main thread loop unexpectedly exited");
}
ActivityThread可以视为应用程序主线程,在该main方法中,看到调用了Looper.prepareMainLooper()和loop()两个方法。下面继续探究这两个方法。
- prepareMainLooper()
// Looper类
/**
 * Initialize the current thread as a looper, marking it as an
 * application's main looper. The main looper for your application
 * is created by the Android environment, so you should never need
 * to call this function yourself.  See also: {@link #prepare()}
 */
public static void prepareMainLooper() {
    prepare(false);
    synchronized (Looper.class) {
        if (sMainLooper != null) {
            throw new IllegalStateException("The main Looper has already been prepared.");
        }
        sMainLooper = myLooper();
    }
}

private static void prepare(boolean quitAllowed) {
    if (sThreadLocal.get() != null) {
        throw new RuntimeException("Only one Looper may be created per thread");
    }
    sThreadLocal.set(new Looper(quitAllowed));
}

private Looper(boolean quitAllowed) {
    mQueue = new MessageQueue(quitAllowed);
    mThread = Thread.currentThread();
}

public static @Nullable Looper myLooper() {
    return sThreadLocal.get();
}
通过代码可以看到,prepareMainLooper方法中创建了一个Looper对象,存放到当前线程的ThreadLocal中,同时创建一个消息队列。
- loop()
/**
 * Run the message queue in this thread. Be sure to call
 * {@link #quit()} to end the loop.
 */
public static void loop() {
    final Looper me = myLooper();
    if (me == null) {
        throw new RuntimeException("No Looper; Looper.prepare() wasn't called on this thread.");
    }
    final MessageQueue queue = me.mQueue;

    ......

    for (;;) {
        Message msg = queue.next(); // might block
        if (msg == null) {
            // No message indicates that the message queue is quitting.
            return;
        }

        ......

        try {
            msg.target.dispatchMessage(msg);
        } finally {
            if (traceTag != 0) {
                Trace.traceEnd(traceTag);
            }
        }

       ......

        msg.recycleUnchecked();
    }
}
这里就是进入到消息循环中去了,它不断地从消息队列mQueue中去获取下一个要处理的消息msg,如果msg为null,就表示退出消息循环,否则的话就要调用这个target对象的dispatchMessage成员函数来处理这个消息,这个target对象的类型其实就是Handler。
分析到这里,基本上将消息循环分析完了,在此处不知大家有没有一个疑问,那就是完全略过了MessageQueue,这个MessageQueue完全是jni层实现的,此处不在详细讲解,可以看看老罗的博客就明白。
四、Handler实现原理及思考
上文从源码的角度分析了Handler的创建及消息循环的实现原理,相信大家对Handler已经豁然开朗了,接下来我们看看Handler发送消息的过程,它是如何将消息发送到消息队列中去的。
- sendMessage(Message msg)
// Handler类
public final boolean sendMessage(Message msg)
{
    return sendMessageDelayed(msg, 0);
}

// delayMillis表示消息是否要延期处理
public final boolean sendMessageDelayed(Message msg, long delayMillis)
{
    if (delayMillis < 0) {
        delayMillis = 0;
    }
    return sendMessageAtTime(msg, SystemClock.uptimeMillis() + delayMillis);
}

public boolean sendMessageAtTime(Message msg, long uptimeMillis) {
    MessageQueue queue = mQueue;
    if (queue == null) {
        RuntimeException e = new RuntimeException(
                this + " sendMessageAtTime() called with no mQueue");
        Log.w("Looper", e.getMessage(), e);
        return false;
    }
    return enqueueMessage(queue, msg, uptimeMillis);
}

private boolean enqueueMessage(MessageQueue queue, Message msg, long uptimeMillis) {
    // 注意此处,将当前的handler对象赋值给msg的target,方便这个消息最终由这个handler来处理
    msg.target = this;
    if (mAsynchronous) {
        msg.setAsynchronous(true);
    }
    return queue.enqueueMessage(msg, uptimeMillis);
}
通过代码可以看到handler首先把自己赋值给msg,然后将msg添加到队列中去。
整个过程代码非常清晰,也比较简单,到此处,基本上把Handler实现原理从源码的角度分析了一遍。
在这里,不知大家有没有考虑一个问题,如果我们在一个子线程中实例化了一个Handler对象,那么它可以发送消息吗?例如下:
private void myThreadTest(){

    MyThread myThread = new MyThread();
    myThread.start();
}

class MyThread extends Thread{

    private MyHandler mHandler;

    public MyThread() {
    }

    private void init(){
        mHandler = new MyHandler();
    }

    @Override
    public void run() {
        super.run();
        Log.i(TAG, "MyThread--run()-->"+Thread.currentThread().getName()+" start...");
        init();
        Log.i(TAG, "MyThread--run()-->"+Thread.currentThread().getName()+" end...");
    }
}

class MyHandler extends Handler{

    public MyHandler() {
    }

    public MyHandler(Looper L) {
        super(L);
    }

    @Override
    public void handleMessage(Message msg) {
        super.handleMessage(msg);
        Log.i(TAG, "MyHandler--handleMessage()-->"+Thread.currentThread().getName());
        Bundle bundle = msg.getData();
        String info = bundle.getString("mydata");
        tvShowInfo.setText(info);
    }
}
这些代码都在Activity中完成,当在一个按钮的点击事件调用myThreadTest函数的时候,点击按钮,大家觉得程序会有问题吗?
细心的读者相信已经发现问题了,因为在子线程中创建的handler,由于该线程没有消息循环也即Loop对象,所以在Handler的构造函数中会出错。错误如下:
java.lang.RuntimeException: Can't create handler inside thread that has not called Looper.prepare()
将MyThread 中的 init方法修改为如下即可:
private void init(){
    Looper.prepare();
    mHandler = new MyHandler();
    Looper.loop();
}
此时如果我们在另一个子线程中通过该handler发送消息:
new Thread(new Runnable() {
    @Override
    public void run() {
        Log.i(TAG, "sendMsg--run()-->"+Thread.currentThread().getName());
        try {
            Thread.sleep(2000);
        } catch (InterruptedException e) {
            e.printStackTrace();
        }
        Message msg = new Message();
        msg.arg1 = 1001;
        Bundle bundle = new Bundle();
        bundle.putString("mydata", "hello, i'am from handler");
        msg.setData(bundle);
        myThread.mHandler.sendMessage(msg);
    }
}).start();
即可以将该消息发送到消息队列中,但是。。。但是。。。
由于我们的handler是在子线程中创建并初始化的,消息循环也是在该子线程下创建的,因此,handleMessage函数的执行也是在该子线程中执行的,因此当我们点击发送消息,程序依然会报错,因为在handleMessage方法中我们更新了UI。
那么如果我们想在子线程中创建handler,发送消息,但是要让handleMessage能够在主线程中执行,该怎么办呢?
相信在这里问这个问题已经难不倒大家了,很简单,我们只需要把主线程的Looper对象传递给子线程的handler即可。
好了,基于Handler机制,就分析到这里结束。
参考文献
Android中子线程真的不能更新UI吗?
老罗博客-Android应用程序消息处理机制(Looper、Handler)分析

