openlayers5+webpack4.x(热更新)配置ES6的开发环境、解决ol5的import问题
最近在学习一些开源的地图api,openlayers5,在使用的时候发现按照官网的import无法根本无法使用。这是因为import是ES6的语法。现在大多数的浏览器都还不支持ES6的语法,要想使用就必须得转化成ES5.
Webpack是web前端当前最流行的造化构建工具.可以将前端的各种资源自动打包构建,详细说明可见官网https://doc.webpack-china.org/,此篇文章针对前端工程化过程中,所需的webpack配置做一些基本的介绍,并给出自己的一套配置,可自动化打包html、css、sass、js(支持ES6)、images,并实现热更新。
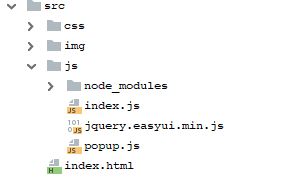
1.先来看一下目录结构。
1.node_modules里面放置的是cnpm安装的api,webpack等自动生成的文件,
2.src里面是一些静态的资源和需要打包的js文件,这里的index.js就是需要打包的js文件,其他的不用管是我用来做测试的,你需要的就是index.html和index.js
3. .babelrc文件,babel的配置文件
4. .package.json,你要下载的包的配置文件
5. webpack.config.js,webpack的配置文件

第一步,在项目中安装webpack
本地安装,cnpm install --save-dev webpack webpack-cli
全局安装,cnpm install -g webpack webpack-cli
第二步,在项目中新建webpack.config.js文件,复制下面的内容
const path = require ( 'path' );
const HtmlWebpackPlugin = require ( 'html-webpack-plugin' );
const CopyWebpackPlugin = require ( 'copy-webpack-plugin' );
const ExtractTextPlugin = require ( "extract-text-webpack-plugin" );
const extractCSS = new ExtractTextPlugin ( 'css/[name]-css.css' );
const extractSASS = new ExtractTextPlugin ( 'css/[name]-sass.css' );
//构建前删除dist目录
const CleanWebpackPlugin = require ( 'clean-webpack-plugin' );


module.exports = {
    entry: {
        a: './src/js/index.js',
    },//入口JS
    output: {
        filename: '[name].bundle.js',
        path: path.resolve ( __dirname, './dist' )
    },
    module: {
        rules: [
            {
                test: /\.css$/,
                use: extractCSS.extract ( {
                    use: "css-loader",
                    fallback: "style-loader"
                } )


            },
            {
                test: /\.scss$/,
                use: extractSASS.extract ( {
                    use: [
                        {loader: "css-loader"},
                        {loader: "sass-loader"}
                    ],
                    fallback: "style-loader"
                } )
            },
            {
                test: /\.js$/,
                exclude: /(node_modules|bower_components)/,
                use: {
                    loader: 'babel-loader',
                    options: {
                        cacheDirectory: true//缓存
                    }
                }
            },
            { //打包css里的图片
                test: /\.(png|jpg|gif|jpeg)$/,
                use: [
                    {
                        loader: 'url-loader',
                        options: {
                            limit: 8192,  //小于8KB,就base64编码
                            name: 'img/[name].[ext]',     //在哪里生成
                            publicPath: '../'    //在生成的文件引用,前面加
                        }
                    }
                ]
            }
        ]
    },
    plugins: [
        new HtmlWebpackPlugin (
            {
                template: './src/index.html',// 模板文件
                filename: 'index.html'
            }
        ),
        new CopyWebpackPlugin ( [
            {from: './src/img', to: './img'}
        ] ),
        extractCSS,
        extractSASS,
        new CleanWebpackPlugin ( ['dist', 'build'], {
            verbose: false,
            exclude: ['img']//不删除img静态资源
        } ),
    ]


}
第三步,在src/js下新建index.js和src下新建index.html文件

第四步,在项目下新建pakage.json文件,复制以下代码,然后运行 cnpm install

{
  "name": "hmap",
  "version": "1.0.0",
  "description": "test",
  "scripts": {
    "dev": "webpack-dev-server --mode development",
    "start": "npm run dev",
    "build": "webpack --mode production"
  },
  "author": "",
  "license": "ISC",
  "devDependencies": {
    "babel-core": "^6.26.0",
    "babel-loader": "^7.1.2",
    "babel-plugin-transform-runtime": "^6.23.0",
    "babel-preset-env": "^1.6.1",
    "clean-webpack-plugin": "^0.1.17",
    "copy-webpack-plugin": "^4.5.1",
    "css-loader": "^0.28.11",
    "extract-text-webpack-plugin": "^4.0.0-beta.0",
    "file-loader": "^1.1.11",
    "html-webpack-plugin": "^3.0.6",
    "node-sass": "^4.9.3",
    "ol": "^5.3.3",
    "sass-loader": "^6.0.6",
    "style-loader": "^0.20.3",
    "url-loader": "^1.0.1",
    "webpack": "^4.2.0",
    "webpack-cli": "^3.1.2",
    "webpack-dev-server": "^3.1.1"
  },
  "dependencies": {
    "expose-loader": "^0.7.5",
  }
}
第五步,配置babel,新建.babelrc文件,直接新建文件输入".babelrc"就行,然后在下面复制一下代码

{
  "presets": [
    [
      "env",
      {
        "targets": {
          "browsers": [
            "last 2 versions",
            "not ie <= 8"
          ]
        }
      }
    ]
  ],
  "plugins": [
    [
      "transform-runtime",
      {
        "helpers": false,
        "polyfill": false,
        "regenerator": true,
        "moduleName": "babel-runtime"
      }
    ]
  ]
}


