Nginx+Tomcat+Redis实现应用服务器集群负载均衡和Session共享
1.实验环境和所需软件
1.Windows7环境
2.nginx 1.6.3
3.redis 2.6.2
4.Tomcat 7.0.56
2.配置Nginx
Nginx路径:E:\new\Tomcat_Nginx_Cluster\nginx-1.6.3\#Nginx所有用户和组,window下不指定
#user Adminstrator
#user nobody;
#工作的子进程数量(通常等于CPU核数或者2倍与CPU核数)
worker_processes 4;
#错误日志存放路径
#error_log logs/error.log;
#error_log logs/error.log notice;
#error_log logs/error.log info;
#指定pid存放文件
#pid logs/nginx.pid;
events {
#使用网络IO模型,Linux建议用epoll,FreeBSD建议用kqueue,window下不指定
#use epoll
#设置单个进程同时打开的最大连接数
worker_connections 1024;
}
http {
include mime.types;
default_type application/octet-stream;
#定义日志格式
#log_format main '$remote_addr - $remote_user [$time_local] "$request" '
# '$status $body_bytes_sent "$http_referer" '
# '"$http_user_agent" "$http_x_forwarded_for"';
#access_log logs/access.log main;
sendfile on;
#tcp_nopush on;
#keepalive_timeout 0;
#http连接的持续时间
keepalive_timeout 65;
#gzip压缩设置
#gzip on; #是否打开gzip压缩,默认不打开
gzip_min_length 1k; #最小压缩文件大小
gzip_buffers 4 16k; #压缩缓冲区
#http的协议版本(1.0/1.1),默认1.1,前端如果是squid2.5请使用1.0
gzip_http_version 1.1;
#gzip压缩比,1压缩比最小处理速度最快,9压缩比最大但处理速度最慢(传输快但比较消耗cpu)
gzip_comp_level 2;
#和http头有关系,加个vary头,给代理服务器用的,有的浏览器支持压缩,有的不支持,所以避免浪费不支持的也压缩,所以根据客户端的HTTP头来判断,是否需要压缩
gzip_vary on;
#gzip压缩类型,不用添加text/html,否则会有警告信息
gzip_types text/plain text/javascript text/css application/xmlapplication/x-javascript application/json;
#设定负载均衡的服务器列表,可以配置多个upstream,但mysvr名字要区分
#下面配置请求的负载分配
upstream localhost {
#根据ip计算将请求分配给那个后端Tomcat,注意:这里并不能解决Session共享问题
#同一机器在多网情况下,路由切换,ip可能不同
#ip_hash
#weight参数表示权值,权值越高被分配到的几率越大,一般在生产环境中,需要根据访问情况制定相应算法
server localhost:8080 weight=5;
server localhost:8081 weight=5;
}
server {
#Nginx监听的端口号
listen 80;
#域名可有多个,用空格隔开
server_name localhost;
#字符编码集
#charset koi8-r;
charset utf-8;
#设定本虚拟主机的访问日志。关闭日志可减少IO,提高性能
#access_log logs/host.access.log main;
#默认请求
location / {
#定义服务器的默认网站根目录位置
#root html;
root E:\new\Tomcat_Nginx_Cluster;
#定义首页
index index.html index.htm index.jsp;
#请求专项mysvr定义的服务器列表
#配置端口转发,proxy_pass
proxy_pass http://localhost;
proxy_redirect default;
#与代理服务器连接的超时时间,必须留意这个timeout不能超过75秒,当一台服务器宕机时,过10秒转发到另外一台服务器
proxy_connect_timeout 10;
}
location ~ .*.jsp$ #所有jsp的页面均交由tomcat处理
{
index index.jsp;
proxy_pass http://localhost;#转向tomcat处理
}
location ~ .*\.(gif|jpg|jpeg|png|bmp|swf)$ #设定访问静态文件直接读取不经过tomcat
{
#设置静态资源的过期时间
expires 30d;
}
#定义几种常见的错误页面:404,400,500等
#error_page 404 /404.html;
# redirect server error pages to the static page /50x.html
#
error_page 500 502 503 504 /50x.html;
location = /50x.html {
root html;
}
#对本server"/"启用负载均衡
#location / {
# proxy_pass http://mysvr;
# proxy_redirect off;
# proxy_set_header Host $host;
# proxy_set_header X-Real-IP $remote_addr;
# proxy_set_header X-Forwarded-For $proxy_add_x_forwarded_for;
# client_max_body_size 10m;
# client_body_buffer_size 128k;
# proxy_connect_timeout 90;
# proxy_send_timeout 90;
# proxy_read_timeout 90;
# proxy_buffer_size 4k;
# proxy_buffers 4 32k;
# proxy_busy_buffers_size 64k;
# proxy_temp_file_write_size 64k;
#}
# proxy the PHP scripts to Apache listening on 127.0.0.1:80
#
#location ~ \.php$ {
# proxy_pass http://127.0.0.1;
#}
# pass the PHP scripts to FastCGI server listening on 127.0.0.1:9000
#
#location ~ \.php$ {
# root html;
# fastcgi_pass 127.0.0.1:9000;
# fastcgi_index index.php;
# fastcgi_param SCRIPT_FILENAME /scripts$fastcgi_script_name;
# include fastcgi_params;
#}
# deny access to .htaccess files, if Apache's document root
# concurs with nginx's one
#
#location ~ /\.ht {
# deny all;
#}
}
# another virtual host using mix of IP-, name-, and port-based configuration
#
#server {
# listen 8000;
# listen somename:8080;
# server_name somename alias another.alias;
# location / {
# root html;
# index index.html index.htm;
# }
#}
# HTTPS server
#
#server {
# listen 443 ssl;
# server_name localhost;
# ssl_certificate cert.pem;
# ssl_certificate_key cert.key;
# ssl_session_cache shared:SSL:1m;
# ssl_session_timeout 5m;
# ssl_ciphers HIGH:!aNULL:!MD5;
# ssl_prefer_server_ciphers on;
# location / {
# root html;
# index index.html index.htm;
# }
#}
}
3.配置两个Tomcat
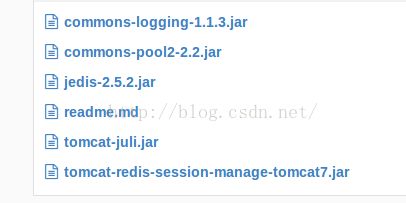
1. 在两个Tomcat的lib中导入连接redis需要的jar包:
2.配置两个Tomcat通过redis共享session
Tomcat-8080 --- localhost:8080
1.conf/server.xml端口配置 --- 使用默认的8080端口,只需配置这个Tomcat了
Engine元素增加jvmRoute属性:
- <Engine name="Catalina" defaultHost="localhost" jvmRoute="tomcat8080">
2.conf/context.xml配置 --- 连接redis共享session的配置
完整配置:
WEB-INF/web.xml
Tomcat-8081 --- localhost:8081
1.conf/server.xml端口配置 --- 使用8081端口,需要在server.xml中进行相应的配置(4个地方需要修改端口)
第一处端口修改:
- <Server port="8006" shutdown="SHUTDOWN">
- <Connector port="8081" protocol="HTTP/1.1"
- connectionTimeout="20000"
- redirectPort="8443" />
- <Connector port="18009" protocol="AJP/1.3" redirectPort="18443" />
- <Engine name="Catalina" defaultHost="localhost" jvmRoute="tomcat8081">
完整配置:
2.conf/context.xml配置 --- 连接redis共享session的配置
4.启动nginx、redis和两个Tomcat组建集群
1.创建index.jsp测试文件
在两个Tomcat的webapps下面创建一个test目录,并创建一个index.jsp文件
<%@ page language="java" %>

  TomcatA


        Session ID
        <%= session.getId() %>


        Created on
        <%= session.getCreationTime() %>


sessionID:<%=session.getId()%>


SessionIP:<%=request.getServerName()%>


SessionPort:<%=request.getServerPort()%>
<%
//为了区分,第二个可以是222
out.println("This is Tomcat Server 1111");
%>
2.先启动Nginx、再启动redis,最后启动两个Tomcat
说明:
Windows下Nginx的启动与关闭
启动: E:\new\Tomcat_Nginx_Cluster\nginx-1.6.3>nginx.exe
关闭:E:\new\Tomcat_Nginx_Cluster\nginx-1.6.3>nginx -s quit
启动: E:\new\Tomcat_Nginx_Cluster\nginx-1.6.3>nginx.exe
关闭:E:\new\Tomcat_Nginx_Cluster\nginx-1.6.3>nginx -s quit
5.测试Session共享
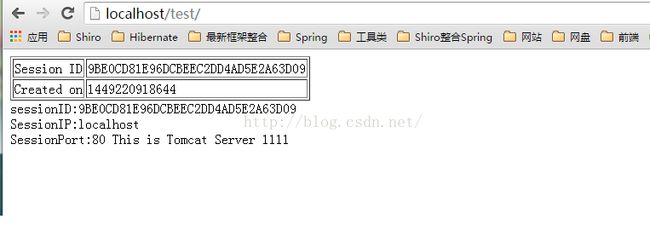
打开浏览器去访问第一个Tomcat,然后再第二个Tomcat,页面Session信息如下
直接访问Tomcat集群的到Session信息如下:
由图可以看到,三个Tomcat的SessionID都是一样的:9BE0CD81E96DCBEEC2DD4AD5E2A63D09,只要不关闭浏览器,不管怎么刷新,SessionID都是不变了。由此可以,三个Tomcat通过redis实现了Session信息共享。
使用Memcached共享Session例子参考:http://blog.csdn.net/zht666/article/details/38515147


