tensorflow(七)实现mnist数据集上图片的训练和测试
本文使用tensorflow实现在mnist数据集上的图片训练和测试过程,使用了简单的两层神经网络,代码中涉及到的内容,均以备注的形式标出。
关于文中的数据集,大家如果没有下载下来,可以到我的网盘去下载,链接如下:
https://pan.baidu.com/s/1KU_YZhouwk0h9MK0xVZ_QQ
下载下来后解压到F盘mnist文件夹下,或者自己选择文件存储位置,然后在下面代码的相应位置改过来即可。
直接上代码:
    import tensorflow as tf
    import numpy as np
    #引入input_mnist
    from tensorflow.examples.tutorials.mnist import input_data
    #加载mnist信息,获得训练和测试图片以及对应标签
    mnist = input_data.read_data_sets('F:/mnist/data/',one_hot = True)
    trainimg = mnist.train.images
    trainlabel = mnist.train.labels
    testimg = mnist.test.images
    testlabel = mnist.test.labels
    print("MNIST LOAD READY")
    #输入图片尺寸28*28
    n_input = 784
    #输出类别数
    n_output = 10
    #初始化权重
    weights = {
            #卷积层参数,采用高斯初始化
            'wc1':tf.Variable(tf.random_normal([3,3,1,64],stddev = 0.1)),
            'wc2':tf.Variable(tf.random_normal([3,3,64,128],stddev=0.1)),
            #全连接层参数
            'wd1':tf.Variable(tf.random_normal([7*7*128,1024],stddev=0.1)),
            'wd2':tf.Variable(tf.random_normal([1024,n_output],stddev=0.1))
           }
    #初始化偏置
    biases = {
            'bc1':tf.Variable(tf.random_normal([64],stddev = 0.1)),
            'bc2':tf.Variable(tf.random_normal([128],stddev=0.1)),
            'bd1':tf.Variable(tf.random_normal([1024],stddev=0.1)),
            'bd2':tf.Variable(tf.random_normal([n_output],stddev=0.1))
           }
    #定义前向传播函数
    def conv_basic(_input,_w,_b,_keepratio):
        #输入
        #reshape()中的-1表示不用我们指定,让函数自己计算
        _input_r = tf.reshape(_input,shape = [-1,28,28,1])
        #CONV1
        _conv1 = tf.nn.conv2d(_input_r,_w['wc1'],strides=[1,1,1,1],padding='SAME')
        _conv1 = tf.nn.relu(tf.nn.bias_add(_conv1,_b['bc1']))
        _pool1 = tf.nn.max_pool(_conv1,ksize = [1,2,2,1],strides = [1,2,2,1],padding='SAME')
        #Dropout层既可以使用在全连接层之后,也可以使用在每层之后,这里在每层之后都加了Dropout
        _pool_dr1 = tf.nn.dropout(_pool1,_keepratio)
        #CONV2
        #conv2d计算二维卷积
        _conv2 = tf.nn.conv2d(_pool_dr1,_w['wc2'],strides=[1,1,1,1],padding='SAME')
        _conv2 = tf.nn.relu(tf.nn.bias_add(_conv2,_b['bc2']))
        _pool2 = tf.nn.max_pool(_conv2,ksize = [1,2,2,1],strides = [1,2,2,1],padding='SAME')
        _pool_dr2 = tf.nn.dropout(_pool2,_keepratio)
        #向量化 全连接层输入 得到wd1层的7*7*128的shape 然后转化为向量
        _dense1 = tf.reshape(_pool_dr2,[-1,_w['wd1'].get_shape().as_list()[0]])
        #FULL CONNECTION1
        _fc1 = tf.nn.relu(tf.add(tf.matmul(_dense1,_w['wd1']),_b['bd1']))
        _fc_dr1 = tf.nn.dropout(_fc1,_keepratio)
        #FULL CONNECTION2
        _out = tf.add(tf.matmul(_fc_dr1,_w['wd2']),_b['bd2'])
        #输出字典
        out = {'input_r':_input_r,'conv1':_conv1,'pool1':_pool1,'pool1_dr1':_pool_dr1,
               'conv2':_conv2,'pool2':_pool2,'pool_dr2':_pool_dr2,'dense1':_dense1,
               'fc1':_fc1,'fc_dr1':_fc_dr1,'out':_out
               }
        return out
    print("CNN READY")
    a = tf.Variable(tf.random_normal([3,3,1,64],stddev=0.1))
    print(a)
    a = tf.Print(a,[a],"a: ")
    init = tf.global_variables_initializer()
    sess = tf.Session()
    sess.run(init)
    #填充
    x = tf.placeholder(tf.float32,[None,n_input])
    y = tf.placeholder(tf.float32,[None,n_output])
    keepratio = tf.placeholder(tf.float32)
    #进行一次前向传播
    _pred = conv_basic(x,weights,biases,keepratio)['out']
    #计算损失
    cost = tf.reduce_mean(tf.nn.softmax_cross_entropy_with_logits(logits = _pred,labels=y))
    #定义优化器
    optm = tf.train.AdamOptimizer(learning_rate = 0.001).minimize(cost)
    #比较预测的标签和真实标签是否一致,一致返回True,不一致返回False
    #argmax找到给定的张量tensor中在指定轴axis上的最大值/最小值的位置,0为每一列,1为每一行
    _corr = tf.equal(tf.argmax(_pred,1),tf.argmax(y,1))
    #True转化为1 False为0
    accr = tf.reduce_mean(tf.cast(_corr,tf.float32))
    #每1个epoch保存一次
    save_step = 1
    #max_to_keep最终只保留三组模型,即(12 13 14)
    saver = tf.train.Saver(max_to_keep=3)
    #控制训练还是测试
    do_train=1
    init = tf.global_variables_initializer()
    sess = tf.Session()
    sess.run(init)
    #训练15个epoch
    training_epochs = 15
    batch_size = 16
    display_step = 1
    #训练过程
    if do_train == 1:
        for epoch in range(training_epochs):
            avg_cost=0.
            total_batch = 10
            #迭代优化
            for i in range(total_batch):
                batch_xs,batch_ys = mnist.train.next_batch(batch_size)
                sess.run(optm,feed_dict = {x:batch_xs,y:batch_ys,keepratio:0.7})
                avg_cost += sess.run(cost,feed_dict={x:batch_xs,y:batch_ys,keepratio:1.})/total_batch
            #打印信息
            if (epoch+1) % display_step ==0:
                print("Epoch:%03d/%03d cost:%.9f"%(epoch,training_epochs,avg_cost))
                train_acc = sess.run(accr,feed_dict = {x:batch_xs,y:batch_ys,keepratio:1.})
                print("Train accuracy:%.3f"%(train_acc))
            #保存模型
            if epoch % save_step == 0:
                saver.save(sess,"F:/mnist/data/model.ckpt-"+str(epoch))
    #测试(cpu版本慢的要死 电脑都快要被卡死了...)
    if do_train == 0:
        #epoch = 15 减1之后即加载第14个模型
        epoch = training_epochs-1
        #读取模型
        saver.restore(sess,"F:/mnist/data/model.ckpt-"+str(epoch))
        #打印测试精度
        test_acc = sess.run(accr,feed_dict={x:testimg,y:testlabel,keepratio:1.})
        print("test accr is:%.3f"%(test_acc))
    print("Optimization Finished")
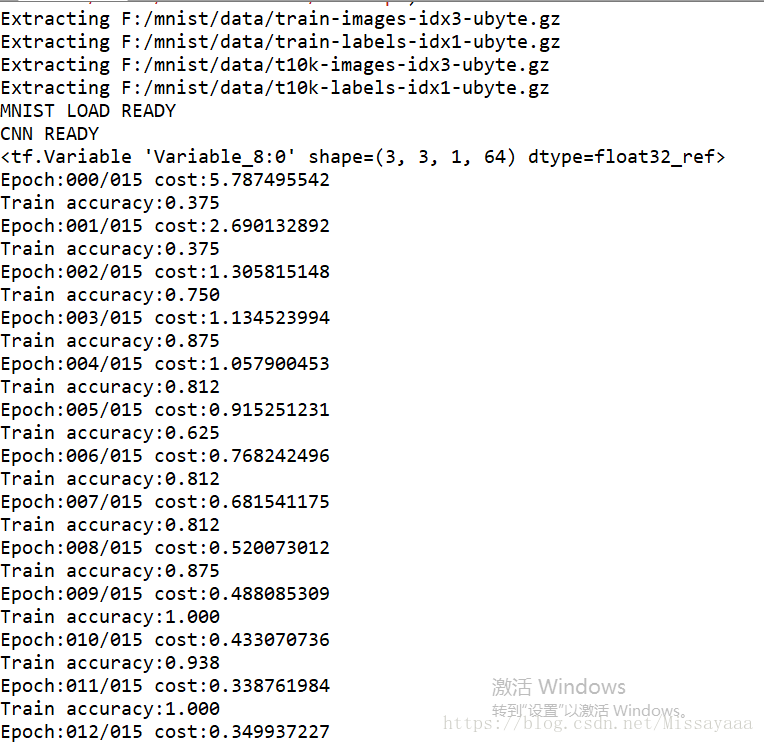
训练的部分过程如下:
测试过程如下:

测试时只需修改do_train==0 即可。如果使用Anaconda的spyder的话,记得测试之前先restart kennel一下。
