Android核心基础-3.Android 开发环境搭建
一、Android开发环境搭建
1.1 前置环境
Java运行和编译环境
JDK:http://www.oracle.com/technetwork/java/javase/downloads/index.html
开发工具
Eclipse:http://www.eclipse.org/downloads/
插件
ADT:http://developer.android.com/tools/sdk/eclipse-adt.html
帮助文档
SDK DOCS:http://developer.android.com/reference/packages.html
1.2 工具包
1.2.1 获取SDK 工具包
32位操作系统
下载地址:http://dl.google.com/android/adt/adt-bundle-windows-x86.zip
64位操作系统
下载地址:http://dl.google.com/android/adt/adt-bundle-windows-x86_64-20130729.zip
1.2.2 工具包,包含以下内容:
Eclipse + ADT 插件
Android SDK
Android Platform-tools
最新的Android 开发平台 platforms
最新的模拟器镜像
以上提供的地址可能已经有些过时,网友可以搜索最新版本;另外谷歌官方最新发布了Android Studio V1.0.0.1稳定版,有兴趣的同学可以去看看。
二、开发工具简介
- Eclipse
- SDK Manager
- SDK
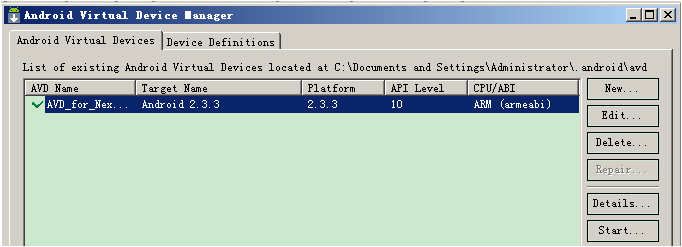
2.1 创建一个Android模拟器
点击手机形状的图形(android virtual device manager) 创建一个新的android模拟器

2.2 开发第一个Android应用
打开eclipse –> File –> New –> Android Application project

2.2.1 SDK目录简介
add-ons——使用SDK Manager.exe时产生的临时目录,不用管
build-tools—Android编译工具集
docs————Android帮助文档
extras———–附加
platforms——-平台
platform-tools—平台工具,如:adb.exe
samples———-Android示例
sources———-只是api的源代码
system-images—–系统镜像
temp—————-临时目录,不用管
tools—————-辅助开发的工具,如:ddms.bat,emulator.exe 管理模拟器
2.2.2 配置SDK Manager的options
1,force勾上(目的:将https协议转为http协议,网络访问速度加快)
2,修改C:\Windows\System32\drivers\etc\hosts文件加入下面代码
#Android-SDK下载
74.125.113.121 developer.android.com
203.208.46.146 dl.google.com
203.208.46.146 dl-ssl.google.com
2.2.3 Android_SDK_Home配置可以解决模拟器存储路径中文问题
2.3 常见命令操作(需要配置adb.exe的环境变量)
adb.exe环境变量配置:加入到path中,D:\adt-bundle-windows-x86-20131019\sdk\platform-tools
2.3.1 adb命令
adb devices 列出所有的设备
adb start-server 开启adb服务
adb kill-server 关闭adb服务
adb logcat 查看Log
adb shell 挂载到Linux的空间
adb install <应用程序(加扩展名)> 安装应用程序
adb –s <模拟器名称> install <应用程序(加扩展名)> 安装应用到指定模拟器
adb uninstall <程序包名>
adb connect 192.168.11.107 远程调试
adb pull < remote> < local>
adb push < local> < remote>
emulator –avd <模拟器名称>
ctrl + F11 横竖屏的切换
推送文件:adb push C:\Users\lijian\Desktop\student.xml /sdcard/student.xml
拉出文件:adb pull /sdcard/student.xml d:/student.xml
2.3.2 查看文件sharedpreferences
adb shell 挂载到linux空间
cd /data/data/net.dxs.mobilesafe进入到包目录
ls -l 列出目录下所有文件及文件夹详细信息
cd shared_prefs 进入到该目录
ls -l 列出该目录下所有文件
cat config.xml 查看该文件所存储的内容
三、工程目录结构
- src:存放java代码的目录,业务逻辑的编写
- gen:用于存放R(resources)文件,自动生成目录
目录中存放所有由Android开发工具自动生成的文件。目录中最重要的就是R.java文件。 这个文件由Android开发工具自动产生的。Android开发工具会自动根据你放入res目录的资源,同步更新修改R.java文件。正因为R.java文件是由开发工具自动生成的,所以我们应避免手工修改R.java。R.java在应用中起到了字典的作用,它包含了各种资源的id,通过R.java,应用可以很方便地找到对应资源。另外编绎器也会检查R.java列表中的资源是否被使用到,没有被使用到的资源不会编绎进软件中,这样可以减少应用在手机占用的空间。 - project.properties:指定当前应用程序所使用的开发工具包的版本
项目环境信息,一般不需要修改此文件。 - libs:存放当前工程依赖的jar包
程序开发时需要的一些三方的jar包可以放在这个目录,系统会自动把里面的jar包,添加到环境变量。 - assets:资产目录
会打包到应用程序包中(Android除了提供/res目录存放资源文件外,在/assets目录也可以存放资源文件,而且/assets目录下的资源文件不会在R.java自动生成ID,所以读取/assets目录下的文件必须指定文件的路径,如:file:///android_asset/xxx.3gp) - bin:用于存放ADT编译时产生的临时文件,最终会被打包成一个xxx.apk
- res(resources):
7.1. drawable:用于存放图片的文件夹
7.2. layout:用于存放Android布局文件的
7.3. menu:存放Android下菜单的布局的
7.4. values:用于存放Android下的一些字符串资源,样式
7.4.1 string.xml 存放字符串资源
7.4.2 demens.xml 存放不同分辨率的尺寸
7.4.3 styles.xml 存放样式
7.4.4 values-sw600dp 存放7寸平板电脑的尺寸值
7.4.5 values-sw720dp-land 存放10寸平板电脑的尺寸值
7.4.6 values-v11 存放3.0以上的版本的样式
7.4.7 values-v14 存放4.0以上的版本的样式
- AndroidManifest.xml:Android应用程序的入口文件,相当于JavaSE里边的Main函数,存放一些Android的四大组件,配置版本信息。
#补充知识#
res/drawable 专门存放png、jpg等图标文件。在代码中使用getResources().getDrawable(resourceId)获取该目录下的资源。
res/layout 专门存放xml界面文件,xml界面文件和HTML文件一样,主要用于显示用户操作界面。
res/values 专门存放应用使用到的各种类型数据。不同类型的数据存放在不同的文件中,如下:
strings.xml 定义字符串和数值,在Activity中使用getResources().getString(resourceId) 或getResources().getText(resourceId)取得资源。它的作用和struts中的国际化资源文件一样。

<resources>
  <string name="app_name">微信string>
resources>

arrays.xml 定义数组。

<resources>
    <string-array name="colors">
        <item>reditem>
        <item>yellowitem>
        <item>greenitem>
        <item>blueitem>
    string-array>
resources>

colors.xml 定义颜色和颜色字串数值,你可以在Activity中使用getResources().getDrawable(resourceId) 以及getResources().getColor(resourceId)取得这些资源。例子如下:

<resources>
  <color name="color_ff0000">#ff0000color>
resources>

dimens.xml 定义尺寸数据,在Activity中使用getResources().getDimension(resourceId) 取得这些资源

<resources>
  <dimen name="key_height">50dipdimen>
resources>

styles.xml 定义样式。

<resources>
    <style name="style_app" parent="@style/Text">
        <item name="android:textSize">18spitem>
        <item name="android:textColor">#0066FFitem>
    style>
resources>

res/anim/ 存放定义动画的XML文件。
res/xml/ 在Activity中使用getResources().getXML()读取该目录下的XML资源文件。
res/raw/ 该目录用于存放应用使用到的原始文件,如音效文件等。编译软件时,这些数据不会被编译,它们被直接加入到程序安装包里。 为了在程序中使用这些资源,你可以调用getResources().openRawResource(ID) , 参数ID形式:R.raw.somefilename。
四、Android 打包应用程序并安装的过程
编译 classes.dex 文件(见Android核心基础-2.Android架构简介)
编译 resources.arsc 文件
- Xml资源文件从文本格式编译转换为二进制格式.
- 生成资源索引表resources.arsc.
- 把resources.arsc转换成的二进制格式.
ADB (android debug bridge) 为开发人员提供便利
IDE Eclipse 把上面的过程全部都自动实现了
- 生成apk文件
1.1 生成.dex文件
.java->javac->.class->dx.bat->.dex
1.2 生成resources.arsc索引表文件
1.3 未编译的资源
1.4 清单文件AndroidManifase.xml转换成二进制
1.5 默认签名文件debug.keystore,使用签名文件进行打包 - 加载apk文件
2.1 把apk文件加载到/data/local/tmp/HelloWorld.apk - 安装apk文件
3.1 把/data/local/tmp/HelloWorld.apk剪切到/data/app/包名-1.apk
3.2 在/data/data/下创建一个文件夹名为:程序的包名
3.3 在packages.list和packages.xml文件中分别添加一条数据
五、开发第一个小程序
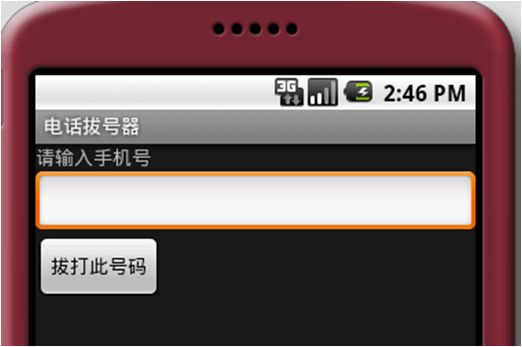
5.1 电话拨号器
需要添加权限: android.permission.CALL_PHONE
效果图:

界面布局:

<LinearLayout xmlns:android="http://schemas.android.com/apk/res/android"
    android:orientation="vertical"
    android:layout_width="fill_parent"
    android:layout_height="fill_parent" >

    <TextView
        android:layout_width="fill_parent"
        android:layout_height="wrap_content"
        android:text="@string/inputmobile"/>

    <EditText
        android:layout_width="fill_parent"
        android:layout_height="wrap_content"
        android:id="@+id/mobile"/>

    <Button
        android:layout_width="wrap_content"
        android:layout_height="wrap_content"
        android:text="@string/button"
        android:id="@+id/button"/>
LinearLayout>

调用系统打电话应用,并传递拨出去的号码:
Intent intent = new Intent(Intent.ACTION_CALL,Uri.parse("tel:5554"));
startActivity(intent);
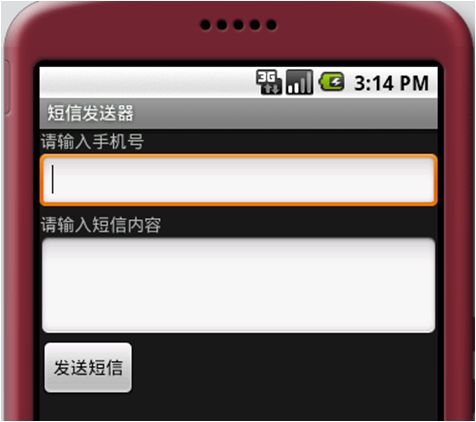
5.2 短信发送器
需要添加权限: android.permission.SEND_SMS
界面布局:

<LinearLayout xmlns:android="http://schemas.android.com/apk/res/android"
    android:orientation="vertical"
    android:layout_width="fill_parent"
    android:layout_height="fill_parent" >
<TextView
    android:layout_width="fill_parent"
    android:layout_height="wrap_content"
    android:text="@string/inputmobile"/>

<EditText
    android:layout_width="fill_parent"
    android:layout_height="wrap_content"
    android:id="@+id/mobile"/>

<TextView
    android:layout_width="fill_parent"
    android:layout_height="wrap_content"
    android:text="@string/content"/>

<EditText
    android:layout_width="fill_parent"
    android:layout_height="wrap_content"
    android:minLines="3"
    android:id="@+id/content"/>

<Button
    android:layout_width="wrap_content"
    android:layout_height="wrap_content"
    android:text="@string/button"
    android:id="@+id/button"/>
LinearLayout>

发送短信Java代码:
SmsManager smsManager = SmsManager.getDefault();
PendingIntent sentIntent = PendingIntent.getBroadcast(SMSSender.this, 0, new Intent(), 0);
//如果字数超过70,需拆分成多条短信发送
List<String> msgs = smsManager.divideMessage(content);
for(String msg : msgs){
    //最后二个参数为短信已发送的广播意图,最后一个参数为短信对方已收到短信的广播意图
    smsManager.sendTextMessage(mobile, null, msg, sentIntent, null);
}
Toast.makeText(this, "短信发送完成", Toast.LENGTH_LONG).show();

