vue2.0+vue-dplayer实现hls播放
开始
安装依赖
npm install vue-dplayer -S
1,编写组件HelloWorld.vue
<template>
    <div class="hello">
      <d-player ref="player" @play="play" :logo="logo" :lang="lang" :video="video" :contextmenu="contextmenu">d-player>
    div>
template>

<script>
import VueDPlayer from './VueDPlayerHls';
import logoImg from '@/assets/logo.png';
export default {
 name: 'HelloWorld',
 data () {
  return {
   video: {
     quality: [{
        name: '240P',
        url: 'https://video-dev.github.io/streams/x36xhzz/x36xhzz.m3u8',
     },{
        name: '360P',
        url: 'https://video-dev.github.io/streams/x36xhzz/x36xhzz.m3u8',
     },{
        name: '720P',
        url: 'https://video-dev.github.io/streams/x36xhzz/x36xhzz.m3u8',
     }],
     pic: 'http://static.smartisanos.cn/pr/img/video/video_03_cc87ce5bdb.jpg',
     defaultQuality: 1,
     thumbnails: logoImg,
     type: 'hls'
    },
    lang: 'zh-cn',
    logo: logoImg,
    autoplay: false,
    player: null,
    contextmenu: [
      {
        text: '博客园',
        link: 'http://www.cnblogs.com/maqingyuan/'
      },{
        text: '博客园',
        link: 'http://www.cnblogs.com/maqingyuan/'
      },{
        text: '博客园',
        link: 'http://www.cnblogs.com/maqingyuan/'
      }
    ]
  }
 },
 components: {
  'd-player': VueDPlayer
 },
 methods: {
  play() {
    // console.log('开始播放...')
   }
 },
 mounted() {
  // this.player = this.$refs.player.dp;
  // console.log(this.player);
  // var hls = new Hls();
  // hls.loadSource('https://video-dev.github.io/streams/x36xhzz/x36xhzz.m3u8');
  // hls.attachMedia(this.player);
 }
}
script>

<style scoped>
h1, h2 {
  font-weight: normal;
}
ul {
  list-style-type: none;
  padding: 0;
}
li {
  display: inline-block;
  margin: 0 10px;
}
a {
  color: #42b983;
}
.hello{
    width: 750px;
    margin: 0 auto 50px;
}
@media only screen and (max-width: 640px){
  .hello{
      width: 100%;
  }
}
style>
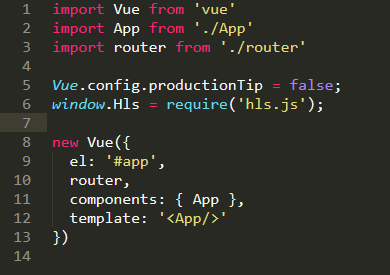
2,引入hls.js (在main.js引入)
window.Hls = require('hls.js');
3,自定义一个组件VueDPlayerHls.vue
<template>
 <div class="dplayer">div>
template>

<script>
 require('../../node_modules/dplayer/dist/DPlayer.min.css');
 import DPlayer from 'DPlayer'
 export default {
  props: {
   autoplay: {
    type: Boolean,
    default: false
   },
   theme: {
    type: String,
    default: '#FADFA3'
   },
   loop: {
    type: Boolean,
    default: false
   },
   lang: {
    type: String,
    default: 'zh'
   },
   screenshot: {
    type: Boolean,
    default: false
   },
   hotkey: {
    type: Boolean,
    default: true
   },
   preload: {
    type: String,
    default: 'auto'
   },
   contextmenu: {
    type: Array
   },
   logo: {
    type: String
   },
   video: {
    type: Object
    // required: true,
    // validator(value) {
    //  return typeof value.url === 'string'
    // }
   }
  },
  data() {
   return {
    dp: null
   }
  },
  mounted() {
   const player = this.dp = new DPlayer({
    element: this.$el,
    autoplay: this.autoplay,
    theme: this.theme,
    loop: this.loop,
    lang: this.lang,
    screenshot: this.screenshot,
    hotkey: this.hotkey,
    preload: this.preload,
    contextmenu: this.contextmenu,
    logo: this.logo,
    video: {
     pic: this.video.pic,
     defaultQuality: this.video.defaultQuality,
     quality: [{
       url: this.video.quality[0].url,
       name: this.video.quality[0].name
     },{
       url: this.video.quality[1].url,
       name: this.video.quality[1].name
     },{
       url: this.video.quality[2].url,
       name: this.video.quality[2].name
     }],
     thumbnails: this.video.thumbnails,
     type: this.video.type
    }
   })
   player.on('play', () => {
    this.$emit('play')
   })
   player.on('quality_start', () => {
    this.$emit('quality_start')
    player.on('play')
   })
   player.on('pause', () => {
    this.$emit('pause')
   })
   player.on('canplay', () => {
    this.$emit('canplay')
   })
   player.on('playing', () => {
    this.$emit('playing')
   })
   player.on('ended', () => {
    this.$emit('ended')
   })
   player.on('error', () => {
    this.$emit('error')
   })
  }
 }
script>
<style scoped>

style>
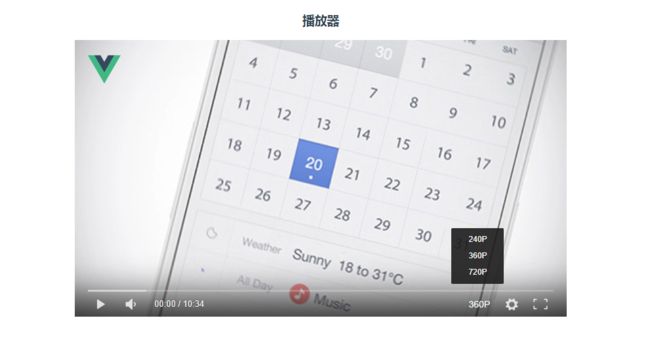
4,实现播放(如下图) :
最后
github地址:https://github.com/whiskyma/vue-dplayer
以上就是本文的全部内容,希望对大家的学习有所帮助,谢谢大家,记得点赞哦!!!

