扫条码集成Activity(Zbar 解码、ZXing 管理相机)
一 ,前言
现在的扫条码是非常普遍了,连华为手机在系统照相时,还可以自动toast显示扫到的二维码等,特别广泛。
这阵子需要搞个扫条码的功能,主要是条码,二维码等。之前用的一直都是 Zxing 的jar包,按照网上的弄。最近客户反映有些长条码特别难扫。试用了ZBar 后,发现扫描速度有提升,并且长条码识别很高。
参考了网络上的一些ZBar或者zxing应用,总是不如意,有些横屏,有些是中文乱码,有些是 ISBN13不能识别。基于此,我在解决了上述问题后,做了一些集成。
以下为参考链接,感谢!
参考链接: http://www.itnose.net/detail/6155831.html (改扫描框)
http://blog.csdn.net/skillcollege (zbar zxing) 基本上我的项目就是在这个基础上弄的,后面参考了github上的一个类似的项目,应该也是这个博主的,只不过这个链接的项目,扫ISBN13 条码有问题,以及没有横屏的。为了方便被别人用,我界面不是用 xml写的,照着xml的属性用纯java代码写。后来发现多此一举,不过不管了。粗糙地用还是可以,扫描框不满意,自己替换图片吧。
二, 说明
我将最终形成的代码打成jar 包(包含图片资源),如果对界面要求不高,可以直接用(方法见后面说明),或者替换图片。如果要定制就只能修改 initUI 了(有两种方法)。
此项目的特点: 1. 界面基本固定,可以替换图片,更改扫描框样式和扫描线
2. 支持横屏和竖屏(全屏) ,识别区域与相机预览区域相匹配
3. zxing 管理相机,zbar 解码。二合一,超强解码。
4. 界面上方有 取消按钮 和 闪光灯(后期有时间考虑增加选择图库中的图片来解码,也可能没时间)
接下来的第三第四步是为了后面的集成工程服务的。
三、Zbar工程NDK编译
这一步确实麻烦,可以找网上的方法。 我这里直接给zbar的工程,有NDK的可以试试(导入后添加本地支持就可以编译了)。不过觉得没必要。底层一般都没有变。可以直接应用它的so库和jar包,这个已经修复中文乱码的了。等会会说明一下几个zbar 的方法
zbar jni 工程下载地址: NDK工程 (也是下载 csdn 的博友的,忘记是谁的了。)
生成的 so 文件 和 jar包 : zbar so 文件
四、ZXing 核心库简化
已经简化的ZXing 的代码(java 1.6版本),地址:zxing java 核心库
顺便说一句,之前直接用了网上的简化zxing.jar,但它是 java 1.7编译的,有些1.7 的API 在1.6没有。所以直接给别人用(有可能他用的是jdk 1.6),会发生某个类没找到的异常
jar 包下载地址:zxing.jar
好了,前面弄完了,开始我们的主要内容了。
五、集成工程(主要工作是说明一些疑惑的地方)
1. 创建一个工程,我帮你们都弄好了。直接下吧,地址: XZbar
2. 一些代码的说明:
(1)CameraConfigurationManager.java
这里作了以下的修改:
public void initFromCameraParameters(Camera camera) {
		Camera.Parameters parameters = camera.getParameters();

		WindowManager manager = (WindowManager) context.getSystemService(Context.WINDOW_SERVICE);
		Display display = manager.getDefaultDisplay();
		Point theScreenResolution = new Point();
		theScreenResolution = getDisplaySize(display);

		screenResolution = theScreenResolution;
		Log.i(TAG, "Screen resolution: " + screenResolution);

		/** 因为换成了竖屏显示,所以不替换屏幕宽高得出的预览图是变形的 */
		//如果为竖屏就替换
		if (screenResolution.x < screenResolution.y) {

			Point screenResolutionForCamera = new Point();
			screenResolutionForCamera.x = screenResolution.y;
			screenResolutionForCamera.y = screenResolution.x;

			//findBestPreviewSizeValue  是以屏幕横屏(W x H)数据求最佳预览界面数据(W x H)//等到最佳预览后,要把长宽互换,这样对外输出的长宽定义是一致的。
Point cameraHW = findBestPreviewSizeValue(parameters, screenResolutionForCamera);
cameraResolution = new Point();
cameraResolution.x = cameraHW.y;
cameraResolution.y = cameraHW.x;
}
else
{
cameraResolution = findBestPreviewSizeValue(parameters, screenResolution);
}
Log.i(TAG, "Camera resolution x: " + cameraResolution.x);
Log.i(TAG, "Camera resolution y: " + cameraResolution.y);
}但cameraResolution还是有可能被改变,在这个方法 setDesiredCameraParameters ,所以在这个方法顺便处理一下。
//相机并不是对所有参数都响应,有可能设置失败。
	public void setDesiredCameraParameters(Camera camera, boolean safeMode) {
		Camera.Parameters parameters = camera.getParameters();

		if (parameters == null) {
			Log.w(TAG, "Device error: no camera parameters are available. Proceeding without configuration.");
			return;
		}

		Log.i(TAG, "Initial camera parameters: " + parameters.flatten());

		if (safeMode) {
			Log.w(TAG, "In camera config safe mode -- most settings will not be honored");
		}


		//如果为竖屏,设置参数
        if(screenResolution.x < screenResolution.y)
        {
        	//有些设备的相机有可能不响应这个参数,所以还是在外面翻转预览的data[]数据
        	//parameters.setRotation(90);

        	/** 设置相机预览为竖屏 */
            camera.setDisplayOrientation(90);
            //preview size 总是设置为横屏时才可能生效
//试验发现,竖屏支持的preview 有 480x800,可是传入480,800时,参数设置不成功,导致设置为默认640x480。 如果传800,480.设置参数成功。
parameters.setPreviewSize(cameraResolution.y, cameraResolution.x);
}
else
{
parameters.setPreviewSize(cameraResolution.x, cameraResolution.y);
}
camera.setParameters(parameters);
Camera.Parameters afterParameters = camera.getParameters();
Camera.Size afterSize = afterParameters.getPreviewSize();
//主要是因为前面作了动作,这里得到竖屏的preview size还是长宽颠倒的。
if(screenResolution.x < screenResolution.y)
{
if (afterSize != null && (cameraResolution.y != afterSize.width || cameraResolution.x != afterSize.height)) {
Log.w(TAG, "Camera said it supported preview size " + cameraResolution.x + 'x' + cameraResolution.y + ", but after setting it, preview size is " + afterSize.width + 'x' + afterSize.height);
cameraResolution.y = afterSize.width;
cameraResolution.x = afterSize.height;
}
}else
{
if (afterSize != null && (cameraResolution.x != afterSize.width || cameraResolution.y != afterSize.height)) {
Log.w(TAG, "Camera said it supported preview size " + cameraResolution.x + 'x' + cameraResolution.y + ", but after setting it, preview size is " + afterSize.width + 'x' + afterSize.height);
cameraResolution.x = afterSize.width;
cameraResolution.y = afterSize.height;
}
}
}(2)DecodeHandler.java
这个文件,主要是对previewcallback 的数据做处理。
主要是几个方法的说明:
Image barcode = new Image(size.width, size.height,"Y800"); // 创建一个image 大小和preview size一致
barcode.setData(rotatedData); //填充数据
barcode.setCrop( rect.left ,rect.top, rect.width(),rect.height());//圈出识别区域
int ret =scanner.scanImage(barcode); //扫描
难点就是怎么确定识别区域? 这个在前面的参考连接中有详细的说明。不过因为我的全屏,所以不用得到状态栏的高度。
	/**
	 * Decode the data within the viewfinder rectangle, and time how long it
	 * took. For efficiency, reuse the same reader objects from one decode to
	 * the next.
	 *
	 * @param data
	 *            The YUV preview frame.
	 * @param width
	 *            The width of the preview frame.
	 * @param height
	 *            The height of the preview frame.
	 */
	private void decode(byte[] data, int width, int height) {
		Size size = activity.getCameraManager().getPreviewSize();
		Log.w("PreView size:","size : w "+ size.width + " h:" + size.height);

		Rect rect = activity.getCropRect();
		Log.i("CropRect","左上点:("+rect.left+","+ rect.top+") 右下点:("+rect.right+","+ rect.bottom+")宽高:width:"+rect.width()+" height:"+rect.height());

		byte[] rotatedData = new byte[data.length];
		if(activity.getResources().getConfiguration().orientation==Configuration.ORIENTATION_PORTRAIT)
		{
			// 这里需要将获取的data翻转一下,因为相机默认拿的的横屏的数据
			rotatedData = new byte[data.length];
			for (int y = 0; y < size.height; y++) {
				for (int x = 0; x < size.width; x++)
					rotatedData[x * size.height + size.height - y - 1] = data[x + y * size.width];
			}

			// 宽高也要调整
			int tmp = size.width;
			size.width = size.height;
			size.height = tmp;
		}
		else
		{
			System.arraycopy(data, 0, rotatedData, 0, data.length);
		}

		//zbar解码
		Image barcode = new Image(size.width, size.height, "Y800");
		barcode.setData(rotatedData);
		barcode.setCrop( rect.left ,rect.top, rect.width(),rect.height());
		int ret = scanner.scanImage(barcode);

		if (ret != 0)  {
            if (null != activity.getHandler()) {

            	SymbolSet syms = scanner.getResults();
    			String resultString = "";
    			for (Symbol sym : syms) {
    				resultString="" + sym.getData();
    			}
    			if (null == resultString || resultString.equals(""))
    			{
    				//继续扫描
    			}else{
    				PlanarYUVLuminanceSource source = buildLuminanceSource(rotatedData, size.width, size.height);
                    Message msg = new Message();
                    Bundle bundle = new Bundle();
                    bundleThumbnail(source, bundle);
                    msg.setData(bundle);
                    msg.obj = resultString;
                    msg.what = decode_succeeded_id;
                    activity.getHandler().sendMessage(msg);
    			}
            }
        } else {
            if (null != activity.getHandler()) {
                activity.getHandler().sendEmptyMessage(decode_failed_id);
            }
        }
	}
六,如果希望直接引入jar 来使用,使用说明在这里。打包好的jar以及资源文件下载地址: XZabr.jar
1. AndroidManifest.xml 添加权限:
申明acticity
2. 将资源文件放置好。

3. 放置 动态库文件和jar包
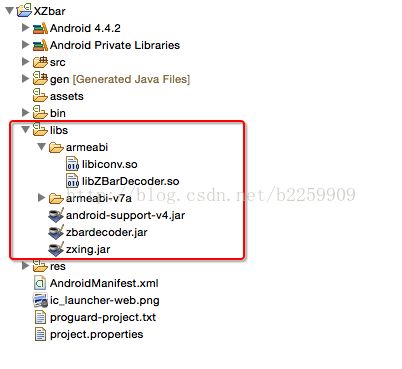
4. 在 mainActivity 创建对象
HxBarcode hxBarcode = new HxBarcode(); //参数为 context,requestCode(在下面的 onResultActivity 中有用),boolean值(是否横屏)
hxBarcode.scan(MainActivity.this, 501,true); @Override
protected void onActivityResult(int requestCode, int resultCode, Intent data) {
// TODO Auto-generated method stub
super.onActivityResult(requestCode, resultCode, data);
System.out.printf("onActivityResult : %s,%s\n",requestCode,resultCode);
switch(requestCode)
{
case 501:
if(data!=null)
{
Bundle extras = data.getBundleExtra("data");
if (null != extras) {
int width = extras.getInt("width");
int height = extras.getInt("height");
String result = extras.getString("result");
mResultText.setText(result);
//以下只是为了显示图片。
LayoutParams lps = new LayoutParams(width,height);
lps.topMargin = (int) TypedValue.applyDimension(TypedValue.COMPLEX_UNIT_DIP, 30, getResources().getDisplayMetrics());
lps.leftMargin = (int) TypedValue.applyDimension(TypedValue.COMPLEX_UNIT_DIP, 20, getResources().getDisplayMetrics());
lps.rightMargin = (int) TypedValue.applyDimension(TypedValue.COMPLEX_UNIT_DIP, 20, getResources().getDisplayMetrics());
mResultImage.setLayoutParams(lps);
Bitmap barcode = null;
byte[] compressedBitmap = extras.getByteArray(DecodeThread.BARCODE_BITMAP);
if (compressedBitmap != null) {
barcode = BitmapFactory.decodeByteArray(compressedBitmap, 0, compressedBitmap.length, null);
// Mutable copy:
barcode = barcode.copy(Bitmap.Config.RGB_565, true);
}
mResultImage.setImageBitmap(barcode);
}
}
break;
}
}2015.2.9 号 增加相册选择图片解码
有网友需要从图片解码,我自己也没时间实现。
我的思路是:
1. 取得图片的原始数据(不包含头信息什么的),这样就跟预览时一样了。问题是我用 bitmap.getPixels取得数据是 int数组,应该是ARGB格式。barcode.setData(int[] in)试验不能解码。(结果不成功,思路应该对吧。)
2. 取得图片的纯RGB数据,再转为预览时回调的那种数据格式,可能是YUV42sp之类的,结果还是不懂怎么转为YUV42sp,而且还要保证,出来的数据是byte数组。(卡了)
然后今天,无意看到 Image barcode = new Image(W,H,"GREY")可以指定为灰度数据解析。而我看了一下ARGB数据,A一直为 0xff,也就是透明度不用管了。我将RGB用灰度公式转成灰度值,并放在byte数组,这样就刚好了。于是选择图片解码,终于可以了。哇咔咔。
(1)ZbarActivity.java中,在addLisenter() 增加一个按键监听
gallery.setOnClickListener(new OnClickListener() {
			public void onClick(View v) {
				Intent intent = new Intent(Intent.ACTION_GET_CONTENT, null);
				intent.setType("image/*");
				intent.putExtra("crop", "true");
				intent.putExtra("aspectX", 3);
				intent.putExtra("aspectY", 2);
				intent.putExtra("outputX", 600);
				intent.putExtra("outputY", 400);
				intent.putExtra("scale", true);
				intent.putExtra("return-data", false);
				intent.putExtra(MediaStore.EXTRA_OUTPUT, imageUri);
				intent.putExtra("outputFormat",Bitmap.CompressFormat.JPEG.toString());
				intent.putExtra("noFaceDetection", true); // no face detection
				startActivityForResult(intent,PHOTO_REQUEST_CUT);
			}
		});
增加 onActivityResult
	@Override
	protected void onActivityResult(int requestCode, int resultCode, Intent data) {
		// TODO Auto-generated method stub
		super.onActivityResult(requestCode, resultCode, data);

		if (requestCode == PHOTO_REQUEST_CUT
				&& resultCode == Activity.RESULT_OK)
		{
			if (imageUri != null) {
				Bitmap bitmap = decodeUriAsBitmap(imageUri);// decode bitmap
				int W = bitmap.getWidth();
				int H = bitmap.getHeight();
				int[] photodata = new int[W * H];
				bitmap.getPixels(photodata, 0, W, 0, 0, W, H); //获取图片原始ARGB数据

				//将RGB转为灰度数据。
				byte[] greyData = new byte[W * H];
				for (int i = 0; i < greyData.length; i++) {
					greyData[i] = (byte) ((((photodata[i] & 0x00ff0000) >> 16)
							* 19595 + ((photodata[i] & 0x0000ff00) >> 8)
							* 38469 + ((photodata[i] & 0x000000ff)) * 7472) >> 16);
				}

				Image barcode = new Image(W, H, "GREY");
				barcode.setData(greyData);
				ImageScanner scanner = new ImageScanner();
				int ret = scanner.scanImage(barcode);

				Log.e("zbh", "" + ret);
				if (ret != 0) {

					SymbolSet syms = scanner.getResults();
					String resultString = "";
					for (Symbol sym : syms) {
						resultString = "" + sym.getData();
						Log.e("zbh", "sym.getData()" + resultString);
					}
					if (null == resultString || resultString.equals("")) {

					} else {
						Bundle resultbundle = new Bundle();

						resultbundle.putByteArray(DecodeThread.BARCODE_BITMAP,
								Bitmap2Bytes(bitmap));

						inactivityTimer.onActivity();
						beepManager.playBeepSoundAndVibrate();
						Intent dataStr = new Intent();

						resultbundle.putInt("width", W);
						resultbundle.putInt("height", H);
						resultbundle.putString("result", resultString);
						dataStr.putExtra("data", resultbundle);
						setResult(Activity.RESULT_OK, dataStr);
						finish();
					}
				} else {
					// 解码失败
					Intent dataStr = null;
					setResult(Activity.RESULT_CANCELED, dataStr);
					finish();
				}
			}
		}
	}

	public byte[] Bitmap2Bytes(Bitmap bm) {
		ByteArrayOutputStream baos = new ByteArrayOutputStream();
		bm.compress(Bitmap.CompressFormat.PNG, 100, baos);
		return baos.toByteArray();
	}

	private Bitmap decodeUriAsBitmap(Uri uri){
	    Bitmap bitmap = null;
	    try {
	        bitmap = BitmapFactory.decodeStream(getContentResolver().openInputStream(uri));
	    } catch (FileNotFoundException e) {
	        e.printStackTrace();
	        return null;
	    }
	    return bitmap;
	}
增加两个变量:
private String IMAGE_FILE_LOCATION="file://"+Environment.getExternalStorageDirectory().getAbsolutePath()+"/temp.jpg";
Uri imageUri=Uri.parse(IMAGE_FILE_LOCATION);//The Uri to store the big bitmap
修改
// Intent intent = new Intent(Intent.ACTION_GET_CONTENT, null);
为 Intent intent = new Intent(Intent. ACTION_PICK , null );因为发现在 4.4 我的华为手机,老是提示 文件没找到 异常。 修改后正常。