Spring5学习笔记
文章目录
- 0. 简介
- 1. 第一个Spring工程
- 1.1 创建Spring工程
- 1.2 创建一个类User
- 1.3 通过配置文件创建类对象
- 1.3.1 创建XML配置文件
- 1.3.2 修改配置文件
- 1.4 编写测试代码
- 1.5 运行测试
- 2. IOC容器
- 2.1 什么是IOC?
- 2.2 IOC操作Bean管理操作
- 2.2.1 什么是Bean管理?
- 2.2.2 Bean管理操作的两种方式
- 2.2.3 基于XML配置文件方式
- 创建对象
- 注入属性
- 2.3 注入属性
- 2.3.1 使用set方法注入属性
- 2.3.2 使用有参构造方法注入属性
- 2.3.3 p名称空间注入
- 2.3.4 null值和特殊符号
- 2.3.5 注入外部bean属性
0. 简介
1. 第一个Spring工程
1.1 创建Spring工程
1.2 创建一个类User
1.3 通过配置文件创建类对象
1.3.1 创建XML配置文件
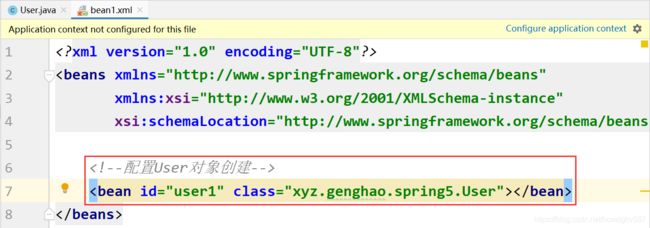
1.3.2 修改配置文件
1.4 编写测试代码
创建TestUser类,编写如下代码:
package xyz.genghao.spring5;

import org.junit.Test;
import org.springframework.context.ApplicationContext;
import org.springframework.context.support.ClassPathXmlApplicationContext;

public class TestUser {
    @Test
    public void testAdd() {
        // 1. 加载Spring配置文件
        ApplicationContext context = new ClassPathXmlApplicationContext("bean1.xml");

        // 2. 获取配置创建的对象
        User user = context.getBean("user1", User.class);

        // 3. 调用方法
        System.out.println(user);
        user.add();
    }
}
1.5 运行测试
2. IOC容器
2.1 什么是IOC?
控制反转(Inversion of Control),可以降低代码耦合度。把对象创建和对象之间的调用过程,交给Spring进行管理。第1章的入门案例就是IOC的实现。
IOC底层原理:XML解析、工厂模式、反射。
IOC思想基于IOC容器完成,IOC容器底层就是对象工厂。
Spring提供IOC容器实现的两种方式(两个接口):
- BeanFactory:IOC容器基本实现,是Spring内部的使用接口,不提供开发人员进行使用。
- ApplicationContext:BeanFactory接口的子接口,提供更多更强大的功能,一般由开发人员使用。
注:ApplicationContext加载配置文件的时候就会创建对象了,而BeanFactory要等到getBean()的时候才会创建。
2.2 IOC操作Bean管理操作
2.2.1 什么是Bean管理?
(1)Spring创建对象
(2)Spring注入属性
2.2.2 Bean管理操作的两种方式
(1)基于XML配置文件方式实现
(2)基于注解方式实现
2.2.3 基于XML配置文件方式
创建对象

见第一章。
(1)在Spring配置文件中,使用bean标签,标签里面添加对应属性,就可以实现对象创建。
(2)在bean标签里有很多属性,介绍常用的属性:
- id:对象的唯一标识。
- class:创建对象所在类的全路径。
- name(了解):与id基本相同,但是name中可以加特殊符号,id不可以。
(3)创建对象的时候,默认也是执行执行无参构造方法。
注入属性
(1)DI:依赖注入,即注入属性。
第一种注入方式:使用set方法进行注入。
第二种注入方式:使用有参构造方法注入。
public class Book {
    private String name;

    public Book(String name) {
        this.name = name;
    }

    public void setName(String name) {
        this.name = name;
    }
}
2.3 注入属性
2.3.1 使用set方法注入属性
创建一个Book类:
package xyz.genghao.spring5;

public class Book {
    private String name;
    private int price;

    public void setName(String name) {
        this.name = name;
    }

    public void setPrice(int price) {
        this.price = price;
    }

    @Override
    public String toString() {
        return name + price;
    }
}
注意:setName和setPrice方法是必须的!
编写Spring配置文件:
<beans xmlns="http://www.springframework.org/schema/beans"
       xmlns:xsi="http://www.w3.org/2001/XMLSchema-instance"
       xsi:schemaLocation="http://www.springframework.org/schema/beans http://www.springframework.org/schema/beans/spring-beans.xsd">


    <bean id="book" class="xyz.genghao.spring5.Book">
        <property name="name" value="哈利波特">property>
        <property name="price" value="998">property>
    bean>
beans>
编写测试类:
package xyz.genghao.spring5;

import org.junit.Test;
import org.springframework.context.ApplicationContext;
import org.springframework.context.support.ClassPathXmlApplicationContext;

public class TestUser {
    @Test
    public void testAdd() {
        // 1. 加载Spring配置文件
        ApplicationContext context = new ClassPathXmlApplicationContext("bean1.xml");

        // 2. 获取配置创建的对象
        Book book = context.getBean("book", Book.class);

        // 3. 调用toString方法
        System.out.println(book);
    }
}
2.3.2 使用有参构造方法注入属性
创建Book类:
package xyz.genghao.spring5;

public class Book {
    private String name;
    private int price;

    public Book(String name, int price) {
        this.name = name;
        this.price = price;
    }

    @Override
    public String toString() {
        return name + price;
    }
}
注:有参的构造器是必须的!
编写Spring配置文件:
<beans xmlns="http://www.springframework.org/schema/beans"
       xmlns:xsi="http://www.w3.org/2001/XMLSchema-instance"
       xsi:schemaLocation="http://www.springframework.org/schema/beans http://www.springframework.org/schema/beans/spring-beans.xsd">


    <bean id="book" class="xyz.genghao.spring5.Book">
        <constructor-arg name="name" value="火影忍者"/>
        <constructor-arg name="price" value="233"/>
    bean>
beans>
编写测试类:同上。
2.3.3 p名称空间注入
实际上是2.3.1节的简化。
XML文件如下:
<beans xmlns="http://www.springframework.org/schema/beans"
       xmlns:xsi="http://www.w3.org/2001/XMLSchema-instance"
       xmlns:p="http://www.springframework.org/schema/p"
       xsi:schemaLocation="http://www.springframework.org/schema/beans http://www.springframework.org/schema/beans/spring-beans.xsd">


    <bean id="book" class="xyz.genghao.spring5.Book" p:name="耿书" p:price="142857"/>
beans>
2.3.4 null值和特殊符号
<beans xmlns="http://www.springframework.org/schema/beans"
       xmlns:xsi="http://www.w3.org/2001/XMLSchema-instance"
       xmlns:p="http://www.springframework.org/schema/p"
       xsi:schemaLocation="http://www.springframework.org/schema/beans http://www.springframework.org/schema/beans/spring-beans.xsd">


    <bean id="book" class="xyz.genghao.spring5.Book">

        <property name="author">
            <null/>
        property>


        <property name="name" value="<象棋>"/>
    bean>
beans>
2.3.5 注入外部bean属性
创建两个类、一个接口:


编写XML:(显然,注入外部bean的关键在于ref属性)
<beans xmlns="http://www.springframework.org/schema/beans"
       xmlns:xsi="http://www.w3.org/2001/XMLSchema-instance"
       xmlns:p="http://www.springframework.org/schema/p"
       xsi:schemaLocation="http://www.springframework.org/schema/beans http://www.springframework.org/schema/beans/spring-beans.xsd">


    <bean id="userService" class="xyz.genghao.spring5.service.UserService">

        <property name="userDao" ref="userDao2">property>
    bean>

    <bean id="userDao2" class="xyz.genghao.spring5.dao.UserDaoImpl">bean>
beans>
编写测试代码并运行:
package xyz.genghao.spring5;

import org.junit.Test;
import org.springframework.context.ApplicationContext;
import org.springframework.context.support.ClassPathXmlApplicationContext;
import xyz.genghao.spring5.service.UserService;

public class TestUser {
    @Test
    public void testAdd() {
        // 1. 加载Spring配置文件
        ApplicationContext context = new ClassPathXmlApplicationContext("bean1.xml");

        // 2. 获取配置创建的对象
        UserService userService = context.getBean("userService", UserService.class);

        // 3. 调用方法
        userService.introduce();
    }
}


