Android自定义键盘之汉字键盘
一、软键盘介绍
实现软键盘主要用到了系统的两个类:Keyboard和KeyboardView。
Keyboard类源码的介绍是: Listener for virtual keyboard events.即用于监听虚拟键盘。
KeyboardView类源码的介绍是: A view that renders a virtual {@link Keyboard}. It handles rendering of keys and detecting key presses and touch movements.即它处理绘制键盘和检测按键和触摸动作。
它里面有很多方法,在我们自定义的软键盘很多属性,就需要我们用这个类来设置。比如:
keyboardView = (KeyboardView) act.findViewById(R.id.keyboard_view);
keyboardView.setKeyboard(k);
keyboardView.setEnabled(true);
keyboardView.setPreviewEnabled(true);
keyboardView.setVisibility(View.VISIBLE);
keyboardView.setOnKeyboardActionListener(listener);
了解一些源码,就可以是我们知道我们为什么要这样写,为什么要这样做了!
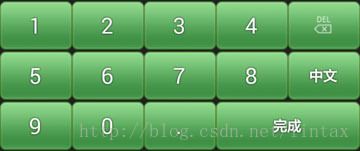
二、数字软键盘的布局
首先在res下新建xml文件夹,在xml文件夹中新建symbols.xml文件,这个布局文件主要是实现数字软键盘的布局,每一个按键都有一个codes值,在类中就是通过codes值来监听每一个按钮。
<Keyboard xmlns:android="http://schemas.android.com/apk/res/android"
    android:keyWidth="20%p" android:horizontalGap="0px"
    android:verticalGap="0px" android:keyHeight="@dimen/key_height">

    <Row>
        <Key android:codes="49" android:keyLabel="1" />
        <Key android:codes="50" android:keyLabel="2" />
        <Key android:codes="51" android:keyLabel="3" />
        <Key android:codes="52" android:keyLabel="4" />
        <Key android:codes="-5" android:keyIcon="@drawable/sym_keyboard_delete" />
    Row>

    <Row>
        <Key android:codes="53" android:keyLabel="5" />
        <Key android:codes="54" android:keyLabel="6" />
        <Key android:codes="55" android:keyLabel="7" />
        <Key android:codes="56" android:keyLabel="8" />
        <Key android:codes="-2" android:keyLabel="中文" />
    Row>

    <Row>
        <Key android:codes="57" android:keyLabel="9" />
        <Key android:codes="48" android:keyLabel="0" />
        <Key android:codes="46" android:keyLabel="." />
        <Key android:codes="-3" android:keyWidth="40%p"
            android:isRepeatable="true" android:keyLabel="完成" />
    Row>

Keyboard>在上面的键盘定义中,通过Keyboard说明是一个软键盘定义文件,Row元素说明这是一行按键的定义,Key元素说明这是一个按键的定义。Key元素通过一些属性来定义每个按键,下面是一些常用的属性介绍:
Codes:代表按键对应的输出值,可以为unicode值或者逗号(,)分割的多个值,也可以为一个字符串。在字符串中通过“\”来转义特殊字符,例如 ‘\n’ 或则 ‘\uxxxx’ 。Codes通常用来定义该键的键码,例如上图中的数字按键1对应的为49;如果提供的是逗号分割的多个值则和普通手机输入键盘一样在多个值之间切换。
keyLabel:代表按键显示的文本内容。
keyIcon:代表按键显示的图标内容,如果指定了该值则在显示的时候显示为图片不显示文本。
keyWidth:代表按键的宽度,可以为精确值或则相对值,对于精确值支持多种单位,例如:像素,英寸 等;相对值为相对于基础取值的百分比,为以% 或%p 结尾,其中%p表示相对于父容器。
keyHeight:代表按键的高度,取值同上。
horizontalGap:代表按键前的间隙(水平方向),取值同上。
isSticky:指定按键是否为sticky的。例如Shift大小写切换按键,具有两种状态,按下状态和正常状态,取值为true或者false。
isModifier:指定按键是否为功能键( modifier key ) ,例如 Alt 或者 Shift ,取值为true或false。
keyOutputText:指定按键输出的文本内容,取值为字符串。
isRepeatable:指定按键是否是可重复的,如果长按该键可以触发重复按键事件则为true,否则为false。
keyEdgeFlags:指定按键的对齐指令,取值为left或right。
我们在设置每一个按键的code时,就是根据keyboard类中定义的一些属性,比如回退,切换,完成等都是固定的。
  public static final int KEYCODE_SHIFT = -1;
  public static final int KEYCODE_MODE_CHANGE = -2;
  public static final int KEYCODE_CANCEL = -3;
  public static final int KEYCODE_DONE = -4;
  public static final int KEYCODE_DELETE = -5;
  public static final int KEYCODE_ALT = -6;
知道了这些,我们就不会有太多的疑惑了!也是说,我们自定义的每一个按键都将会有一个codes值,比如回退我们就写成:
<Key android:codes="-5" android:keyIcon="@drawable/sym_keyboard_delete" />在监听处就是:
if (primaryCode == Keyboard.KEYCODE_DELETE){}这就表示,监听回退事件了!
三、中文软键盘的布局
然后在xml文件夹中新建chinese.xml文件,这个布局文件主要是实现中文软键盘的布局,每一个按键都有一个codes值,这个codes就是一个汉字在utf16标准中的编码值。
查找汉字的编码,有两种方法:
1,直接查找utf16表,可以参考:http://blog.csdn.net/lintax/article/details/51866861
如果汉字个数比较多,需要将汉字与编码值一个个准确对应的键入xml中,也是一个挺费神的事情。
2,使用程序员的办法,用代码来帮我们实现:
//get the codes for xml
char c;
int i;
String[] strings = { "一", "二", "三", "四", "五", "六", "年", "级", "班", "."};
for(String str : strings){
c=str.toCharArray()[0];
i=c;
//xml中格式:+i+"\" android:keyLabel=\""+c+"\" />");
} 这样,就按照xml中的格式,写好了汉字与编码值的关联语句。
剩下还有一个小问题:在logcat的输出中,还有其他的信息,如时间、log等级等,如下:
07-16 18:20:12.220: I/key(5200): <Key android:codes="29677" android:keyLabel="班" />我们可以将logcat信息保存到文本文件中,使用一个文本编辑器将前面的不想要的信息(此处是“07-16 18:20:12.220: I/key(5200): ”)全部替换为8个空格即可。
为何是8个空格?是为了xml中的格式对齐。
最终,xml中文件内容如下:
<Keyboard android:keyWidth="25.000002%p" android:keyHeight="@dimen/key_height"
    android:horizontalGap="0.0px" android:verticalGap="0.0px"
    xmlns:android="http://schemas.android.com/apk/res/android">

    <Row>
        <Key android:codes="19968" android:keyLabel="一" />
        <Key android:codes="20108" android:keyLabel="二" />
        <Key android:codes="19977" android:keyLabel="三" />
        <Key android:codes="-5" android:isRepeatable="true"
            android:keyIcon="@drawable/sym_keyboard_delete" />
    Row>

    <Row>
        <Key android:codes="22235" android:keyLabel="四" />
        <Key android:codes="20116" android:keyLabel="五" />
        <Key android:codes="20845" android:keyLabel="六" />
        <Key android:codes="-2" android:keyLabel="数字" />
    Row>

    <Row>
        <Key android:codes="24180" android:keyLabel="年" />
        <Key android:codes="32423" android:keyLabel="级" />
        <Key android:codes="29677" android:keyLabel="班" />
        <Key android:keyWidth="25.000004%p" android:codes="-3"
            android:keyEdgeFlags="right" android:keyLabel="完成" />
    Row>

Keyboard>四、键盘事件处理
然后创建一个类,用于处理软键盘事件,文件名为KeyboardUtil.Java,里面主要完成几件事:
1,构造函数,2,键盘动作监听与处理;3,几个对外控制键盘显隐的接口;
首先定义构造函数:
public class KeyboardUtil {
    private Context ctx;
    private Activity act;
    private KeyboardView keyboardView;
    private Keyboard k1;// 中文键盘
    private Keyboard k2;// 数字键盘
    public boolean isNumber = false;// 是否数字键盘
    public boolean isUpper = false;// 是否大写
    private EditText ed;

    public KeyboardUtil(Activity act, Context ctx, EditText edit) {
        this.act = act;
        this.ctx = ctx;
        this.ed = edit;
        k1 = new Keyboard(ctx, R.xml.chinese);
        k2 = new Keyboard(ctx, R.xml.symbols);
        keyboardView = (KeyboardView) act.findViewById(R.id.keyboard_view);
        keyboardView.setKeyboard(k1);
        keyboardView.setEnabled(true);
        keyboardView.setPreviewEnabled(true);
        keyboardView.setOnKeyboardActionListener(listener);
    }
然后是最核心的键盘动作监听,在这里我只展示了最核心的onKey(),完整的代码,请参考文末的demo。onKey()中首先是处理了几个特殊键,有“完成”、“删除”、数字与汉字的切换键。另外,就是字符的键入处理了,代码如下:
    private OnKeyboardActionListener listener = new OnKeyboardActionListener() {

        @Override
        public void onKey(int primaryCode, int[] keyCodes) {
            Editable editable = ed.getText();
            int start = ed.getSelectionStart();
            if (primaryCode == Keyboard.KEYCODE_CANCEL) {//完成
                hideKeyboard();
            } else if (primaryCode == Keyboard.KEYCODE_DELETE) {//回退
                if (editable != null && editable.length() > 0) {
                    if (start > 0) {
                        editable.delete(start - 1, start);
                    }
                }
            } else if (primaryCode == Keyboard.KEYCODE_MODE_CHANGE) {//数字键盘切换
                if (isNumber) {
                    isNumber = false;
                    keyboardView.setKeyboard(k1);
                } else {
                    isNumber = true;
                    keyboardView.setKeyboard(k2);
                }
            } else {
                editable.insert(start, Character.toString((char) primaryCode));
            }
        }
    };
另外还有几个函数,是对外的接口,控制键盘的显示与隐藏,已经控制显示哪种键盘,是显示汉字键盘,还是数字键盘。
    public void showKeyboard() {
        int visibility = keyboardView.getVisibility();
        if (visibility == View.GONE || visibility == View.INVISIBLE) {
            keyboardView.setVisibility(View.VISIBLE);
        }
    }

    public void hideKeyboard() {
        int visibility = keyboardView.getVisibility();
        if (visibility == View.VISIBLE) {
            keyboardView.setVisibility(View.INVISIBLE);
        }
    }

    public void showChinese() {
        showKeyboard();
        isNumber = false;
        keyboardView.setKeyboard(k1);
    }

    public void showNumber() {
        showKeyboard();
        isNumber = true;
        keyboardView.setKeyboard(k2);
    }
}
五、主界面布局
接下来就是实现activity的视图布局文件了,文件名为main.xml,主体部分就是两个EditText,一个用于输入班级(汉字),一个用于输入分数(数字)。另外就是我们自定义的KeyboardView了,默认为隐藏的,在我们点击文本输入框时,会显示出来。按照一般的输入习惯,将键盘放于界面的底部。
内容如下:
    <LinearLayout
        android:id="@+id/ll_content"
        android:layout_width="fill_parent"
        android:layout_height="wrap_content"
        android:layout_below="@id/ll_hint"
        android:layout_marginTop="10dp"
        android:orientation="horizontal" >

        <EditText
            android:id="@+id/edit_class"
            android:layout_width="0dp"
            android:layout_height="wrap_content"
            android:layout_weight="1"
            android:hint="请输入班级" />

        <EditText
            android:id="@+id/edit_score"
            android:layout_width="0dp"
            android:layout_height="wrap_content"
            android:layout_weight="1"
            android:hint="请输入分数" />
    LinearLayout>

    <RelativeLayout
        android:layout_width="fill_parent"
        android:layout_height="wrap_content" >

        <android.inputmethodservice.KeyboardView
            android:id="@+id/keyboard_view"
            android:layout_width="fill_parent"
            android:layout_height="wrap_content"
            android:layout_alignParentBottom="true"
            android:background="@color/lightblack"
            android:focusable="true"
            android:focusableInTouchMode="true"
            android:keyBackground="@drawable/btn_keyboard_chinese"
            android:keyTextColor="@color/white"
            android:visibility="gone" />
    RelativeLayout>
六、主类的实现
最后就是在要执行的activity中,添加一些代码就行了,剩下的就和其他控件使用方式一样了,类名为KeydemoActivity.java,内容如下:
public class KeydemoActivity extends Activity {
    private Context ctx;
    private Activity act;
    private EditText edit_class, edit_score;
    @Override
    public void onCreate(Bundle savedInstanceState) {
        super.onCreate(savedInstanceState);
        setContentView(R.layout.main);
        edit_class = (EditText) this.findViewById(R.id.edit_class);
        edit_score = (EditText) this.findViewById(R.id.edit_score);

        //禁止弹出系统默认的软键盘
        if (android.os.Build.VERSION.SDK_INT <= 10) {
            edit_class.setInputType(InputType.TYPE_NULL);
        } else {
            this.getWindow().setSoftInputMode
(WindowManager.LayoutParams.SOFT_INPUT_STATE_ALWAYS_HIDDEN);
            try {
                Class cls = EditText.class;
                Method setSoftInputShownOnFocus;
                setSoftInputShownOnFocus = cls.getMethod("setShowSoftInputOnFocus", boolean.class);
                setSoftInputShownOnFocus.setAccessible(true);
                setSoftInputShownOnFocus.invoke(edit_class, false);
                setSoftInputShownOnFocus.invoke(edit_score, false);
            } catch (Exception e) {
                e.printStackTrace();
            }
        }

        //设置监听动作,弹出自定义键盘
        ctx = this;
        act = this;
        edit_class.setOnTouchListener(new OnTouchListener() {
            @Override
            public boolean onTouch(View v, MotionEvent event) {
                new KeyboardUtil(act, ctx, edit_class).showChinese();
                return false;
            }
        });
        edit_score.setOnTouchListener(new OnTouchListener() {
            @Override
            public boolean onTouch(View v, MotionEvent event) {
                new KeyboardUtil(act, ctx, edit_score).showNumber();
                return false;
            }
        });
    }
} 七、demo地址
http://download.csdn.net/detail/lintax/9577994
八、参考
http://blog.csdn.net/hfsu0419/article/details/7924673
http://blog.csdn.net/acrambler/article/details/13213181


