话说程序员有三大浪漫,操作系统、编译原理和计算机图形学。这里称作计算机图形学,而不是图形学,是为了避免歧义。
opengl是干什么的,可以自行google。这里仅作为一个学习里程中的记录。不作为权威指南。
入门教程参见,https://learnopengl-cn.readthedocs.io/zh/latest/01%20Getting%20started/02%20Creating%20a%20window/
opengl的环境配置可以见,https://zhuanlan.zhihu.com/p/23226676?utm_medium=social&utm_source=qq,谢谢大神分享。
本是在windows10, visual studio2015的环境下运行。顺便提一句,windows10自带opengl库,即包含了opengl32.lib。下面上代码。
shader.vs 顶点着色器代码
#version 330 core
layout (location = 0) in vec3 position;//in 代表输入向量, location,与下面的顶点属性描述有关。
layout (location = 1) in vec3 color;

out vec3 ourColor;//out 代表输出3维向量,作为片段着色器的输入,见下文

void main()
{
    gl_Position = vec4(position, 1.0f);
    ourColor = color;
}
shader.frag 片段着色器代码
#version 330 core
in vec3 ourColor;
out vec4 color;

void main()
{
    color = vec4(ourColor, 1.0f);
}
main.cpp
#include// GLEW #define GLEW_STATIC #include // GLFW #include // Other includes #include "Shader.h" // Function prototypes void key_callback(GLFWwindow* window, int key, int scancode, int action, int mode); // Window dimensions const GLuint WIDTH = 800, HEIGHT = 600;
// The MAIN function, from here we start the application and run the game loop int main() { // Init GLFW glfwInit(); // Set all the required options for GLFW glfwWindowHint(GLFW_CONTEXT_VERSION_MAJOR, 3); glfwWindowHint(GLFW_CONTEXT_VERSION_MINOR, 3); glfwWindowHint(GLFW_OPENGL_PROFILE, GLFW_OPENGL_CORE_PROFILE); glfwWindowHint(GLFW_RESIZABLE, GL_FALSE); // Create a GLFWwindow object that we can use for GLFW's functions GLFWwindow* window = glfwCreateWindow(WIDTH, HEIGHT, "LearnOpenGL", nullptr, nullptr); glfwMakeContextCurrent(window); // Set the required callback functions glfwSetKeyCallback(window, key_callback); // Set this to true so GLEW knows to use a modern approach to retrieving function pointers and extensions glewExperimental = GL_TRUE; // Initialize GLEW to setup the OpenGL Function pointers glewInit(); // Define the viewport dimensions glViewport(0, 0, WIDTH, HEIGHT); //读取shader文件,并编译,见shader.h代码 Shader ourShader("C:\\Users\\leng\\Desktop\\shader.vs", "C:\\Users\\leng\\Desktop\\shader.frag"); // 一维数组,每六个代表一个顶点属性,前三个代表位置属性,后三个代表颜色属性 GLfloat vertices[] = { // Positions // Colors 0.5f, -0.5f, 0.0f, 1.0f, 0.0f, 0.0f, // Bottom Right -0.5f, -0.5f, 0.0f, 0.0f, 1.0f, 0.0f, // Bottom Left 0.0f, 0.5f, 0.0f, 0.0f, 0.0f, 1.0f // Top }; GLuint VBO, VAO;//声明顶点缓冲,声明顶点数组用于管理顶点数据 glGenVertexArrays(1, &VAO);//创建顶点数组,返回一个独一无二的整数,标识数组 glGenBuffers(1, &VBO);//创建顶点缓冲,返回一个独一无二的整数,标识缓冲区 glBindVertexArray(VAO);//绑定顶点数组 glBindBuffer(GL_ARRAY_BUFFER, VBO);//绑定顶点缓冲
//指定顶点数组的数据源为vertices,第四个参数代表显卡如何管理给定的数据,GL_STATIC_DRWA代表几乎不会改变 glBufferData(GL_ARRAY_BUFFER, sizeof(vertices), vertices, GL_STATIC_DRAW); // 指定顶点属性的解析方式。即,如何从顶点缓冲获取相应的顶点属性和相应的颜色属性。或者说,顶点着色器中如何知道去哪个顶点属性分量重着色呢
//对每一个顶点而言,属性有2种,一是位置属性,而是颜色属性,因此每六个浮点数决定了一个顶点的位置和颜色
//顶点着色器中使用layout(location = 0)定义了position顶点属性的位置值(Location),因此第一个参数,代表属性分量的索引
//参数二:顶点位置属性的维度,参数三:属性向量的数据类型,参数四:是否标准化;参数五,顶点位置属性的总字节长度,参数六:在缓冲数组中的偏移量,即起始位置 glVertexAttribPointer(0, 3, GL_FLOAT, GL_FALSE, 6 * sizeof(GLfloat), (GLvoid*)0); glEnableVertexAttribArray(0);//启用属性0,因为默认是禁用的
// 参数一,对应顶点着色器中的layout (location = 1) in vec3 color;参数六:说明颜色属性的偏移量在三个浮点数后,与上文vertices一致 glVertexAttribPointer(1, 3, GL_FLOAT, GL_FALSE, 6 * sizeof(GLfloat), (GLvoid*)(3 * sizeof(GLfloat))); glEnableVertexAttribArray(1);//启用属性1.
//顶点数组对象(Vertex Array Object, VAO)的好处就是,当配置顶点属性指针时,你只需要将上面的代码调用执行一次,之后再绘制物体的时候只需要绑定相应的VAO就行了。如下文循环中的绑定再解绑 glBindVertexArray(0); // 解绑 VAO // Game loop while (!glfwWindowShouldClose(window)) { // 检查事件,调用相应的回调函数,如下文的key_callback函数 glfwPollEvents(); // Render // Clear the colorbuffer glClearColor(0.2f, 0.3f, 0.3f, 1.0f);//渲染颜色到后台缓冲 glClear(GL_COLOR_BUFFER_BIT);//清除前台缓冲 // Draw the triangle ourShader.Use();//启用着色器程序 glBindVertexArray(VAO);//每次循环都调用,绑定函数绑定VAO glDrawArrays(GL_TRIANGLES, 0, 3); glBindVertexArray(0);//解绑 // Swap the screen buffers glfwSwapBuffers(window); } // Properly de-allocate all resources once they've outlived their purpose glDeleteVertexArrays(1, &VAO); glDeleteBuffers(1, &VBO); // Terminate GLFW, clearing any resources allocated by GLFW. glfwTerminate(); return 0; } // Is called whenever a key is pressed/released via GLFW void key_callback(GLFWwindow* window, int key, int scancode, int action, int mode) { if (key == GLFW_KEY_ESCAPE && action == GLFW_PRESS) glfwSetWindowShouldClose(window, GL_TRUE); }
Shader.h 从文件中读取着色器代码,并编译。
#ifndef SHADER_H #define SHADER_H #include <string> #include#include #include #include class Shader { public: GLuint Program; // Constructor generates the shader on the fly Shader(const GLchar* vertexPath, const GLchar* fragmentPath) { // 1. Retrieve the vertex/fragment source code from filePath std::string vertexCode; std::string fragmentCode; std::ifstream vShaderFile; std::ifstream fShaderFile; // ensures ifstream objects can throw exceptions: vShaderFile.exceptions(std::ifstream::badbit); fShaderFile.exceptions(std::ifstream::badbit); try { // Open files vShaderFile.open(vertexPath); fShaderFile.open(fragmentPath); std::stringstream vShaderStream, fShaderStream; // Read file's buffer contents into streams vShaderStream << vShaderFile.rdbuf(); fShaderStream << fShaderFile.rdbuf(); // close file handlers vShaderFile.close(); fShaderFile.close(); // Convert stream into string vertexCode = vShaderStream.str(); fragmentCode = fShaderStream.str(); } catch (std::ifstream::failure e) { std::cout << "ERROR::SHADER::FILE_NOT_SUCCESFULLY_READ" << std::endl; } const GLchar* vShaderCode = vertexCode.c_str(); const GLchar * fShaderCode = fragmentCode.c_str(); // 2. Compile shaders GLuint vertex, fragment; GLint success; GLchar infoLog[512]; // Vertex Shader vertex = glCreateShader(GL_VERTEX_SHADER);//创建顶点着色器 glShaderSource(vertex, 1, &vShaderCode, NULL);//指定源代码 glCompileShader(vertex);//编译着色器 // Print compile errors if any glGetShaderiv(vertex, GL_COMPILE_STATUS, &success);//查看是否编译成功 if (!success) { glGetShaderInfoLog(vertex, 512, NULL, infoLog); std::cout << "ERROR::SHADER::VERTEX::COMPILATION_FAILED\n" << infoLog << std::endl; } // Fragment Shader fragment = glCreateShader(GL_FRAGMENT_SHADER);//创建片段着色器 glShaderSource(fragment, 1, &fShaderCode, NULL); glCompileShader(fragment); // Print compile errors if any glGetShaderiv(fragment, GL_COMPILE_STATUS, &success); if (!success) { glGetShaderInfoLog(fragment, 512, NULL, infoLog); std::cout << "ERROR::SHADER::FRAGMENT::COMPILATION_FAILED\n" << infoLog << std::endl; } // Shader Program this->Program = glCreateProgram();//创建着色程序 glAttachShader(this->Program, vertex);//关联顶点着色器 glAttachShader(this->Program, fragment);//关联片段着色器 glLinkProgram(this->Program);//链接编译器 // Print linking errors if any glGetProgramiv(this->Program, GL_LINK_STATUS, &success); if (!success) { glGetProgramInfoLog(this->Program, 512, NULL, infoLog); std::cout << "ERROR::SHADER::PROGRAM::LINKING_FAILED\n" << infoLog << std::endl; } // Delete the shaders as they're linked into our program now and no longer necessery glDeleteShader(vertex); glDeleteShader(fragment); } // Uses the current shader void Use() { glUseProgram(this->Program); } }; #endif
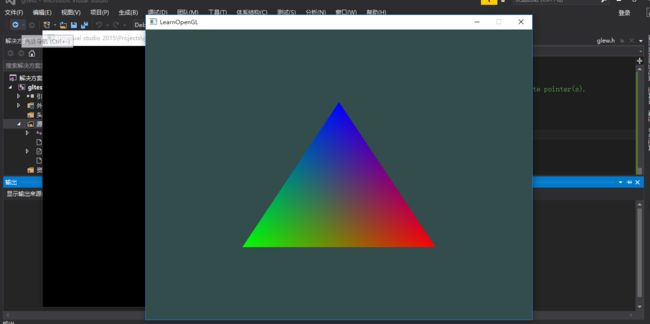
最后附上,运行图片
