springboot-study
目录
Springboot 优点
SpringBoot的核心功能
入门程序
Starter Pom
全局配置文件
获取自定义配置的值
通过@Value映射
使用@ConfigurationProperties赋值给实体类
profile 配置文件
整合测试
扫描包,启动项目
controller 和 Restcontroller
把工程设置为开发模式
访问静态资源
自定义消息转换器
Json解析
整合mybatis
resultType 和 resultMap的区别
注解方式整合Mybatis
mybatis动态SQL
集成Junit进行测试
集成Spring Data JPA
JPA相关注解
整合Redis
Springboot 优点
- 为基于Spring的开发提供更快的入门体验
- 开箱即用,没有代码生成,也无需XML配置。同时也可以修改默认值来满足特定的需求
- 提供了一些大型项目中常见的非功能性特性,如嵌入式服务器、安全、指标,健康检测、外部配置等
- SpringBoot不是对Spring功能上的增强,而是提供了一种快速使用Spring的方式
SpringBoot的核心功能
- 起步依赖
起步依赖本质上是一个Maven项目对象模型(Project Object Model,POM),定义了对其他库的传递依赖,这些东西加在一起即支持某项功能。 - 自动配置
Spring Boot的自动配置是一个运行时(更准确地说,是应用程序启动时)的过程,考虑了众多因素,才决定Spring配置应该用哪
以上原文链接:https://blog.csdn.net/qq_36821220/article/details/102674358.
入门程序
helloword报错,页面显示不出来,是因为在pom.xml中引入了security依赖
pom.xml中配置信息
···
	org.springframework.boot
	spring-boot-starter-parent
	2.2.0.RELEASE


		org.springframework.boot
		spring-boot-starter-web
···
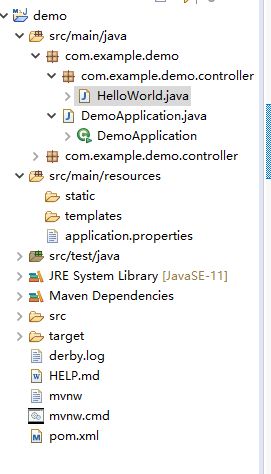
编写一个HelloWorld
// HelloWorld.java
@Controller
public class HelloWorld {
	@RequestMapping("/")
	@ResponseBody
	public String say() {
		return "Hello World";
	}

}
//DemoApplication.java
//入口
@SpringBootApplication
public class DemoApplication {
//入口
	public static void main(String[] args) {
		SpringApplication.run(DemoApplication.class, args);
	}
在入口中点击导航的小蜘蛛图标
下方cosole控制台中显示如下图,则表明开启成功
//启用自动配置
@EnableAutoConfiguration
Starter Pom
Starter Poms是可以包含到应用中的一个方便的依赖关系描述符集合。可以获取所有Sping及相关技术得意展会服务,不需要拷贝大量依赖关系代码。
staters遵循一个相似的命名模式:spring-bbot-starter-*
例如
一些常见的依赖
- spring-boot-starter:核心Spring Boot starter,包括自动配置支持,日志和YAML
- spring-boot-starter-data-jpa:对”Java持久化API”的支持,包括spring-data-jpa,spring-orm和Hibernate
- spring-boot-starter-thymeleaf:对Thymeleaf模板引擎的支持,包括和Spring的集成
- spring-boot-starter-web :对全栈web开发的支持,包括Tomcat和spring-webmvc
全局配置文件
必须写在application.文件中,放在resources文件下
以修改配置默认端口号和路径为例
- 通过application.properties
server.port=8088
server.context-path=/hello
- 通过application.yml
- 注意:冒号
:后面必须有一个空格
server:
  port: 8088
  context-path: /hello
再次访问时,访问 localhost:8088/hello.
- yml配置数组数据
#配置数据、集合(配置普通字符串)
city:
	- beijing
	- tianjin
	- shanghai
	-
#city: [beijing,tianjin,shanghai]

#配置对象集合数据
student:
	- name: tom
	  age: 18
	- name: lucy
	  sg2:19
#student: [{name: tom,age: 18},{name: lucy,age: 19}]
先加载yml文件,在加载properties
获取自定义配置的值
通过@Value映射
- 在source包下的application.yml下写自定义配置文件(以yml为例,也可以写在application.properties里)
book:
  author:gsy
  name:springboot
- 配置文件的内容之后,获取值有两种方法
- 写在controller中
@Controller
public class BookController {

	//获取值
	@Value("${book.author}")
	private String author;

	@Value("${book.name}")
	private String name;

	@RequestMapping("/book")
	@ResponseBody
	public String say() {
		return author+":"+name;
	}


}
使用@ConfigurationProperties赋值给实体类
- 创建实体类
//把普通pojo实例化到spring容器中,相当于配置文件中的- controller中
@Controller
public class BeanController {
//	自动注入
	@Autowired
	private BookDao bookDao;
	@RequestMapping("/a")
	public String getBook() {
		return bookDao.getAuthor()+":"+bookDao.getName();
	}
profile 配置文件
profile是针对不同环境(开发测试生产)对不同的配置进行支持。
例如在sources下palication-dev.properties代表开发环境下的配置文件palication-sit.properties代表测试环境下的配置文件palication-prod.properties代表生产环境下的配置文件
如何使用呢?
需要创建一个全局的配置文件 Application.properties
在里面通过写入spring.profiles.active=dev来告诉使用的配置文件是开发环境下的。
整合测试
测试“Hello”输出是否正确
@Controller
public class TestController {
	@RequestMapping("/test")
	@ResponseBody
	public String yes() {
		return "Hello";
	}
}
在src\test\java中进行测试
/指明要测试谁
@SpringBootTest(classes = Test.class)
//指明进行测试的类是谁
@RunWith(SpringJUnit4ClassRunner.class)
//和web的整合
@WebAppConfiguration
public class TestHello {

//	注入Test对象
	@Autowired
	private TestController testController;
//断言测试
	@Test
	public void testh() {
		TestCase.assertEquals(this.testController.yes(), "Hello");
	}

}
在测试方法中右键testh选择Run As -> JUnit Test
扫描包,启动项目
@SpringBootApplication = @EnableAutoConfiguration+ @ComponentScan("com.example.test.controller")
//默认情况下扫描的都是当前包及当前包的子包
//组合注解
@SpringBootApplication(scanBasePackageClasses = {"com.example.test.controller"})
//如果是子包,就不用指定包名

//@EnableAutoConfiguration
//指明controller所在的包,进行扫描
//@ComponentScan("com.example.test.controller")
public class TestApplication {

	public static void main(String[] args) {
		SpringApplication.run(TestApplication.class, args);
	}
controller 和 Restcontroller
//如果每个功能返回的都是Restfull内容,那么可以使用该注解
@RestController
//@Controller
public class TestController {
	@RequestMapping("/test")
//	返回的是Restful,不使用该注解跳转
//	@ResponseBody
	public String yes() {
		return "Hello";
	}

	@RequestMapping("/ok")
//	@ResponseBody
	public String ok() {
		return "ok";
	}
}
什么是Restfull?
见连接https://www.cnblogs.com/potato-chip/p/9031808.html.
- 支持Rest风格
//	支持Rest风格
	@RequestMapping("/info/{msg}")
//	@PathVariable 负责把url中输入的msg传进参数
	public String showInfo(@PathVariable String msg) {
		return "show" + msg;
	}
在浏览器中输入localhost:8080/info/haha.
看到页面显示 showhaha
把工程设置为开发模式
只需要在pom.xml添加下列依赖
      org.springframework
      springloaded


      org.springframework.boot
      spring-boot-devtools
访问静态资源
静态资源放到这几个目录下,springboot会自动扫描到
- “classpath:/META-INF/resources/”,
- “classpath:/resources/”,
- “classpath:/static/”,
- “classpath:/public/”
- “/”:当前项目的根路径
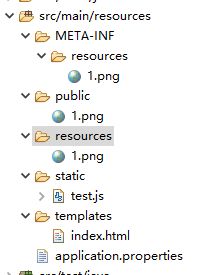
一般static文件中方js,css,图片,templates存放html页面
访问 http://localhost:8080/1.png.会出现图片
但是如果访问 http://localhost:8080/index.html.会出现如下页面
我在我的controller类里进行修改,在tenplates中新建一个login.html
@Controller
public class HelloWorld {
	@RequestMapping("/login")
	// @ResponseBody
	public String login() {
		return "index";
	}
	@RequestMapping("/")
	public String index() {
	    return "index";
	}

}
注:@ResponseBody 返回的是json,如果想输入http://localhost:8080/login.
进入login.html界面,需要去掉@ResponseBody 这个注解
此时访问http://localhost:8080/.会出现在index.html中写入的内容。
这一系列的访问似乎没有在访问的时候写static,resources这些文件路径,这是为什么呢?
在访问源码之前,我们先看一下自定义文件夹访问静态资源的方式
@Configuration
public class WebConfigurer extends WebMvcConfigurerAdapter{
    @Override
    public void addResourceHandlers(ResourceHandlerRegistry registry) {
        registry.addResourceHandler("/test/**").addResourceLocations("classpath:/templates/");
        super.addResourceHandlers(registry);
    }

}
之后再访问 http://localhost:8080/test/login.html.会显示login页面的内容
不难看出,addResourceHandler("/test/**")提供资源访问路径,addResourceLocations(“classpath:/templates/”);是本地项目路径
=查看源码
具体介绍看原文链接 https://blog.csdn.net/qq_34797335/article/details/80194137.
#配置静态资源访问路径
spring.resources.static-locations=classpath:/META-INF/resources/,classpath:/resources/,classpath:/static/,classpath:/public/,classpath:/templates/
自定义消息转换器
springboot已经做默认处理了,默认配置了消息转换器。
//    定义消息转换器
    @Bean
    public StringHttpMessageConverter stringHttpMessageConverter() {
        StringHttpMessageConverter convert = new StringHttpMessageConverter(Charset.forName("UTF-8"));
        return convert;
    }
@Bean一定要加上,这样springboot才能识别
Json解析
在springboot中,默认配置Jackson.
需要包:
jackson-core-2.2.3.jar(核心jar包)
jackson-annotations-2.2.3.jar(该包提供Json注解支持)
jackson-databind-2.2.3.jar
原文章连接链接: https://www.jianshu.com/p/3931b3b6e7b6.
实现使用FastJson解析Json数据
- 将FastJson的依赖放到pom.xml中
//FastJson依赖

            com.alibaba
            fastjson
           //注意版本号
            1.2.15
- 在dao中创建Person实体类
package com.example.demo.dao;

import java.sql.Date;

public class Person {
    private int id;
    private String name;
    private Date date;
    public int getId() {
        return id;
    }
    public void setId(int id) {
        this.id = id;
    }
    public String getName() {
        return name;
    }
    public void setName(String name) {
        this.name = name;
    }
    public Date getDate() {
        return date;
    }
    public void setDate(Date date) {
        this.date = date;
    }


}
- 在controller类里返回实体类对象
@Controller
public class PersonController {

//    @Autowired
//    private Person person;
    @RequestMapping("/person")
    @ResponseBody
    public Object show() {
        Person person = new Person();
        person.setId(666);
       person.setName("gsy");
       person.setDate(new Date());
       return person;

    }
- 配置FastJson有两种方式
- 第一种是让启动类继承WebMvcControllerAdapter
SpringBootApplication
public class DemoApplication extends WebMvcConfigurerAdapter{
//    重写里面的方法
//    注意重写的是configureMessageConverters这个方法
@Override
   public void configureMessageConverters(List> converters) {
//        创建FastJson的消息转换器
       FastJsonHttpMessageConverter convert = new FastJsonHttpMessageConverter();
//        创建FastJson的配置对象
       FastJsonConfig config = new FastJsonConfig();
//        对Json数据格式化
       config.setSerializerFeatures(SerializerFeature.PrettyFormat);
//        把配置对象给converter转换器
       convert.setFastJsonConfig(config);
//        把convert加到converters集合里
       converters.add(convert);


   }
在浏览器输入 http://localhost:8080/person.
结果:
{ “date”:1571903802600, “id”:666, “name”:“鑰侀儹” }
出现乱码
解决办法:
在全局配置文件application.properties中加入spring.http.encoding.force=true就会变成正常汉字
{ “date”:1571903933576, “id”:666, “name”:“老郭” }
//    规定日期格式
    @JSONField(format = "yyy-MM-dd HH")
{ “date”:“2019-10-24 17”, “id”:666, “name”:“老郭” }
- 第二种是通过@Bean写一个HttpMessageConverter类型的转换器
public class DemoApplication{
    @Bean
    public HttpMessageConverters fastJsonMessageConverter(){
//      创建FastJson的消息转换器
      FastJsonHttpMessageConverter convert = new FastJsonHttpMessageConverter();
//      创建FastJson的配置对象
      FastJsonConfig config = new FastJsonConfig();
//      对Json数据格式化
      config.setSerializerFeatures(SerializerFeature.PrettyFormat);
//      把配置对象给converter转换器
      convert.setFastJsonConfig(config);
      HttpMessageConverter con = convert;
      return new HttpMessageConverters(con);

    }
整合mybatis
用的数据库是h2数据库,具体使用方法见https://jingyan.baidu.com/article/c275f6ba607282e33d756784.html.
- 导入依赖
			org.mybatis.spring.boot
			mybatis-spring-boot-starter
			1.1.1


            com.alibaba
            druid
           1.0.25


            junit
            junit
            3.8.1
            test


            com.h2database
            h2
            runtime
- application.yml中配置数据库信息
server:
    port: 8080
spring:
    jpa:
        database: h2
        show-sql: true
        generate-ddl: false
        hibernate:
            ddl-auto: none
    #主要部分
    datasource:
        url: jdbc:h2:mem:test;DB_CLOSE_DELAY=-1
        driver-class-name: org.h2.Driver
        username: sa
        password: 123456
    h2:
        console:
            path: /h2-console
            enabled: true
- h2数据源配置
#配置数据库信息
server:
   port: 8080
spring:
   jpa:
       database: h2
       show-sql: true
       generate-ddl: false
       hibernate:
           ddl-auto: none
   datasource:
       url: jdbc:h2:file:C:/H2/mybatis
       driver-class-name: org.h2.Driver
       username: sa
       password: 123456
   h2:
       console:
           path: /h2-console
           enabled: true
- mysql druid数据源配置https://www.jb51.net/article/136513.htm.
- 创建表数据
DROP TABLE IF EXISTS user;
CREATE TABLE user(ID INT PRIMARY KEY,
   username VARCHAR(255),
    password VARCHAR(255));
INSERT INTO user VALUES(1, 'lily','123');
INSERT INTO user VALUES(2, 'tom','456');
- 创建User类
package com.example.test.domain;

public class User {
    private Integer id;
    private String username;
    private String password;
    public Integer getId() {
        return id;
    }
    public void setId(Integer id) {
        this.id = id;
    }
    public String getUsername() {
        return username;
    }
    public void setUsername(String username) {
        this.username = username;
    }
    public String getPassword() {
        return password;
    }
    public void setPassword(String password) {
        this.password = password;
    }
    @Override
    public String toString() {
        return "User [id=" + id + ", username=" + username + ", password=" + password + "]";
    }
}
- 在sources下创建UserMapper.xml
/
- 创建UserMapper接口
package com.example.test.mapper;

import java.util.List;

import org.apache.ibatis.annotations.Mapper;

import com.example.test.domain.User;

@Mapper
public interface UserMapper {
    public List queryUserList();

}
#配置mybatis信息
#spring集成mybatis环境
#pojo别名扫描包
mybatis:
    type-aliases-package: com.example.test.domian
    #加载mybatis映射文件
    #UserMapper.xml建在了mapper下
    mapper-locations: classpath:mapper/UserMapper.xml
- 在Controller中写入
@Controller
public class TestController {
    @Autowired
    UserMapper userMapper
    @RequestMapping("/test")
    @ResponseBody
    public List queryUserList(){
        List users = userMapper.queryUserList();
        return users;
    }
- 启动项目
报错:
org.apache.ibatis.binding.BindingException: Invalid bound statement (not found): com.example.test.mapper.UserMapper.queryUserList - 解决问题
是因为在写UserMapper.xml配置的时候,映射不到UserMapper,并且Mybtis依赖导入有问题
一定要检查好namespace和id和resultType对应的包名是否一致
//namespace必须是全包名
//resultType也必须到包名
			org.mybatis.spring.boot
			mybatis-spring-boot-starter
			1.1.1
resultType 和 resultMap的区别
原文章链接链接: https://www.cnblogs.com/coder-lzh/p/8960928.html.
- resultType适用于单表查询。
- resultType于SQL语句查询出的字段在相应的pojo中必须有和它相同的字段对应,比如说 cId和c_id 这种的都不能映射。
- resultMap适用于单表查询和关联查询
- resultMap配置一下,表和类的一一对应关系,所以说就算你的字段名和你的实体类的属性名不一样也没关系,都会给你映射出来。
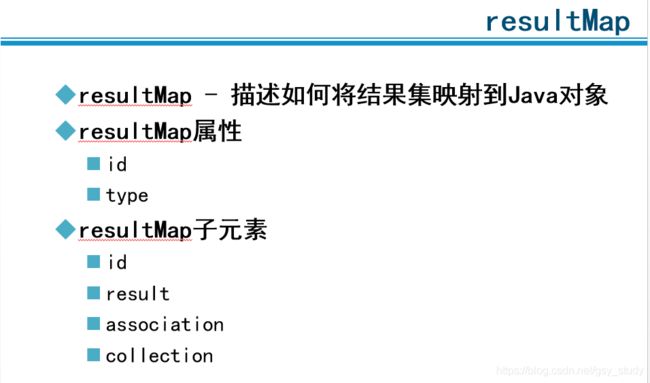
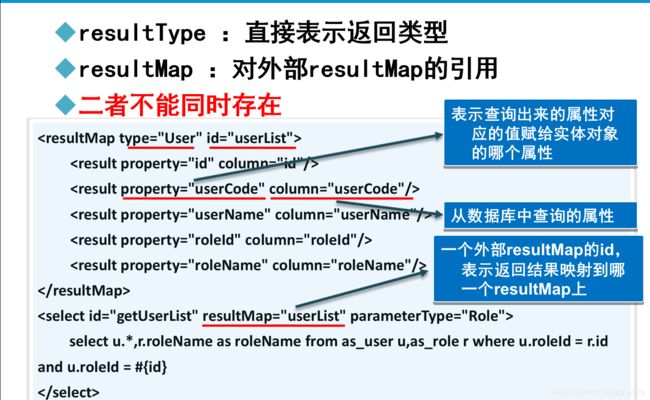
- resultMap的单表查询,当使用resultMap做SQL语句返回结果类型处理时,通常需要在mapper.xml中定义resultMap进行pojo和相应表字段的对应。
- 关联查询(一对一),resultMap对于一对一表连接的处理方式通常为在主表的pojo中添加嵌套另一个表的pojo,然后在mapper.xml中采用association节点元素进行对另一个表的连接处理。
- 关联查询(一对多):resultMap的处理方式为在订单表数据的pojo中添加一个list,list中为订单明细表的属性,在mapper.xml中采用如下的处理方式:
-- 订单及订单明细的resultMap
    使用extends继承,不用在中配置订单信息和用户信息的映射
     -->
注解方式整合Mybatis
@Select("select * from users where id=#{id}")
mybatis动态SQL
见原文链接https://www.cnblogs.com/ysocean/p/7289529.html
集成Junit进行测试
- 添加Junit起步依赖
            org.springframework.boot
            spring-boot-starter-test
            test


                    org.junit.vintage
                    junit-vintage-engine
- 在test下新建测试类
//用谁去执行
@RunWith(SpringRunner.class)
//引导类字节码,引导启动入口
@SpringBootTest(classes = TestApplication.class)
public class MybatisTest {
//    注入要测试的
    @Autowired
    private UserMapper userMapper;

    @Test
    public void test() {
        List users = userMapper.queryUserList();
        System.out.println(users);
    }

}
集成Spring Data JPA
- jpa起步依赖,h2数据库依赖
			org.springframework.boot
			spring-boot-starter-data-jpa


			com.h2database
			h2
			runtime
- 在application.yml中配置书库信息和jpa相关属性
server:
    port: 8080
spring:
    jpa:
        database: h2
        show-sql: true
        generate-ddl: false
        hibernate:
            ddl-auto: update
            naming_strategy: org.hibernate.cfg.ImprovedNamingStrategy
    datasource:
        url: jdbc:h2:file:C:/H2/mybatis
        driver-class-name: org.h2.Driver
        username: sa
        password: 123456
    h2:
        console:
            path: /h2-console
            enabled: true
- 写User实体
package com.example.jpa.domain;

import javax.persistence.GeneratedValue;
import javax.persistence.Id;

import org.hibernate.annotations.Entity;

@Entity
public class User {

    @Id
    @GeneratedValue
    private Long id;
    private String username;
    private String password;
    public Long getId() {
        return id;
    }
    public void setId(Long id) {
        this.id = id;
    }
    public String getUsername() {
        return username;
    }
    public void setUsername(String username) {
        this.username = username;
    }
    public String getPassword() {
        return password;
    }
    public void setPassword(String password) {
        this.password = password;
    }
    @Override
    public String toString() {
        return "User [id=" + id + ", username=" + username + ", password=" + password + "]";
    }
}
- 创建功能接口
package com.example.jpa.repository;

import java.util.List;

import org.springframework.data.jpa.repository.JpaRepository;

import com.example.jpa.domain.User;

public interface UserRepository extends JpaRepository{
    public List findAll() ;

}
JPA相关注解
- @Entity
实体类声明语句之前
标注该java类为实体类,且将其映射到指定的数据库表中 - @Table
实体类声明语句之前,与@Entity注释并列使用
标注当前实体类映射到数据库中的数据表名,当实体类与数据库表明不一致时使用 - @Id
实体类的声明语句之前,或属性getter()方法之前
指定该实体类的当前属性映射到数据表的主键列 - @GeneratedValue
与@Id注释配合使用
通过其strategy属性指定数据表主键的生成策略。- strategy提供四种值
- Auto:默认选项,不设置就是这个
- IDENTITY :主键由数据库生成, 采用数据库自增长, Oracle不支持这种方式
- SEQUENCE 通过数据库的序列产生主键, MYSQL 不支持
- Table:提供特定的数据库产生主键, 该方式更有利于数据库的移植
- strategy提供四种值
整合Redis
- 起步依赖
      org.springframework.boot
      spring-boot-starter-data-redis

    //响应式redis

      org.springframework.boot
      spring-boot-starter-data-redis-reactive
- 直接访问github网址:https://github.com/MSOpenTech/redis/releases,下载最新的windows X64版本的压缩包,如下图所示:
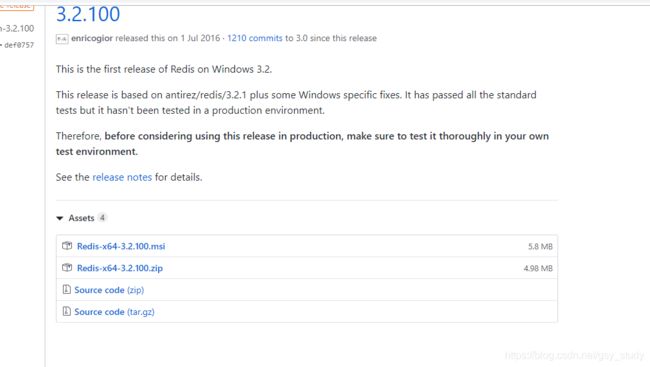
下载第二个.zip,免安装,解压就直接可以用,双击redis-server.exe启动,则出现如下图所示,则启动成功。
- 配置redis服务器连接信息
#Redis
spring:
    redis:
        host: 127.0.0.1
        port: 6379
- 做测试
package com.example.jpa;

import java.util.List;

import org.junit.jupiter.api.Test;
import org.junit.runner.RunWith;
import org.springframework.beans.factory.annotation.Autowired;
import org.springframework.boot.test.context.SpringBootTest;
import org.springframework.data.redis.core.RedisTemplate;
import org.springframework.test.context.junit4.SpringRunner;

import com.example.jpa.domain.User;
import com.example.jpa.repository.UserRepository;
import com.fasterxml.jackson.core.JsonProcessingException;
import com.fasterxml.jackson.databind.ObjectMapper;

@RunWith(SpringRunner.class)
@SpringBootTest(classes = JpaApplication.class)
public class RedisTest {
    /*
     * 缓存业务模型结构
     * 先从缓存拉数据
     * 如果缓存没有数据
     * 从数据库查询
     * 查询之后存储到redis缓存中
     * 方便以后进行查询
     */

//    注入末班获取数据
    @Autowired
    private RedisTemplate redisTemplate;
    @Autowired
    UserRepository userRepository;

    @Test
    public void test() throws JsonProcessingException {
//        从Redis中获得数据,数据形式是字符串
        String userJson = redisTemplate.boundValueOps("user.findAll").get();

//        判断Redis中是否存在数据
        if(userJson == null) {
//        如果不存在,从数据库查询
            List allList = userRepository.findAll();
//            将查询出的数据存储到redis中
//            使用JachJson转换数据
            ObjectMapper objectMapper = new ObjectMapper();
            userJson = objectMapper.writeValueAsString(allList);
            redisTemplate.boundValueOps("user.findAll").set(userJson);
            System.out.println("===从数据库获取的数据===");


        }
//        如果存在,将返回的数据打印
        System.out.println("===从Redis获取的数据===");
        System.out.println(userJson);
    }

}
