TensorFlow实现inception-resnet
论文地址
inception-v1,inception-v2,inception-v3,inception-v4
事前准备
我这边使用的是Windows平台TensorFlow1.4 gpu版本,当然如果是cpu版本也玩不了,太慢了,这个网络可是用来跑ImageNet的。另外你可以下载前面的inception-v4论文,因为接下来要对照论文进行实现。当然这里只是尝试模拟,可能会有错误,欢迎指正。最后就是数据集的准备了,这里使用的是ImageNet dog的一部分,来自网友分享
链接: https://pan.baidu.com/s/1pMS6Xon 密码: dnha
里面有训练集的数据和标签,测试集只有数据没有标签,当然,如果你问Windows怎么装TensorFlow啊,推荐:
Windows下安装TensorFlow
准备好了就准备进入正题吧
inception-resnet网络主体
如果你已经阅读了inception-v4的论文,你可能会发现里面提到了两个inception-resnet,一个是v1,一个是v2,v1是对应于inception-v3进行resnet改造的,v2就自然是对应于inception-v4,这里我们只管v2,其实他俩结构是一样的。另外读者可以下载TensorFlow的开源模组实现,在research/slim/net中有其他网络的实现,这里也是参考了一部分。
TensorFlow model
现在我们可以打开inception-v4论文了,我们找到17号图
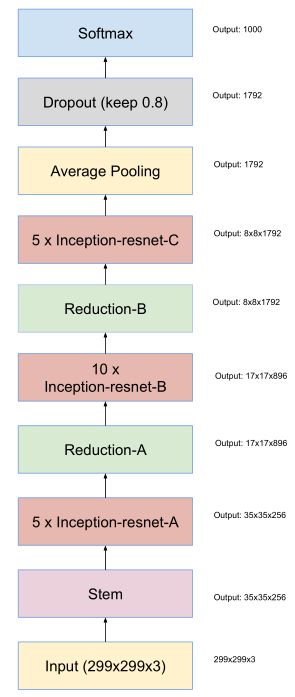
Schema for Inception-ResNet-v1 and Inception-ResNet-v2 networks. This schema applies to both networks but the underlying components differ. Inception-ResNet-v1 uses the blocks as described in Figures 14, 10, 7, 11, 12 and 13. Inception-ResNet-v2 uses the blocks as described in Figures 3, 16, 7,17, 18 and 19. The output sizes in the diagram refer to the activation vector tensor shapes of Inception-ResNet-v1.
它说这个架构是resnet v1和v2共用的,但是里面的组件细节可能有不同,v1使用组件为图14,10巴拉巴拉,v2为巴拉巴拉,输出大小两者都适用。
知道了这些,我们就清楚了如何来看这篇论文了,其实这篇论文叙述文字并不多,主要是以图来讲解结构,因为使用的理论前面都有了。所以我们直接按顺序来看那些用于组成inception-v2的图,当然,论文中提到了一些细节,后面会说。回过头来看这张图,首先它的输入是299x299x3,这是ImageNet当年的规定。然后进入一个叫stem的模组,出来后变为35x35x256,这是第一步提取特征。
Stem
我们找到stem模组,图号为3

我们可以新建一个python文件mystruct.py,里面用于存放这里模组,本着简单说事的原则,这里就不详细展开其中的卷积操作了,希望读者已经熟悉卷积操作,对图中的输入输出能够自己推算。所以如果不是特殊情况,这里就直接上代码了。先说明一下,图中矩形,从上到下从左到右依次为
- 卷积核大小
- 操作,卷积或者池化
- 通道数
- 标出stride代表步长,一般为1时不标出
- V代表valid,不填充,不标出则表示SAME填充,读者从输入输出大小变化也可以看出
- filter concat表示张量连接,图中可以看见连接后通道数为前者的和
import tensorflow as tf
import tensorflow.contrib.slim as slim

def Stem(inputs):

    output = slim.conv2d(inputs, 32, [3, 3], stride=2, padding='VALID')
    output = slim.conv2d(output, 32, [3, 3], padding='VALID')
    output = slim.conv2d(output, 64, [3, 3])
    output_left = slim.max_pool2d(output, [3, 3])
    output_right = slim.conv2d(output, 96, [3, 3], stride=2, padding='VALID')
    output = tf.concat([output_left, output_right], 3)

    output_left = slim.conv2d(output, 64, [1, 1])
    output_left = slim.conv2d(output_left, 96, [3, 3], padding='VALID')
    output_right = slim.conv2d(output, 64, [1, 1])
    output_right = slim.conv2d(output_right, 64, [7, 1])
    output_right = slim.conv2d(output_right, 64, [1, 7])
    output_right = slim.conv2d(output_right, 96, [3, 3], padding='VALID')
    output = tf.concat([output_left, output_right], 3)

    output_left = slim.conv2d(output, 192, [3, 3], stride=2, padding='VALID')
    output_right = slim.max_pool2d(output, [3, 3])
    output = tf.concat([output_left, output_right], 3)
    return tf.nn.relu(output)
要提的一点是,这里为了简化网络构建,使用TensorFlow中的slim组件,可以将激活函数,批次归一化这些操作统一到一个操作中了,所以你现在看到conv2d函数并没有接激活函数。代码完全根据图上的结构写的,conv2d函数默认stride为1,padding为SAME,max_pool2d函数默认stride为2,padding为VALID。concat函数便是张量连接函数,第二个参数用于指定连接的维度,因为TensorFlow中的维度顺序是[样本数,宽,高,通道数],所以我们要连接通道数,从0开始第3个。
inception-resnet-A
找到inception-resnet-A模组,图号为16
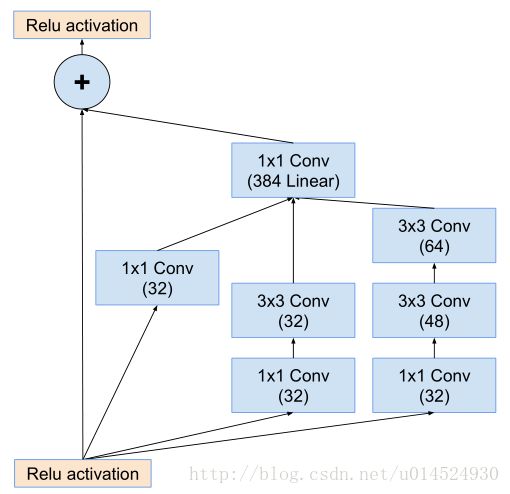
这是第一个inception-resnet模组,有两个地方需要提一下,看到论文3.2. Residual Inception Blocks章节开头:
For the residual versions of the Inception networks, we use cheaper Inception blocks than the original Inception. Each Inception block is followed by filter-expansion layer (1 × 1 convolution without activation) which is used for scaling up the dimensionality of the filter bank before the addition to match the depth of the input. This is needed to
compensate for the dimensionality reduction induced by the Inception block.
意思是,在这个残差版本的inception模组,使用更简单的inception模型(可以看到才三个简单分支,比起inception-v4来说,确实是简单许多)。并且每个inception分支后面都跟着一个1x1线性卷积层(就是不带激活函数的卷积层),这是为了匹配输入时的维度,因为残差分支是直接将输入送给输出,但是inception这边很明显进行通道压缩了,所以要通过1x1卷积重新扩增到输入时的维度,用原文话说就是,补偿inception模块带来的降维。
另外一个地方是论文3.3. Scaling of the Residuals:
Also we found that if the number of filters exceeded 1000, the residual variants started to exhibit instabilities and the network has just “died” early in the training, meaning that the last layer before the average pooling started to pro-
duce only zeros after a few tens of thousands of iterations.This could not be prevented, neither by lowering the learn-
ing rate, nor by adding an extra batch-normalization to this layer.
它说如果通道数量超过1000时,这个inception-resnet就会失去稳定,并且在训练的早期死亡,死亡意指几千次迭代后在平均池化前的最后一层会开始完全零化,就是只产生很小的数。并且这种现象无法被避免,无论是调低学习率还是增加批次归一化在这一层。
We found that scaling down the residuals before adding them to the previous layer activation seemed to stabilize the
training. In general we picked some scaling factors between 0.1 and 0.3 to scale the residuals before their being added to the accumulated layer activations (cf. Figure 20).
但是他们发现如果在将其添加到前一层激活函数之前进行缩小似乎就能稳定训练,一般他们会挑选一些0.1到0.3之间的缩放系数在进行累加层激活之前来压缩inception-resnet模组。如图20
我们找到图20
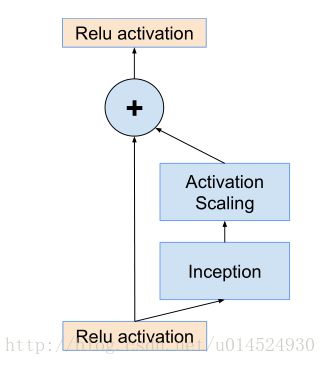
我们可以看见图中表达的意思是在inception模块与残差分支相加前进行缩放,前面论文意思和这个似乎有点对不上,不过可能是我水平不够,没get到,不过这里还是以图为主,并且取论文中的0.1作为系数。
def Inception_ResNet_A(inputs, activation_fn=tf.nn.relu):

    output_res = tf.identity(inputs)

    output_inception_a = slim.conv2d(inputs, 32, [1, 1])
    output_inception_a = slim.conv2d(output_inception_a, 384, [1, 1], activation_fn=None)

    output_inception_b = slim.conv2d(inputs, 32, [1, 1])
    output_inception_b = slim.conv2d(output_inception_b, 32, [3, 3])
    output_inception_b = slim.conv2d(output_inception_b, 384, [1, 1], activation_fn=None)

    output_inception_c = slim.conv2d(inputs , 32, [1, 1])
    output_inception_c = slim.conv2d(output_inception_c, 48, [3, 3])
    output_inception_c = slim.conv2d(output_inception_c, 64, [3, 3])
    output_inception_c = slim.conv2d(output_inception_c, 384, [1, 1], activation_fn=None)

    output_inception = tf.add_n([output_inception_a, output_inception_b, output_inception_c])
    output_inception = tf.multiply(output_inception, 0.1)

    return activation_fn(tf.add_n([output_res, output_inception]))
tf.identity是恒等映射,就是输入等于输出,可能会有人问为什么要多此一举,这个我也无法给出完全合理的解释,不过这样可以额外增加一个节点,使其在计算图中可以被显示,在使用tensorboard时可能需要。我们可以看到在最后的1x1卷积操作中我额外显示指定了激活函数为空,因为这是线性的。tf.add_n函数为张量相加函数,需要列表中张量必须形状完全一致,这里都是提前计算好的形状,正常情况都应该是一致的。可以看到在inception输出与res输出相加之前进行了0.1的数乘操作,缩小10倍。
Reduction-A
我们找到reduction-a模组,图号为7
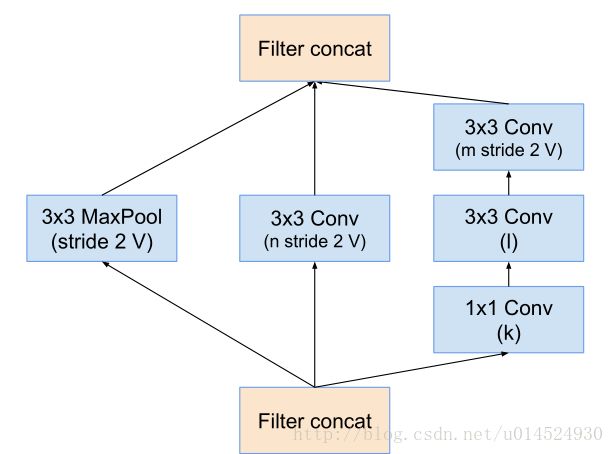
细心的同学应该发现,这张图上通道数是变量。是的,这个模组是三个模型共用的,所以不同模型有不同系数,我们可以找到3.3节的最后部分,表1

def Reduction_A(inputs):

    output_a = slim.max_pool2d(inputs, [3, 3])
    output_b = slim.conv2d(inputs, 384, [3, 3], stride=2, padding='VALID')
    output_c = slim.conv2d(inputs, 256, [1, 1])
    output_c = slim.conv2d(output_c, 256, [3, 3])
    output_c = slim.conv2d(output_c, 384, [3, 3], stride=2, padding='VALID')
    return tf.nn.relu(tf.concat([output_a, output_b, output_c], 3))
如其字面意思,reduction就是减少的意思,这个模组负责减半数据空间尺寸,并且加深通道,不知道从某种程度上我们是否可以将其理解为聚集特征。要提的一点是,我这里在最后都是加了一个relu激活函数的,读者可以试试不同情况。
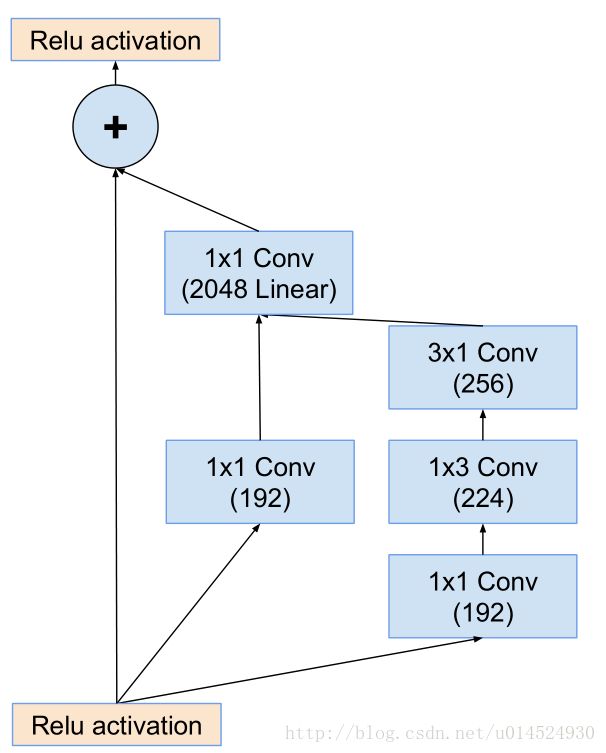
inception-resnet-B
图号为17

def Inception_ResNet_B(inputs, acfivation_fn=tf.nn.relu):

    output_res = tf.identity(inputs)
    output_a = slim.conv2d(inputs, 192, [1, 1])
    output_a = slim.conv2d(output_a, 1152, [1, 1], activation_fn=None)
    output_b = slim.conv2d(inputs, 128, [1, 1])
    output_b = slim.conv2d(output_b, 160, [1, 7])
    output_b = slim.conv2d(output_b, 192, [7, 1])
    output_b = slim.conv2d(output_b, 1152, [1, 1], activation_fn=None)
    output = tf.add_n([output_a, output_b])
    output = tf.multiply(output, 0.1)
    return acfivation_fn(tf.add_n([output_res, output]))
细心的同学应该发现了代码中的通道数与图中不服,我们可以计算一下,按照前面的流程,reduction-a输出的应该是1152通道,应该是384x3,但是图中为1154,我也不去管这是为什么了,不过我们要知道的是,inception-resnet模组的输入与输出应该是一致的。其实到这里我们发现inception模组都是1x1卷积然后接不同大小卷积,这其实有一种换不同的视野进行相关性特征提取的感觉,然后到reduction模组就是将提取的特征进行聚合,当然这只是逻辑上这么想。
Reduction-B
图号为18

def Reduction_B(inputs):

    output_a = slim.max_pool2d(inputs, [3, 3])

    output_b = slim.conv2d(inputs, 256, [1, 1])
    output_b = slim.conv2d(output_b, 384, [3, 3], stride=2, padding='VALID')

    output_c = slim.conv2d(inputs, 256, [1, 1])
    output_c = slim.conv2d(output_c, 256, [1, 1])
    output_c = slim.conv2d(output_c, 288, [3, 3], stride=2, padding='VALID')

    output_d = slim.conv2d(inputs, 256, [1, 1])
    output_d = slim.conv2d(output_d, 288, [3, 3])
    output_d = slim.conv2d(output_d, 320, [3, 3], stride=2, padding='VALID')

    return tf.nn.relu(tf.concat([output_a, output_b, output_c, output_d], 3))
inception-resnet-C
图19
def Inception_ResNet_C(inputs, activation_fn=tf.nn.relu):

    output_res = tf.identity(inputs)

    output_a = slim.conv2d(inputs, 192, [1, 1])
    output_a = slim.conv2d(output_a, 2144, [1, 1], activation_fn=None)

    output_b = slim.conv2d(inputs, 192, [1, 1])
    output_b = slim.conv2d(output_b, 224, [1, 3])
    output_b = slim.conv2d(output_b, 256, [3, 1])
    output_b = slim.conv2d(output_b, 2144, [1, 1], activation_fn=None)

    output = tf.add_n([output_a, output_b])
    output = tf.multiply(output, 0.1)

    return activation_fn(tf.add_n([output_res, output]))
还是前面的问题,这里依然以reduction-B输出为准,将通道数修改为2144
average pooling与dropout
def Average_Pooling(inputs):

    output = slim.avg_pool2d(inputs, [8, 8])
    return output

def Dropout(inputs, keep=0.8):

    output = slim.dropout(inputs, keep_prob=keep)
    return output
这里平均池化是全局的,也就是将空间8x8变为1x1,dropout,这里0.8是指以0.8的概率保留,0.2的概率置零,目的是为了增强模型泛化能力,减少过拟合,原理解析想必网上也挺多的,自行查阅吧
前向传播
前向传播我们根据前面那个结构图来设计,这里添加一个inference.py来存放前向传播过程
from mystruct import *

def Forward(inputs, num_classes):

    with slim.arg_scope([slim.conv2d],
                        weights_initializer=tf.truncated_normal_initializer(stddev=0.1),
                        activation_fn = tf.nn.relu,
                        normalizer_fn = slim.batch_norm):

        with tf.name_scope('Stem'):
            output = Stem(inputs)

        with tf.name_scope('5xInception-ResNet-A'):
            for i in range(5):
                output = Inception_ResNet_A(output)

        with tf.name_scope('Reduction-A'):
            output = Reduction_A(output)

        with tf.name_scope('10xInception-ResNet-B'):
            for i in range(10):
                output = Inception_ResNet_B(output)

        with tf.name_scope('Reduction-B'):
            output = Reduction_B(output)

        with tf.name_scope('5xInception-ResNet-C'):
            for i in range(5):
                output = Inception_ResNet_C(output)

        with tf.name_scope('AveragePooling'):
            output = Average_Pooling(output)

        with tf.name_scope('Dropout0.8'):
            output = Dropout(output)
            output = slim.flatten(output)

        with tf.name_scope('fc'):
            output = slim.fully_connected(output,num_classes)

        return output
这里提几点,一点是函数参数num_classes,用于指定最后的全连接层输出大小,用于最后的softmax分类,另一点是在dropout后进行了张量平整化,也就是[batch,1,1,2144]变为[batch,2144]。最后就是slim参数空间,我们可以看到slim.arg_scope函数指定了卷积操作的默认激活函数,batch_normalization以及权重生成方式,这里是截断正态分布。
训练
其实这个挺麻烦的,因为训练集标签是字典形式,所以无法直接张量读取,所以我们先将其转换为TFRecord数据,这个就蛋疼了,整个训练集直接转换很占内存,高峰时能占近10G,但是后面稳定后保持在5G左右,可能前面读取快后面就慢下来了,而且越来越慢。所以这里我建议使用分批转换,我们解压后可以看到三个东西,一个训练集一个测试集一个训练标签,标签是csv格式。我们可以建立一个train.py用于存放训练过程
首先读取标签,将其转换为序号格式,因为softmax需要这种格式。
def read_labels(dir, file):
    with open(os.path.join(dir, file), 'r') as f:
        lines = f.readlines()[1:]
        label_list = [l.rstrip().split(',') for l in lines]
        label_dict = dict(((idx, label) for idx, label in label_list))
    labels = list(set(label_dict.values()))
    dict_idx = {}
    for i in range(len(labels)):
        dict_idx[labels[i]] = i
    return label_dict, dict_idx
这里读取标签,跳过第一行标题,最后返回两个字典,一个是uid到label的映射,一个是label到index的映射。
def save_by_tfrecord(train_dir, label_dict, idx_dict):
    files = tf.train.match_filenames_once(train_dir)
    files = files[9198:10220]
    filename_queue = tf.train.string_input_producer(files)
    reader = tf.WholeFileReader()
    filename, value = reader.read(filename_queue)
    init_op = tf.local_variables_initializer()
    with tf.Session() as sess:
        sess.run(init_op)
        coord = tf.train.Coordinator()
        threads = tf.train.start_queue_runners(sess=sess, coord=coord)

        file_num = sess.run(files).shape[0]
        batch_size = file_num
        print('准备写入文件个数为', file_num)
        # for n in range(10):
        outpath = ('E:\dog_tf_record\dog299x299.tfrecords-%.5d' % 9)
        writer = tf.python_io.TFRecordWriter(outpath)
        for i in range(batch_size):
            name, image = sess.run([filename, value])
            name = ''.join(list(str(name))[-37:-5])
            label = idx_dict[label_dict[name]]
            image = tf.image.decode_jpeg(image)
            image = tf.image.resize_images(image, [299, 299], method=0,)
            image = tf.image.convert_image_dtype(image, dtype=tf.uint8)
            image = sess.run(image)
            image = image.tobytes()
            example = tf.train.Example(features=tf.train.Features(feature={
                'label':tf.train.Feature(int64_list=tf.train.Int64List(value=[label])),
                'image':tf.train.Feature(bytes_list=tf.train.BytesList(value=[image]))
            }))
            writer.write(example.SerializeToString())
            if i % 100 == 0:
                print('写入%d个文件,label为%d' % (i, label))
        writer.close()
        coord.request_stop()
        coord.join(threads)
这个函数用于将训练集数据转换为TFRecord数据,函数接收前面读取的两个字典,首先将训练集目录中的文件生成一个文件名序列,这里我是手动指定范围,我是分成10批,一共10222个文件,那么每个批次就应该是1022个,输出由outpath指定。这里使用WholeReader对象进行读取,其返还两个值,一个是文件路径,一个是字节流,我们截取文件名对字典取值作为label,将字节流解码为像素值矩阵,形状为[3,w,h],要注意的是,这里再调整大小为299后要重新进行数据格式的调整,为什么可以看
TensorFlow resize_images函数导致TFRecord产生形状不匹配
最后大概是这样

然后就是读取tf数据
def read_tf_record(filenames):
    filename_queue = tf.train.string_input_producer(filenames)
    image_reader = tf.TFRecordReader()
    filename, image = image_reader.read(filename_queue)
    features = tf.parse_single_example(image, features={
        'label':tf.FixedLenFeature([], tf.int64),
        'image':tf.FixedLenFeature([], tf.string)
    })
    img = tf.decode_raw(features['image'], tf.uint8)
    img = tf.reshape(img, [3, 299, 299])
    img = tf.transpose(img, [1, 2, 0])
    label = tf.cast(features['label'], tf.int32)
    return img, label
这里filenames与上面的files一样都是文件名列表,然后产生队列用于读取,最后将矩阵形状[3,299,299]转换为[299,299,3],这是因为TensorFlow需要形状为[宽,高,通道],此外,这里操作的数据都是张量,可以被用于多线程队列操作。所以后面我们可以使用batch函数自动获取批次数据。
写一个简单训练函数
def train():
    batch_size = 16
    num_train = 10000
    epoch = 3
    with tf.Graph().as_default():
        with tf.variable_scope('input'):
            xs = tf.placeholder(tf.float32, [batch_size, 299, 299, 3])
            ys = tf.placeholder(tf.int32, [batch_size])
        with tf.name_scope('forward'):
            y_ = Forward(xs, 120)
        with tf.name_scope('loss'):
            entropy_cross = tf.nn.sparse_softmax_cross_entropy_with_logits(logits=y_, labels=ys)
            loss = tf.reduce_mean(entropy_cross)
        with tf.name_scope('optimizer'):
            optimizer = tf.train.RMSPropOptimizer(learning_rate= 0.045, epsilon=1.0)
            global_step = tf.Variable(initial_value=0, trainable=False, name='global_step', dtype=tf.int64)
            train_op = optimizer.minimize(loss, global_step)
        with tf.name_scope('eval'):
            eval = tf.nn.in_top_k(y_, ys, k=1)

        with tf.Session() as sess:
            files = tf.train.match_filenames_once('E:\dog_tf_record\dog*')
            img, label = read_tf_record(files)
            batch_data, batch_label = tf.train.shuffle_batch([img, label], batch_size,
                                                             num_threads=16,
                                                             min_after_dequeue=4000,
                                                             capacity=4000 + 3 * batch_size)
            init_op = tf.local_variables_initializer()
            sess.run(init_op)
            sess.run(tf.global_variables_initializer())
            coord = tf.train.Coordinator()
            threads = tf.train.start_queue_runners(sess=sess, coord=coord)
            for i in range(epoch):
                for j in range(num_train//batch_size):
                    img, label = sess.run([batch_data, batch_label])
                    _, curr_loss, accuracy = sess.run([train_op, loss, eval], feed_dict={xs:img, ys:label})
                    curr_step = sess.run(global_step)
                    curr_accuracy = np.sum(accuracy) / batch_size
                    print('第%d轮,第%d批次,损失%f, 准确率%f' % (i, curr_step, curr_loss, curr_accuracy))
            coord.request_stop()
            coord.join(threads)
训练方式参考论文第4章,使用RMS优化,学习率0.045,ε为1.0,它还指定了学习率衰减,不过这里训练不了那么久就不用了。显存限制导致只能使用16大小的batch,有条件的可以使用更大的batch。这里使用的是随机批次shuffle_batch,所以多次训练可能会有不同情况。这里放上700批次的情况供参考
第1轮,第690批次,损失4.787498, 准确率0.937500
第1轮,第691批次,损失4.787681, 准确率0.875000
第1轮,第692批次,损失4.787492, 准确率1.000000
第1轮,第693批次,损失4.787560, 准确率0.812500
第1轮,第694批次,损失4.787492, 准确率1.000000
第1轮,第695批次,损失4.787570, 准确率0.937500
第1轮,第696批次,损失4.787492, 准确率1.000000
第1轮,第697批次,损失4.787492, 准确率1.000000
第1轮,第698批次,损失4.787496, 准确率0.937500
第1轮,第699批次,损失4.787708, 准确率0.937500
第1轮,第700批次,损失4.787492, 准确率1.000000