NIO基础及进阶案例---NIO聊天室
首先来简单说一下IO
IO
阻塞式数据传输
IO设计的核心思想:装饰者模式
装饰者模式
装饰模式是指在不影响原有对象的情况下,动态地、无侵入地给一个对象添加一些额外的功能。
InputStreamReader iReader = new InputStreamReader(new FileInputStreamReader(new File("D:\\abc.txt")));可以通过装饰模式对各个功能进行模块化封装。
组成:
被装饰的对象:
- 抽象构建角色(Component)
- 具体构建角色(ConcreteComponent)
装饰者:
- 装饰角色(Decorator)
- 具体装饰角色(ConcreteDecorator)
示例:
抽象构件角色
public interface Phone {
    public void call();
}
具体构件角色
public class BasePhone implements Phone {
    @Override
    public void call() {
        System.out.println("打电话");
    }
}
装饰角色
public abstract class SmartPhone implements Phone {
    /**
     * 包含一个对真实对象的引用
     */
    private Phone phone;

    public SmartPhone(Phone phone) {
        super();
        this.phone = phone;
    }

    @Override
    public void call() {
        phone.call();
    }
}
具体装饰角色AISmartPhone
public class AISmartPhone extends SmartPhone {

    public AISmartPhone(Phone phone) {
        super(phone);
    }

    /**
     * 给电话增加新的功能:人工智能
     */
    public void aiFunction() {
        System.out.println("电话拥有人工智能的强大功能");
    }

    @Override
    public void call() {
        super.call();
        aiFunction();
    }
}
具体装饰角色AutoSizeSmartPhone
public class AutoSizeSmartPhone extends SmartPhone {
    public AutoSizeSmartPhone(Phone phone) {
        super(phone);
    }

    /**
     * 给电话增加新的功能:手机尺寸自动伸缩
     */
    public void autoSize(){
        System.out.println("手机的尺寸可以自动伸缩");
    }
    @Override
    public void call(){
        super.call();
        autoSize();
    }
}
IO远程传输文件
示例使用IO和new Thead()
缺点
- 数据以阻塞的方式传输
- 当服务端每次收到客户端发来的连接时,都会通过new Thread(new SendFile(socket)).start()创建一个线程,去处理这个客户端的连接。而每次jvm创建一个线程,大约会消耗1Mb内存,并且在创建、线程时cpu也会因为对线程的上小文切换而消耗性能。
NIO
new io | non blocking io
非阻塞式数据传输
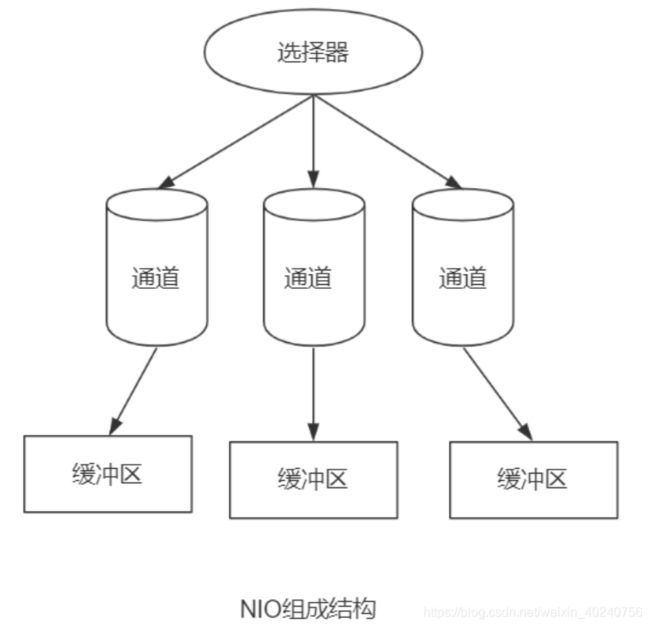
- 非阻塞式
- 面向通道(Channel)和缓冲区(Buffer)
- 提供了选择器(Selector)
NIO数据存储结构:缓冲区Buffer
底层为数组,用于存储数据
7种类型缓冲区,用于存储不同类型的数据,都继承自Buffer(与java的8种基本类型相比,缺少了BooleanBuffer)
ByteBuffer、ShortBuffer、IntBuffer、LongBuffer、FloatBuffer、DoubleBuffer、CharBuffer
ByteBuffer
属性:
- int position:下一个将要读或写的元素位置,也就是说position永远指向Buffer中最后一次操作元素的下一个位置
- int limit:限制Buffer中能够存放的元素个数,limit及之后的位置不能使用。
- int capacity:Buffer的最大容量,在创建后不能修改
- int mark:标记,使用reset()方法返回到该标记的位置
- long address:堆外内存的地址
前四个属性大小关系:
0<=mark<=position<=limit<=capacity
方法:
分配缓冲区
- allocate(int capacity)
- allocateDirect(int capacity)'
向缓冲区存放数据
- put(byte)
- put(int,byte)
- put(byte[])
- put(byte[],int,int)
从缓冲区中读取数据
- get()
- get(int)
- get(byte[])
- get(byte[] dst, int offset, int length) 注意,此方法可以直接从Buffer中的指定位置offset开始读取数据,而不需要flip()或rewind()
将一个Buffer转为一个只读Buffer
- asReadOnlyBuffer()
将原Buffer从position到limit之间的部分数据交给一个新的Buffer引用。也就是说,此方法返回的Buffer所引用的数据,是原Buffer的一个子集。并且新的Buffer引用和原Buffer引用共享相同的数据。
- slice()
ByteBuffer buffer = ByteBuffer.allocate(8);
//buffer:0,1,2,3,4,5,6,7
for (int i = 0; i < buffer.capacity(); i++) {
    buffer.put((byte)i);
}
buffer.position(2);
buffer.limit(6);
//sliceBuffer:2,3,4,5;获取从position到limit之间buffer的引用。
ByteBuffer sliceBuffer = buffer.slice();
//sliceBuffer与原Buffer共享相同的数据;即修改sliceBuffer中的数据时,buffer也会改变。
for (int i = 0; i < sliceBuffer.capacity(); i++) {
    byte b = sliceBuffer.get(i);
    b += 100 ;
    sliceBuffer.put(i,b);
}
//测试
System.out.println("当修改了sliceBuffer之后,查看buffer:");
buffer.position(0) ;
buffer.limit(buffer.capacity());
while (buffer.hasRemaining()) {
    //{x,x,x,x,x,x}  buffer.hasRemaining():判断是否有剩余元素
    System.out.print( buffer.get() +",");
}
返回一个内容为array的Buffer。此外,如果修改缓冲区的内容,array也会随着改变,反之亦然。
- wrap(byte[])
父类Buffer中4个常用方法
1.flip()
public final Buffer flip() {
    limit = position;
    position = 0;
    mark = -1;
    return this;
}
2.rewind()
public final Buffer rewind() {
    position = 0;
    mark = -1; //取消mark
    return this;
}
3.clear()
public final Buffer clear() {
    position = 0;
    limit = capacity;
    mark = -1;
    return this;
}
4.mark()/reset()
public final Buffer mark() {
    mark = position;
    return this;
}
public final Buffer reset() {
    int m = mark;
    if (m < 0)
        throw new InvalidMarkException();
    position = m;
    return this;
}
//使用
ByteBuffer buffer2 = ByteBuffer.allocate(100) ;
buffer2.put("abcdefg".getBytes()) ;

//在此时的position位置处,做一个标记mark
buffer2.mark() ;
System.out.println("position:" + buffer2.position());
System.out.println("mark:" + buffer2.mark().position());
/*
 通过get(byte[] dst, int offset, int length)方法,读取buffer中的“cde”。
 注意,此方法可以直接从Buffer中的指定位置offset开始读取数据,而不需要flip()或rewind()。
*/
buffer2.get(bs,2,3);//10 why??看如下get的源码
buffer2.reset();//恢复到mark的位置 2
System.out.println("position:" + buffer2.position());
System.out.println("mark:" + buffer2.mark().position());
get(byte[] dst, int offset, int length)的源码
public ByteBuffer get(byte[] dst, int offset, int length) {
    checkBounds(offset, length, dst.length);
    if (length > remaining())
        throw new BufferUnderflowException();
    int end = offset + length;
    for (int i = offset; i < end; i++)
        dst[i] = get();
    return this;
}
其他方法
- hasRemaining()
- remaining()
- array()
- putDouble()、getDouble()等 : ByteBuffer存储各类型数据,必须保证get和put顺序一致
ByteBuffer buffer = ByteBuffer.allocate(100);
buffer.putChar('a');
buffer.putInt(2);
buffer.putLong(50000L);
buffer.putShort((short) 2);
buffer.putDouble(12.4);
System.out.println(buffer.position());
buffer.flip();
System.out.println(buffer.getChar());
System.out.println(buffer.getInt());
System.out.println(buffer.getLong());
System.out.println(buffer.getShort());
System.out.println(buffer.getDouble());
缓冲区的搬运工:Channel
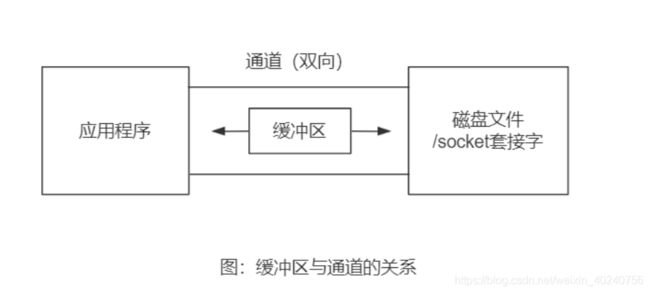
数据的双向传输,同一个通道既可以用于读数据,也可以用于写数据
缓冲区(货车)+通道(道路) 就是使用通道对缓冲区、文件或套接字进行数据传输
Channel接口
其实现类有FileChannel、SocketChannel、ServerSocketChannel、DatagramChannel等
获取Channel对象
FileInputStream、FileOutputStream、RandomAccessFile
FileChannel.getChannel()
Socket、ServerSocket、DatagramSocket
xxxChannel.getChannel()
FileChannel等各个Channel实现类
public static FileChannel open(Path path, OpenOption... options) throws IOException
Files
public static SeekableByteChannel newByteChannel(Path path, OpenOption... options)throws IOException
示例
文件复制
//使用非直接缓冲区复制文件
public static void test2_2() throws IOException {
    long start = System.currentTimeMillis();
    FileInputStream input = new FileInputStream("e:\\JDK_API.CHM");
    FileOutputStream out = new FileOutputStream("e:\\JDK_API_COPY.CHM");
    //获取通道
    FileChannel inChannel = input.getChannel();
    FileChannel outChannel = out.getChannel();
    ByteBuffer buffer = ByteBuffer.allocateDirect(1024);

    while (inChannel.read(buffer) != -1) {
        buffer.flip();
        outChannel.write(buffer);
        buffer.clear(); // 这步很重要
    }
    outChannel.close();
    inChannel.close();
    out.close();
    input.close();
    long end = System.currentTimeMillis();
    System.out.println("复制操作消耗的时间(毫秒):" + (end - start));
}
也可以使用非直接缓冲区allocateDirect()
public abstract class ByteBuffer  extends Buffer  implements Comparable {
    // ...
    public static ByteBuffer allocateDirect(int capacity) {
        return new DirectByteBuffer(capacity);
    }
    //...
}
DirectByteBuffer 表示堆外内存(直接缓冲区)
MappedByteBuffer 是堆外内存的父类 可以使用MappedByteBuffer来操作堆外内存,MappedByteBuffer也称为内存映射文件
class DirectByteBuffer extends MappedByteBuffer implements DirectBuffer {
// Cached unsafe-access object
    protected static final Unsafe unsafe = Bits.unsafe();
    private long address;
    //...
    DirectByteBuffer(int cap) {                   // package-private

        super(-1, 0, cap, cap);
        boolean pa = VM.isDirectMemoryPageAligned();
        int ps = Bits.pageSize();
        long size = Math.max(1L, (long)cap + (pa ? ps : 0));
        Bits.reserveMemory(size, cap);

        long base = 0;
        try {
            base = unsafe.allocateMemory(size); // 分配堆外内存  返回给base
        } catch (OutOfMemoryError x) {
            Bits.unreserveMemory(size, cap);
            throw x;
        }
        unsafe.setMemory(base, size, (byte) 0);
        if (pa && (base % ps != 0)) {
            // Round up to page boundary
            address = base + ps - (base & (ps - 1));
        } else {
            address = base; // base赋值给address
        }
        cleaner = Cleaner.create(this, new Deallocator(base, size, cap));
        att = null;
    }
}
使用零拷贝实现高性能文件传输
缓冲区操作两种方式:
- 直接缓冲区
- 非直接缓冲区
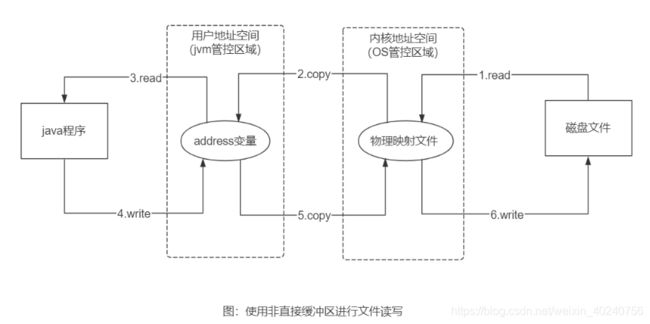
4次copy、4次用户空间与内核空间的上下文切换
读操作
磁盘文件---->OS提供的内核地址空间的内存中(第一次复制,OS上下文切换到内核模式)
内核地址空间内存中的文件---->JVM提供的用户地址空间的内存中(第二次复制,OS上下文切换到用户模式)
写操作
用户地址空间JVM内存中的文件---->OS提供的内核地址空间中的内存 (第一次复制,OS上下文切换到内核模式)
内核地址空间中内存的文件---->磁盘文件(第二次复制,写入 操作完毕后,OS上下文最终切换到用户模式以后)
文件内容要在用户地址空间和内核地址空间的两个内存中来回复制
堆外内存脱离了JVM的管控,受操作系统完全控制
问题:
1.read或write,为什么不直接在JVM内存中操作,而必须在内存和堆外内存间进行一次copy?
GC会不定时释放无用的对象,并且压缩某些内存区域。如果某一时间正在JVM中复制一个文件(该文件可能存在于JVM的多个位置),但由于GC的压缩操作可能会引起该文件在JVM中的位置发生改变,进而导致程序出现异常。
2.能否减少copy操作?
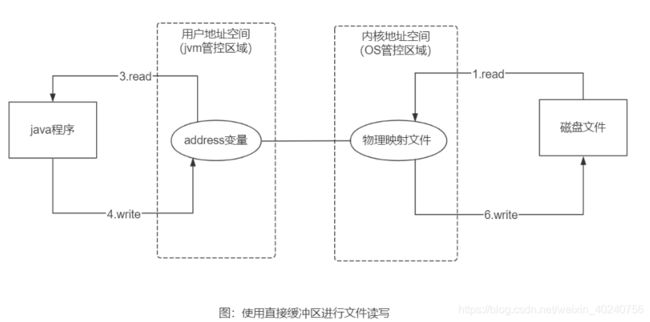
可以。使用直接缓冲区,就可以在JVM中通过一个address变量指向OS中的一块内存(“物理映射文件”)。之后就可以直接通过JVM使用OS中的内存。
这样,数据的复制操作都是在内核空间里进行的,也就是“零拷贝”(用户空间与内核空间之间的复制次数为零)。
但是,在内核空间内仍然可以有另外两次复制操作
3.能否进一步减少内核空间内部的复制次数呢?
可以,但需要操作系统的支持,需在内核空间中增加一个表示“文件描述符”的缓冲区,用以记录文件的大小,以及文件在内存中的位置。有了“文件描述符”的支持,最理想的“零拷贝”过程如下:
1.将磁盘文件的内容复制到内核空间(一次文件数据的复制),并用文件描述符记录文件大小和文件在内核空间中的位置。
2.将文件描述符的内容复制到输出缓冲区中(没有复制文件内容本身,而只复制了文件描述符),然后直接根据文件描述符寻找到文件内容并输出到磁盘。
文件描述符和文件内容两者的协同工作,需要操作系统底层scatter-and-gather功能。
零拷贝既减少了数据的复制次数,又降低了cpu的负载压力
可以使用JAVA API的MappedByteBuffer类和FileChannel中的transferFrom()/transferTo()方法,进行文件的零拷贝。
code:
本例是在直接缓冲区通过“内存映射文件”进行了文件复制;
public static void test3() throws IOException {
    long start = System.currentTimeMillis();
    //用文件的输入通道
    FileChannel inChannel
            = FileChannel.open(Paths.get("e:\\JDK_API.CHM"), StandardOpenOption.READ);
    //用文件的输出通道
    FileChannel outChannel = FileChannel.open(Paths.get("e:\\JDK_API2.CHM"), StandardOpenOption.WRITE, StandardOpenOption.READ, StandardOpenOption.CREATE);
    //输入通道和输出通道之间的内存映射文件(内存映射文件处于堆外内存中)
    MappedByteBuffer inMappedBuf = inChannel.map(FileChannel.MapMode.READ_ONLY, 0, inChannel.size());
    MappedByteBuffer outMappedBuf = outChannel.map(FileChannel.MapMode.READ_WRITE, 0, inChannel.size());
    //直接对内存映射文件进行读写
    byte[] dst = new byte[inMappedBuf.limit()];
    inMappedBuf.get(dst);
    outMappedBuf.put(dst);
    inChannel.close();
    outChannel.close();
    long end = System.currentTimeMillis();
    System.out.println("复制操作消耗的时间(毫秒):" + (end - start));
}
文件修改:
public static void test6() throws IOException {
    RandomAccessFile raf = new RandomAccessFile("D:\\abc.txt", "rw");
    FileChannel channel = raf.getChannel();
    // mappedByteBuffer代表了abc.txt在内存中的映射文件
    MappedByteBuffer mappedByteBuffer = channel.map(FileChannel.MapMode.READ_WRITE, 0, raf.length());
    mappedByteBuffer.put(1, (byte) 'X');
    mappedByteBuffer.put(1, (byte) 'Y');
    raf.close();
}
直接缓冲区是驻留在JVM之外的区域,因此无法受java代码及GC的控制。此外,分配直接缓冲区时系统开销很大,因此建议将直接缓冲区分配给哪些持久的、经常重用的数据使用。
如果更进一步使用“零拷贝”方式在直接缓冲区进行复制,效率会进一步提升。
//在直接缓冲区中,将输入通道的数据直接转发给输出通道
public static void test4() throws IOException {
    long start = System.currentTimeMillis();
    FileChannel inChannel = FileChannel.open(Paths.get("e:\\JDK_API.CHM"), StandardOpenOption.READ);
    FileChannel outChannel = FileChannel.open(Paths.get("e:\\JDK_API.CHM3"), StandardOpenOption.WRITE, StandardOpenOption.READ, StandardOpenOption.CREATE);
    inChannel.transferTo(0, inChannel.size(), outChannel);
    /*
     也可以使用输出通道完成复制,即上条语句等价于以下写法:
     outChannel.transferFrom(inChannel, 0, inChannel.size());
    */
    inChannel.close();
    outChannel.close();
    long end = System.currentTimeMillis();
    System.out.println("复制操作消耗的时间(毫秒):" + (end - start));
}
NIO文件传输
public class NIOSendFile {
    public static void client() throws IOException {
        FileChannel inFileChannel = FileChannel.open(Paths.get("e:\\JDK_API.CHM"), StandardOpenOption.READ);
        //创建与服务端建立连接的SocketChannel对象
        SocketChannel socketChannel = SocketChannel.open(new InetSocketAddress("127.0.0.1", 8888));
        //分配指定大小的缓冲区
        ByteBuffer buffer = ByteBuffer.allocate(1024);
        long start = System.currentTimeMillis();
        //读取本地文件,并发送到服务端
        while (inFileChannel.read(buffer) != -1) {
            buffer.rewind();
            socketChannel.write(buffer);
            buffer.clear();
        }
        inFileChannel.close();
        if (socketChannel != null) {
            socketChannel.close();
        }
        long end = System.currentTimeMillis();
        System.out.println("客户端发送文件耗时:" + (end - start));
    }

    public static void server() throws IOException {
        ServerSocketChannel serverSocketChannel = ServerSocketChannel.open();
        FileChannel outFileChannel = FileChannel.open(Paths.get("e:\\JDK_API4.CHM"), StandardOpenOption.WRITE, StandardOpenOption.CREATE);
        //将服务绑定在8888端口上
        serverSocketChannel.bind(new InetSocketAddress(8888));//默认服务的ip就是 本机ip
        //创建与客户端建立连接的SocketChannel对象
        SocketChannel sChannel = serverSocketChannel.accept();
        System.out.println("连接成功...");

        long start = System.currentTimeMillis();
        //分配指定大小的缓冲区
        ByteBuffer buf = ByteBuffer.allocate(1024);
        //接收客户端发送的文件,并保存到本地
        while (sChannel.read(buf) != -1) {
            buf.flip();
            outFileChannel.write(buf);
            buf.clear();
        }
        System.out.println("接收成功!");

        sChannel.close();
        outFileChannel.close();
        serverSocketChannel.close();
        long end = System.currentTimeMillis();
        System.out.println("服务端接收文件耗时:" + (end - start));
    }

    public static void client2() throws IOException {
        long start = System.currentTimeMillis();
        SocketChannel socketChannel = SocketChannel.open(new InetSocketAddress("127.0.0.1", 8888));

        FileChannel inFileChannel = FileChannel.open(Paths.get("e:\\JDK_API.CHM"), StandardOpenOption.READ);
        //通过inFileChannel.size()获取文件的大小,从而在内核地址空间中开辟与文件大小相同的直接缓冲区
        inFileChannel.transferTo(0, inFileChannel.size(), socketChannel);
        inFileChannel.close();
        if (socketChannel != null) {
            socketChannel.close();
        }
        long end = System.currentTimeMillis();
        System.out.println("客户端发送文件耗时:" + (end - start));
    }

    public static void main(String[] args) throws IOException {
//        server();
        client2();
    }
}
使用直接缓冲区客户端
未完待续。。。。。。。。。。。。。。。


