android应用图片加载与存放目录分析
本文分析的代码版本为Android 6.0
请尊重博主劳动成果,转载请标明出处。
一 使用资源id加载加载图片流程
在Activity或Fragment中常使用getResources().getDrawable()加载图片资源。getResources和getDrawable方法的调用需要经过哪些步骤和流程。
1 与Context相关的步骤
ContextThemeWrapper的
    @Override
    public Resources getResources() {
        return getResourcesInternal();
    }

    private Resources getResourcesInternal() {
        if (mResources == null) {
            if (mOverrideConfiguration == null) {
                mResources = super.getResources();
            } else {
                final Context resContext = createConfigurationContext(mOverrideConfiguration);
                mResources = resContext.getResources();
            }
        }
        return mResources;
    }
只分析mOverrideConfiguration==null条件下如何获取resource。super.getResources()调用的是ContextWrapper的方法,而ContextWrapper调用的是mBase.getResources()。mBase是ContextImpl实例,在Activity被ActivityThread创建时,通过Activity的attach()方法赋值给Activity的。Activity和ContextImpl的创建和赋值过程这里就不分析了。
ContextImpl的getResources()方法:
    @Override
    public Resources getResources() {
        return mResources;
    }
而mResources是在ContextImpl的私有构造方法内创建的。
   private ContextImpl(ContextImpl container, ActivityThread mainThread,
            LoadedApk packageInfo, IBinder activityToken, UserHandle user, int flags,
            Display display, Configuration overrideConfiguration, int createDisplayWithId) {
        …//省略部分无关代码
        mMainThread = mainThread;
        mActivityToken = activityToken;
        mFlags = flags;

        if (user == null) {
            user = Process.myUserHandle();
        }
        mUser = user;

        mPackageInfo = packageInfo;
        mResourcesManager = ResourcesManager.getInstance();

        final int displayId = (createDisplayWithId != Display.INVALID_DISPLAY)
                ? createDisplayWithId
                : (display != null) ? display.getDisplayId() : Display.DEFAULT_DISPLAY;

        CompatibilityInfo compatInfo = null;
        if (container != null) {
            compatInfo = container.getDisplayAdjustments(displayId).getCompatibilityInfo();
        }
        if (compatInfo == null) {
            compatInfo = (displayId == Display.DEFAULT_DISPLAY)
                    ? packageInfo.getCompatibilityInfo()
                    : CompatibilityInfo.DEFAULT_COMPATIBILITY_INFO;
        }
        //创建
        Resources resources = packageInfo.getResources(mainThread);
        if (resources != null) {
            if (displayId != Display.DEFAULT_DISPLAY
                    || overrideConfiguration != null
                    || (compatInfo != null && compatInfo.applicationScale
                            != resources.getCompatibilityInfo().applicationScale)) {

                if (container != null) {
                    // This is a nested Context, so it can't be a base Activity context.
                    // Just create a regular Resources object associated with the Activity.
                    resources = mResourcesManager.getResources(
                            activityToken,
                            packageInfo.getResDir(),
                            packageInfo.getSplitResDirs(),
                            packageInfo.getOverlayDirs(),
                            packageInfo.getApplicationInfo().sharedLibraryFiles,
                            displayId,
                            overrideConfiguration,
                            compatInfo,
                            packageInfo.getClassLoader());
                } else {
                    // This is not a nested Context, so it must be the root Activity context.
                    // All other nested Contexts will inherit the configuration set here.
                    //创建Activity的Context时的赋值流程
                    resources = mResourcesManager.createBaseActivityResources(
                            activityToken,
                            packageInfo.getResDir(),
                            packageInfo.getSplitResDirs(),
                            packageInfo.getOverlayDirs(),
                            packageInfo.getApplicationInfo().sharedLibraryFiles,
                            displayId,
                            overrideConfiguration,
                            compatInfo,
                            packageInfo.getClassLoader());
                }
            }
        }
        mResources = resources;

        …//省略部分无关代码
    }
这里就不分析packageInfo.getResources,mResourcesManager.getResources和mResourcesManager.createBaseActivityResources如何创建Resources。
2 Resources和ResourcesImpl中的步骤
继续看Resources#getDrawable:
    public Drawable getDrawable(@DrawableRes int id, @Nullable Theme theme)
            throws NotFoundException {
        //获取TypedValue,这个对象很重要,获取图片流时会用到
        final TypedValue value = obtainTempTypedValue();
        try {
            final ResourcesImpl impl = mResourcesImpl;
            //根据资源id获取信息,并对value赋值
            //这一步很重要,赋值后,就获取到对应资源的基本信息了。
            impl.getValue(id, value, true);
            return impl.loadDrawable(this, value, id, theme, true);
        } finally {
            releaseTempTypedValue(value);
        }
    }
ResourcesImpl#getValue方法对TypedValue赋值,然后ResourcesImpl#loadDrawable加载图片。真正获取Drawable的是ResourcesImpl。继续往下看代码:
    void getValue(@AnyRes int id, TypedValue outValue, boolean resolveRefs)
            throws NotFoundException {
        //使用AssetManager的native方法根据id和当前屏幕信息对value赋值
        boolean found = mAssets.getResourceValue(id, 0, outValue, resolveRefs);
        if (found) {
            return;
        }
        throw new NotFoundException("Resource ID #0x" + Integer.toHexString(id));
    }


    @Nullable
    Drawable loadDrawable(Resources wrapper, TypedValue value, int id, Resources.Theme theme, boolean useCache) throws NotFoundException {
        try {
            ...//省略无关代码
            final boolean isColorDrawable;
            final DrawableCache caches;
            final long key;
            if (value.type >= TypedValue.TYPE_FIRST_COLOR_INT
                    && value.type <= TypedValue.TYPE_LAST_COLOR_INT) {
                //使用color的xml相关的Drawable
                isColorDrawable = true;
                caches = mColorDrawableCache;
                key = value.data;
            } else {
                //非color的
                isColorDrawable = false;
                caches = mDrawableCache;
                key = (((long) value.assetCookie) << 32) | value.data;
            }

            // First, check whether we have a cached version of this drawable
            // that was inflated against the specified theme. Skip the cache if
            // we're currently preloading or we're not using the cache.
            //缓存获取
            if (!mPreloading && useCache) {
                final Drawable cachedDrawable = caches.getInstance(key, wrapper, theme);
                if (cachedDrawable != null) {
                    return cachedDrawable;
                }
            }
            // Next, check preloaded drawables. Preloaded drawables may contain
            // unresolved theme attributes.
            final Drawable.ConstantState cs;
            //从预先加载的缓存回去
            if (isColorDrawable) {
                cs = sPreloadedColorDrawables.get(key);
            } else {
                cs = sPreloadedDrawables[mConfiguration.getLayoutDirection()].get(key);
            }

            Drawable dr;
            if (cs != null) {
                dr = cs.newDrawable(wrapper);
            } else if (isColorDrawable) {
                dr = new ColorDrawable(value.data);
            } else {
                //******* 执行根据资源id加载图片 *******
                dr = loadDrawableForCookie(wrapper, value, id, null);
            }

            // Determine if the drawable has unresolved theme attributes. If it
            // does, we'll need to apply a theme and store it in a theme-specific
            // cache.
            final boolean canApplyTheme = dr != null && dr.canApplyTheme();
            if (canApplyTheme && theme != null) {
                dr = dr.mutate();
                dr.applyTheme(theme);
                dr.clearMutated();
            }

            // If we were able to obtain a drawable, store it in the appropriate
            // cache: preload, not themed, null theme, or theme-specific. Don't
            // pollute the cache with drawables loaded from a foreign density.
            //缓存效果信息和资源
            if (dr != null && useCache) {
                dr.setChangingConfigurations(value.changingConfigurations);
                cacheDrawable(value, isColorDrawable, caches, theme, canApplyTheme, key, dr);
            }

            return dr;
        } catch (Exception e) {
            String name;
            try {
                name = getResourceName(id);
            } catch (NotFoundException e2) {
                name = "(missing name)";
            }

            // The target drawable might fail to load for any number of
            // reasons, but we always want to include the resource name.
            // Since the client already expects this method to throw a
            // NotFoundException, just throw one of those.
            final NotFoundException nfe = new NotFoundException("Drawable " + name
                    + " with resource ID #0x" + Integer.toHexString(id), e);
            nfe.setStackTrace(new StackTraceElement[0]);
            throw nfe;
        }
}查看loadDrawableForCookie(这是真正加载图片的方法,重点关注):
private Drawable loadDrawableForCookie(Resources wrapper, TypedValue value, int id,
            Resources.Theme theme) {
        if (value.string == null) {
            throw new NotFoundException("Resource \"" + getResourceName(id) + "\" ("
                    + Integer.toHexString(id) + ") is not a Drawable (color or path): " + value);
        }

        //**** 重点信息:文件路径信息(是指存储在resources.arsc资源块中的文件路径,非目录信息)****
        final String file = value.string.toString();

        ...//省略无关日志信息

        final Drawable dr;

        Trace.traceBegin(Trace.TRACE_TAG_RESOURCES, file);
        try {
            if (file.endsWith(".xml")) {//获取xml类型的Drawable
                final XmlResourceParser rp = loadXmlResourceParser(
                        file, id, value.assetCookie, "drawable");
                dr = Drawable.createFromXml(wrapper, rp, theme);
                rp.close();
            } else {
                //******* 开始加载图片 *******
                //使用AssetManger的native方法获取图片资源的流
                final InputStream is = mAssets.openNonAsset(
                        value.assetCookie, file, AssetManager.ACCESS_STREAMING);
                //使用Drawable的静态方法构建
                dr = Drawable.createFromResourceStream(wrapper, value, is, file, null);
                is.close();
                //******* 加载图片结束 *******
            }
        } catch (Exception e) {
            Trace.traceEnd(Trace.TRACE_TAG_RESOURCES);
            final NotFoundException rnf = new NotFoundException(
                    "File " + file + " from drawable resource ID #0x" + Integer.toHexString(id));
            rnf.initCause(e);
            throw rnf;
        }
        Trace.traceEnd(Trace.TRACE_TAG_RESOURCES);

        return dr;
    }
3 Drawable和Bitmap生成步骤
查看Drawable#createFromResourceStream:
    public static Drawable createFromResourceStream(Resources res, TypedValue value,
            InputStream is, String srcName, BitmapFactory.Options opts) {
        if (is == null) {
            return null;
        }

        /*  ugh. The decodeStream contract is that we have already allocated
            the pad rect, but if the bitmap does not had a ninepatch chunk,
            then the pad will be ignored. If we could change this to lazily
            alloc/assign the rect, we could avoid the GC churn of making new
            Rects only to drop them on the floor.
        */
        Rect pad = new Rect();

        // Special stuff for compatibility mode: if the target density is not
        // the same as the display density, but the resource -is- the same as
        // the display density, then don't scale it down to the target density.
        // This allows us to load the system's density-correct resources into
        // an application in compatibility mode, without scaling those down
        // to the compatibility density only to have them scaled back up when
        // drawn to the screen.
        if (opts == null) opts = new BitmapFactory.Options();
        //设置当前屏幕的信息(160,240,320,480或640等等)
        //这些信息会决定生成bitmap的宽高
        opts.inScreenDensity = Drawable.resolveDensity(res, 0);
        //由于没有设置config,所以会默认采用Bitmap.Config.ARGB_8888。
        //即在内存中一个像素使用4个字节来存储
        Bitmap  bm = BitmapFactory.decodeResourceStream(res, value, is, pad, opts);
        if (bm != null) {
            byte[] np = bm.getNinePatchChunk();
            if (np == null || !NinePatch.isNinePatchChunk(np)) {
                np = null;
                pad = null;
            }

            final Rect opticalInsets = new Rect();
            bm.getOpticalInsets(opticalInsets);
            return drawableFromBitmap(res, bm, np, pad, opticalInsets, srcName);
        }
        return null;
    }
至此,根据资源Id加载图片的流程已分析完毕。
二 图片在不同drawable/mipmap目录与生成Bitmap大小的关系
从上一节的流程分析,可以清楚的知道通过使用Resource,TypedValue,AssetManager和BitmapFactory,我们也可以像应用框架一样根据id加载图片并控制生成的图片大小。
那么就敲代码验证。
布局文件
<RelativeLayout xmlns:android="http://schemas.android.com/apk/res/android"
    xmlns:tools="http://schemas.android.com/tools"
    android:id="@+id/activity_bitmap_test"
    android:layout_width="match_parent"
    android:layout_height="match_parent" >

    <ImageView
        android:id="@+id/iv"
        android:layout_width="wrap_content"
        android:layout_height="wrap_content"
        android:layout_alignParentBottom="true"
        android:src="@mipmap/ic_launcher"/>

RelativeLayout>
测试Activity的主要代码
@Override
    protected void onCreate(Bundle savedInstanceState) {
        super.onCreate(savedInstanceState);
        setContentView(R.layout.activity_bitmap_test);
        testLoadBitmap(R.mipmap.ic_launcher);
    }

    public void testLoadBitmap(int resId) {
        try {
            //资源名称
            String name = getResources().getResourceName(resId);

            TypedValue value = new TypedValue();
            //对value赋值
            getResources().getValue(resId, value, true);
            //资源路径
            String fs = value.string.toString();

            //Bitmap配置信息
            BitmapFactory.Options options = new BitmapFactory.Options();
            options.inScreenDensity = getResources().getDisplayMetrics().densityDpi;

            //获取资源信息
            AssetFileDescriptor afd = getAssets().openNonAssetFd(value.assetCookie, fs);

            //生产Bitmap
            Bitmap bm = BitmapFactory.decodeResourceStream(getResources(), value, afd.createInputStream(), new Rect(), options);

            //日志信息
            StringBuilder info = new StringBuilder();
            info.append(" name: ").append(name).append(" \n");
            info.append(" file info: ").append(fs).append("\n");
            info.append(" AssetFileDescriptor: ").append(afd.toString()).append("\n");
            info.append(" byteCount: ").append(bm.getByteCount()).append(" \n");
            info.append(" width = ").append(bm.getWidth()).append(", height = ").append(bm.getWidth()).append(" \n");
            info.append(" bm density = ").append(bm.getDensity()).append(" \n");
            info.append(" screenDensity = ").append(options.inScreenDensity).append(" \n");
            info.append(" config = ").append(bm.getConfig().toString());
            Log.i("Test", info.toString());
            bm.recycle();
        } catch (Exception e) {
            e.printStackTrace();
        }
    }

    @Override
    protected void onResume() {
        super.onResume();
        ImageView iv = (ImageView) findViewById(R.id.iv);
        //用断点查看drawable中的bitmap信息
        iv.setContentDescription("");
    }
工程目录中的ic_launcher.png信息。
| 目录 | mipmap-mdpi | mipmap-hdpi | mipmap-xhdpi | mipmap-xxhdpi | mipmap-xxxhdpi |
|---|---|---|---|---|---|
| 大小(byte) | 2206 | 3418 | 4842 | 7718 | 10486 |
测试手机屏幕尺寸为1920*1080,screenDensity为480。ImageView获取的图片应该为mipmap-xxhdpi目录中的ic_launcher.png。
1 测试一
测试的日志信息
name: org.md.train:mipmap/ic_launcher
file info: res/mipmap-xxhdpi-v4/ic_launcher.png
AssetFileDescriptor: {AssetFileDescriptor: {ParcelFileDescriptor: FileDescriptor[50]} start=26984 len=7007}
byteCount: 82944
width = 144, height = 144
bm density = 480
screenDensity = 480
config = ARGB_8888
断点查看的信息

使用代码加载的Bitmap与布局ImageView获取的字节数,宽高和density都一致,说明代码逻辑正确。
bitmap的字节数为什么比原图片文件大很多?现在我们来计算一下。
计算格式: byteCount = width * height * 4;
因为生成bitmap时,使用默认的Config,即Bitmap.Config.ARGB_8888,所以为乘4。如果使用Bitmap.Config.ARGB_565,采用2个字节存储一个像素,则为乘2。
144 * 144* 4 = 82944,刚好为所显示的字节数。
日志中AssetFileDescriptor的项信息,start为图片在resources.arsc资源块中的起始位置,len为大小。通过与信息表对比可知,图片在写入资源块时被压缩了711byte。
2 测试二
将mipmap-xhdpi目录的尺寸为96 * 96的ic_launcher.png复制一份,重命名为aaa.png,放入mipmap-hdpi目录。修改布局文件中ImageView的src值为aaa,使用testLoadBitmap方法加载该图片。
结果日志信息
name: org.md.train:mipmap/aaa
file info: res/mipmap-hdpi-v4/aaa.png
AssetFileDescriptor: {AssetFileDescriptor: {ParcelFileDescriptor: FileDescriptor[50]} start=220860 len=4366}
byteCount: 147456
width = 192, height = 192
bm density = 480
screenDensity = 480
config = ARGB_8888
查看到ImageView中的bitmap信息
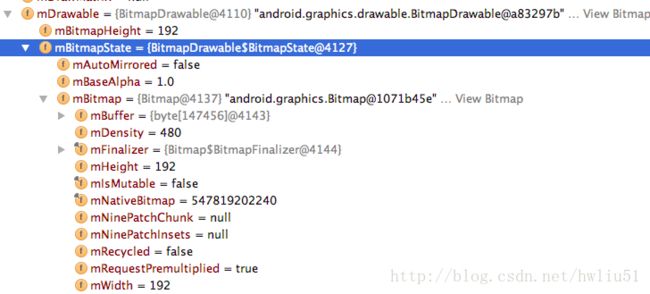
这个结果是不是有点奇怪。为什么生成的bitmap尺寸变大了?从上一节的第3小节Drawable和Bitmap生成步骤的代码分析,这个现象就比较容易理解。
先看尺寸对照表
| 目录 | mipmap-mdpi | mipmap-hdpi | mipmap-xhdpi | mipmap-xxhdpi | mipmap-xxxhdpi |
|---|---|---|---|---|---|
| screenDensity | 160 | 240 | 320 | 480 | 640 |
aaa.png在480的手机上显示的真实宽度:96 * 480 / 240 = 192;显示的高度也是同比例放大。为什么是240,而不是320?因为aaa.png图片存放在mipmap-hdpi。如果存放在mipmap-xhdpi,则aaa.png在测试手机上显示的宽度为96 * 480 / 320 = 144。
3 测试三
依照以下测试条件,从当前的mipmap目录复制一份ic_launcher.png,重命名为abc.png。
(注:Y为有abc.png,N为无)
| 组 | mipmap-mdpi | mipmap-hdpi | mipmap-xhdpi | mipmap-xxhdpi | mipmap-xxxhdpi | 当前图片来源 |
|---|---|---|---|---|---|---|
| 第一组 | Y | N | N | N | Y | mipmap-xxxhdpi |
| 第二组 | Y | Y | N | N | N | mipmap-hdpi |
| 第三组 | Y | Y | Y | N | N | mipmap-xhdpi |
| 第四组 | Y | Y | Y | N | Y | mipmap-xxxhdpi |
这个结果显示:如果当前屏幕尺寸的mipmap目录无图片,则会找最近目录中相同名称的图片。如果最近的两个目录都有,则会选择高分辨率目录的图片。
三 如何存放图片和优化加载
由以上的代码分析和测试结果,切图一定要放到匹配的目录。一般从1280 * 720的设计图切取的图片要放到mipmap-xhdpi目录。如果放入到低分辨率的目录,则在1280 * 720尺寸或更高的手机上时,由于需要放大,则加载图片所需的内存暴增。而放入到高分辨率的目录,则会导致在1280 * 720尺寸或更低的手机显示很模糊或很小,因为图片被缩放。
如果是代码加载图片,且图片没有透明色(即alpha通道),则最好将BitmapFactory.Options的config设置为Bitmap.Config.ARGB_565。如果是加载很大尺寸的图片,最好先只获取图片的宽高,然后按显示需要的尺寸进行缩放获取bitmap。
使用BitmapFactory.Options.inBitmap重用以前bitmap分配的内存。这个属性在Androiod 4.2版本被引入。不过需要注意:Android 4.4之前的版本,在使用inBitmap时,两者的size要相同。而4.4之后,只要新生成的Bitmap比之前的size小就可以。
源码上部分注释说明:
Prior to {@link android.os.Build.VERSION_CODES#KITKAT} additional
constraints apply: The image being decoded (whether as a resource or
as a stream) must be in jpeg or png format. Only equal sized bitmaps
are supported, with {@link #inSampleSize} set to 1. Additionally, the
{@link android.graphics.Bitmap.Config configuration} of the reused
bitmap will override the setting of {@link #inPreferredConfig}, if
set.As of {@link android.os.Build.VERSION_CODES#KITKAT}, any mutable
bitmap can be reused by {@link BitmapFactory} to decode any other
bitmaps as long as the resulting {@link Bitmap#getByteCount() byte
count} of the decoded bitmap is less than or equal to the {@link
Bitmap#getAllocationByteCount() allocated byte count} of the reused
bitmap. This can be because the intrinsic size is smaller, or its size
post scaling (for density / sample size) is smaller.
更详细的说明可以查看BitmapFactory内部类Options。