solr-hbase二级索引及查询解决方案(一)
最近要搞一个查询功能,是把hbase中的数据方便的查询出来.之前根据rowkey的查询方式,尽管有针对性设计过rowkey,有前缀查询,后缀查询,以及正则查询,但是实际上不够用.
参考了网络上的设计,建立二级索引是比较好的思路.于是就以solr存储hbase里面的列索引,实现了这个功能.
需要的组件有:
1.hbase
2.solr
3.key-value store indexer
4.CDH
5.zookeeper
6.hadoop
key-value store indexer 是一个基于hbase的replication特性而实现的能够动态的将hbase的二级索引同步给solr的组件,并且可以批量导入索引,增量同步索引,同步时延比较小,几乎近实时.
需要的组件看起来有些多,由于我们本来是用CDH管理组件,所以这里也是在CDH中搭建环境的.当然,单独安装组件也可以,不过容易出错,本人之前单独安装配置了solr,却感觉接下来无从下手,喜欢动手的可以一试.
在CDH中安装好以上环境.具体安装配置,方式,CDH有介绍.
…
…
7.cdh安装solr集群
8.安装key-value store indexer 集群
…
这里的集群,hadoop,hbase用了4台机器,其它的都用了3台机器,机器数量不一致,但是zookeeper,solr机器数量最好一致,因为zookeeper集群数量在2n+1时最为稳定.
SOLR-HBASE-INDEXER安装
1.cdh安装solr集群
solr的java heap内存配置改成1G.
2.安装key-value store indexer 集群
3.Hbase表需要开启REPLICATION复制功能
create 'table',{NAME => 'info', REPLICATION_SCOPE => 1}其中1表示开启replication功能,0表示不开启,默认为0
4.对于已经创建的表可以使用如下命令
    disable 'table' alter 'table',{NAME => 'info', REPLICATION_SCOPE => 1}

    enable 'table'
5.生成实体配置文件, /testhbase/cdhsolr/testIndex是自定义路径,可以自己设置
solrctl instancedir --generate /testhbase/cdhsolr/testIndex6.编辑生成好的scheme.xml文件
把hbase表中需要索引的列添加到scheme.xml filed节点,其中的name属性值要与Morphline.conf文件中的outputField属性值对应
"COL1" type="string" indexed="true" stored="true" multiValued="false" required="true"/>

   "COL2" type="string" indexed="true" stored="true" multiValued="false" required="true"/>
修改solrconfig.xml 文件中autoCommit. 这里还可以调整同步间隔,比如把60000改成120000.
    <autoCommit>
       <maxTime>${solr.autoCommit.maxTime:60000}maxTime>
       <openSearcher>trueopenSearcher>
     autoCommit>
7.创建collection实例并配置文件上传到zookeeper,命令
solrctl instancedir --create testIndex /testhbase/cdhsolr/testIndex8.上传到zookeeper之后,其他节点就可以从zookeeper下载配置文件。接下来创建collection,命令:可指定分片数和副本数量
solrctl collection --create testIndex -s 3 -r 3 -m 509.在Hbase-solr的安装目录(cdh目录下面)下,创建Lily HBase Indexer配置文件morphline-hbase-mapper.xml
vi /testhbase/cdhsolr/testIndex/conf/hbase-indexer/morphline-hbase-mapper.xmlmorphline-hbase-mapper.xml文件内容:
<indexer table="solr_test_table" mapper="com.ngdata.hbaseindexer.morphline.MorphlineResultToSolrMapper">
 <param name="morphlineFile" value="morphlines.conf">param>
 <param name="morphlineId" value="testIndexMap">param>
indexer>
其中morphlineId 的value是对应Key-Value Store Indexer 中配置文件Morphlines.conf 中morphlines 属性id值
Morphlines.conf 文件配置,下文有说明.
mkdir /testhbase/cdhsolr/testIndex/conf/hbase-indexer
    cp /testhbase/cdhsolr/hbase-indexer/morphline-hbase-mapper.xml /testhbase/cdhsolr/testIndex/conf/hbase-indexer/morphline-hbase-mapper.xml
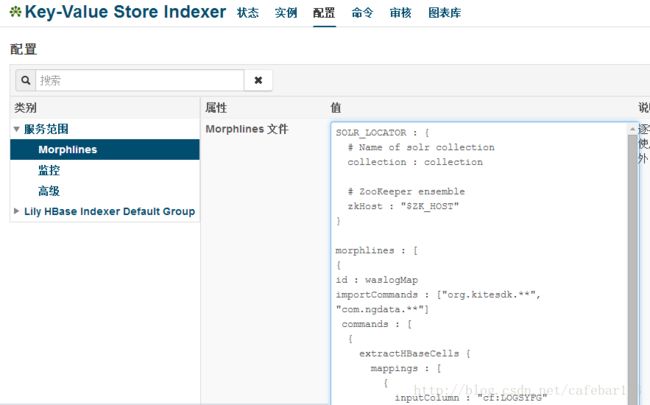
10.修改Morphlines 文件, 具体操作:进入Key-Value Store Indexer面板->配置->查看和编辑->属性-Morphline文件, 
inputColumn:Hbase的CLOUMN
outputField:Solr的Schema.XML配置的fields
morphlines : [
{
id :testIndexMap
importCommands : ["org.kitesdk.**", "com.ngdata.**"]

commands : [
  {
    extractHBaseCells {
    mappings : [
    {
      inputColumn : "info:COL1"
      outputField : "COL1"
      type : string
      source : value
    },
   {
      inputColumn : "info:COL2"
      outputField : "COL2"
      type : string
      source : value
    }
  ]
}
  }
  { logDebug { format : "output record: {}", args : ["@{}"] } }
]
}
]
11.注册Lily HBase Indexer configuration 和 Lily Hbase Indexer Service
    hbase-indexer add-indexer \
    --name testIndex \
    --indexer-conf /testhbase/cdhsolr/testIndex/conf/hbase-indexer/morphline-hbase-mapper.xml \
    --connection-param solr.zk=c2:2181,c3:2181,c4:2181/solr \
    --connection-param solr.collection=testIndex \
    --zookeeper c2:2181,c3:2181,c4:2181
12.验证索引器是否成功创建
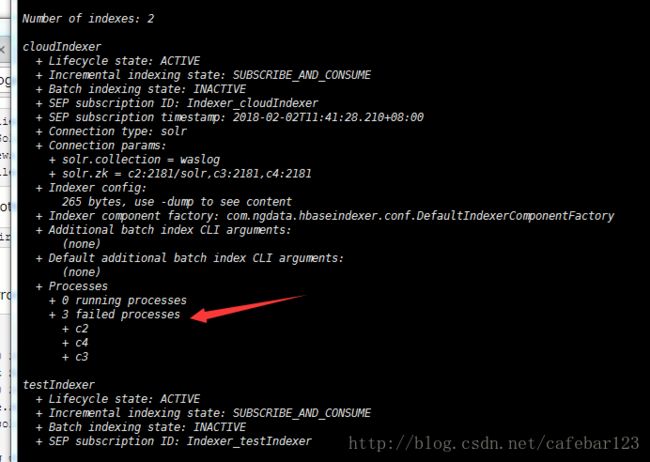
hbase-indexer list-indexers13.测试put数据查看结果
当写入数据后,稍过几秒我们可以在相对于的solr中查询到该插入的数据,表明配置已经成功
put 'solr_test_table','r1','info:COL1','123456'14.使用IK分词器(这里我下了一个solr5以上版本适用的IK jar包)
在/home/parcels/CDH/lib/solr/webapps/solr/WEB-INF创建classes目录
把IKAnalyzer.cfg.xml 和 stopword.dic添加到classes目录
把IKAnalyzer2012FF_u1.jar添加到/opt/cloudera/parcels/CDH/lib/solr/webapps/solr/WEB-INF/lib目录
在Schema.xml中添加
 <fieldType name="text_ik" class="solr.TextField">


        <analyzer type="index" isMaxWordLength="false" class="org.wltea.analyzer.lucene.IKAnalyzer"/>


        <analyzer type="query" isMaxWordLength="true" class="org.wltea.analyzer.lucene.IKAnalyzer"/>
fieldType>
配置好后,更新ZK配置文件,重启solr服务
15.扩展命令
Scheme.xml新增索引字段
执行以下命令更新配置:
solrctl instancedir --update testIndex /testhbase/cdhsolr/testIndex

solrctl collection --reload testIndex
hbase-indexer update-indexer -n testIndex
添加多个索引器
当你需要创建多个索引时,可以按下面说明操作。
一个solr 索引对应一个collection,一个collection对一个morphline-hbase-mapper.xml和Morphlines.conf。当需要配置多个索引时,在Morphlines.conf的morphlines节点添加对应索引模块,以id区分,如下面代码模块:
morphlines : [
{
id :testIndexMap
importCommands : [“org.kitesdk.“, “com.ngdata.“]
commands : [
{
extractHBaseCells {
mappings : [
{
inputColumn : “info:COL1”
outputField : “COL1”
type : string
source : value
},
{
inputColumn : “info:COL2”
outputField : “COL2”
type : string
source : value
}
]
}
}
{ logDebug { format : “output record: {}”, args : [“@{}”] } }
]
},
{
id :testIndexMap2
importCommands : [“org.kitesdk.“, “com.ngdata.“]
commands : [
{
extractHBaseCells {
mappings : [
{
inputColumn : “info2:COL1”
outputField : “COL1”
type : string
source : value
},
{
inputColumn : “info2:COL2”
outputField : “COL2”
type : string
source : value
}
]
}
}
{ logDebug { format : “output record: {}”, args : [“@{}”] } }
]
}
]
16.Hbase表数据到SOLR集群迁移
在CDH5.3.2中Hbase-indexer提供了MapReduce来批量构建索引的方式,该MapReduce封装在如下jar包中,只需用命令行执行:
/home/parcels/CDH-5.3.2-1.cdh5.3.2.p0.10/lib/hbase-solr/tools/hbase-indexer-mr-1.5-cdh5.3.2-job.jar
如果对一个已经存在数据的hbase表做了索引,会发现只记录了后面插入的数据,已经存在的数据没有索引。那么就要将之前的数据的索引同步上。
运行同步命令需要在有morphlines.conf文件的目录进行。在hbase的master节点上,执行命令:
find / | grep morphlines.conf$进入最新的那个process目录/run/cloudera-scm-agent/process/345-ks_indexer-HBASE_INDEXER,本人是在solrcloud 的leader core所在节点上操作,当然最好找最新的process. ks_indexer-HBASE_INDEXER 前面的数字最大,表示最新.
(如果想不进入目录执行,则在命令中加上 –morphline-file /run/cloudera-scm-agent/process/345-ks_indexer-HBASE_INDEXER/morphlines.conf,来指定目录所在位置 )
在进入的目录中,将morphlines.conf文件拷到该目录.
执行命令:
hadoop --config /etc/hadoop/conf \
jar /home/parcels/CDH-5.12.0-1.cdh5.12.0.p0.29/lib/hbase-solr/tools/hbase-indexer-mr-1.5-cdh5.12.0-job.jar \
--conf /etc/hbase/conf/hbase-site.xml \
--hbase-indexer-file /testhbase/cdhsolr/testIndex/conf/hbase-indexer/morphline-hbase-mapper.xml \
--zk-host c2:2181,c3:2181,c4:2181/solr \
--collection testIndex \
--reducers 0 \
--go-live
等待完成,这样,hbase中的数据的二级索引就批量导进solr中.
17.卸载索引
solr删除索引,一般只能一条一条的删,当然可以写程序批量删除.
如果是删除建立的testIndex索引,删除步骤:
hbase-indexer delete-indexer -n testIndex

solrctl collection --delete testIndex

solrctl collection --list

solrctl instancedir --delete testIndex

solrctl instancedir --list
删除hadoop上core目录:
export HADOOP_USER_NAME=solr

hdfs dfs -rm -r /solr/*
清空回收站:
hdfs dfs -expunge删除索引物理目录:
rm -rf /testhbase/cdhsolr/testIndex以上操作是必须项.
有必要的时候,还要清理zookeeper上和solr有关(/solr),和indexer有关(/ngdata),和hbase有关(/hbase)
清理/var/lib/solr中创建的core目录下面的与indexer配置相关的文件
重启solr-server服务,重启Lily hbase indexer服务.
18.报错解决思路.
执行17步骤的流程,能解决大部分错误.除此之外,可以删除/tmp中跟solr有关文件,/home/yarn/userCache中跟solr有关文件, solr分片所在目录中的文件,总之,尽量先清除solr的残余缓存,core文件,再重启solr,Lily hbase indexer等服务.
参考资料:
http://blog.csdn.net/u010936936/article/details/78064148
http://blog.csdn.net/zgjdzwhy/article/details/68059751
http://www.niuchaoqun.com/14543825447680.html
http://www.zhangrenhua.com/2017/02/10/Hbase%E4%BD%BF%E7%94%A8Solr%E4%BA%8C%E7%BA%A7%E7%B4%A2%E5%BC%95(Lily%20Hbase%20Index)/
等.
(非常感谢以上作者提供的细致解答)
