Android 学习之《第一行代码》第二版 笔记(九)探究碎片(一)
一、碎片
1. 碎片是什么:
碎片(Fragment)是一种可以嵌入在活动当中的UI片段,能让程序更加合理和充分地利用大屏幕的空间。(可以理解成迷你型活动)
2. 简单用法:
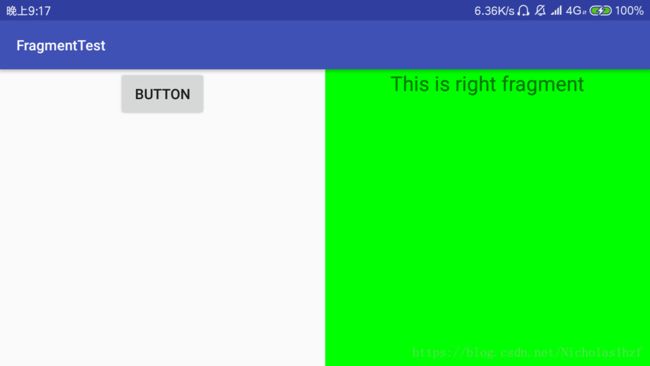
在一个活动当中添加两个碎片,并让这两个碎片平分活动空间。
1.)效果图(没钱买平板,CPU不支持使用Android Studio的模拟器,所以使用手机横屏演示)
2.)新建一个左侧碎片布局和一个右侧碎片布局
左侧碎片布局(left_fragment.xml)
<LinearLayout xmlns:android="http://schemas.android.com/apk/res/android"
    android:orientation="vertical"
    android:layout_width="match_parent"
    android:layout_height="match_parent">

    <Button
        android:id="@+id/button"
        android:layout_width="wrap_content"
        android:layout_height="wrap_content"
        android:layout_gravity="center_horizontal"
        android:text="Button"/>

LinearLayout>
右侧碎片布局(right_fragment.xml)
<LinearLayout xmlns:android="http://schemas.android.com/apk/res/android"
    android:orientation="vertical"
    android:background="#00ff00"
    android:layout_width="match_parent"
    android:layout_height="match_parent">

    <TextView
        android:layout_width="wrap_content"
        android:layout_height="wrap_content"
        android:layout_gravity="center_horizontal"
        android:textSize="20sp"
        android:text="This is right fragment"/>

LinearLayout>
3.)新建一个LeftFragment类和一个RightFragment类
LeftFragment.java
重写onCreateView(…)方法,通过LayoutInflater的inflate()方法把刚才定义的布局动态加载进来。
import android.os.Bundle;
import android.support.annotation.Nullable;
import android.support.v4.app.Fragment;
import android.view.LayoutInflater;
import android.view.View;
import android.view.ViewGroup;

public class LeftFragment extends Fragment {
    @Nullable
    @Override
    public View onCreateView(LayoutInflater inflater, @Nullable ViewGroup container, @Nullable Bundle savedInstanceState) {
        View view = inflater.inflate(R.layout.left_fragment,container,false);
        return view;
    }
}
RightFragment.java
重写onCreateView(…)方法,通过LayoutInflater的inflate()方法把刚才定义的布局动态加载进来。
import android.os.Bundle;
import android.support.annotation.Nullable;
import android.support.v4.app.Fragment;
import android.view.LayoutInflater;
import android.view.View;
import android.view.ViewGroup;

public class RightFragment extends Fragment {
    @Nullable
    @Override
    public View onCreateView(LayoutInflater inflater, @Nullable ViewGroup container, @Nullable Bundle savedInstanceState) {
        View view = inflater.inflate(R.layout.right_fragment,container,false);
        return view;
    }
}
4.)修改activity_main.xml
<LinearLayout xmlns:android="http://schemas.android.com/apk/res/android"
    android:orientation="horizontal"
    android:layout_width="match_parent"
    android:layout_height="match_parent">

    <fragment
        android:id="@+id/left_fragment"
        android:name="com.example.thinkpad.fragmenttest.LeftFragment"
        android:layout_width="0dp"
        android:layout_height="match_parent"
        android:layout_weight="1"/>

    <fragment
        android:id="@+id/right_fragment"
        android:name="com.example.thinkpad.fragmenttest.RightFragment"
        android:layout_width="0dp"
        android:layout_height="match_parent"
        android:layout_weight="1"/>

LinearLayout>
3. 动态添加碎片
在上面简单用法上修改代码。
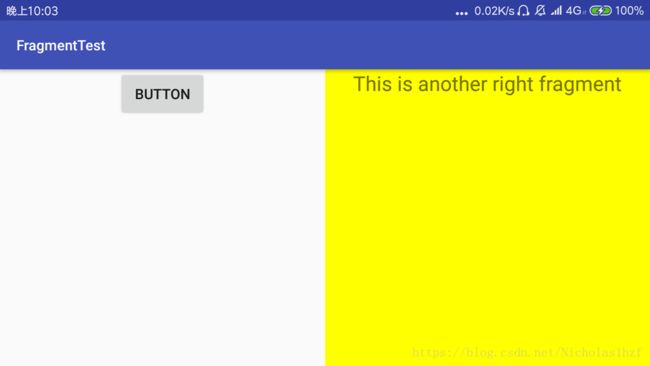
1.)效果图(原先是绿色碎片点击之后变成黄色碎片)
2.)新建 another_right_fragment.xml 和 AnotherRightFragment.java 作为动态添加进去的碎片。
another_right_fragment.xml
<LinearLayout xmlns:android="http://schemas.android.com/apk/res/android"
    android:orientation="vertical"
    android:background="#ffff00"
    android:layout_width="match_parent"
    android:layout_height="match_parent">

    <TextView
        android:layout_width="wrap_content"
        android:layout_height="wrap_content"
        android:layout_gravity="center_horizontal"
        android:textSize="20sp"
        android:text="This is another right fragment"/>

LinearLayout>
AnotherRightFragment.java
import android.os.Bundle;
import android.support.annotation.Nullable;
import android.support.v4.app.Fragment;
import android.view.LayoutInflater;
import android.view.View;
import android.view.ViewGroup;

public class AnotherRightFragment extends Fragment {
    @Nullable
    @Override
    public View onCreateView(LayoutInflater inflater, @Nullable ViewGroup container, @Nullable Bundle savedInstanceState) {
        View view = inflater.inflate(R.layout.another_right_fragment,container,false);
        return view;
    }
}
3.)修改 activity_main.xml 创建“容器”
activity_main.xml
<LinearLayout xmlns:android="http://schemas.android.com/apk/res/android"
    android:orientation="horizontal"
    android:layout_width="match_parent"
    android:layout_height="match_parent">

    <fragment
        android:id="@+id/left_fragment"
        android:name="com.example.thinkpad.fragmenttest.LeftFragment"
        android:layout_width="0dp"
        android:layout_height="match_parent"
        android:layout_weight="1"/>

    <FrameLayout
        android:id="@+id/right_layout"
        android:layout_width="0dp"
        android:layout_height="match_parent"
        android:layout_weight="1">
    FrameLayout>

LinearLayout>
4.)在主活动中向“容器”FrameLayout里添加内容,从而实现动态添加碎片的功能。
import android.support.v4.app.Fragment;
import android.support.v4.app.FragmentManager;
import android.support.v4.app.FragmentTransaction;
import android.support.v7.app.AppCompatActivity;
import android.os.Bundle;
import android.view.View;
import android.widget.Button;

public class MainActivity extends AppCompatActivity {

    @Override
    protected void onCreate(Bundle savedInstanceState) {
        super.onCreate(savedInstanceState);
        setContentView(R.layout.activity_main);
        Button button = (Button) findViewById(R.id.button);
        button.setOnClickListener(new View.OnClickListener() {
            @Override
            public void onClick(View view) {
                //new AnotherRightFragment()创建碎片实例
                //点击Button按钮,出发事件,将绿色碎片替换成黄色碎片
                replaceFragment(new AnotherRightFragment());
            }
        });
        //在Button按钮未被点击之前先动态加载进去绿色的碎片
        replaceFragment(new RightFragment());
    }

    private void replaceFragment(Fragment fragment){
        //获取FragmentManager 恩,应该叫碎片管理器吧
        FragmentManager fragmentManager = getSupportFragmentManager();
        //开启一个碎片事务
        FragmentTransaction transaction = fragmentManager.beginTransaction();
        //向FrameLayout容器替换碎片 第一个参数为容器,第二个参数为替换进去的碎片
        transaction.replace(R.id.right_layout,fragment);
        //提交事务
        transaction.commit();
    }
}
5.)动态添加碎片主要分为5步:
A. 创建待添加的碎片实例。
B. 获取 FragmentManager “碎片管理者”,在活动中调用getSupportFragmentManager();得到。
C. 开启一个碎片事务,通过beginTransaction();方法开启。
D. 向容器里面添加或替换碎片,一般使用replace()方法实现,参数为容器id和待添加或替换的碎片实例。
E. 提交事务,commit();
4. 在碎片中模拟返回栈
在事务提交之前调用FragmentTransaction的addToBackStack(null)方法。
5. 碎片和活动之间进行通信:
1.)在活动中使用碎片方法
FragmentManager 提供的方法 findFragmentById(…); 获取碎片实例。
2.)在碎片里使用活动方法
调用getActivity()方法(获取到的活动本身也是一个Context对象)
3.)碎片到碎片
使用2.)再使用1.)
5. 动态加载布局的技巧——使用限定符
整理学习自郭霖大佬的《第一行代码》
目前小白一名,持续学习Android中,如有错误请批评指正!

