SpringBoot简单的SpringBoot后端
下面案例作为自己学习SpringBoot的笔记,是一个简单SpringBoot后端代码;
包含 entity , dao ,controller
一、开发准备:
1)Jdk1.7及以上(官方建议使用最新版本的jdk,spring boot对最新版本的jdk也是支持最好的。) jdk安装省略。
2)Maven安装:使用maven能够快速的添加jar包,提高工作效率。
3)IDE:spring tool suit (STS),eclipse,idea等都可以,下面是用sts演示;
二、创建项目
注:以下程序示例是在安装maven和jdk1.8下进行的
创建过程如图:
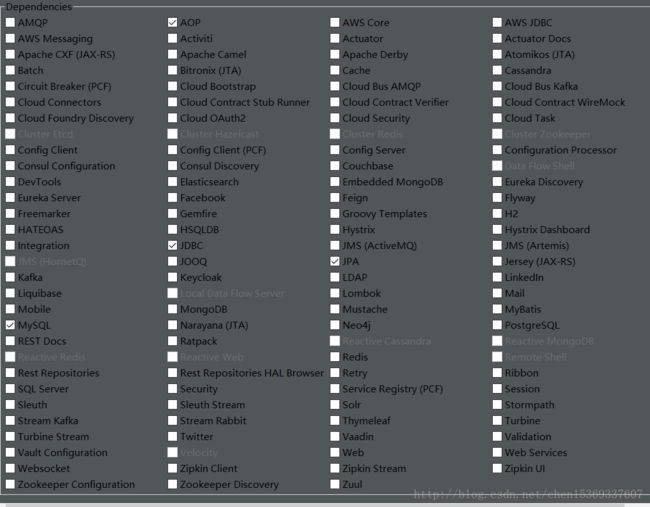
第一步:创建项目(这里有jdk的版本和spring boot的版本)

第二步:添加依赖(AOP,MYSQL,JDBC,JPA)
第三步:
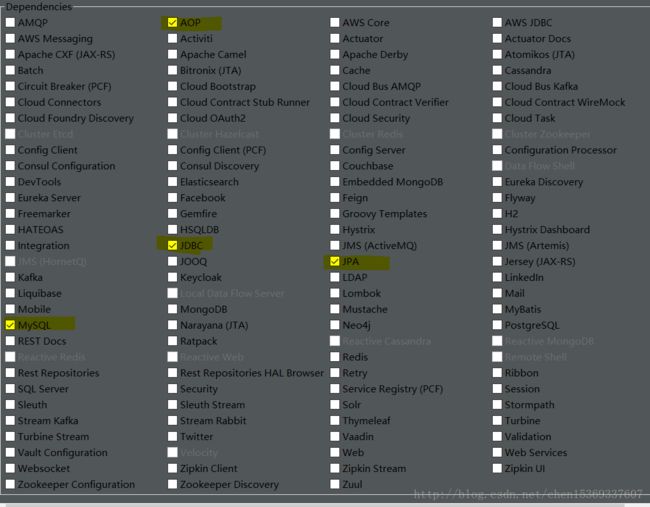
创建完成后为:
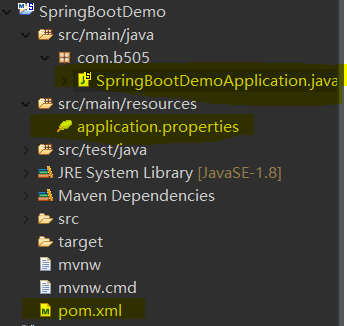
SpringBootDemoApplication这个类为包含一个main方法,启动项目的入口;
Application.properties 这个是spring boot的配置文件
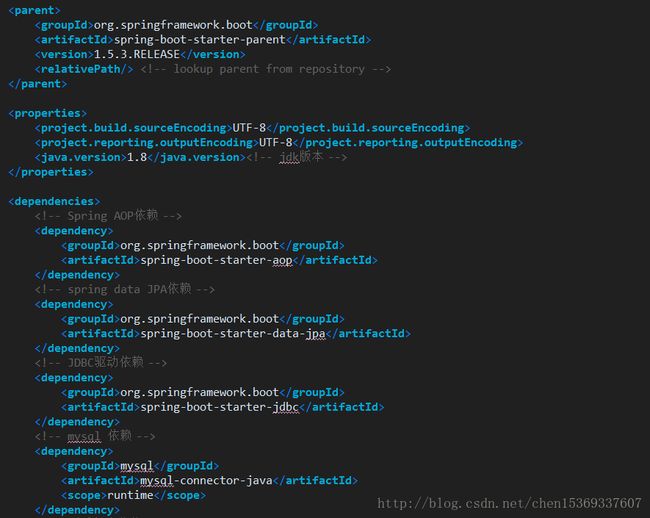
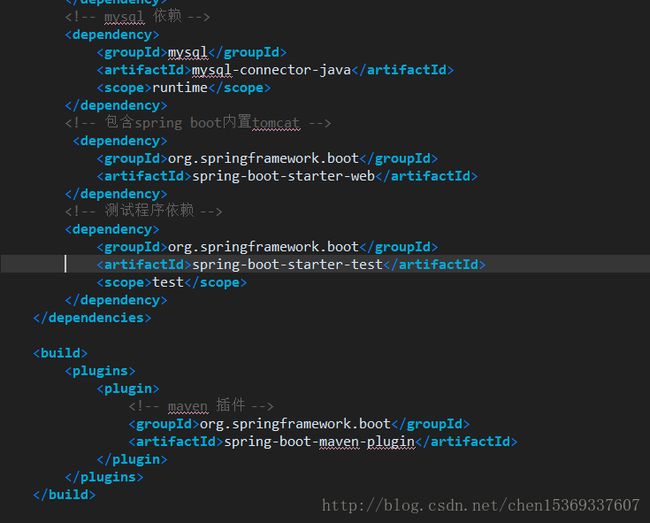
Pom.xml 这个是放项目依赖的地方。
项目结构如上,下面来看看内部:
Pom:
下面开始编写示例代码:
首先就应该是Spring Boot连数据库的配置,SpringBoot为我们做了很多自动配置,我们只需要配置数据地址,用户名和密码即可,找到application.properties文件配置如下:
spring.datasource.username=root
spring.datasource.password=你的数据库密码
spring.datasource.driver-class-name=com.mysql.jdbc.Driver
spring.datasource.url=jdbc:mysql://127.0.0.1:3306/dbgirl

#JPA 配置
spring.jpa.properties.hibernate.hbm2ddl.auto=update
#Spring mvc 配置前缀
spring.mvc.view.prefix=classpath:/templates/
# … 后缀
spring.mvc.view.suffix=*.html
创建一个bean:
package com.b505.bean;

import javax.persistence.Column;
import javax.persistence.Entity;
import javax.persistence.GeneratedValue;
import javax.persistence.Id;
import javax.persistence.Table;

/**
     * @Name:
     * @Description:  user 实体类
     * @Author: 追到乌云的尽头找太阳
     * @Version: V1.00 (版本号)
     * @Create Date: 2017年5月5日下午9:29:18
     * @Parameters:
     * @Return:
     */
@Entity
@Table(name = "user")
public class User {
    @Id
    @GeneratedValue
    private Integer id;
    @Column(name = "name")
    private String name;
    @Column(name = "age")
    private int age;
    @Column(name = "hobby")
    private String hobby;
    //省略set get方法
}
编写Dao层,Dao层十分简单,直接继承Spring data Jpa可以获取十八中默认方法,代码如下:
package com.b505.dao;

import org.springframework.data.jpa.repository.JpaRepository;

import com.b505.bean.User;

public interface UserDao extends JpaRepository<User, Integer> {

}
编写controller(此处直接调用Dao层,没有经过service)
代码如下:
package com.b505.web;

import java.util.List;

import org.springframework.beans.factory.annotation.Autowired;
import org.springframework.web.bind.annotation.RequestMapping;
import org.springframework.web.bind.annotation.RequestMethod;
import org.springframework.web.bind.annotation.RequestParam;
import org.springframework.web.bind.annotation.RestController;

import com.b505.bean.User;
import com.b505.dao.UserDao;

/**
     * @Name:
     * @Description: user控制类
     * @Author: 追到乌云的尽头找太阳
     * @Version: V1.00 (版本号)
     * @Create Date: 2017年5月5日下午9:30:14
     * @Parameters:
     * @Return:
     */
@RestController
public class UserController {

    @Autowired
    private UserDao userDao;
    //删除
    @RequestMapping(value ="/delete" ,method = RequestMethod.POST)
    public  void weekdaylDelete(@RequestParam("id") Integer id){
        System.out.println("删除执行");
        userDao.delete(id);
    }
    //添加
    @RequestMapping(value ="/add" ,method = RequestMethod.POST)
    public void weekdayAdd(@RequestParam("name") String name,
            @RequestParam("age") Integer age,@RequestParam("hobby") String hobby
            ){
        User user = new User();
        user.setName(name);
        user.setAge(age);
        user.setHobby(hobby);
        userDao.save(user);
    }
    //查询所有
    @RequestMapping(value ="/getall" ,method = RequestMethod.GET)
    public List girlList(){
        System.out.println("查询所有执行");
        return  userDao.findAll();
    }
}
至此就已经返回json数据了,运行一下程序进行测试
运行方法:找到含有mian 方法的类 运行 run Java application;
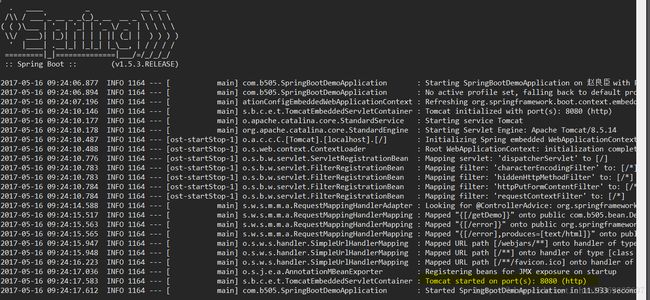
出现类似如图所示,说明程序编译通过。
直接在后台数据库添加数据(也可以是用postman)因为浏览器默认是使用get方法:

下面我们在谷歌浏览器中访问:
在地址栏输入 http://127.0.0.1:8080/getall
测试结果:
![]()
在controller中的add和delete方法测试结果
测试页面代码:
<html lang="en" ng-app="myApp" ng-controller="myController">
<head>
    <meta charset="UTF-8">
    <title>Titletitle>
    <script src="js/angular.min.js">script>
    <link href="css/directive_bind.css" rel="stylesheet" type="text/css" />
    <script src="js/service_http.js">script>
head>
<body>

<div class="box">
<div class="portlet-title">
    <div class="caption">
        <img class="icon-reorder" src="images/record.png">img> 人员信息管理 div>
div>
<table class="table table-bordered" ng-style="myStyle">

    <tr>
        <td>姓名td>
        <td>年龄td>
        <td>爱好td>
        <td>td>
    tr>
    <tr ng-repeat="day in days" >
        <td ng-class-even="'even'"> {{day.name}} td>
        <td>
         {{day.age}}
        td>
        <td>
            {{day.hobby}}
        td>
        <td>
         <button class="delete" ng-click="removeDay(day.id)"><img src="images/Delete (1).png" />删除 button>
        td>
    tr>
table>
    <button ng-click="add()">添加人员信息button>
    <div  id="table1" ng-show='menuState.show'>
        <div class="portlet-title1">
            <div class="caption">
                <img class="icon-reorder" src="images/record.png">img> 添加信息 div>
        div>
        <div class="content" >
            <span>姓名:span> <input ng-model="name" type="text" placeholder="请输入姓名" />
        <br>
            <span>年龄:span> <input ng-model="age" type="text" placeholder="请输入年龄" />
        <br>
            <span>爱好:span> <input ng-model="hobby" class="hobby" type="text" placeholder="请输入爱好" />
        div>
         <input class="submit" ng-click="submit(name,age,hobby)" type="button" value="提交" />

    div>
div>
body>
html>
用的是angularJs ,相关js依赖自行添加;
在浏览器中输入 : http://localhost:8080
映射自行配置,在后面的博客中我写

点击添加按钮:
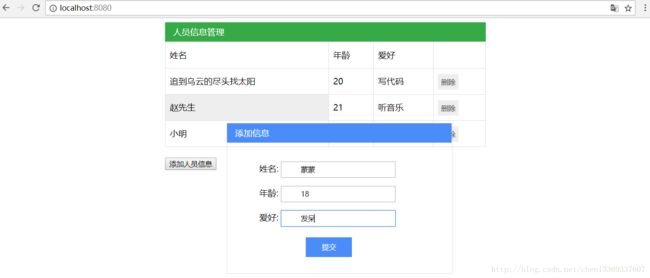
添加后结果为:

点击删除小明:

至此简单的后台已经搭建完毕,SpringBoot能够将类直接转换为json数据,这只是SpringBoot众多功能中的一个;后面我会将这两次博客的源码地址放上,如有错误,请多指教!