OpenGL渲染框架搭建
文章目录
- OpenGL渲染框架搭建
- OpenGL场景控制
- 初始化
- 全局变量
- 键盘控制
- 鼠标控制
- shader控制
- camera控制
- 模型导入
- 虚函数接口和模型基类
- 模型导入
- 渲染流程
OpenGL渲染框架搭建
OpenGL场景控制
初始化
使用的glfw和glad。glad需要将glad.c引入到工程中。
在使用glfw建立窗口后,使用glad获得OpenGL函数地址,可以看到的是一些宏。这样在上下文中就可以使用OpenGL的函数了。
static void init(int WIDTH, int HEIGHT, std::string name)
{
	if (glfwInit() == -1)
		Error("glfw init failed");
	glfwWindowHint(GLFW_CONTEXT_VERSION_MAJOR, 3);
	glfwWindowHint(GLFW_CONTEXT_VERSION_MINOR, 3);
	glfwWindowHint(GLFW_OPENGL_PROFILE, GLFW_OPENGL_CORE_PROFILE);
	glfwWindowHint(GLFW_RESIZABLE, GL_FALSE);
	window = glfwCreateWindow(WIDTH, HEIGHT, name.data(), nullptr, nullptr);
	if (window == NULL)
	{
		glfwTerminate();
		Error("Failed to create GLFW window");
	}
	glfwMakeContextCurrent(window);
	// 注册回调
	glfwInitCallback();
	if (!gladLoadGLLoader((GLADloadproc)glfwGetProcAddress))
	{
		Error("Failed to initialize GLAD");
	}
	glEnable(GL_DEPTH_TEST);
}
全局变量
在OpenGL环境中,需要用一些全局变量来控制渲染流程,使用函数的静态变量来进行包装,主要有以下变量。
static bool f[256];		// 键盘数组
static bool firstMouse;	// 标志是否第一次进入窗口
static GLfloat lastX;	// 上一次的鼠标位置,用于改变相机俯仰角
static GLfloat lastY;
static std::vector<Model *> model_list;	// 场景中的模型
static GLFWwindow * window;		// glfw窗口
static GLfloat deltaTime;		// 时间控制
static GLfloat lastFrame;
键盘控制
函数注册。
static void glfwInitCallback()
{
	glfwSetKeyCallback(window, RenderingApp::keyfunc);		// 键盘控制
	glfwSetCursorPosCallback(window, RenderingApp::mouse_callback);	// 鼠标控制
}
控制细节。
// 处理键盘
static void keyfunc(GLFWwindow* window, int key, int scancode, int action, int mode)
{
// 设置键盘数组
	if (key == GLFW_KEY_ESCAPE)
		return;
	if (action == GLFW_PRESS)
	{
		if (key == GLFW_KEY_Q)
		{
			glfwSetWindowShouldClose(window, GL_TRUE);
			return;
		}
		for (auto &m : model_list)
			m->setKey(key, true);
		f[key] = true;
	}
	else if (action == GLFW_RELEASE)
	{
		f[key] = false;
		for (auto &m : model_list)
			m->setKey(key, false);
	}
	// 设置每个model的键盘事件
	for (auto &m : model_list)
	{
		if (f['W'])
			m->getCamera()->ProcessKeyboard(Camera_Movement::FORWARD, deltaTime);
		if (f['S'])
			m->getCamera()->ProcessKeyboard(Camera_Movement::BACKWARD, deltaTime);
		if (f['A'])
			m->getCamera()->ProcessKeyboard(Camera_Movement::LEFT, deltaTime);
		if (f['D'])
			m->getCamera()->ProcessKeyboard(Camera_Movement::RIGHT, deltaTime);
		// 切换控制模式,是否隐藏鼠标
		if (f['O'])
			glfwSetInputMode(window, GLFW_CURSOR, GLFW_CURSOR_DISABLED);
		if (f['P'])
			glfwSetInputMode(window, GLFW_CURSOR, GLFW_CURSOR_NORMAL);
	}
}
鼠标控制
鼠标控制主要用于改变相机俯仰角,偏航角,以及获得屏幕点(例如可以计算得到对应的三维坐标)
// 处理鼠标
static void mouse_callback(GLFWwindow* window, double xpos, double ypos)
{
	if (firstMouse)
	{
		lastX = xpos;
		lastY = ypos;
		firstMouse = false;
	}
	GLfloat xoffset = xpos - lastX;
	GLfloat yoffset = lastY - ypos;
	lastX = xpos;
	lastY = ypos;
	// 处理每个model的鼠标事件
	for (auto &m : model_list)
	{
		m->getCamera()->ProcessMouseMovement(xoffset, yoffset);
	}
}
shader控制
shader控制主要用于读取shader文本,编译链接,然后供绘制软件使用。
class Shader
{
public:
	GLuint Program;		// 标识符
	// Constructor generates the shader on the fly
	Shader(std::string vertexPath, std::string fragmentPath);

	// destroy
	~Shader();

	// Uses the current shader
	void Use();		// 使用这个shader

	// utility uniform functions
	// ------------------------------------------------------------------------
	void setBool(const std::string &name, bool value) const;
	// ------------------------------------------------------------------------
	void setInt(const std::string &name, int value) const;
	// ------------------------------------------------------------------------
	void setFloat(const std::string &name, float value) const;
	// ------------------------------------------------------------------------
	void setVec2(const std::string &name, const glm::vec2 &value) const;
	// ------------------------------------------------------------------------
	void setVec2(const std::string &name, float x, float y) const;
	// ------------------------------------------------------------------------
	void setVec3(const std::string &name, const glm::vec3 &value) const;
	// ------------------------------------------------------------------------
	void setVec3(const std::string &name, float x, float y, float z) const;
	// ------------------------------------------------------------------------
	void setVec4(const std::string &name, const glm::vec4 &value) const;
	// ------------------------------------------------------------------------
	void setVec4(const std::string &name, float x, float y, float z, float w);
	// ------------------------------------------------------------------------
	void setMat2(const std::string &name, const glm::mat2 &mat) const;
	// ------------------------------------------------------------------------
	void setMat3(const std::string &name, const glm::mat3 &mat) const;
	// ------------------------------------------------------------------------
	void setMat4(const std::string &name, const glm::mat4 &mat) const;
};
camera控制
实现OpenGL中的相机,一个相机包括三个方向向量Front,Right,Up。这三个向量由俯仰角Pitch偏航角Yaw计算出来。相机的view矩阵决定投影变换,view矩阵由两个部分得到,分别是相机位置position和俯仰角pitch和偏航角yaw。
- 键盘控制改变相机的位置
position,沿着Front,Right方向移动,改变view矩阵 - 鼠标移动改变俯仰角
Pitch偏航角Yaw,进而改变view矩阵
class Camera
{
public:
	// Camera Attributes
	glm::vec3 Position;
	glm::vec3 Front;
	glm::vec3 Up;
	glm::vec3 Right;
	glm::vec3 WorldUp;
	// Eular Angles
	GLfloat Yaw;
	GLfloat Pitch;
	// Camera options
	GLfloat MovementSpeed;
	GLfloat MouseSensitivity;
	GLfloat Zoom;

	// Constructor with vectors
	Camera(glm::vec3 position = glm::vec3(0.0f, 0.0f, 0.0f), glm::vec3 up = glm::vec3(0.0f, 1.0f, 0.0f), GLfloat yaw = YAW, GLfloat pitch = PITCH);
	// Constructor with scalar values
	Camera(GLfloat posX, GLfloat posY, GLfloat posZ, GLfloat upX, GLfloat upY, GLfloat upZ, GLfloat yaw, GLfloat pitch);

	// Returns the view matrix calculated using Eular Angles and the LookAt Matrix
	glm::mat4 GetViewMatrix();

	// Processes input received from any keyboard-like input system. Accepts input parameter in the form of camera defined ENUM (to abstract it from windowing systems)
	void ProcessKeyboard(Camera_Movement direction, GLfloat deltaTime);

	// Processes input received from a mouse input system. Expects the offset value in both the x and y direction.
	void ProcessMouseMovement(GLfloat xoffset, GLfloat yoffset, GLboolean constrainPitch = true);

	// Processes input received from a mouse scroll-wheel event. Only requires input on the vertical wheel-axis
	void ProcessMouseScroll(GLfloat yoffset);

	~Camera();
private:
	// Calculates the front vector from the Camera's (updated) Eular Angles
	void updateCameraVectors();
};
模型导入
虚函数接口和模型基类
- 为了方便统一化,在
OpenGL初始化的绘制函数中,使用同样一个基类指针指向任何类型的模型对象。因此必须提供统一的绘制接口draw函数,不同的模型类只要重写这个虚函数就可以。 - 每个模型应该具有自己的相机和
shader,为了方便共享对象,使用指针来指向对象。 - 每个模型的一些其他信息。
class Model
{
public:	// 虚函数
	virtual void Draw(){};							// 绘制接口,重写这个函数即可
	virtual void bindShader(Shader * shader);
	virtual void bindCamera(Camera * camera);
	virtual void setKey(int k, bool f);
public:	// 返回模型信息的函数

	glm::vec3 getBoxMin();
	glm::vec3 getBoxMax();
	Camera * getCamera();
	Shader * getShader();
	float getMaxEdge();
	void setBoxMax(glm::vec3 bm);
	void setBoxMin(glm::vec3 bm);
	glm::vec3 getBoxCenter();
public:
	Model();
	~Model();
	void saveImage();		// 保存图片
protected:
	Camera * camera;
	Shader * shader;
	bool key[256];			// 键盘事件
protected:
	// 模型本身信息
	glm::vec3 box_min = glm::vec3(1e10);
	glm::vec3 box_max = glm::vec3(-1e10);
};
模型导入
具体实现模型类时,继承Model类,加入模型读取操作,重写draw函数就可以了。
这里使用的是类似assimp的框架,将每一个group作为一个mesh,拥有自己的材质。一个model由多个mesh组成,材质由model类所有。
struct Vertex {
		// position
		glm::vec3 Position;
		// normal
		glm::vec3 Normal;
		// texCoords
		glm::vec2 TexCoords;
		// tangent
		//glm::vec3 Tangent;
		// bitangent
		//glm::vec3 Bitangent;
	};

	struct Texture {
		unsigned int id;
		std::string type;
		std::string path;
	};

	struct Matrial
	{
		glm::vec3 ka;
		glm::vec3 kd;
		glm::vec3 ks;
		float shininess;
		std::vector<Texture> texture;
	};
	// mesh的定义
	class Mesh
	{
	public:
		std::vector<Vertex>  vertices;
		std::vector<unsigned int> indices;
		std::vector<Texture> textures;
		unsigned int VAO;
		std::string meshname;
		/*材质属性,如果没有贴图的话*/
		glm::vec3 ambient;
		glm::vec3 diffuse;
		glm::vec3 specular;
		float shininess;
		Mesh(std::string meshname, std::vector<Vertex> vertices, std::vector<Texture> textures, glm::vec3 ambient, glm::vec3 diffuse, glm::vec3 specular, float shininess);

		// render the mesh
		void Draw(Shader *shader, bool mode=false, glm::vec3 dcolor=glm::vec3(0));

	private:
		unsigned int VBO, EBO;
		void setupMesh();
	};

	class meshModel:public Model
	{
	public:
		std::string modelName;
		std::string directory;
		meshModel(std::string path);
		virtual void Draw() override;		// 重写的draw函数
	protected:
		std::string Dir;

		void loadMtl(const std::string &mtlname);
		std::map<std::string, Matrial>  matrial_loaded;
		std::map<std::string, unsigned int> texture_map;
		std::vector<Mesh> meshes;
		unsigned int TextureFromFile(const char *path, bool gamma = false);

	};
渲染流程
- 初始化
openGL环境 - 生成模型对象
- 绑定相机
- 绑定
shader对象 - 加入到场景中
- 渲染
#include "glControl.h"
#include "meshModel.h"

int main()
{
	PureOpenGL::RenderingApp::init(800, 600, "Pure OpenGL");
	PureOpenGL::Model * sModel = new PureOpenGL::meshModel("model/cow.obj");
	sModel->bindShader(new Shader("shader/diffuse.vs", "shader/diffuse.fs"));
	sModel->bindCamera(new Camera());
	PureOpenGL::RenderingApp::addModel(sModel);
	PureOpenGL::RenderingApp::run();
	return 0;
}
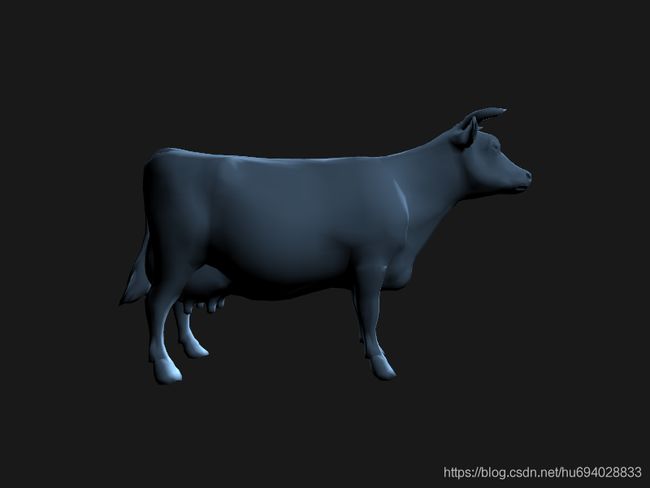
使用以上渲染框架将OpenGL渲染逻辑非常明确的剥离出来,简洁迅速,扩展方便。如下图:

完整的代码见github地址,如有问题,欢迎指正~