resnet.py代码阅读记录
class ResNet(nn.Module):
首先定义了类ResNet,继承了nn.Module模块。继承nn.Module模块是pytorch的使用要求,这样ResNet可以作为一个Module自动进行求导等操作。
下面开始介绍ResNet类里面的各个函数,其中还会涉及到Bottlenect类。这个类会单独拎出来讲。
Class ResNet(nn.Module)
函数_load_pretrained_model()不影响对模型结构的理解,暂时不做注释。
函数forward()只需注意,在返回网络输出结果时,同时返回了浅层网络的学习结果即可,不做注释。
函数__init__()
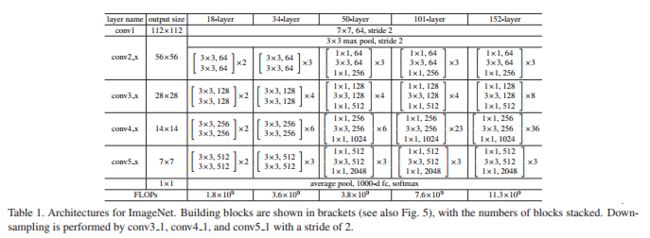
先祭出一张论文里的结构表,一会儿会参考着来讲。
    def __init__(self, block, layers, output_stride, BatchNorm, pretrained=True):
        self.inplanes = 64  # 设置默认输入通道
        super(ResNet, self).__init__()
        blocks = [1, 2, 4]
        # output_stride = 输入图像的长或宽 / 输出图像的长或宽
        # 根据output_stride的要求,设置每一层的stride和dilation值
        if output_stride == 16:
            strides = [1, 2, 2, 1]
            dilations = [1, 1, 1, 2]
        elif output_stride == 8:
            strides = [1, 2, 1, 1]
            dilations = [1, 1, 2, 4]
        else:
            raise NotImplementedError

        # 开始构建网络结构,各个Module。
        # 先建立一个conv2d的卷积层,对应表1中,layer_name为conv1的那一行:
        # conv1的输入通道为3,对应RGB图像的三色通道;
        # 输出通道为64,对应默认输入通道self.inplanes的64;
        # kernel, stride, padding,图像输入大小x和
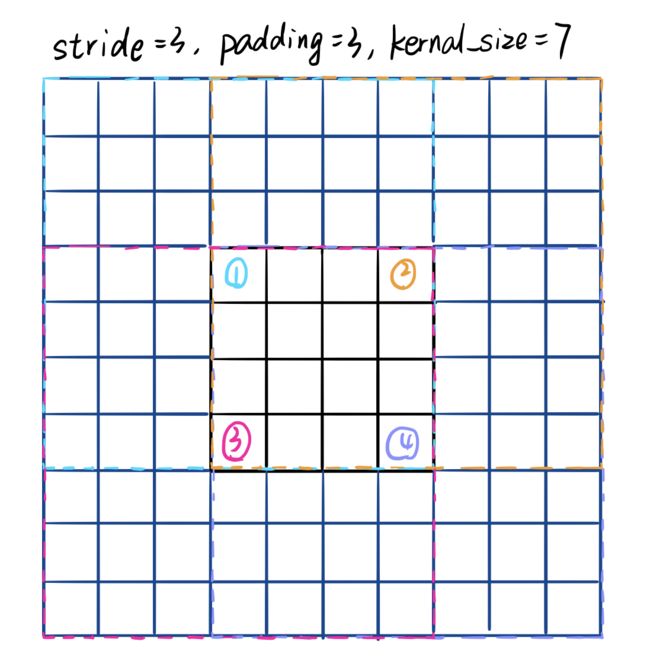
        # 输出大小y的关系需要理清楚,参考另外一篇博客。
        self.conv1 = nn.Conv2d(3, 64, kernel_size=7, stride=2, padding=3,
                                bias=False)
        # 进行batch normalization操作,防止梯度爆炸或者消失的情况发生。
        self.bn1 = BatchNorm(64)
        # 进行ReLu非饱和(non-saturating)的非线性操作。
        self.relu = nn.ReLU(inplace=True)
        # 进行最大值池化操作,这里遵循padding = kernal / 2的公式。
        self.maxpool = nn.MaxPool2d(kernel_size=3, stride=2, padding=1)

        # 添加三组层,每组又有指定层数:
        # layer1, layer2和layer3分别对应表1中,layer name为conv2_x, conv3_x和conv4_x的部分。
        self.layer1 = self._make_layer(block, 64, layers[0], stride=strides[0], dilation=dilations[0], BatchNorm=BatchNorm)
        self.layer2 = self._make_layer(block, 128, layers[1], stride=strides[1], dilation=dilations[1], BatchNorm=BatchNorm)
        self.layer3 = self._make_layer(block, 256, layers[2], stride=strides[2], dilation=dilations[2], BatchNorm=BatchNorm)
        # layer4对应表1中,layer name为conv5_x的部分。
        # 与layer1,2,3不同,layer4中,每一层的dilation值都不同。
        self.layer4 = self._make_MG_unit(block, 512, blocks=blocks, stride=strides[3], dilation=dilations[3], BatchNorm=BatchNorm)

        self._init_weight()

        if pretrained:
            self._load_pretrained_model()
函数_make_layer()
注意
论文的Bottleneck模块设计中,采用的三层卷积分别为1x1, 3x3和1x1。
本实现代码中,采用的三层卷积也是1x1, 3x3和1x1。
但只有中间卷积(即3x3那层)的stride, dilation, padding值是可以调的。
并且从第二个模块(即layer)开始,只有dilation的值还采用输入参数,stride恢复成了默认值1。
    # 先介绍一下除了stride的各个输入参数:
    #   block:  模块类别,此处为bottleneck。bottleneck类详解放在最后部分。
    #   planes:输出的通道数。输入通道数存在self.inplanes中,因此不再另作参数。
    #   blocks: 需要几层模块。控制表1中间的[···]x2,[···]x3部分中的参数2和3。
    #   dilation:   挺难解释的,参考我以往的博客。
    def _make_layer(self, block, planes, blocks, stride=1, dilation=1, BatchNorm=None):
        downsample = None
        # 当stride != 1或者输入的通道数与最终输出的通道数不同时,
        # 为了进行elementwise Add操作,需要对输入的x进行downsample操作.
        # 此处downsample操作,对应论文的option B —— 有条件的增加权重参数。
        if stride != 1 or self.inplanes != planes * block.expansion:
            #   注意,downsample 是针对输入进行操作的
            downsample = nn.Sequential(
                nn.Conv2d(self.inplanes, planes * block.expansion,
                          kernel_size=1, stride=stride, bias=False),
                BatchNorm(planes * block.expansion),
            )

        layers = []
        # 先添加本类层组的第一个模块。
        # 此时需要利用上述的downsample操作,因为输入图像可能跟输出维度不同。
        layers.append(block(self.inplanes, planes, stride, dilation, downsample, BatchNorm))
        # 之后所有层的输入图像通道数都是第一层输出的通道数,即planes * expansion。
        self.inplanes = planes * block.expansion
        for i in range(1, blocks):
            # 从第二层开始,所有block的输入图像与输出图像维度都相同(理解),也不再需要downsample。
            # ATTENTION!!! 注意!!!
            # 从第二层开始,stride都采用的是默认值1,而dilation还是采用的输入参数值。
            layers.append(block(self.inplanes, planes, dilation=dilation, BatchNorm=BatchNorm))

        return nn.Sequential(*layers)
函数_make_MG_unit()
基本与_make_layer()函数相同,除了在这里,每一层的dilation参数发生了变化。
    def _make_MG_unit(self, block, planes, blocks, stride=1, dilation=1, BatchNorm=None):
        downsample = None
        if stride != 1 or self.inplanes != planes * block.expansion:
            downsample = nn.Sequential(
                nn.Conv2d(self.inplanes, planes * block.expansion,
                          kernel_size=1, stride=stride, bias=False),
                BatchNorm(planes * block.expansion),
            )

        layers = []
        # 以上部分与_make_layer()函数相同。
        # 这里只有dilation参数有所变化,由原来的dilation=dilation -> dilation = block[i]*dilation
        layers.append(block(self.inplanes, planes, stride, dilation=blocks[0]*dilation,
                            downsample=downsample, BatchNorm=BatchNorm))
        self.inplanes = planes * block.expansion
        for i in range(1, len(blocks)):
            # 这里也是,只有不同层的dilation参数发生了变化,逐层变大。(可能是为了减少计算量)
            layers.append(block(self.inplanes, planes, stride=1,
                                dilation=blocks[i]*dilation, BatchNorm=BatchNorm))

        return nn.Sequential(*layers)
函数_init_weight()
这里注意所有的卷积都没有设置偏置,因此无需对偏置bias初始化参数。
    def _init_weight(self):
        # 这里就体现继承pytorch中,nn.module类的好处。可以迭代提取网络中的所有模块。
        for m in self.modules():
            if isinstance(m, nn.Conv2d):
                # 当模块m是二维卷积时,模块参数即kernel的大小,计算值得n
                n = m.kernel_size[0] * m.kernel_size[1] * m.out_channels
                # 随机初始化权重。满足所有权重的平均值为0,标准差即方差为(2./n)的平方。
                m.weight.data.normal_(0, math.sqrt(2. / n))
            elif isinstance(m, SynchronizedBatchNorm2d):
                # 当模块m是同步BN模块时,初始化所有权重为1,偏置为0
                m.weight.data.fill_(1)
                m.bias.data.zero_()
            elif isinstance(m, nn.BatchNorm2d):
                # 当模块m是BN模块时,初始化所有权重为1,偏置为0
                m.weight.data.fill_(1)
                m.bias.data.zero_()

