MySQL入门与进阶
需求:对一张表中的数据进行增删改查操作(CURD)
C:create 创建
U:update 修改
R:read 读|检索 查询
D:delete 删除
涉及技术:数据库
1、数据库认知
1.1、数据库
本质上就是一个文件系统.通过标准的sql对数据进行curd操作
安装数据库管理系统:数据库管理系统就是一个软件,与安装其他软件操作一样,但是需要进行配置,具体步骤略
1.2、常见的关系型数据库
关系型数据库:存放实体与实体之间的关系的数据库(就是二维表)
实体:用户 订单 商品
关系:用户拥有订单 订单包含商品
非关系型数据库:存放的是对象(redis) NO-sql(not only sql)
常见数据库及对应特点
软件名 厂商 特点
mysql oracle 开源mian的数据库
oracle oracle 大型的收费的数据库
DB2 IBM 大型的收费的数据库
sqlserver 微软 中大型的收费的数据库
sybase sybase (powerdesigner)
MYSQL :开源免费的数据库,小型的数据库.已经被Oracle收购了.MySQL6.x版本也开始收费.

Oracle :收费的大型数据库.Oracle公司的产品.Oracle收购SUN公司,收购MYSQL.

DB2 :IBM公司的数据库产品,收费的.银行系统中.

SQLServer:MS公司.收费的中型的数据库.

SyBase :已经淡出历史舞台.提供了一个非常专业数据建模的工具PowerDesigner.

SQLite : 嵌入式的小型数据库,应用在手机端.

Java相关的数据库:MYSQL,Oracle
安装了数据库管理系统的计算机称之为数据库服务器
服务器:给别人提供提供服务器(软件服务器)
我们可以通过标准的sql在服务器创建数据库(database),有了数据库之后,就可以在数据库上创建表了,有了表之后,就可以在里面存放数据了.
SQL:结构化查询语句
作用:管理数据库.

sql的分类:
    DDL:数据定义语言
        操作对象:数据库和表
        关键词:create alter drop
    DML:数据操作语言
        操作对象:记录
     关键词:insert,delete,update
    DQL:数据查询语言(非官方)
     关键词:select
    DCL:数据控制语言
        操作对象:用户 事务 权限
    关键词:if,grant
2、DDL数据定义语言
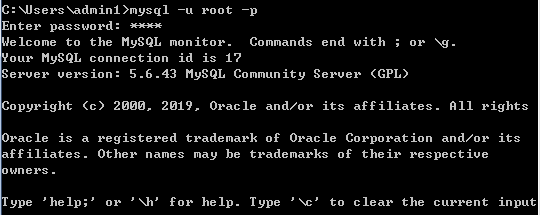
2.1 mysql数据库的登录
命令:mysql -u root -p (即:mysql -u 数据库用户名 -p)
2.2 DDL数据定义语言
操作对象:数据库、表
关键词:create alter drop
2.3数据库的CRUD操作
2.3.1创建数据库
语法:
    * create database 数据库名;
    * create database 数据库名 character set 字符集;
    * create database 数据库名 character set 字符集 collate 校对规则;
2.3.2查看数据库
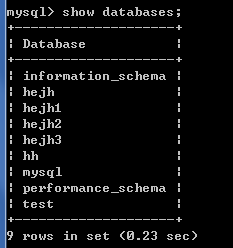
* 查看数据库服务器中的所有的数据库:show databases;
* 查看某个数据库的定义的信息:show create database 数据库名;
2.3.3删除数据库
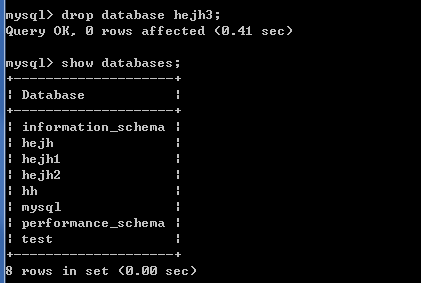
* drop database 数据库名称;
此前有hejh3这个数据库,对其进行删除,执行结果如下:
2.3.4修改数据库
* alter database 数据库名 character set 字符集 collate 校对规则;
2.3.5其他命令操作数据库
* 切换数据库:use 数据库名;
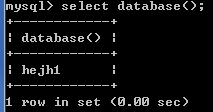
* 查看正在使用的数据库:select database();
切换到hejh1数据库:
查看当前使用的数据库:
2.4数据库中表的CRUD操作
2.4.1创建表
create table 表名(
   字段名 类型(长度) 约束,
   字段名 类型(长度) 约束
);

java和mysql类型对比
  Java                   MYSQL
  int                    int
  float                 float
  double                double
  char/String           char/varchar(char固定长度字符串,varchar可变长度的字符串)
  Date               date,time,datetime,timestamp
  文件类型             BLOB、TEXT   TEXT指的是文本文件  BLOB二进制文件
* Oracle的文件类型:BLOB  CLOB

约束:
  单表约束:
      * 主键约束:primary key
      * 唯一约束:unique
      * 非空约束:not null

创建一个分类表:
    分类ID int类型 主键 自动增长
    分类名称 字符串类型 长度20

create table category(
    cid int primary key auto_increment,
    cname varchar(20)
);

***** 注意:建表之前一定先选择数据库.
例如,创建user表,
create table user(
    id int primary key auto_increment,
    username varchar(20)
);
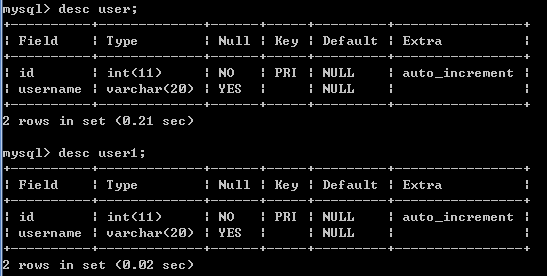
例如,创建user1表,
create table user1(
    id int primary key auto_increment,
    username varchar(20)
);
2.4.2查看表
查看数据库中的所有表:show tables;
查看表结构:desc 表名;
基于2.4.1创建的2张表,用show tables命令查看当前数据库hejh1下所有的表,
查看表结构:desc 表名;
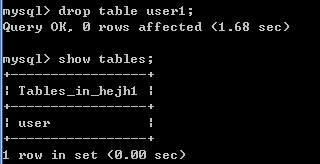
2.4.3删除表
drop table 表名;
hejh1数据库中有,user、user1 2张表,删除user1表,drop table user1;
truncate 清空表 ★
    格式:
        truncate 表名; 干掉表,重新创建一张空表

    和delete from 区别:
          delete属于DML语句,数据可以回滚     truncate属于DDL语句
          delete逐条删除                    truncate干掉表,重新创建一张空表
auto_increment 自增
    要求:
        1.被修饰的字段类型支持自增. 一般int
        2.被修饰的字段必须是一个key 一般是primary key
  create table ai01(
        id varchar(10) auto_increment
    );-- 错误 Incorrect column specifier for column 'id'
 create table ai01(
        id int auto_increment
    );-- 错误 Incorrect table definition; there can be only one auto column and it must be defined as a key
2.4.4修改表
格式: alter table 表名 ....
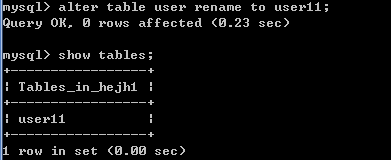
hejh1数据库中,修改user表名为user11,命令如下:修改表名: alter table 旧表名 rename to 新表名;
例如: alter table user rename to user11;
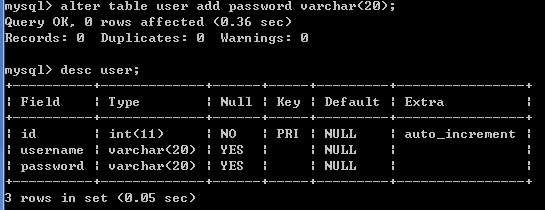
user表中增加password字段(列)
添加字段:  alter table 表名 add [column] 字段描述;
例如:  alter table user add password varchar(20);
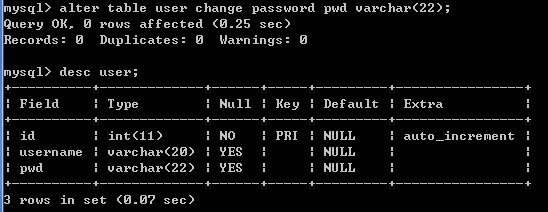
将字段password名字改为pwd,命令如下:
修改字段名:  alter table 表名 change 字段名称 新字段描述;
例如:  alter table user change password pwd varchar(22);
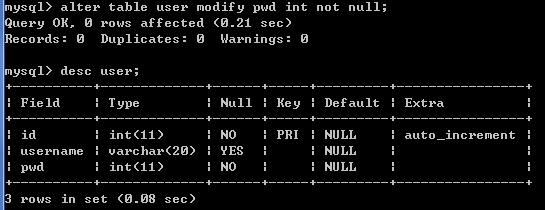
将pwd字段的类型从varchar改为int类型,命令如下:
修改字段描述:  alter table 表名 modify 字段名称 字段类型 [约束];
例如:  alter table user modify pwd int [not null];
删除字段pwd,命令如下:
删除字段:  alter table 表名 drop 字段名;
例如:alter table user drop pwd;
2.4.5常用命令
切换或者进入数据库: use 数据库名称;
查看当前数据库下所有表: show tables;
查看表结构:desc 表名;
查看建表语句:show create table 表名;
3.DML数据操作语言
操作对象:记录(行)
关键词:insert update delete
3.1insert插入数据
语法:
* insert into 表(列名1,列名2,列名3..)  values(值1,值2,值3..); -- 向表中插入某些列
* insert into 表  values(值1,值2,值3..); --向表中插入所有列

注意:
* 1.列名数与values后面的值的个数相等
* 2.列的顺序与插入的值得顺序一致
* 3.列名的类型与插入的值要一致.
* 4.插入值得时候不能超过最大长度.
* 5.值如果是字符串或者日期需要加’’.

cmd下插入中文的乱码的解决:
* 修改mysql.ini文件.
    * 将[mysql]下面的字符集改为gbk
    * 重启mysql服务.services.msc
插入:
    格式1:  insert into 表名 values(字段值1,字段值2...,字段值n);
    注意:
        默认插入全部字段,必须保证values后面的内容的类型、顺序和表结构中的一致,若字段类型为数字,可以省略引号
例如:
insert into user values(1,'hejh');
insert into user values('2','swy');
insert into user values('5');-- 错误的
格式2:  insert into 表名(字段名,字段名1...) values(字段值,字段值1...);
注意:  插入指定的字段,必须保证values后面的内容的类型、顺序和表名后面的字段的类型和顺序保持一致.
 例如:
      insert into user (username,id) values('hh',4);
      insert into user (username) values('jack',5);-- 错误的
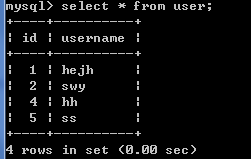
![]()
查看数据插入是否成功
3.2 update数据修改
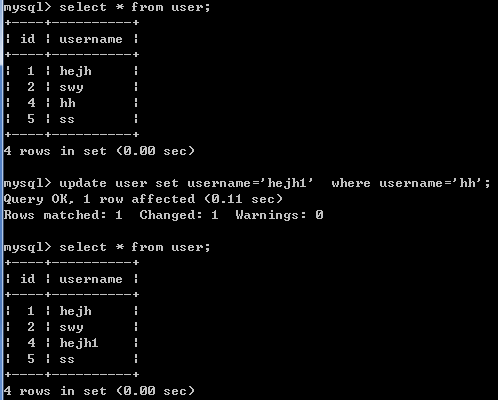
格式: update 表名 set 字段名=字段值,字段名1=字段值1... [where 条件];
例如: update user set username='hejh1' where username='hh';
注意:
* 1.列名的类型与修改的值要一致.
* 2.修改值得时候不能超过最大长度.
* 3.值如果是字符串或者日期需要加’’.
3.3 delete数据修改
格式:  delete from 表名 [where 条件];
例如:  delete from user where id = '4';
面试:删除表中所有记录使用delete from 表名; 还是用truncate table 表名?
* 删除方式:delete 一条一条删除. 而truncate 直接将表删除,重新建表.
* 事务控制DML。delete属于DML,如果在一个事务中,delete数据,这些数据可以找回;truncate删除的数据找不回来。
4.DQL数据查询语言
关键词:select
格式:
     select ... from 表名 where 条件 group by 分组字段 having 条件 order by 排序字段 ase|desc
    或 select [distinct]*[列名,列名] from 表 [where 条件]
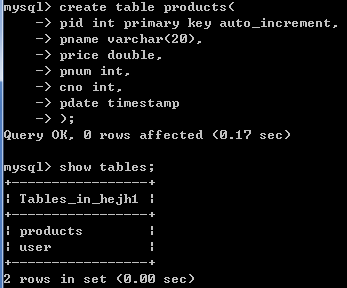
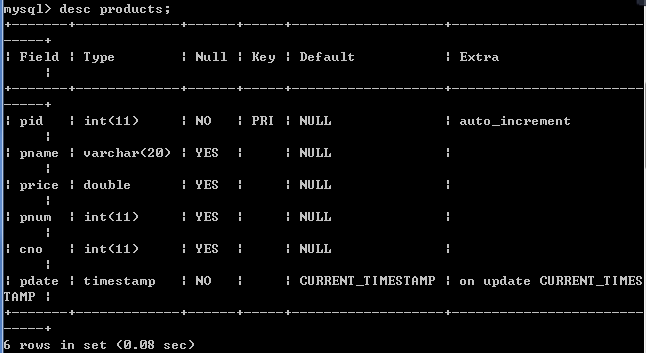
4.1初始化测试环境
建表:
创建商品表
create table products(
    pid int primary key auto_increment,
    pname varchar(20),
    price double,
    pnum int,
    cno int,
    pdate timestamp
);
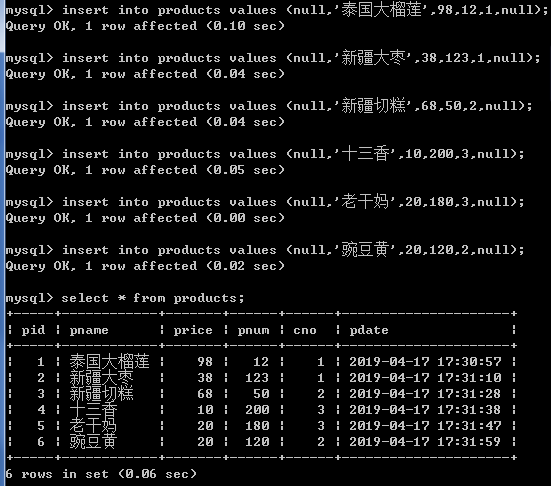
插入数据:
insert into products values (null,'泰国大榴莲',98,12,1,null);
insert into products values (null,'新疆大枣',38,123,1,null);
insert into products values (null,'新疆切糕',68,50,2,null);
insert into products values (null,'十三香',10,200,3,null);
insert into products values (null,'老干妈',20,180,3,null);
insert into products values (null,'豌豆黄',20,120,2,null);
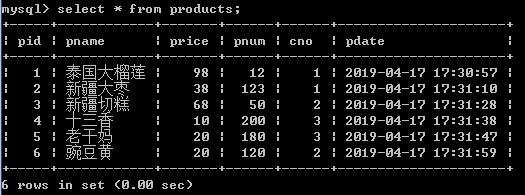
4.2简单查询练习
1.查询所有的商品
select * from products;
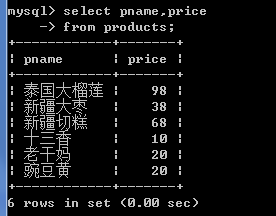
2.查询商品名和商品价格.
-- 查看指定的字段
-- 格式: select 字段名1,字段名2 from 表名
select pname,price from products;
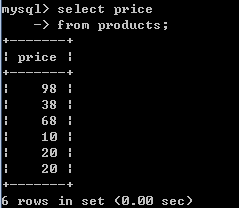
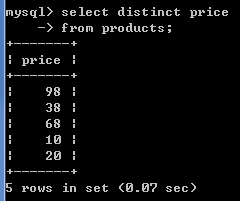
3.查询所有商品都有那些价格.
-- 去重操作 distinct
-- 格式: select distinct 字段名,字段名2 from 表名
select price from products;
select distinct price from products;
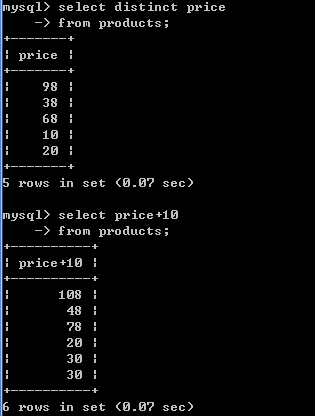
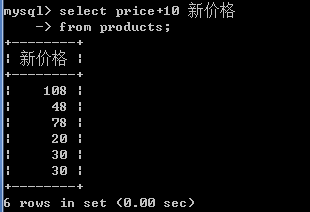
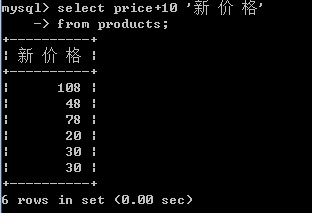
4.将所有商品的价格+10元进行显示.(别名)
-- 可以在查询的结果之上进行运算,不影响数据库中的值
-- 给列起别名 格式: 字段名 [as] 别名
select price+10 from products;
select price+10 新价格 from products;
select price+10 '新价格' from products;
![]()
select price+10 新 价 格 from products;-- 错误
select price+10 '新 价 格' from products;
select price+10 `新 价 格` from products;--错误,中文单引号
4.3条件查询练习
1.查询商品名称为十三香的商品所有信息:
select * from products where pname='十三香';
2.查询商品价格>60元的所有的商品信息:
select * from products where price>60;
3.查询商品名称中包含”新”的商品
-- 模糊匹配
    --    格式: 字段名 like "匹配规则";
    --    匹配内容 %
            "龙"    值为龙
            "%龙"    值以"龙"结尾
            "龙%"    值以"龙"开头
            "%龙%"     值包含"龙"
    --    匹配个数 "__" 占两个位置
select * from products where pname like '%新%';
4.查询价格为38,68,98的商品
select * from products where price=38 or price=68 or price=98;
select * from products where price in(38,68,98);
where后的条件写法:
     * > ,<,=,>=,<=,<>,!=

       * like 使用占位符 _ 和 %  _代表一个字符 %代表任意个字符.
           * select * from product where pname like '%新%';
* in在某个范围中获得值.
           * select * from product where pid in (2,5,8);
* between 较小值 and 较大值
            select * from products where price between 50 and 70;
4.4排序查询
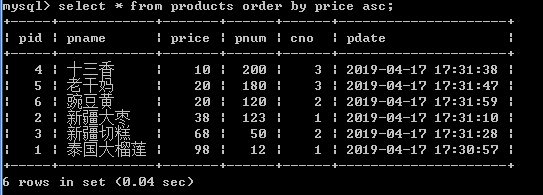
1.查询所有的商品,按价格进行排序.(asc-升序,desc-降序)
select * from products order by price asc;
select * from products order by price desc;
2.查询名称有新的商品的信息并且按价格降序排序.
select * from products where pname like '%新%' order by price desc;
3.查询所有商品的信息并且按价格降序、数量升序排列.
select * from products order by price desc,pnum asc;
4.5聚合函数
聚合函数:  对一列进行计算 返回值是一个,忽略null值
    * sum(),avg(),max(),min(),count();
1.获得所有商品的价格的总和:
select sum(price) from products;
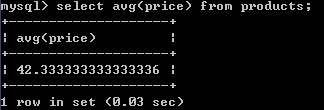
2.获得商品表中价格的平均数:
select avg(price) from products;
-- round(值,保留小数位)
select round(avg(price),3) from products ;
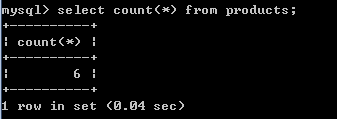
3.获得商品表中有多少条记录:
select count(*) from products;
4.获得商品表中最高的价格:
select max(price) from products ;
5.获得商品表中价格最小的商品信息:
select min(price) from products ;
4.6 group by分组
1.根据cno字段分组,分组后统计商品的个数.
select cno,count(*) from products group by cno;
2.根据cno分组,分组统计每组商品的总数量,并且总数量> 200;
select cno,sum(pnum) from products group by cno having sum(pnum)>200;
注意:
where和having区别:
    1.where 是对分组前的数据进行过滤 ;having 是对分组后的数据进行过滤
    2.where 后面不能使用聚合函数,having可以
4.7数据类型
java              mysql
byte              tinyint
short              smallint
int                  int(★)
long              bigint
char/String          varchar(★)|char
                        varchar:可变长度 mysql的方言  varchar(20):  存放abc 只会占用三个
                        char:固定长度 char(20) 存放abc 占用20个
boolean              tinyint|int 代替
float|double      float|double
                      注意:
                          double(5,2):该小数长度为5个,小数占2个  最大值:999.99


java.sql.Date          date 日期
java.sql.Time          time 时间
java.sql.Timestamp      timestamp(★) 时间戳 若给定值为null,数据库会把当前的系统时间存放到数据库中
                      datetime(★) 日期+时间

java.sql.Clob(长文本)      mysql的方言(text)
java.sql.Blob(二进制)      blob
5 约束
约束作用:
为了保证数据的有效性和完整性。
常用约束:
mysql常用约束:主键约束(primary key) 唯一约束(unique) 非空约束(not null) 外键约束(foreign key)
5.1主键约束
主键约束:被修饰过的字段唯一非空
        注意:一张表只能有一个主键,这个主键可以包含多个字段
        方式1:建表的同时添加约束 格式: 字段名称 字段类型 primary key
        方式2:建表的同时在约束区域添加约束
            所有的字段声明完成之后,就是约束区域了
            格式: primary key(字段1,字段2)
    方式3:建表之后,通过修改表结构添加约束
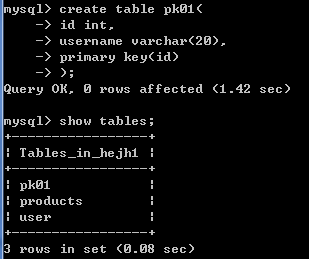
创建一张表,
create table pk01(
    id int,
    username varchar(20),
    primary key (id)
);
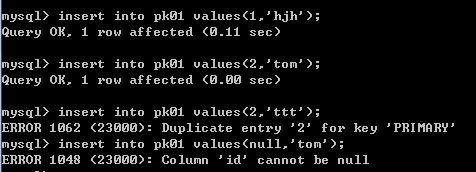
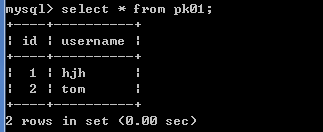
insert into pk01 values(1,'hjh');-- 成功
insert into pk01 values(2,'ttt');-- 失败 Duplicate entry '2' for key 'PRIMARY'
insert into pk01 values(null,'tom');-- 失败  Column 'id' cannot be null
再次创建表pk01,
create table pk01(
    id int primary key,
    username varchar(20),
    primary key (id)
);-- 错误的 一张表只能有一个主键
方式3:建表之后,通过修改表结构添加约束
create table pk02(
    id int,
    username varchar(20)
);
alter table pk02 add primary key(字段名1,字段名2..);
alter table pk02 add primary key(id,username);
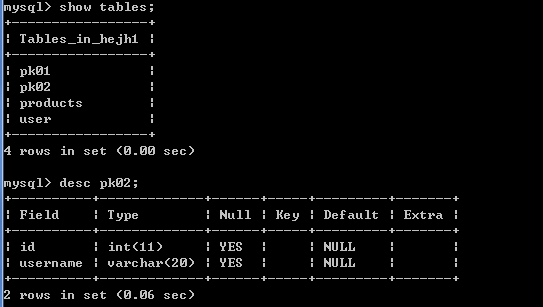
给表pk02的id和username增加主键约束,所以id和username为联合主键,故id和username都是非空的,如下图
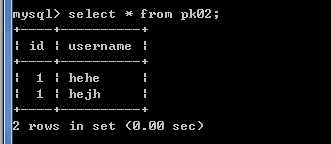
插入数据,
insert into pk02 values(1,'hejh');-- 成功
insert into pk02 values(1,'hehe');-- 成功
insert into pk02 values(1,'hehe');-- 失败
5.2 唯一约束
被修饰过的字段唯一,对null不起作用
方式1:建表的同时添加约束 格式: 字段名称 字段类型 unique
方式2:建表的同时在约束区域添加约束
方式3:建表之后,通过修改表结构添加约束
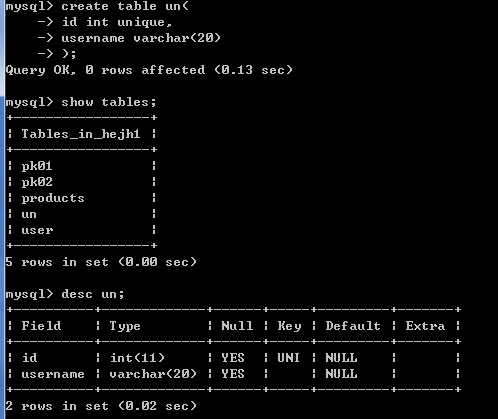
方式1:建表的同时添加约束 格式: 字段名称 字段类型 unique
create table un(
    id int unique,
    username varchar(20)
);
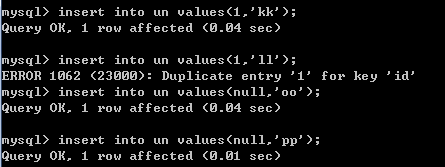
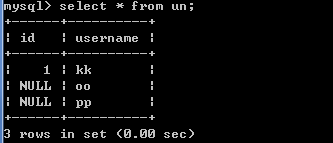
insert into un value(1,'kk');-- 成功
insert into un value(1,'ll');-- 错误 Duplicate entry '1' for key 'id'
insert into un value(null,'oo');-- 成功
insert into un value(null,'pp');-- 成功
方式2:建表的同时在约束区域添加约束
    所有的字段声明完成之后,就是约束区域了
    unique(字段1,字段值2...)
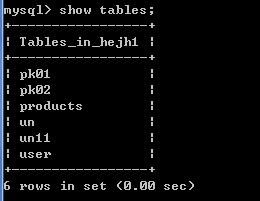
建表un11,给id设置唯一性约束,故id非空,
create table un11(
    id int ,
    username varchar(20) ,
  unique(id)
);
方式3:建表之后,通过修改表结构添加约束
alter table 表名 add unique(字段1,字段2);-- 添加的联合唯一
alter table 表名 add unique(字段1);-- 给一个添加唯一
table 表名 add unique(字段2);-- 给另一个添加唯一
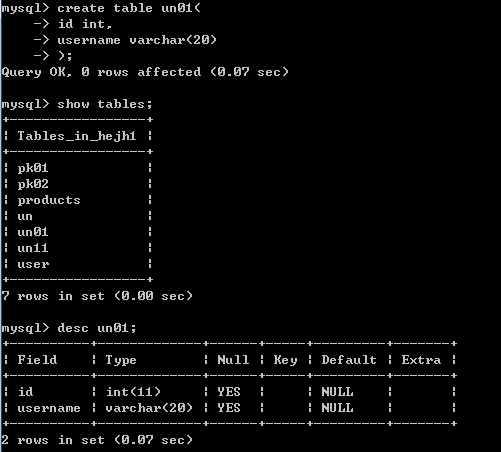
create table un01(
	id int,
	username varchar(20)
);
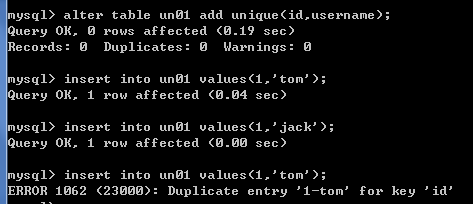
给id和username设置联合唯一,只有id和username都相同,插入数据时才会报错,如下图
alter table un01 add unique(id,username);
insert into un01 values(1,'tom');-- 成功
insert into un01 values(1,'jack');-- 成功
insert into un01 values(1,'tom');-- 失败  Duplicate entry '1-tom' for key 'id'
5.3 非空约束
非空约束(了解)
        特点:被修饰过的字段非空
        方式:
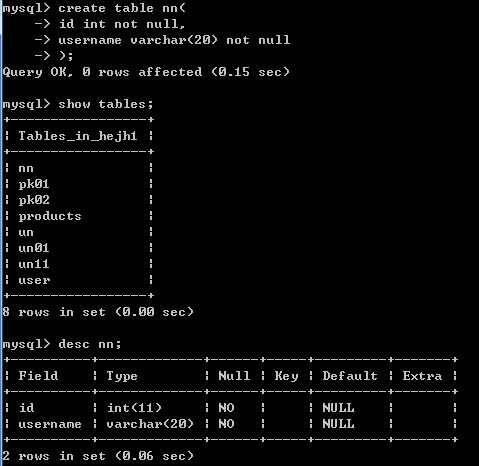
            create table nn(
                id int not null,
                username varchar(20) not null
            );
insert into nn values(null,'tom');-- 错误的 Column 'id' cannot be null
5.4外键约束
多个表之间是有关系的,那么关系靠谁来维护?
多表约束:外键约束.
alter table products add foreign key (cno) references category(cid);
1.一对多关系
客户和订单,分类和商品,部门和员工.
一对多建表原则:在多的一方创建一个字段,字段作为外键指向一的一方的主键.
用户和订单
    -- 创建用户表
    create  table user(
        id int primary key auto_increment,
        username varchar(20)
    );

    -- 创建订单表
    create  table orders(
        id int primary key auto_increment,
        totalprice double,
        user_id int
    );
为了保证数据的有效性和完整性,添加约束(外键约束).
在多表的一方添加外键约束
    格式:
        alter table 多表名称 add foreign key(外键名称) references 一表名称(主键);
    例如:
        alter table orders add foreign key(user_id) references user(id);
添加了外键约束之后有如下特点:★
    1.主表中不能删除从表中已引用的数据
    2.从表中不能添加主表中不存在的数据
开发中处理一对多:
    在多表中添加一个外键,名称一般为主表的名称_id,字段类型一般和主表的主键的类型保持一致,
    为了保证数据的有效性和完整性,在多表的外键上添加外键约束即可.
2.多对多关系
学生和课程:
多对多关系建表原则:需要创建第三张表,中间表中至少两个字段,这两个字段分别作为外键指向各自一方的主键.
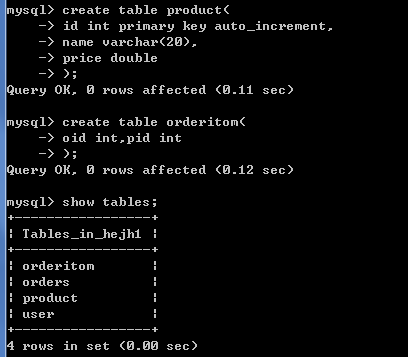
例子:商品和订单
        -- 创建商品表
    create table product(
        id int primary key auto_increment,
        name varchar(20),
        price double
    );

    -- 创建中间表
    create table orderitem(
        oid int,
        pid int
    );
-- 添加外键约束
    alter table orderitem add foreign key(oid) references orders(id);
    alter table orderitem add foreign key(pid) references product(id);
开发中处理多对多:
    引入一张中间表,存放两张表的主键,一般会将这两个字段设置为联合主键,这样就可以将多对多的关系拆分成两个一对多了;
  为了保证数据的有效性和完整性,需要在中间表上添加两个外键约束即可.
3.一对一关系
在实际的开发中应用不多.因为一对一可以创建成一张表.

两种建表原则:
唯一外键对应:假设一对一是一个一对多的关系,在多的一方创建一个外键指向一的一方的主键,将外键设置为unique.
主键对应:让一对一的双方的主键进行建立关系.
6.多表查询
建表与初始化数据
###创建分类表
create table category(
  cid varchar(32) PRIMARY KEY ,
  cname varchar(100)        #分类名称
);
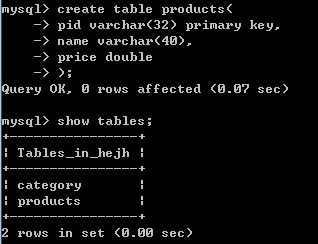
# 商品表
CREATE TABLE products (
  pid varchar(32) PRIMARY KEY  ,
  name VARCHAR(40) ,
  price DOUBLE
);
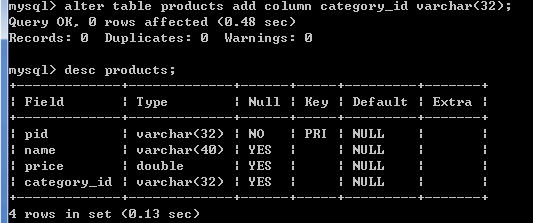
#添加外键字段
alter table products add column category_id varchar(32);
#添加约束
alter table products add constraint product_fk foreign key (category_id) references category (cid);
添加外键约束:

  alter table 从表 add constraint [外键名称字段]_fk foreign key(从表外键字段) references 主表(主表主键字段);

  [外键名称] 用于删除外键约束,一般以_fk结尾

  alter table 从表drop foreign key [外键名称]

主要作用:保障数据的完整性.  不删除从表内容,主表不能删除.(因为在从表中有外键关联主表id,删除的时候只能先删除从表,后删主表,
                                      可以理解为:删除从表,释放主表id,之后才能删除主表)
![]()
### 订单表
create table orders(
  oid varchar(32) PRIMARY KEY ,
  totalprice double     #总计
);
### 订单项表
create table orderitem(
  oid varchar(50),-- 订单id
  pid varchar(50)-- 商品id
);
### 联合主键(可省略)
alter table orderitem add primary key (oid,pid);
###---- 订单表和订单项表的主外键关系
alter table orderitem add constraint orderitem_orders_fk foreign key (oid) references orders(oid);
###---- 商品表和订单项表的主外键关系
alter table orderitem add constraint orderitem_product_fk foreign key (pid) references products(pid);
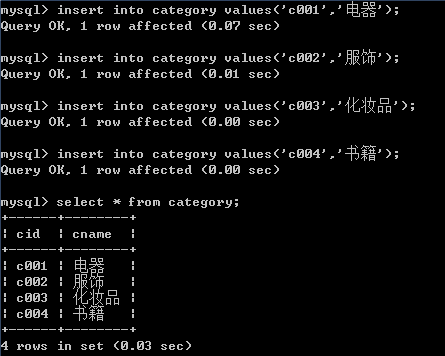
-- 给分类表初始化数据
insert into category values('c001','电器');
insert into category values('c002','服饰');
insert into category values('c003','化妆品');
insert into category values('c004','书籍');
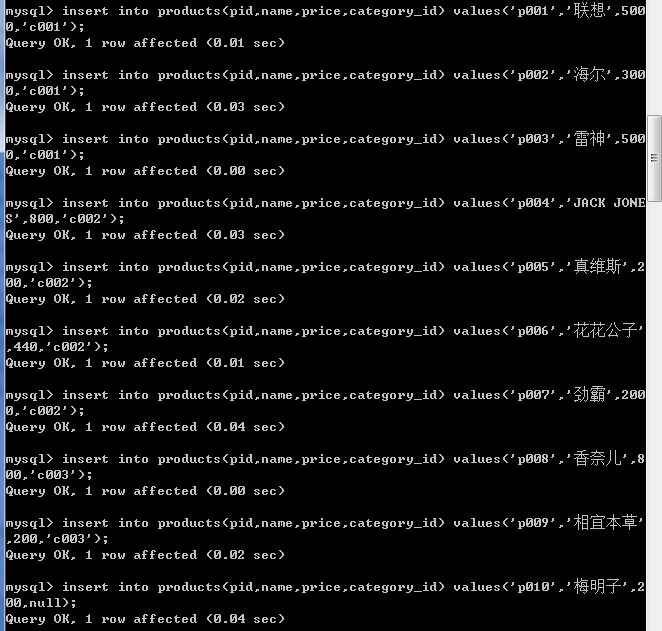
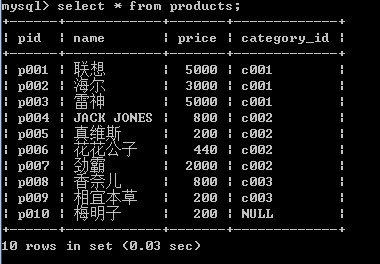
-- 给商品表初始化数据
insert into products(pid,name,price,category_id) values('p001','联想',5000,'c001');
insert into products(pid,name,price,category_id) values('p002','海尔',3000,'c001');
insert into products(pid,name,price,category_id) values('p003','雷神',5000,'c001');
insert into products(pid,name,price,category_id) values('p004','JACK JONES',800,'c002');
insert into products(pid,name,price,category_id) values('p005','真维斯',200,'c002');
insert into products(pid,name,price,category_id) values('p006','花花公子',440,'c002');
insert into products(pid,name,price,category_id) values('p007','劲霸',2000,'c002');
insert into products(pid,name,price,category_id) values('p008','香奈儿',800,'c003');
insert into products(pid,name,price,category_id) values('p009','相宜本草',200,'c003');
insert into products(pid,name,price,category_id) values('p010','梅明子',200,null);
6.1内连接
内连接查询(使用的关键字 inner join -- inner可以省略)
  格式1:显式的内连接
        select a.*,b.* from a [inner] join b on ab的连接条件
  格式2:隐式的内连接
        select a.*,b.* from a,b where ab的连接条件
建表与初始化
-- 用户表(user)
  create table user (
          id int auto_increment primary key,
          username varchar(50)  -- 用户姓名
     );
-- 订单表(order)
  create table order1 (
          id int  auto_increment primary key,
          price double,
          user_id int
  );
-- 给订单表添加外键约束
alter table orders add constraint user_fk foreign key (user_id) references user(id);
-- 向user表中添加数据
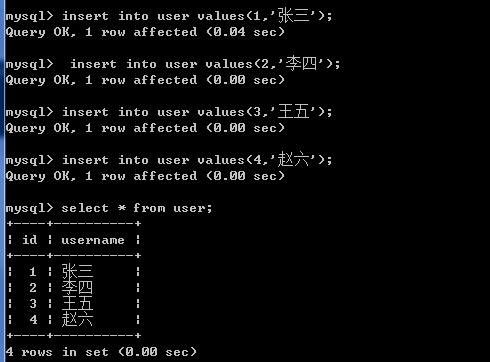
    insert into user values(1,'张三');
    insert into user values(2,'李四');
    insert into user values(3,'王五');
    insert into user values(4,'赵六');
-- 向order1 表中插入数据
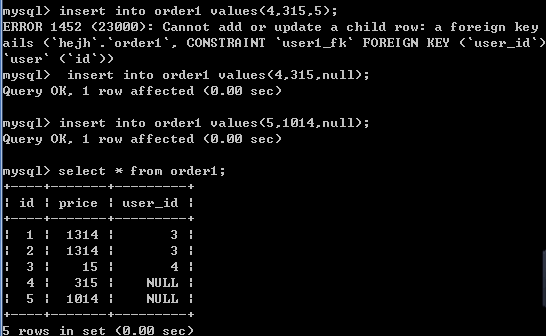
    insert into order1 values(1,1314,3);
    insert into order1 values(2,1314,3);
    insert into order1 values(3,15,4);
    insert into order1 values(4,315,null);
    insert into order1 values(5,1014,null);
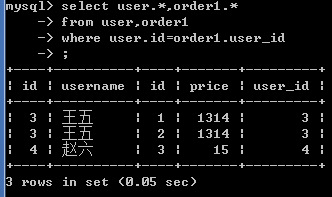
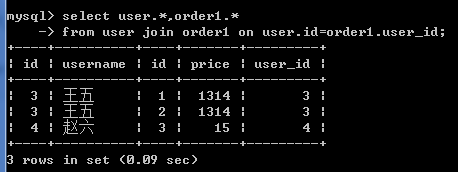
示例如下:查询用户的订单,没有订单的用户不显示
隐式内连接:
    select user.*,order1.* from user ,order1 where user.id=order1.user_id;
 显示内连接
    select user.*,order1.* from user join order1 on user.id=order1.user_id;
6.2外连接
外连接查询(使用的关键字 outer join -- outer可以省略)
左外连接:left outer join
    select a.*,b.* from a left [outer] join b on 连接条件;
    意思:
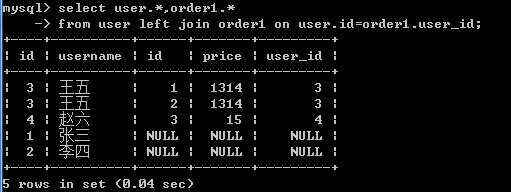
        先展示join左边的(a)表的所有数据,根据条件关联查询 join右边的表(b),符合条件则展示出来,不符合以null值展示.

右外连接:right outer join
    select a.*,b.* from b right [outer] join a on 连接条件;
    意思:
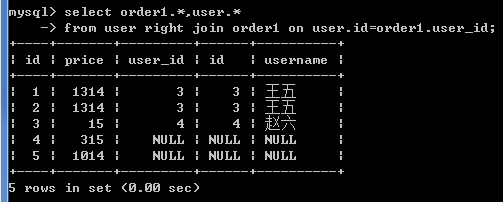
        先展示jion右边的表(a)表的所有数据,根据条件关联查询join左边的表(b),符合条件则展示出来,不符合以null值展示.
查询所有用户的订单详情
左外连接: user在左
select user.*,order1.* from user left join order1 on user.id=order1.user_id;
查询所有订单的用户详情
右外连接:orders 在右
select order1.*,user.* from user right join order1 on user.id=order1.user_id;
6.3子查询
子查询:
    一个查询依赖另一个查询,即当一个查询是另一个查询的条件时,称之为子查询
例如:select user.*,tmp.* from user,(select * from orders where price>300) as tmp where user.id=tmp.user_id;
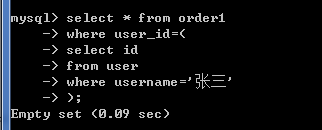
查看用户为张三的订单详情
1.先查询张三的id
    select id from User where username = '张三';// 3
2.select * from orders where user_id = ?;

两个合二为一
select * from order1 where user_id = (select id from User where username = '张三');
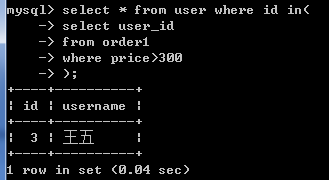
查询出订单的价格大于300的所有用户信息。
1.先查询出订单价格>300的用户的id
    select user_id from orders where price >300;//(3,3,5,null)
2.select * from user where id in(3,3,5,null);

两个合二为一:
select * from user where id in(select user_id from order1 where price >300);
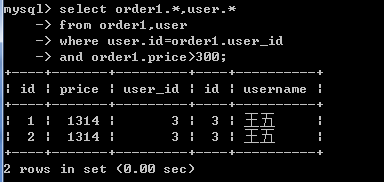
查询订单价格大于300的订单信息及相关用户的信息。
内连接:
        select order1.*,user.* from order1,user where user.id=order1.user_id  and orders.price>300 ;
6.4分页查询
分页查询每个数据库的语句是不通用的.
MYSQL:使用limit的关键字.
* select * from product limit a,b;  --a:从哪开始,b:查询多少条.

Oracle:使用SQL语句嵌套.
SQLServer:使用top的关键字.
7.事务管理
7.1什么是事务管理
事务是恢复和并发控制的基本单位。
可以把一系列要执行的操作称为事务,而事务管理就是管理这些操作要么完全执行,要么完全不执行(很经典的一个例子是:A要给B转钱,首先A的钱减少了,但是突然的数据库断电了,导致无法给B加钱,然后由于丢失数据,B不承认收到A的钱;在这里事务就是确保加钱和减钱两个都完全执行或完全不执行)
事务管理的意义:保证数据操作的完整性
事务有四个特性(ACID):
原子性(Atomicity),一致性(Consistency),隔离性(Isolation),持久性(Durability)
- 原子性:事务是应用中最小的执行单位,就如原子是自然界最小颗粒,具有不可再分的特征一样。事务是应用中不可再分的最小逻辑执行体,一组事务,要么成功;要么撤回。
- 一致性:事务执行的结果,必须使数据库从一个一致性状态,变到另一个一致性状态。当数据库中只包含事务成功提交的结果时,数据库处于一致性状态。一致性是通过原子性来保证的。有非法数据(外键约束之类),事务撤回。。
- 隔离性:各个事务的执行互不干扰,任意一个事务的内部操作对其他并发事务都是隔离的。即:并发执行事务之间不能看到对方的中间状态,并发执行的事务之间不能相互影响。事务独立运行。一个事务处理后的结果,影响了其他事务,那么其他事务会撤回。
- 持久性:事务一旦提交,对数据所做的任何改变,都要记录到永久存储器中,通常是保存进物理数据库。软、硬件崩溃后,InnoDB数据表驱动会利用日志文件重构修改。
事务管理操作命令:
- 开启事务管理:开启之后,下面的sql语句并不会马上执行并把结果写到表中,而是会写到事务日志中。
- start transaction;
- 回退操作:回退会清掉开始事务管理之后写到事务日志中的内容,即恢复到开启事务管理之前。
- 语法:rollback;
- 注意:回退操作只是回退"写"的内容,对于普通的读表select语句不能回退。
- 事务提交:将sql语句的结果写到数据表中。
- 语法:commit:
建表与初始化数据:
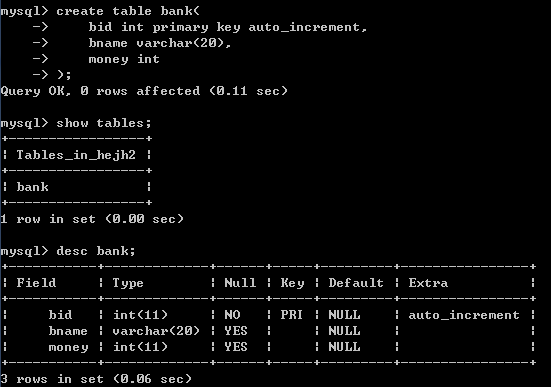
create table bank(
  bid int primary key auto_increment,
  bname varchar(20),
  money int
);
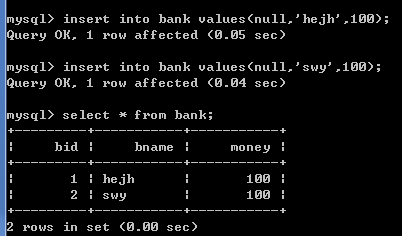
insert into bank values(null,'hejh',100);
insert into bank values(null,'swy',100);
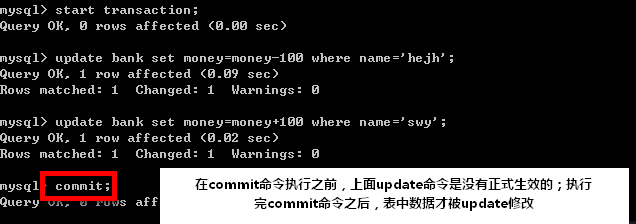
开启事务:start transaction
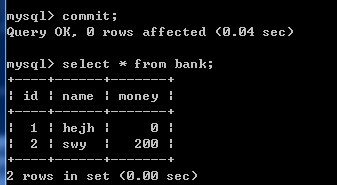
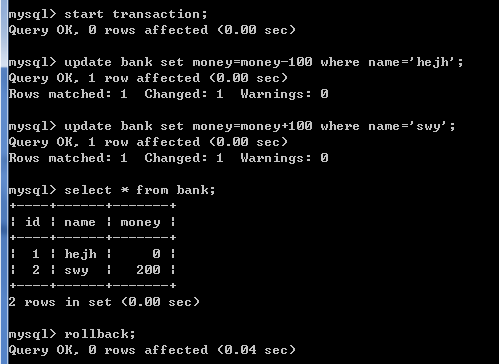
在执行start transaction之后,执行的一系列操作,是先写在相关日志里的,命令执行下去实际数据库并没有生效;一旦执行commit命令,start transaction命令和commit之间执行的开始生效,即数据库数据已经被修改提交。
在执行commit命令之前,如果执行了rollback命令,则start transaction命令 到 rollback命令 之间执行的命令不会生效,数据回滚到start transaction命令执行之前的数据。
注意:
- 当 commit 或 rollback 语句执行后,事务会自动关闭。
- 锁机制:在事务操作一个表时,如果使用索引来取值,那么会锁定到对应行;如果没有使用索引来取值,那么会锁定整个表。锁定之后其他连接无法操作指定行或表。
7.2回滚点
回滚点就是为了准确的回滚到某个操作之前,可以指定rollback回退的位置。
语法:
- 创建回滚点:savepoint 回滚点名;
- 回滚到回滚点:rollback to 回滚点名;
注意:回滚点在事务管理关闭(rollback或commit之后)之后失效,不要在事务之外使用回滚点。
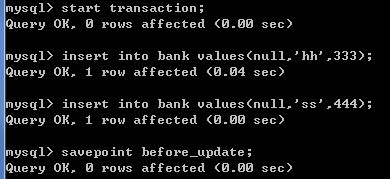
1)执行start transaction;开启事务
start transaction;
2)接着插入2条数据
insert into bank values(null,'hh',333);
insert into bank values(null,'ss',444);
3)执行设置回滚点。在修改数据之前设置一个回滚点
savepoint before_update;
4)修改2条记录
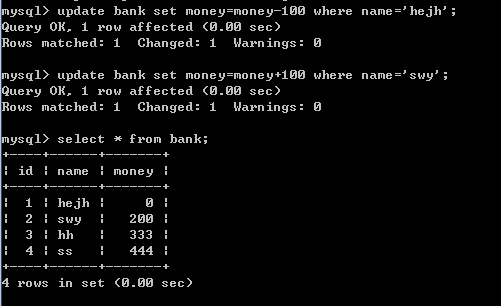
update bank set money=money-100 where name='hejh';
update bank set money=money+100 where name='swy';
此时查询表中数据如下图:
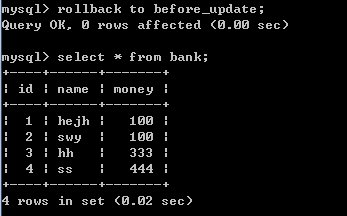
5)一旦执行回滚命令,回滚到修改数据之前,数据表中数据显示如下图:
rollback to before_update;
7.3默认事务管理
默认情况下,mysql的事务管理是关闭(自动事务)的,语句的结果会马上写到数据表中。
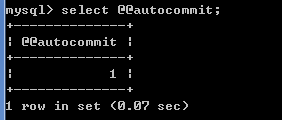
  可以通过select @@autocommit;来查看是否开启自动事务,值为1为自动事务已开启,为0则为关闭。

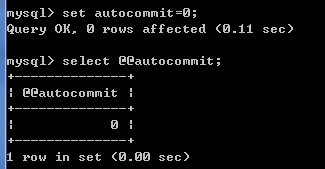
关闭自动事务:set autocommit =0;【关闭后需要commit来执行每一条语句,相当于开始了事务管理】

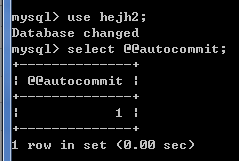
不过注意的是set autocommit针对的是会话变量,所以这个设置只在此次会话连接中生效。
敲入quit断开此次连接,然后再次连接,值为1:
8.序列
① mysql的自增长“序列”和序列是两回事,mysql本身不提供序列机制,只有一个auto_increment自增长字段
②mysql的auto_increment可以设置起始值,但是不能设置步长,其固定步长是1
③mysql一个表只能有一个自增长字段。自增长只能被分配给固定表的固定的某一字段,不能被多个表共用,并且只能是数字型
1.创建序列表sequence
create  table sequence (
   name varchar(50) collate utf8_bin not null comment ,
   current_value int(11) not null comment ,
   increment int(11) not null default 1 comment, // 序列的自增值
 primary key(name)
)
engine=InnoDB default charset=utf8 collate=utf8_bin;
2.创建函数--取当前值
begin
  declare value integer;
  set value=0;
  select current_value into value
    from sequence
    where name = seq_name;
  return value;
end
3.创建函数--取下一个值
drop function if exists nextval;
delimiter $
create function nextval (seq_name varchar(50))
   returns integer
     language SQL
     deterministic
     contains SQl
     SQL security definer
     comment ''
begin
    update sequence
        set current_value = current_values + increment
          where name = seq_name;
     return currval(seq_name);
end
$
delimiter
4.创建函数--更新当前值
drop function id exists setval;
delimiter $
create function setval (seq_name varchar(50),value integer)
   returns integer
     language SQL
     deterministic
     contains SQL
     SQL security definer
     comment ''
begin
     update sequence
         set current_value = value
          where name = seq_name;
     return currval(seq_name);
end
$
delimiter;
5.测试序列
insert into sequence values('testSeq',0,1);--添加一个sequence名称和初始值,以及自增幅度
select setval('testSeq',10);--设置指定sequence的初始值
select currval('testSeq');--查询指定sequence的当前值
select nextval('testSeq');--查询指定squence的下一个值
9.视图
9.1什么是视图
视图(view):是一种虚拟存在的表,是一个逻辑表,本身并不包含数据。作为一个select语句保存在数据字典中的。
通过视图,可以展现基表(创建视图的表base table)的部分数据;视图数据来自定义视图的查询中使用的表,使用视图动态生成。
9.2视图的特点
视图是对若干张基本表的引用,是一张虚表,是查询语句执行的结果,不存储具体的数据(基本表数据发生了改变,视图也会跟着改变);
可以跟基本表一样,进行增删改查操作(ps:增删改操作有条件限制);
视图的优点:
①简单:使用视图的用户完全不需要关心后面对应的表的结构、关联条件和筛选条件,对用户来说已经是过滤好的复合条件的结果集。
②安全:使用视图的用户只能访问他们被允许查询的结果集,对表的权限管理并不能限制到某个行某个列,但是通过视图就可以简单的实现。
③数据独立:一旦视图的结构确定了,可以屏蔽表结构变化对用户的影响,源表增加列对视图没影响;源表修改列名,则可以通过修改视图来解决,不会造成对访问者的影响。
视图使用场景:
①权限控制的时候,不希望用户访问表中某些含敏感信息的列,比如salary...
②关键信息来源于多个复杂关联表,可以创建视图提取我们需要的信息,简化操作;
9.2示例
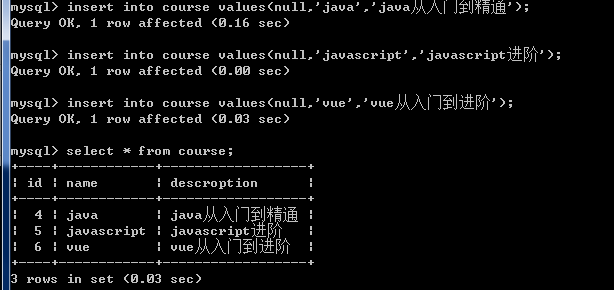
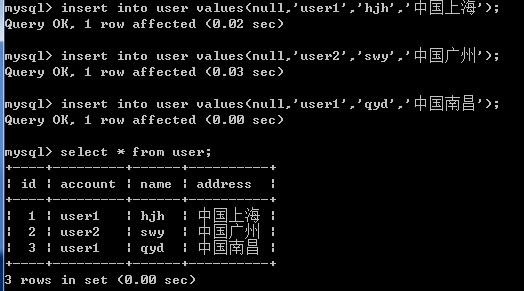
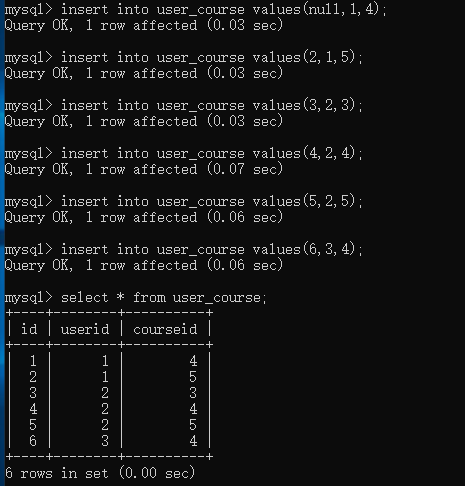
建表和数据初始化:用户(user)、课程(course)、用户课程中间表(user_course)
drop table if exists course;
create table course(
  id bigint(20) not null auto_increment,
  name varchar(20) not null,
  descroption varchar(200) not null,
  primary key(id)
 ) engine=InnoDB auto_increment=4 default charset=utf8;//从4开始自增
insert into course values(null,'java','java从入门到精通');
insert into course values(null,'javascript','javascript进阶');
insert into course values(null,'vue','vue从入门到进阶');
drop table if exists user;
create table user(
  id int(20) not null auto_increment,
  account varchar(200) not null,
  name varchar(20) not null,
  address varchar(200) default null,
  primary key(id)
) engine=InnoDB auto_increment=1 default charset=utf8;
insert into user values(null,'user1','hjh','中国上海');
insert into user values(null,'user2','swy','中国广州');
insert into user values(null,'user1','qyd','中国南昌');
drop table if exists user_course;
create table user_course(
  id int(20) not null auto_increment,
  userid int(20) not null,
  courseid int(20) not null,
  primary key(id)
) engine=InnoDB auto_increment=1 default charset=utf8;
user的id是从1开始到3,course的id是从4到6,所以插入的时候数据是以下样式的:
insert into user_course values(null,1,4);
insert into user_course values(2,1,5);
insert into user_course values(3,2,3);
insert into user_course values(4,2,4);
insert into user_course values(5,2,5);
insert into user_course values(6,3,4);
创建视图view_user_course
drop view if exists view_user_course;
create view view_user_course as (
select uc.id as id,u.name as username,c.name as coursename
from (
(
user u left join user_course uc on ((u.id = uc.userid))
)
left join course c on ((uc.courseid = c.id))
)
);
查询hejh用户上的所以课程相关信息(hejh用户不存在,所以查询结果是empty)
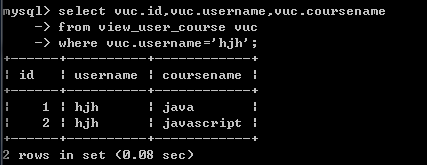
查询hjh用户上的所以课程相关信息(初始化数据时插入过一个用户名为hjh的用户,所以查询结果不为empty)
由多张表建立起来的视图中,不能做同时修改2张以上表数据的操作,会报错:![]()
可参考博文https://www.cnblogs.com/geaozhang/p/6792369.html#chuangjianshitu
9.3视图的修改
基本格式:create or replace view view_name as select语句;
在视图存在的情况下可对视图进行修改,视图不在的情况下可创建视图
9.4drop删除视图
删除视图是指删除数据库中已存在的视图,删除视图时,只能删除视图的定义,不会删除数据,即不动基表。
DROP VIEW [IF EXISTS]
view_name [, view_name] ...
使用IF EXISTS选项使得删除不存在的视图时不抛出异常
10.索引
10.1索引的分类
索引分单列索引(主键索引,唯一索引,普通索引)和组合索引。
单列索引:即一个索引只包含单个列,一个表可以有多个单列索引,但这不是组合索引
组合索引:即一个索引包含多个列
创建索引时,需要确保该索引是应用在 SQL 查询语句的条件(一般作为 WHERE 子句的条件)。实际上,索引也是一张表,该表保存了主键与索引字段,并指向实体表的记录。
索引的优点:
MySQL索引的建立对于MySQL的高效运行是很重要的,索引可以大大提高MySQL的检索速度(在数据量很大的时候,效果更明显)。
索引的缺点:
虽然索引大大提高了查询速度,但是同时也会降低更新表的速度,如对表进行INSERT、UPDATE和DELETE操作。因为更新表时,MySQL不仅要保存数据,还要保存一下索引文件。建立索引会占用磁盘空间的索引文件。
10.2普通索引
创建索引
最基本的索引,没有限制,创建方式如下:
create index 索引名 on  表名(字段(字段长度));
如果是CHAR,VARCHAR类型,length可以小于字段实际长度;如果是BLOB和TEXT类型,必须指定 length
通过修改表结构来添加索引:
alter table 表名 add index 索引名(字段名);
建表时直接指定索引:
create table 表名(
   字段 数据类型 约束,
    字段  数据类型   约束,
    index [索引名] (字段(字段长度))
);
删除索引:
drop index 索引名 on 表名
10.3 唯一索引
与前面的普通索引类似,不同的就是:索引列的值必须唯一,但允许有空值。如果是组合索引,则列值的组合必须唯一。它有以下几种创建方式:
直接创建唯一索引:
create unique index 索引名 on 表名(字段(字段长度))
修改表结构创建唯一索引:
alter table 表名 add unique [索引名](字段名(字段长度))
创建表的时候直接指定唯一索引:
create table 表名(
  字段1 数据类型 约束,
  字段2 数据类型 约束,
  ......
  unique [索引名] (字段名(字段长度))
)
使用ALTER 命令添加和删除索引:
有四种方式来添加数据表的索引:
①alter table 表名 add primary key(字段列表);//添加一个主键,这意味着索引值必须是唯一的,且不能为NULL
②alter table 表名 add unique 索引名(字段列表);//创建索引的值必须是唯一的(输了Null外,null可能会出现很多次)
③alter table 表名 add index 索引名 (字段列表);//添加普通索引,索引值可以出现多次
④alter table 表名 add fulltext 索引名(字段列表);//指定索引为fulltext,用于全文索引
ALTER 命令中使用 DROP 子句来删除索引。尝试以下实例删除索引:
alter table 表名 drop index 索引名;
使用 ALTER 命令添加和删除主键
主键只能作用于一个列上,添加主键索引时,你需要确保该主键默认不为空(NOT NULL)。实例如下
alter table 表名 modify 字段 数据类型 约束;
alter table 表名 add primary key(字段名);
也可以使用 ALTER 命令删除主键:
alter table 表名 drop primary key;
删除主键时只需指定PRIMARY KEY,但在删除索引时,必须知道索引名。
显示索引信息:show index
使用 SHOW INDEX 命令列出表中的相关索引信息。可以通过添加 \G 来格式化输出信息。
尝试以下实例:
show index from 表名; \G
参见博文:细说mysql索引 https://www.cnblogs.com/chenshishuo/p/5030029.html
