使用opencv进行Ostu二值化
Otsu’s Binarization
Otsu 二值化
在第一部分,我说过这里有第二个参数retVal。如果我们使用Otsu我们将使用这个参数。怎么用呢?
In the first section, I told you there is a second parameter retVal. Its use comes when we go for Otsu’s Binarization. So what is it?
在全局阈值中,我们使用一个固定的值作为阈值。对吧?那么我们如何知道我们选的值好不好呢?答案是:反复试验。但是如果考虑双峰图像(简单的说,双峰图像就是直方图有两个波峰的图像)。对于这种图像,我们可以在两个波峰中间大约的取一个值作为阈值,对吧?这就是Ostu算法。简单的说,他可以在直方图中给双峰图像自动计算出一个阈值。(如果图像不是双峰图,这种办法并不准确)
In global thresholding, we used an arbitrary value for threshold value, right? So, how can we know a value we selected is good or not? Answer is, trial and error method. But consider a bimodal image (In simple words, bimodal image is an image whose histogram has two peaks). For that image, we can approximately take a value in the middle of those peaks as threshold value, right ? That is what Otsu binarization does. So in simple words, it automatically calculates a threshold value from image histogram for a bimodal image. (For images which are not bimodal, binarization won’t be accurate.)
我们可以用cv2.threshold()来实现,但是需要一个额外的标记cv2.THRESH_OTSU。阈值可以简单设为0。这个算法找到一个优化的阈值,并返回您作为第二个输出,retVal。如果Ostu没有使用,retVal仍然作为阈值被使用。(???)
For this, our cv2.threshold() function is used, but pass an extra flag, cv2.THRESH_OTSU. For threshold value, simply pass zero. Then the algorithm finds the optimal threshold value and returns you as the second output, retVal. If Otsu thresholding is not used, retVal is same as the threshold value you used.
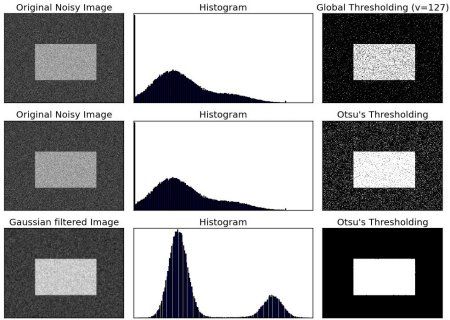
检查下面的例子,输入一个带有噪声的图片,在第一行例子中,我是用了全局阈值127,在第二个例子中,我使用了Ostu算法。在第三行我使用5*5的高斯核来进行降噪,然后在进行Ostu,看一下滤波对结果的影响。
Check out below example. Input image is a noisy image. In first case, I applied global thresholding for a value of 127. In second case, I applied Otsu’s thresholding directly. In third case, I filtered image with a 5x5 gaussian kernel to remove the noise, then applied Otsu thresholding. See how noise filtering improves the result.
import cv2
import numpy as np
from matplotlib import pyplot as plt
img = cv2.imread('noisy2.png',0)
# global thresholding
ret1,th1 = cv2.threshold(img,127,255,cv2.THRESH_BINARY)
# Otsu's thresholding
ret2,th2 = cv2.threshold(img,0,255,cv2.THRESH_BINARY+cv2.THRESH_OTSU)
# Otsu's thresholding after Gaussian filtering
blur = cv2.GaussianBlur(img,(5,5),0)
ret3,th3 = cv2.threshold(blur,0,255,cv2.THRESH_BINARY+cv2.THRESH_OTSU)
# plot all the images and their histograms
images = [img, 0, th1,
          img, 0, th2,
          blur, 0, th3]
titles = ['Original Noisy Image','Histogram','Global Thresholding (v=127)',
          'Original Noisy Image','Histogram',"Otsu's Thresholding",
          'Gaussian filtered Image','Histogram',"Otsu's Thresholding"]
for i in xrange(3):
    plt.subplot(3,3,i*3+1),plt.imshow(images[i*3],'gray')
    plt.title(titles[i*3]), plt.xticks([]), plt.yticks([])
    plt.subplot(3,3,i*3+2),plt.hist(images[i*3].ravel(),256)
    plt.title(titles[i*3+1]), plt.xticks([]), plt.yticks([])
    plt.subplot(3,3,i*3+3),plt.imshow(images[i*3+2],'gray')
    plt.title(titles[i*3+2]), plt.xticks([]), plt.yticks([])
plt.show()