- Vue + Django的人脸识别系统
DXSsssss
pythonDRFtensorflow人脸识别
最近在研究机器学习,刚好最近看了vue+Djangodrf的一些课程,学以致用,做了一个人脸识别系统。项目前端使用Vue框架,用到了elementui组件,写起来真是方便。比之前传统的dtl方便了太多。后端使用了drf,识别知识刚开始打算使用opencv+tensorflow,但是发现吧识别以后的结果返回到浏览器当中时使用opencv比较麻烦(主要是我太菜,想不到比较好的方法),因此最终使用了tf
- Django+Vue基于OpenCV的人脸识别系统的设计与实现
赵广陆
projectdjangovue.jsopencv
目录1项目介绍2项目截图3核心代码3.1需要的环境3.2Django接口层3.3实体类3.4config.ini3.5启动类3.5Vue4数据库表设计5文档参考6计算机毕设选题推荐7源码获取1项目介绍博主个人介绍:CSDN认证博客专家,CSDN平台Java领域优质创作者,全网30w+粉丝,超300w访问量,专注于大学生项目实战开发、讲解和答疑辅导,对于专业性数据证明一切!主要项目:javaweb、
- 规划大二上期
白色的风扇
学习
英语过四级。这个学期将java核心卷1看完。每天3道sql语句编程题。11月之前将ssmredis学完,过年之前mysql学完,MQ消息队列,ES学完。期末不挂科。问题争取自己解决,如何导入api,如何训练自己的ai,如何人脸识别之类的技术问题争取独立解决。养成一个好的生活习惯,每天争取2点之前就睡,减少油炸食品的摄入,坚持每两天跑一次步,争取这个学期减肥20斤。心态:顺其自然,尽力而为,少于人比
- 实现在不预览情况下获取摄像头原始回调数据
hfut_why
android相机不预览数据camera
之前在解析百度离线人脸识别SDK的Demo封装的结构时,我就说到后面会介绍如何实现在不预览的情况下获取摄像头回调的元素数据,今天我们就来实现一下。下面先给出实现代码:packageaoto.com.cameranopreviewtest;importandroid.content.Context;importandroid.graphics.PixelFormat;importandroid.ha
- 解锁Python中的人脸识别:Face Recognition库详解与应用
码上飞扬
Recognition人脸识别
在当今的人工智能时代,人脸识别技术已经成为了计算机视觉领域的一项重要应用。无论是在安全监控、社交媒体还是智能设备中,人脸识别都扮演着不可或缺的角色。在众多的人脸识别工具和库中,Python的FaceRecognition库以其简单易用和高效性而备受青睐。本文将深入探讨FaceRecognition库的使用方法、工作原理及其应用场景,帮助你快速掌握这一强大的工具。一、什么是FaceRecogniti
- 构建智能门禁安防系统:树莓派 4B、OpenCV、SQLite 和 MQTT 的应用(代码示例)
极客小张
opencvsqlitejvm单片机物联网计算机视觉树莓派
一、项目概述1.1项目目标和用途本项目旨在开发一个智能门禁安防系统,该系统利用摄像头和人脸识别技术,结合本地人脸库,实现对进出人员的自动识别和管理。系统能够实时记录进出人员的信息,并对未注册人员进行警报提示。通过与物联网平台的集成,用户可以远程监控和管理门禁系统,提升安全性和管理效率。1.2解决的问题和价值传统的门禁系统往往依赖于钥匙或密码,存在安全隐患和管理不便的问题。本项目通过人脸识别技术,解
- 【深度学习实战】行人检测追踪与双向流量计数系统【python源码+Pyqt5界面+数据集+训练代码】YOLOv8、ByteTrack、目标追踪、双向计数、行人检测追踪、过线计数
阿_旭
AI应用软件开发实战深度学习实战深度学习python行人检测行人追踪过线计数
《博主简介》小伙伴们好,我是阿旭。专注于人工智能、AIGC、python、计算机视觉相关分享研究。✌更多学习资源,可关注公-仲-hao:【阿旭算法与机器学习】,共同学习交流~感谢小伙伴们点赞、关注!《------往期经典推荐------》一、AI应用软件开发实战专栏【链接】项目名称项目名称1.【人脸识别与管理系统开发】2.【车牌识别与自动收费管理系统开发】3.【手势识别系统开发】4.【人脸面部活体
- 【激活函数总结】Pytorch中的激活函数详解: ReLU、Leaky ReLU、Sigmoid、Tanh 以及 Softmax
阿_旭
深度学习知识点pytorch人工智能python激活函数深度学习
《博主简介》小伙伴们好,我是阿旭。专注于人工智能、AIGC、python、计算机视觉相关分享研究。感谢小伙伴们点赞、关注!《------往期经典推荐------》一、AI应用软件开发实战专栏【链接】项目名称项目名称1.【人脸识别与管理系统开发】2.【车牌识别与自动收费管理系统开发】3.【手势识别系统开发】4.【人脸面部活体检测系统开发】5.【图片风格快速迁移软件开发】6.【人脸表表情识别系统】7.
- 人脸识别技术框架
weixin_30314813
人工智能
1、人脸检测(确定人脸的位置)。2、人脸关键点(确定眼睛,嘴角等特征位置)。3、人脸几何校正(把人脸通过缩放、旋转、拉伸等图像变化到一个比较标准的大小位置)。4、人脸光学校正(滤波,去除一些对光照敏感的面部特征)。5、人脸特征提取(包括LBP,HOG,Gabor等)。6、人脸识别转载于:https://www.cnblogs.com/lanye/p/3620621.html
- 疯壳AI语音及人脸识别3-4AI人脸系统架构
fengkesz
AI语音识别人脸识别
详情地址:https://fengke.club/GeekMart/views/offline/ai购买链接:https://fengke.club/GeekMart/su_fKw7Nb7oC.jsp视频地址:https://fengke.club/GeekMart/su_f9cTSxNsp.jsp官方QQ群:457586268AI人脸系统架构AI人脸识别系统由7大块组成,分别是摄像头、CC320
- 人脸识别概述
TreeFish2012
FaceRecognition
欢迎关注微博:http://weibo.com/facerecog一人脸识别系统结构图1显示了人脸识别系统所包含的各个模块,其中,图像采集模块用于采集包含人脸的图像;人脸检测跟踪模块用于确定视频中人脸的位置和大小,并确定同一个人在帧间的对应关系;而特征点定位模块用于定位眼睛、嘴巴等脸部特征点的位置;图像质量评估模块,用于从采集的同一个人的多张人脸图像中,根据人脸姿态和光照条件选择最适合识别的一张或
- 【Python】成功解决TypeError: list indices must be integers or slices, not str
高斯小哥
BUG解决方案合集pythonlist新手入门学习debug
【Python】成功解决TypeError:listindicesmustbeintegersorslices,notstr欢迎进入我的个人主页,我是高斯小哥!博主档案:广东某985本硕,SCI顶刊一作,深耕深度学习多年,熟练掌握PyTorch框架。技术专长:擅长处理各类深度学习任务,包括但不限于图像分类、图像重构(去雾\去模糊\修复)、目标检测、图像分割、人脸识别、多标签分类、重识别(行人\车辆
- 人脸识别算法MTCNN论文解读
纸上得来终觉浅~
图像处理paper阅读人脸识别mtcnn
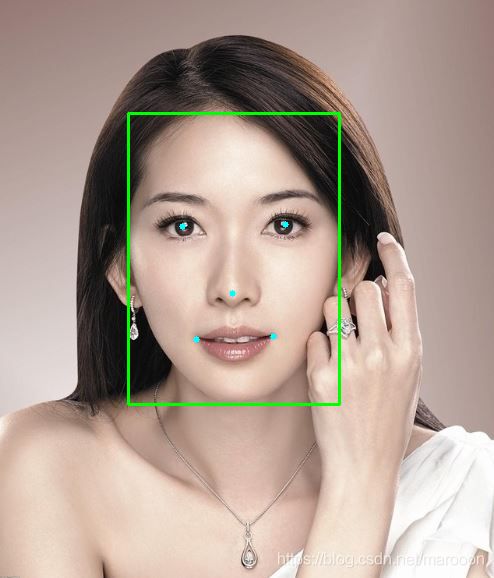
论文名称:JointFaceDetectionandAlignmentusingMulti-taskCascadedConvolutionalNetworks论文地址:https://www.lao-wang.com/wp-content/uploads/2017/07/1604.02878.pdf1、MTCNN原理MTCNN,Multi-taskconvolutionalneuralnetwor
- Azure和Transformers的详细解释
漫天飞舞的雪花
azuremicrosoftpython
AzureAI是微软提供的人工智能(AI)解决方案的集合,旨在帮助开发人员、数据科学家和企业轻松构建和部署智能应用程序。以下是对AzureAI各个方面的详细解释:AzureAI主要组件AzureCognitiveServices(认知服务):计算视觉:包括图像识别、物体检测、人脸识别以及图像标注等。语音服务:包括语音识别、语音合成、说话人识别和语音翻译等。语言理解服务:包括文本分析、语言翻译、情感
- 人脸识别界面设计Android,人脸识别系统的设计及Android平台实现
代码侠士
人脸识别界面设计Android
摘要:近些年来,随着人们对信息安全问题的日益重视,生物识别技术由于其自身具有传统身份技术所不具备的优势,被大量地用于身份认证中.人脸作为一种重要的生物特征,具有唯一性,随身携带的优点,而且人脸图像的采集条件相对宽松,因此人脸识别技术被大量地用作门禁,安检等相关领域.本文对人脸识别系统进行了相关研究.在人脸检测阶段,对人脸检测的两种方法进行了研究.使用肤色检测的方法检测速度较快,但检测范围不准确并且
- 【OpenCV】手势识别实现电脑音量控制
Eden_Hazard7
计算机视觉opencv人工智能计算机视觉python
从AdvanceComputerVisionwithPython-ComputerVisionZone这个网站上找到了一些有关人脸识别和手势识别的示例代码与课程,记录一下学习的过程和结果,Python初学,写得比较基础。代码基本是流程类的代码,核心功能在导入的库中已经实现。程序包括两个文件。【注】本文写于2024.8.30,修改了原代码的库中已不支持的函数用法,截止到目前,可以直接复制运行。一、H
- 每天五分钟计算机视觉:Siamese深度神经网络模型和FaceNet的关系
幻风_huanfeng
计算机视觉计算机视觉dnn人工智能SiameseFaceNet神经网络
本文重点在前面的课程中,我们学习了Siamese深度神经网络模型和FaceNet,二者都可以完成人脸识别任务,本文进行整理学习,理清二者的区别和联系。基本概念与原理Siamese深度神经网络模型Siamese网络,又称孪生网络,由两个结构相同且权重共享的神经网络组成。这两个网络分别处理输入的对比样本,通过比较两个输入样本的特征向量来判断它们的相似度。在人脸识别中,Siamese网络通过计算输入人脸
- 【Tools】计算机视觉(CV)技术的优势和挑战。
音乐学家方大刚
工具计算机视觉人工智能
我们从不正视那个问题那一些是非题总让人伤透脑筋我会期待爱盛开那一个黎明一定会有美丽的爱情范玮琪《是非题》计算机视觉(CV)技术是一种模拟人类视觉系统的能力,通过使用计算机算法和图像处理技术,让计算机能够理解和解释图像和视频。它在许多领域都有广泛的应用,包括医疗诊断、安全监控、自动驾驶、人脸识别等。下面是计算机视觉技术的优势和挑战的一些例子:优势:高速处理:计算机视觉可以快速处理大量的图像和视频数据
- 吴恩达深度学习笔记(24)-为什么要使用深度神经网络?
极客Array
为什么使用深层表示?(Whydeeprepresentations?)我们都知道深度神经网络能解决好多问题,其实并不需要很大的神经网络,但是得有深度,得有比较多的隐藏层,这是为什么呢?我们一起来看几个例子来帮助理解,为什么深度神经网络会很好用。首先,深度网络在计算什么?如果你在建一个人脸识别或是人脸检测系统,深度神经网络所做的事就是,当你输入一张脸部的照片,然后你可以把深度神经网络的第一层,当成一
- 华为鸿蒙Core Vision Kit 骨骼检测技术
神码兄弟
华为harmonyos
鸿蒙CoreVisionKit是华为鸿蒙系统中的一个图像处理框架,旨在提供各种计算机视觉功能,包括物体检测、人脸识别、文本识别等。骨骼检测是其中的一项功能,主要用于检测和识别人类身体的骨骼结构。骨骼检测的关键点骨骼点检测:通过骨骼检测功能,可以识别出人体的关键骨骼点,如肩膀、肘部、膝盖等。每个骨骼点都有特定的坐标,可以用于进一步分析人体姿势。姿势估计:在检测到骨骼点后,系统可以进行姿势估计,即通过
- DNN学习平台(GoogleNet、SSD、FastRCNN、Yolov3)
吾名招财
人工智能MFC界面应用dnnopencv神经网络
DNN学习平台(GoogleNet、SSD、FastRCNN、Yolov3)前言相关介绍1,登录界面:2,主界面:3,部分功能演示如下(1)识别网络图片(2)GoogleNet分类(3)人脸识别(4)SSD目标检测(5)FasterRCNN目标检测资源链接(含源码)前言 还记得上学那会儿刚学完几个深度学习模型的C++简单部署应用,当时特别兴奋,外加那会儿还能自己写界面生成应用程序了,就想着做一个
- Java人证合一接口原理、身份证识别、人工智能
翔云API
人工智能
人脸识别,是基于人的脸部特征信息进行身份识别的一种生物识别技术。用摄像机或摄像头采集含有人脸的图像或视频流,并自动在图像中检测和跟踪人脸,进而对检测到的人脸进行脸部的一系列相关技术,通常也叫做人像识别、面部识别。人证合一接口,一般是指人脸与身份证识别接口的相结合,包括人脸图像采集、人脸定位、人脸识别预处理、身份确认以及身份查找等;而狭义的人脸识别特指通过人脸进行身份确认或者身份查找的技术或系统。人
- 人脸识别设计
melonbo
项目分享深度学习人脸识别openface
总体思路人脸识别使用的算法思路为:首先,定位一张图像中所有的人脸位置;其次,对于同一张脸,当光线改变或者朝向方位改变时,算法还能判断是同一张脸;然后找到每一张脸不同于其他脸的独特之处,比如脸的大小、眉毛的弯曲程度,并表示出来;最后,通过把表示出来的脸的特征数据与数据库中的所有的人脸特征进行匹配,确定图像中人的身份信息。模型介绍OpenFace是一个基于深度神经网络的人脸识别和面部特征提取系统,它主
- 基于xr-frame实现微信小程序的人脸识别3D模型叠加AR功能(含源码)
十幺卜入
AR微信小程序微信小程序AR微信小程序人脸识别3DAR微信小程序源码XR
前言xr-frame是一套小程序官方提供的XR/3D应用解决方案,基于混合方案实现,性能逼近原生、效果好、易用、强扩展、渐进式、遵循小程序开发标准。xr-frame在基础库v2.32.0开始基本稳定,发布为正式版,但仍有一些功能还在开发,目前(2024.08.24)有一些限制如下:1最低要求客户端iOS8.0.29、安卓8.0.30及以上,推荐稳定版在iOS8.0.36、安卓8.0.35及以上。2
- 基于OpenCV-Python实现人脸识别-----摄像头捕获人脸图像显示中文乱码问题
匹数
opencvpython人工智能
基于OpenCV-Python实现人脸识别时,为了使图像上显示识别到人员的中文名字,做了几次尝试,使用PIL.Image和OpenCV图像格式相互转换解决:使用OpenCV将图片灰度化,对加载的灰度化图使用分类器中的detectMultiScale()函数查找目标人脸,并使用for循环实现矩形框和圆形框框住查找到的人脸。再使用OpenCV中识别器face.LBPHFaceRecognizer()方
- OPenCV和OPenGL的区别
zxz520zmg
opencv人工智能计算机视觉
OPenCV主要用来处理图像和视频,还涉及到一些机器学习的算法。专注于从图像中获取信息是用机器来理解图像。比如:视频降噪、运动物体的跟踪、目标识别(比如人脸识别)。OPenGL主要用于三维图形的渲染。专注于用机器绘制图像给人看。Graphics,3D绘图。Opencv是从图像到数据OpenGL是从数据到图像
- Anaconda大坑 | Python版本显示不正确 | 虚拟环境没有bin文件夹
特立独行的Q
python开发语言linux
问题:要做人脸识别任务,想用facenet,发现facenet的配置要求是tensorflow1.7,网上说对应python是3.5,因此我打算重新建立虚拟环境。建立环境后,发现conda可以下载python3.5,pip不行,同时conda下载后,python-V显示的版本却是3.8。至此,我把问题初步确定为系统环境和虚拟环境之间工具包的优先级问题。调整sys.path的顺序,没有作用。在不断的
- 【ShuQiHere】求求你了,来学吧:小白也能懂的人脸识别教程
ShuQiHere
机器学习人工智能opencv
【ShuQiHere】1.人脸识别到底有多简单?人脸识别听起来可能很复杂,但其实并不难。今天我们会带你一步步用Python和OpenCV实现一个基础的2D人脸识别程序。只要按照步骤操作,你很快就能搞定。当然,如果你对更高级的技术感兴趣,我们还可以探索3D、4D人脸识别,甚至使用深度学习模型处理动态识别。不过,打好基础最重要,从这里开始,你就已经踏出了迈向AI世界的重要一步。2.必备工具:准备上阵在
- 大数据毕设 图像识别-人脸识别与疲劳检测 - python opencv
fawubio_A
python算法
文章目录0前言1课题背景2Dlib人脸识别2.1简介2.2Dlib优点2.3相关代码2.4人脸数据库2.5人脸录入加识别效果3疲劳检测算法3.1眼睛检测算法3.2打哈欠检测算法3.3点头检测算法4PyQt54.1简介4.2相关界面代码0前言这两年开始毕业设计和毕业答辩的要求和难度不断提升,传统的毕设题目缺少创新和亮点,往往达不到毕业答辩的要求,这两年不断有学弟学妹告诉学长自己做的项目系统达不到老师
- 线性代数在卷积神经网络(CNN)中的体现
科学的N次方
人工智能线性代数cnn人工智能
案例:深度学习中的卷积神经网络(CNN)在图像识别领域,卷积神经网络(ConvolutionalNeuralNetworks,CNN)是一个广泛应用深度学习模型,它在人脸识别、物体识别、医学图像分析等方面取得了显著成效。CNN中的核心操作——卷积,就是一个直接体现线性代数应用的例子。假设我们正在训练一个用于识别猫和狗的图像分类器,原始输入是一幅RGB彩色图片,可以将其视为一个高度、宽度和通道数(R
- Java序列化进阶篇
g21121
java序列化
1.transient
类一旦实现了Serializable 接口即被声明为可序列化,然而某些情况下并不是所有的属性都需要序列化,想要人为的去阻止这些属性被序列化,就需要用到transient 关键字。
- escape()、encodeURI()、encodeURIComponent()区别详解
aigo
JavaScriptWeb
原文:http://blog.sina.com.cn/s/blog_4586764e0101khi0.html
JavaScript中有三个可以对字符串编码的函数,分别是: escape,encodeURI,encodeURIComponent,相应3个解码函数:,decodeURI,decodeURIComponent 。
下面简单介绍一下它们的区别
1 escape()函
- ArcgisEngine实现对地图的放大、缩小和平移
Cb123456
添加矢量数据对地图的放大、缩小和平移Engine
ArcgisEngine实现对地图的放大、缩小和平移:
个人觉得是平移,不过网上的都是漫游,通俗的说就是把一个地图对象从一边拉到另一边而已。就看人说话吧.
具体实现:
一、引入命名空间
using ESRI.ArcGIS.Geometry;
using ESRI.ArcGIS.Controls;
二、代码实现.
- Java集合框架概述
天子之骄
Java集合框架概述
集合框架
集合框架可以理解为一个容器,该容器主要指映射(map)、集合(set)、数组(array)和列表(list)等抽象数据结构。
从本质上来说,Java集合框架的主要组成是用来操作对象的接口。不同接口描述不同的数据类型。
简单介绍:
Collection接口是最基本的接口,它定义了List和Set,List又定义了LinkLi
- 旗正4.0页面跳转传值问题
何必如此
javajsp
跳转和成功提示
a) 成功字段非空forward
成功字段非空forward,不会弹出成功字段,为jsp转发,页面能超链接传值,传输变量时需要拼接。接拼接方式list.jsp?test="+strweightUnit+"或list.jsp?test="+weightUnit+&qu
- 全网唯一:移动互联网服务器端开发课程
cocos2d-x小菜
web开发移动开发移动端开发移动互联程序员
移动互联网时代来了! App市场爆发式增长为Web开发程序员带来新一轮机遇,近两年新增创业者,几乎全部选择了移动互联网项目!传统互联网企业中超过98%的门户网站已经或者正在从单一的网站入口转向PC、手机、Pad、智能电视等多端全平台兼容体系。据统计,AppStore中超过85%的App项目都选择了PHP作为后端程
- Log4J通用配置|注意问题 笔记
7454103
DAOapachetomcatlog4jWeb
关于日志的等级 那些去 百度就知道了!
这几天 要搭个新框架 配置了 日志 记下来 !做个备忘!
#这里定义能显示到的最低级别,若定义到INFO级别,则看不到DEBUG级别的信息了~!
log4j.rootLogger=INFO,allLog
# DAO层 log记录到dao.log 控制台 和 总日志文件
log4j.logger.DAO=INFO,dao,C
- SQLServer TCP/IP 连接失败问题 ---SQL Server Configuration Manager
darkranger
sqlcwindowsSQL ServerXP
当你安装完之后,连接数据库的时候可能会发现你的TCP/IP 没有启动..
发现需要启动客户端协议 : TCP/IP
需要打开 SQL Server Configuration Manager...
却发现无法打开 SQL Server Configuration Manager..??
解决方法: C:\WINDOWS\system32目录搜索framedyn.
- [置顶] 做有中国特色的程序员
aijuans
程序员
从出版业说起 网络作品排到靠前的,都不会太难看,一般人不爱看某部作品也是因为不喜欢这个类型,而此人也不会全不喜欢这些网络作品。究其原因,是因为网络作品都是让人先白看的,看的好了才出了头。而纸质作品就不一定了,排行榜靠前的,有好作品,也有垃圾。 许多大牛都是写了博客,后来出了书。这些书也都不次,可能有人让为不好,是因为技术书不像小说,小说在读故事,技术书是在学知识或温习知识,有些技术书读得可
- document.domain 跨域问题
avords
document
document.domain用来得到当前网页的域名。比如在地址栏里输入:javascript:alert(document.domain); //www.315ta.com我们也可以给document.domain属性赋值,不过是有限制的,你只能赋成当前的域名或者基础域名。比如:javascript:alert(document.domain = "315ta.com");
- 关于管理软件的一些思考
houxinyou
管理
工作好多看年了,一直在做管理软件,不知道是我最开始做的时候产生了一些惯性的思维,还是现在接触的管理软件水平有所下降.换过好多年公司,越来越感觉现在的管理软件做的越来越乱.
在我看来,管理软件不论是以前的结构化编程,还是现在的面向对象编程,不管是CS模式,还是BS模式.模块的划分是很重要的.当然,模块的划分有很多种方式.我只是以我自己的划分方式来说一下.
做为管理软件,就像现在讲究MVC这
- NoSQL数据库之Redis数据库管理(String类型和hash类型)
bijian1013
redis数据库NoSQL
一.Redis的数据类型
1.String类型及操作
String是最简单的类型,一个key对应一个value,string类型是二进制安全的。Redis的string可以包含任何数据,比如jpg图片或者序列化的对象。
Set方法:设置key对应的值为string类型的value
- Tomcat 一些技巧
征客丶
javatomcatdos
以下操作都是在windows 环境下
一、Tomcat 启动时配置 JAVA_HOME
在 tomcat 安装目录,bin 文件夹下的 catalina.bat 或 setclasspath.bat 中添加
set JAVA_HOME=JAVA 安装目录
set JRE_HOME=JAVA 安装目录/jre
即可;
二、查看Tomcat 版本
在 tomcat 安装目
- 【Spark七十二】Spark的日志配置
bit1129
spark
在测试Spark Streaming时,大量的日志显示到控制台,影响了Spark Streaming程序代码的输出结果的查看(代码中通过println将输出打印到控制台上),可以通过修改Spark的日志配置的方式,不让Spark Streaming把它的日志显示在console
在Spark的conf目录下,把log4j.properties.template修改为log4j.p
- Haskell版冒泡排序
bookjovi
冒泡排序haskell
面试的时候问的比较多的算法题要么是binary search,要么是冒泡排序,真的不想用写C写冒泡排序了,贴上个Haskell版的,思维简单,代码简单,下次谁要是再要我用C写冒泡排序,直接上个haskell版的,让他自己去理解吧。
sort [] = []
sort [x] = [x]
sort (x:x1:xs)
| x>x1 = x1:so
- java 路径 配置文件读取
bro_feng
java
这几天做一个项目,关于路径做如下笔记,有需要供参考。
取工程内的文件,一般都要用相对路径,这个自然不用多说。
在src统计目录建配置文件目录res,在res中放入配置文件。
读取文件使用方式:
1. MyTest.class.getResourceAsStream("/res/xx.properties")
2. properties.load(MyTest.
- 读《研磨设计模式》-代码笔记-简单工厂模式
bylijinnan
java设计模式
声明: 本文只为方便我个人查阅和理解,详细的分析以及源代码请移步 原作者的博客http://chjavach.iteye.com/
package design.pattern;
/*
* 个人理解:简单工厂模式就是IOC;
* 客户端要用到某一对象,本来是由客户创建的,现在改成由工厂创建,客户直接取就好了
*/
interface IProduct {
- SVN与JIRA的关联
chenyu19891124
SVN
SVN与JIRA的关联一直都没能装成功,今天凝聚心思花了一天时间整合好了。下面是自己整理的步骤:
一、搭建好SVN环境,尤其是要把SVN的服务注册成系统服务
二、装好JIRA,自己用是jira-4.3.4破解版
三、下载SVN与JIRA的插件并解压,然后拷贝插件包下lib包里的三个jar,放到Atlassian\JIRA 4.3.4\atlassian-jira\WEB-INF\lib下,再
- JWFDv0.96 最新设计思路
comsci
数据结构算法工作企业应用公告
随着工作流技术的发展,工作流产品的应用范围也不断的在扩展,开始进入了像金融行业(我已经看到国有四大商业银行的工作流产品招标公告了),实时生产控制和其它比较重要的工程领域,而
- vi 保存复制内容格式粘贴
daizj
vi粘贴复制保存原格式不变形
vi是linux中非常好用的文本编辑工具,功能强大无比,但对于复制带有缩进格式的内容时,粘贴的时候内容错位很严重,不会按照复制时的格式排版,vi能不能在粘贴时,按复制进的格式进行粘贴呢? 答案是肯定的,vi有一个很强大的命令可以实现此功能 。
在命令模式输入:set paste,则进入paste模式,这样再进行粘贴时
- shell脚本运行时报错误:/bin/bash^M: bad interpreter 的解决办法
dongwei_6688
shell脚本
出现原因:windows上写的脚本,直接拷贝到linux系统上运行由于格式不兼容导致
解决办法:
1. 比如文件名为myshell.sh,vim myshell.sh
2. 执行vim中的命令 : set ff?查看文件格式,如果显示fileformat=dos,证明文件格式有问题
3. 执行vim中的命令 :set fileformat=unix 将文件格式改过来就可以了,然后:w
- 高一上学期难记忆单词
dcj3sjt126com
wordenglish
honest 诚实的;正直的
argue 争论
classical 古典的
hammer 锤子
share 分享;共有
sorrow 悲哀;悲痛
adventure 冒险
error 错误;差错
closet 壁橱;储藏室
pronounce 发音;宣告
repeat 重做;重复
majority 大多数;大半
native 本国的,本地的,本国
- hibernate查询返回DTO对象,DTO封装了多个pojo对象的属性
frankco
POJOhibernate查询DTO
DTO-数据传输对象;pojo-最纯粹的java对象与数据库中的表一一对应。
简单讲:DTO起到业务数据的传递作用,pojo则与持久层数据库打交道。
有时候我们需要查询返回DTO对象,因为DTO
- Partition List
hcx2013
partition
Given a linked list and a value x, partition it such that all nodes less than x come before nodes greater than or equal to x.
You should preserve the original relative order of th
- Spring MVC测试框架详解——客户端测试
jinnianshilongnian
上一篇《Spring MVC测试框架详解——服务端测试》已经介绍了服务端测试,接下来再看看如果测试Rest客户端,对于客户端测试以前经常使用的方法是启动一个内嵌的jetty/tomcat容器,然后发送真实的请求到相应的控制器;这种方式的缺点就是速度慢;自Spring 3.2开始提供了对RestTemplate的模拟服务器测试方式,也就是说使用RestTemplate测试时无须启动服务器,而是模拟一
- 关于推荐个人观点
liyonghui160com
推荐系统关于推荐个人观点
回想起来,我也做推荐了3年多了,最近公司做了调整招聘了很多算法工程师,以为需要多么高大上的算法才能搭建起来的,从实践中走过来,我只想说【不是这样的】
第一次接触推荐系统是在四年前入职的时候,那时候,机器学习和大数据都是没有的概念,什么大数据处理开源软件根本不存在,我们用多台计算机web程序记录用户行为,用.net的w
- 不间断旋转的动画
pangyulei
动画
CABasicAnimation* rotationAnimation;
rotationAnimation = [CABasicAnimation animationWithKeyPath:@"transform.rotation.z"];
rotationAnimation.toValue = [NSNumber numberWithFloat: M
- 自定义annotation
sha1064616837
javaenumannotationreflect
对象有的属性在页面上可编辑,有的属性在页面只可读,以前都是我们在页面上写死的,时间一久有时候会混乱,此处通过自定义annotation在类属性中定义。越来越发现Java的Annotation真心很强大,可以帮我们省去很多代码,让代码看上去简洁。
下面这个例子 主要用到了
1.自定义annotation:@interface,以及几个配合着自定义注解使用的几个注解
2.简单的反射
3.枚举
- Spring 源码
up2pu
spring
1.Spring源代码
https://github.com/SpringSource/spring-framework/branches/3.2.x
注:兼容svn检出
2.运行脚本
import-into-eclipse.bat
注:需要设置JAVA_HOME为jdk 1.7
build.gradle
compileJava {
sourceCompatibilit
- 利用word分词来计算文本相似度
yangshangchuan
wordword分词文本相似度余弦相似度简单共有词
word分词提供了多种文本相似度计算方式:
方式一:余弦相似度,通过计算两个向量的夹角余弦值来评估他们的相似度
实现类:org.apdplat.word.analysis.CosineTextSimilarity
用法如下:
String text1 = "我爱购物";
String text2 = "我爱读书";
String text3 =