从0搭建Django-windows
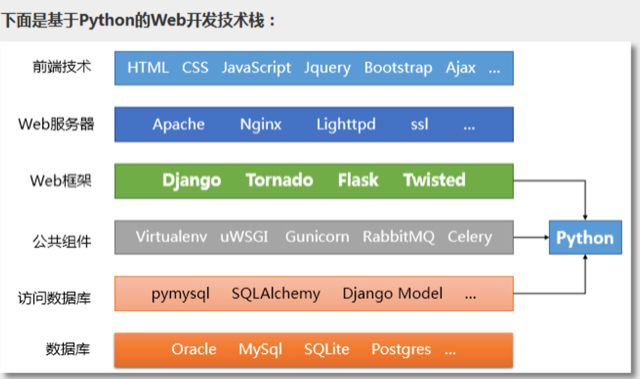
Django的知识架构图:
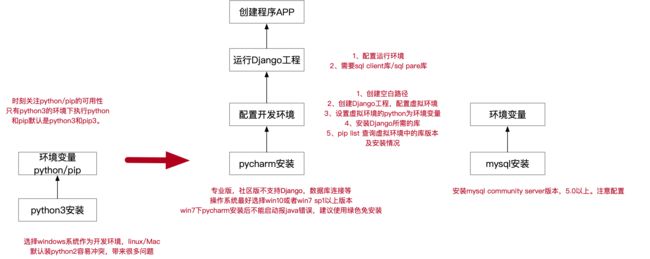
从0到创建app流程图
从0到创建简易Django网站
配置venv及开发环境
Django的开发环境配置可以采用两种方式,建议采用后一种,尽管后一种比较麻烦。
(方便,但不推荐)一种是使用已安装的python3,此时已经设置python的环境变量,后续库的安装和使用都可以直接pip安装。
另外一种是新建一个虚拟环境(稍麻烦,但开发环境隔离,推荐使用),该虚拟环境会以Base interpreter在venv中复制一个新的python环境。后续库的安装和使用需要在该虚拟环境下安装和使用。安装库时,进入此路径下安装,避免安装在默认路径(pycharm有对应入口)。
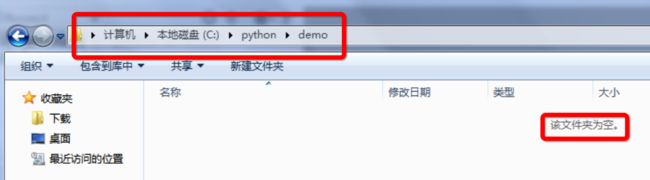
先创建一个空白项目目录,再使用pycharm完成venv的配置。
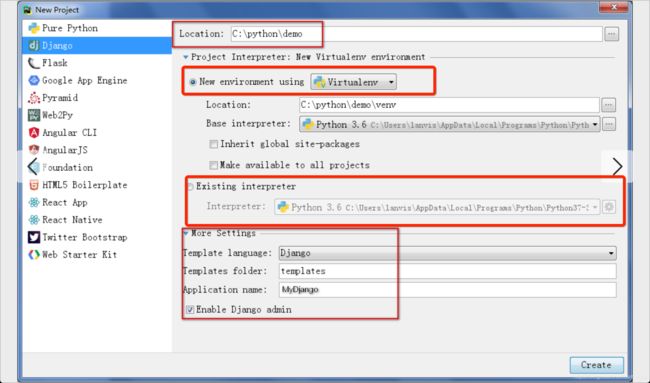
pycharm的Django配置界面
- 注意工程名称即为location空白路径名demo,而venv就创建在demo下,不建议使用已有的编译环境(Existing interpreter)
- more setting中默认使用Django的模板,也可以选择使用jinja2模板。
- 如果配置了application name,在创建Django配置环境的时候就会创建一个以此命名的app。见下图的配置完成界面。
点击创建后要稍等待一会儿才能完成Django环境创建
环境变量配置
在完成上图之后,会在路径下创建venv的虚拟环境文件夹。该文件夹是一个python的编译环境。
可以将该环境设置为环境变量,以便安装库。
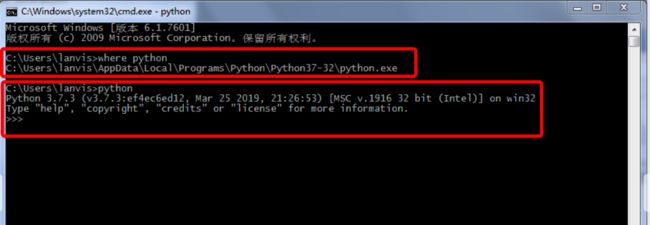
使用where python 查找
C:\python\demo\venv\Scripts\python.exe
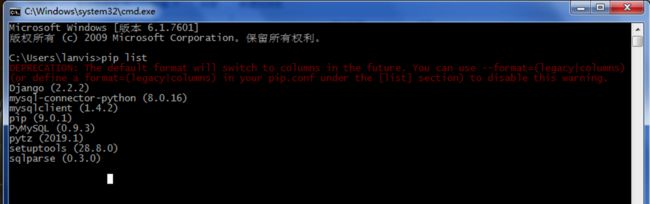
库安装检查
where pip应显示为:
C:\python\demo\venv\Scripts\pip.exe
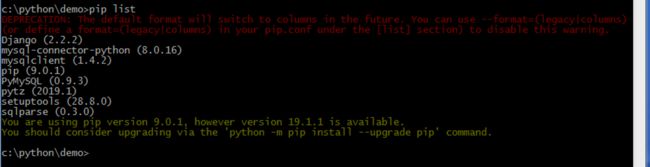
pip list
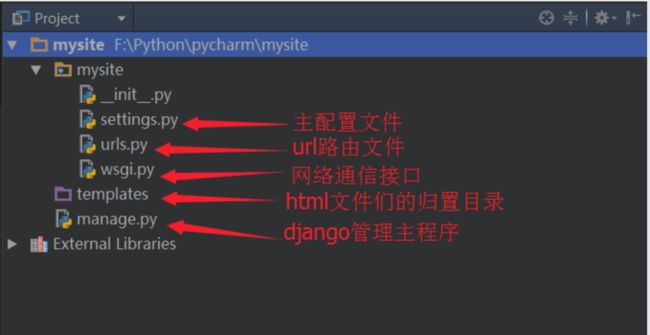
完成工程名为mysite的配置的界面:
创建完成后,首次启动配置
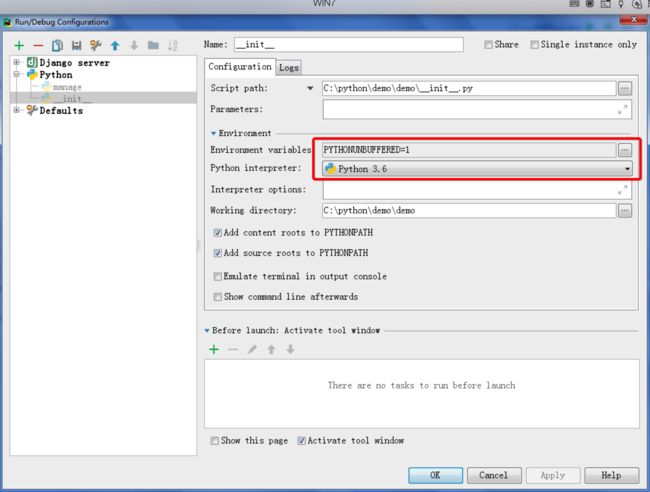
配置Python interpreter记得选择虚拟环境。不要选择的默认路径路径。
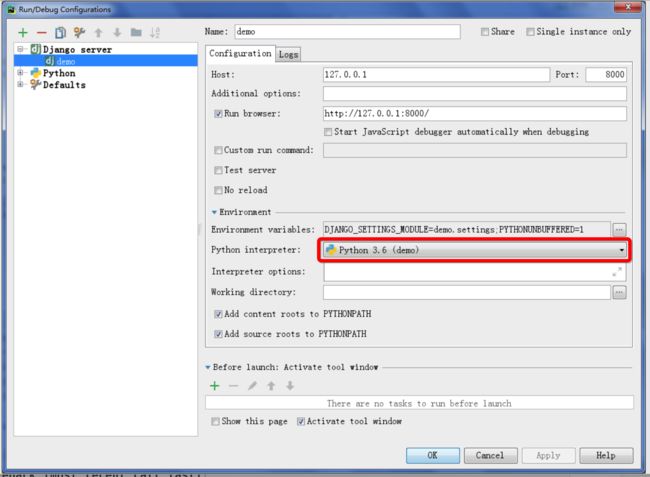 完成配置后,可以以工程的形式运行。
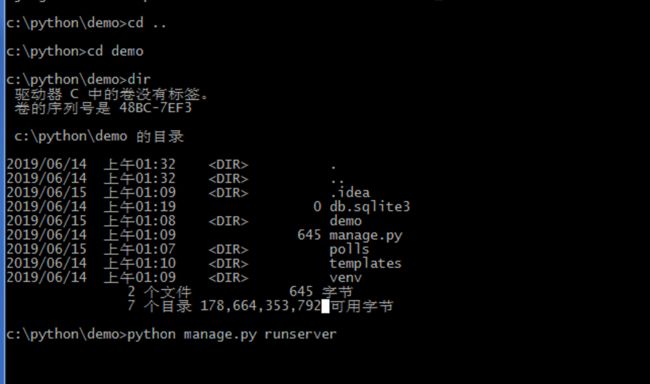
也可以使用命令行启动。建议两个都试一下,以便更好的理解Django的开发环境
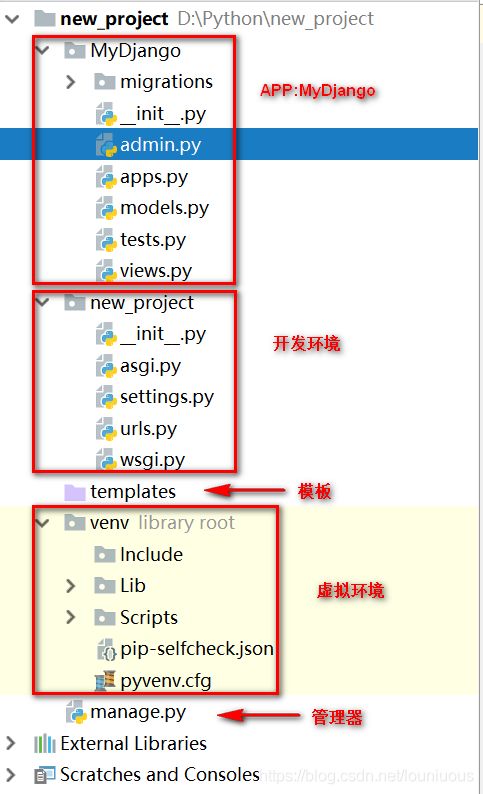
从app到简易Django网站
创建应用程序APP
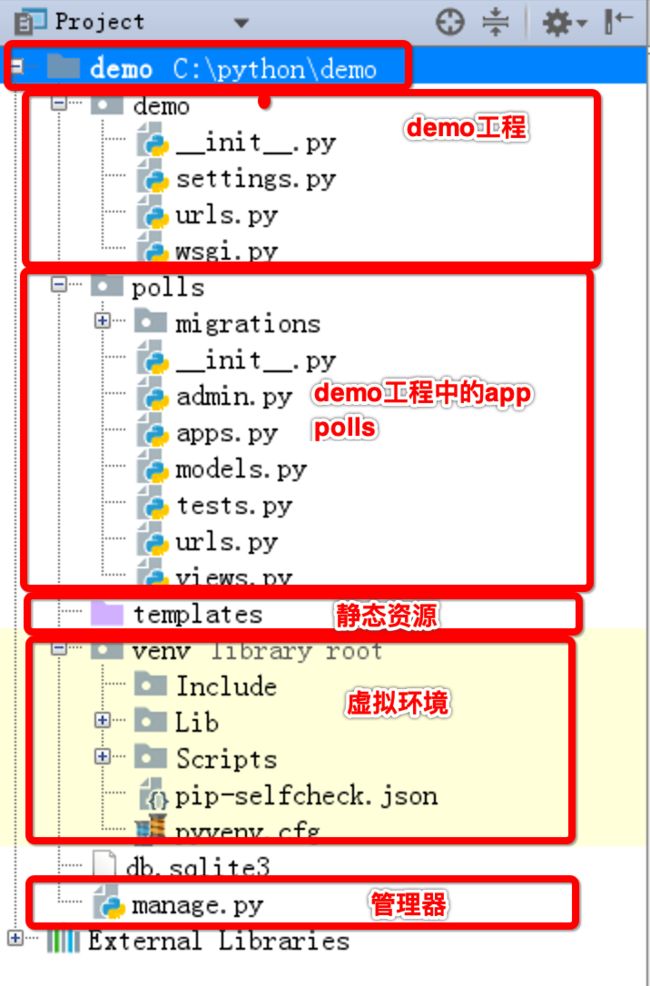
首先manage.py是在如下图demo项目下的,并与工程demo并列一级。执行manage.py相关的命令应在:
C:\python\demo下执行。
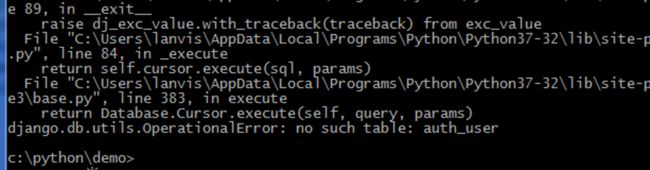
创建超级用户
创建超级用户前,需要安装数据库,否则会报错无法创建table
问题处理
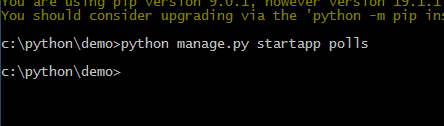
报错1:无法导入django,重新使用pip安装一次django
Microsoft Windows [版本 6.1.7601]
版权所有 (c) 2009 Microsoft Corporation。保留所有权利。

C:\Users\lanvis>cd c:\python\demo\

c:\python\demo>python manage.py startapp polls
Traceback (most recent call last):
  File "manage.py", line 10, in main
    from django.core.management import execute_from_command_line
ModuleNotFoundError: No module named 'django'

The above exception was the direct cause of the following exception:

Traceback (most recent call last):
  File "manage.py", line 21, in
    main()
  File "manage.py", line 16, in main
    ) from exc
ImportError: Couldn't import Django. Are you sure it's installed and available on your PYTHONPATH environmen
t variable? Did you forget to activate a virtual environment?

c:\python\demo>pip install Django==2.2.2
Collecting Django==2.2.2
  Using cached https://files.pythonhosted.org/packages/eb/4b/743d5008fc7432c714d753e1fc7ee56c6a776dc566cc6cf
b4136d46cdcbb/Django-2.2.2-py3-none-any.whl
Collecting pytz (from Django==2.2.2)
  Using cached https://files.pythonhosted.org/packages/3d/73/fe30c2daaaa0713420d0382b16fbb761409f532c56bdcc5
14bf7b6262bb6/pytz-2019.1-py2.py3-none-any.whl
Collecting sqlparse (from Django==2.2.2)
  Using cached https://files.pythonhosted.org/packages/ef/53/900f7d2a54557c6a37886585a91336520e5539e3ae2423f
f1102daf4f3a7/sqlparse-0.3.0-py2.py3-none-any.whl
Installing collected packages: pytz, sqlparse, Django
Successfully installed Django-2.2.2 pytz-2019.1 sqlparse-0.3.0
You are using pip version 9.0.1, however version 19.1.1 is available.
You should consider upgrading via the 'python -m pip install --upgrade pip' command.

c:\python\demo>
问题2:使用了默认路径下的python
如果在使用pip的时候是使用的环境变量,库的安装是安装在python的默认路径下的。因此在编译的时候
选择默认python 3.6,不要选择项目的python 3.6(demo)。否则可能导致一些库虽然安装了,但依然报错。
如pycharm上运行demo工程,报错no module name pymysql。
而实际上pymysql已经安装在系统内。只是不在demo的工程下,而是在环境变量的路径下。
要把pymqsql安装的demo的venv中,需要进入该目录下安装。这样会首先使用该目录下的pip而不是去环境变量下找。(理解环境变量的原理)
数据库基础
安装与配置
安装mysql数据库
参考csdn的链接
环境变量配置
在win7安装mysql数据库并配置,会导致python的环境变量被取消。需要重新设置python,pip的环境变量。
找到python的安装路径,pip的安装路径,将这些路径加入到系统环境变量中
C:\Users\lanvis\AppData\Local\Programs\Python\Python37-32;
C:\Users\lanvis\AppData\Local\Programs\Python\Python37-32\Scripts

创建数据库
命令行创建数据库(数据库默认端口3306)
lounious@ali-198299:~$ mysql -u root -p
Enter password:
Welcome to the MySQL monitor. Commands end with ; or \g.
Your MySQL connection id is 11
Server version: 8.0.16 MySQL Community Server - GPL
Copyright (c) 2000, 2019, Oracle and/or its affiliates. All rights reserved.
Oracle is a registered trademark of Oracle Corporation and/or its
affiliates. Other names may be trademarks of their respective
owners.
Type 'help;' or '\h' for help. Type '\c' to clear the current input statement.
mysql> create database Django_database; #要特别注意要加上结束符;
Query OK, 1 row affected (0.02 sec)
#查看创建的数据库
mysql> show databases;
+--------------------+
| Database |
+--------------------+
| django_database |
| information_schema |
| mysql |
| performance_schema |
| sys |
+--------------------+
5 rows in set (0.01 sec)
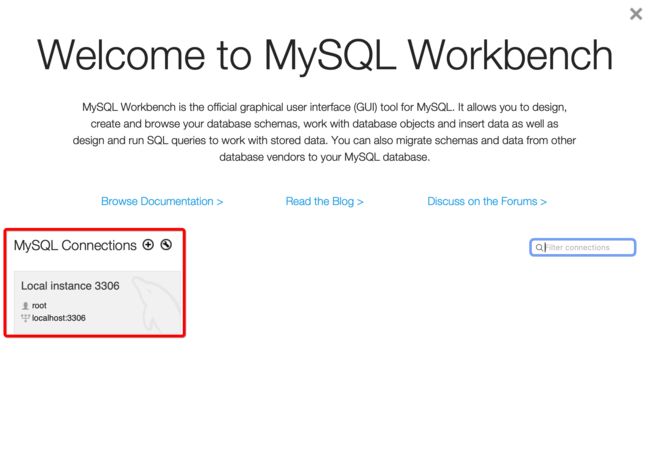
mysql>//使用MySQLWorkbench查询生成的数据库
打开MySQLWorkbench,看到已经创建的instance。
若点击提示错误:
MySQL said: Authentication plugin 'caching_sha2_password' cannot be loaded: dlopen(/usr/local/lib/plugin/caching_sha2_password.so, 2): image not found
就是在链接数据库时不能加载‘caching_sha2_password'这个插件,也就是不能对身份验证。
解决方案:
- 打开系统偏好设置,找到mysql,点击Initialize Database。
- 输入你的新密码,记住这个密码,用于后期链接数据库的登陆使用。
- 选择‘Use legacy password‘。
- 重启mysql服务。
- 再次打开MySQLWorkbench
正常打开界面
创建完成的数据库:
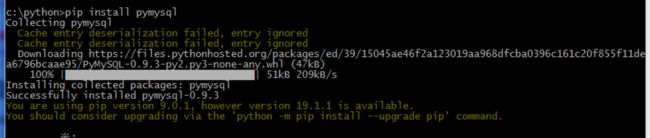
安装pymysql库
安装第三方库的时候,出现组件 is requested,如下,安装pysql出错
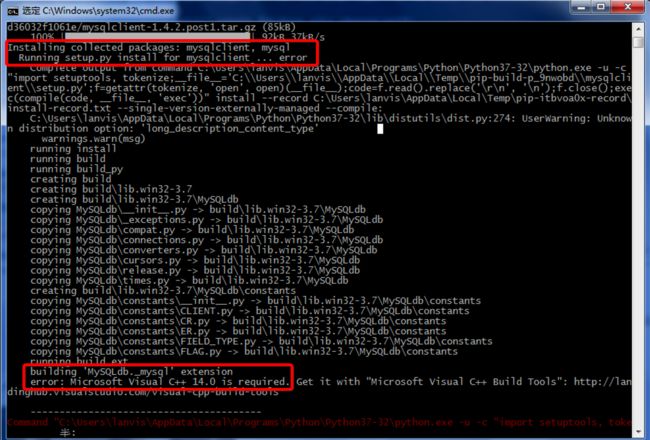
表示库需要一些组件的支持,此时可以访问python的库依赖,查找对应的库所需要的组件。对应python的版本和32/64位数
https://www.lfd.uci.edu/~gohlke/pythonlibs/
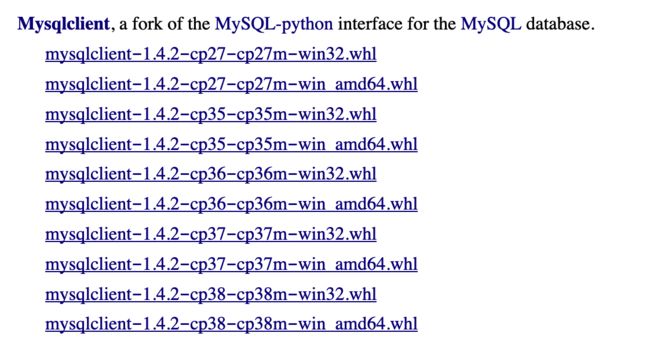
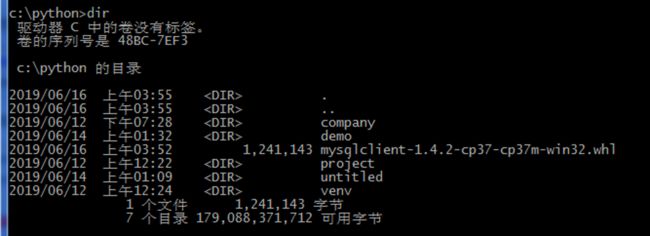
下载whl文件,进入whl文件的目录,使用pip安装
pip install ****-18.7.0-cp37-cp37m-win_amd64.whl
安装完pymysql所需的组件后,就可以顺利安装pymysql了。

pysql导入Django
https://www.cnblogs.com/wcwnina/p/8719482.html
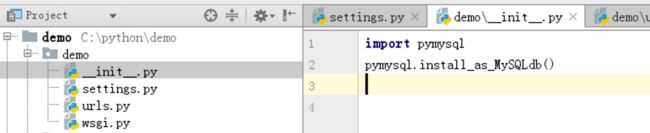
需要在project目录下的__init__.py 添加如下代码
import pymysql
pymysql.install_as_MySQLdb()
至此完成数据库的配置,下面需要创建模型,才能够做数据库的迁移
模型与数据库
创建模型
额外配置:
配置时区
配置语言
在demo/settings.py的INSTALLED_APPS节点,添加polls/app.py中的PollsConfig信息。
数据库迁移
python manage.py makemigrations
第一个报错:
报错mysql数据库偏低。查询mysql数据库
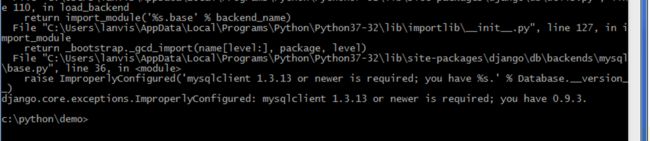
实际通过pip list查询版本,mysqlclint已经超过1.3.13,只是因为PyMySql是0.9.3导致识别错误。需要修改mysql下的base.py文件。
注意是修改上述错误路径下的。不是vevn下的
注释掉35/36行中对版本的判断
第二个报错
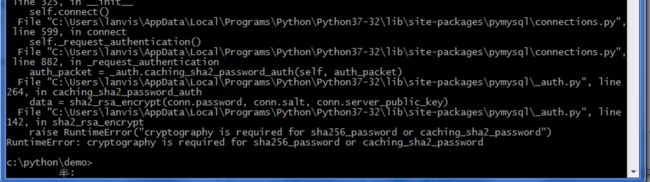
查询mysql的版本发现,mysql版本是8.0的版本。该版本加密方式是使用cha2加密,而django支持的额sha256/caching_sha2
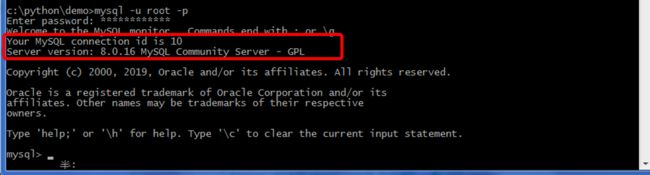
c:\python\demo>mysql -u root -p
Enter password:
Welcome to the MySQL monitor.  Commands end with ; or \g.
Your MySQL connection id is 10
Server version: 8.0.16 MySQL Community Server - GPL
Copyright (c) 2000, 2019, Oracle and/or its affiliates. All rights reserved.
Oracle is a registered trademark of Oracle Corporation and/or its
affiliates. Other names may be trademarks of their respective
owners.
Type 'help;' or '\h' for help. Type '\c' to clear the current input statement.

mysql> ALTER USER 'root'@'localhost' IDENTIFIED WITH mysql_native_password By '20190124@ali';
Query OK, 0 rows affected (0.03 sec)

mysql> FLUSH PRIVILEGES;
Query OK, 0 rows affected (0.00 sec)
第三个报错:
根据问题提示,意思是,属性错误:“str”对象没有属性“decode”
python3.5和Python2.7在套接字返回值解码上的区别
python在bytes和str两种类型转换,所需要的函数依次是encode(),decode()
tips:str通过encode()方法可以编码为指定的bytes。反过来,当从网络或磁盘上读取了字节流,那么读到的数据就是bytes。要把bytes变为str,就需要用decode()方法。反之,则使用encode()方法即可!

顺着报错文件点进去,找到query = query.decode(errors=‘replace’)
将decode修改为encode即可
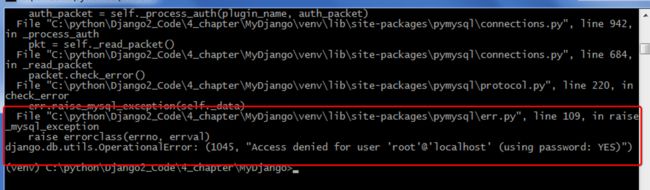
第四个报错:root账号的密码错误。
setting中的数据库密码设置出错,需要修改。
/project_name/setting/ 中的DATABASES包含数据库的信息
DATABASES = {
'default': {
'ENGINE': 'django.db.backends.mysql',
'NAME': 'mydjango',
'USER': 'root',
'PASSWORD': '20190124@ali',
'HOST': '127.0.0.1',
'PORT': '3306',
},
}
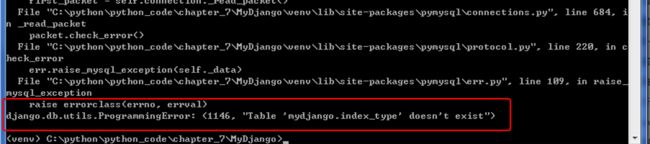
第五个报错
https://blog.csdn.net/weisubao/article/details/77187876
清除之前运行makemigrations产生的文件,重新生成即可。
运行报错处理
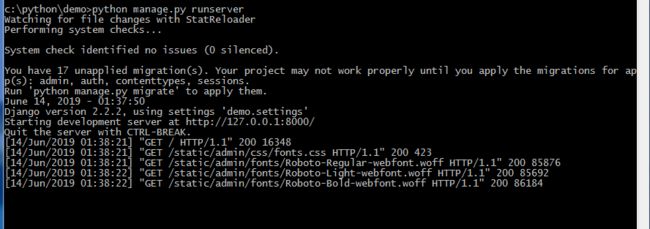
运行命令:
在mysite下运行python3 manage.py runserver
lounious@ali-198299:~/PycharmProjects/python3_untitled1/django_demo/mysite$     python3 manage.py runserver
Performing system checks...

System check identified no issues (0 silenced).

You have 15 unapplied migration(s). Your project may not work properly until you apply the migrations for app(s): admin, auth, contenttypes, sessions.
Run 'python manage.py migrate' to apply them.

May 26, 2019 - 16:12:21
Django version 2.1.8, using settings 'mysite.settings'
Starting development server at http://127.0.0.1:8000/
Quit the server with CONTROL-C.
数据库的密码策略不一致,需要安装pip install cryptography

Django在运行时:LookupError: No installed app with label 'admin'.
python版本 3.7
django版本 2.2
据说是django版本兼容原因,将django降到2.1.8版本即可,另外要安装sqlparse。
pip3 install django==2.1.8
pip3 install sqlparse
Django数据库
数据库与model
新增数据库表
web访问
访问1
访问app的视图中的请求数据mysite/index/templates/views.py
此时根目录的urls已经将app的urls统一管理
http://127.0.0.1:8000/
访问2
访问在主目录(public_static)或者app(index/index_static)下的静态资源
mysit/index/index_static/index_pic.jpg
http://127.0.0.1:8000/static/index_pic.jpg
mysite/public_static/mysite_pic.jpg
http://127.0.0.1:8000/static/mysite_pic.jpg
访问3
访问html文件