Cocos2d-x使用ClippingNode实现遮罩效果
主要是介绍下遮罩,裁剪背景中的某个部位,可以是多边形,任何图形都可以#include "HelloWorldScene.h"
#include "cocostudio/CocoStudio.h"
#include "ui/CocosGUI.h"
USING_NS_CC;
using namespace cocostudio::timeline;
Scene* HelloWorld::createScene()
{
// 'scene' is an autorelease object
auto scene = Scene::create();
// 'layer' is an autorelease object
auto layer = HelloWorld::create();
// add layer as a child to scene
scene->addChild(layer);
// return the scene
return scene;
}
// on "init" you need to initialize your instance
bool HelloWorld::init()
{
// you can create scene with following comment code instead of using csb file.
// 1. super init first
if ( !Layer::init() )
{
return false;
}
Size visibleSize = Director::getInstance()->getVisibleSize();
Vec2 origin = Director::getInstance()->getVisibleOrigin();
/
// 2. add a menu item with "X" image, which is clicked to quit the program
// you may modify it.
// add a "close" icon to exit the progress. it's an autorelease object
auto closeItem = MenuItemImage::create(
"CloseNormal.png",
"CloseSelected.png",
CC_CALLBACK_1(HelloWorld::menuCloseCallback, this));
closeItem->setPosition(Vec2(origin.x + visibleSize.width - closeItem->getContentSize().width/2 ,
origin.y + closeItem->getContentSize().height/2));
// create menu, it's an autorelease object
auto menu = Menu::create(closeItem, NULL);
menu->setPosition(Vec2::ZERO);
this->addChild(menu, 1);
/
// 3. add your codes below...
// add a label shows "Hello World"
// create and initialize a label
auto label = Label::createWithTTF("Hello World", "fonts/Marker Felt.ttf", 24);
// position the label on the center of the screen
label->setPosition(Vec2(origin.x + visibleSize.width/2,
origin.y + visibleSize.height - label->getContentSize().height));
// add the label as a child to this layer
this->addChild(label, 1);
/*
auto clipNode = ClippingNode::create();
clipNode->setAnchorPoint(Vec2::ZERO);
//this->addChild(clipNode);
//创建DrawNode
DrawNode* drawNode = DrawNode::create();
this->addChild(drawNode,10);
//圆点
drawNode->drawDot(Vec2(50, 50), 10, Color4F::RED);
//线段
drawNode->drawSegment(Vec2(20, 100), Vec2(100, 100), 5, Color4F(0, 1, 0, 1));
drawNode->drawSegment(Vec2(20, 150), Vec2(100, 150), 10, Color4F(0, 0, 1, 1));
//三角形
drawNode->drawTriangle(Vec2(20, 250), Vec2(100, 300), Vec2(50, 200), Color4F(1, 1, 0, 1));
//实心多边形
Vec2 point1[4];
point1[0] = Vec2(150, 50);
point1[1] = Vec2(150, 150);
point1[2] = Vec2(250, 150);
point1[3] = Vec2(250, 50);
drawNode->drawPolygon(point1, 4, Color4F(1, 0, 0, 1), 1, Color4F(0, 1, 0, 1));
//空心多边形
Vec2 point2[4];
point2[0] = Vec2(150, 200);
point2[1] = Vec2(150, 300);
point2[2] = Vec2(500, 300);
point2[3] = Vec2(500, 200);
drawNode->drawPolygon(point2, 4, Color4F(1, 0, 0, 0), 1, Color4F(0, 1, 0, 1));
clipNode->setStencil(drawNode);
//二次贝塞尔
Vec2 from1 = Vec2(300, 20);
Vec2 to1 = Vec2(450, 20);
Vec2 control = Vec2(360, 100);
drawNode->drawQuadraticBezier(from1, control, to1, 100, Color4F::ORANGE);
//三次贝塞尔
Vec2 from2 = Vec2(300, 100);
Vec2 to2 = Vec2(450, 100);
Vec2 control1 = Vec2(350, 0);
Vec2 control2 = Vec2(400, 200);
drawNode->drawCubicBezier(from2, control1, control2, to2, 100, Color4F::YELLOW);
//颜色混合测试
BlendFunc bl = { GL_ONE, GL_ONE };
drawNode->setBlendFunc(bl);
drawNode->drawSegment(Vec2(300, 250), Vec2(450, 250), 10, Color4F::GREEN);
drawNode->drawTriangle(Vec2(300, 200), Vec2(400, 300), Vec2(450, 150), Color4F::RED);
//
// add "HelloWorld" splash screen"
auto sprite = Sprite::create("HelloWorld.png");
// position the sprite on the center of the screen
sprite->setPosition(Vec2(visibleSize.width / 2 + origin.x, visibleSize.height / 2 + origin.y));
// add the sprite as a child to this layer
clipNode->addChild(sprite);
//cc.Log("=======================);
*/
/*
auto bg = LayerColor::create(Color4B(0, 0, 0, 0));
this->addChild(bg, -1);//1
auto stencil = Sprite::create("CloseNormal.png");
stencil->setScale(2);//2
*/
//以下粗体字就是创建的过程
        auto clipper = ClippingNode::create();
	this->addChild(clipper);

	//创建DrawNode
	DrawNode* drawNode = DrawNode::create();
	this->addChild(drawNode, 10);
	//空心多边形
	Vec2 point2[4];
	point2[0] = Vec2(150, 200);
	point2[1] = Vec2(150, 300);
	point2[2] = Vec2(500, 300);
	point2[3] = Vec2(500, 200);
	drawNode->drawPolygon(point2, 4, Color4F(1, 0, 0, 0), 1, Color4F(0, 1, 0, 1));
	clipper->setStencil(drawNode);


	//clipper->setStencil(stencil);//设置裁剪模板 //3
	//clipper->setInverted(false);//设置底板可见,显示剩余部分
	//clipper->setAlphaThreshold(0);//设置绘制底板的Alpha值为0


	auto content = Sprite::create("HelloWorld.png");//被裁剪的内容
	clipper->addChild(content);//5
	clipper->setPosition(Vec2(visibleSize.width / 2 + origin.x, visibleSize.height / 2 + origin.y));
//
// 1. super init first
if ( !Layer::init() )
{
return false;
}
//auto rootNode = CSLoader::createNode("MainScene.csb");
//addChild(rootNode);
return true;
}
void HelloWorld::menuCloseCallback(Object* pSender)
{
Director::getInstance()->end();
#if (CC_TARGET_PLATFORM == CC_PLATFORM_IOS)
exit(0);
#endif
}
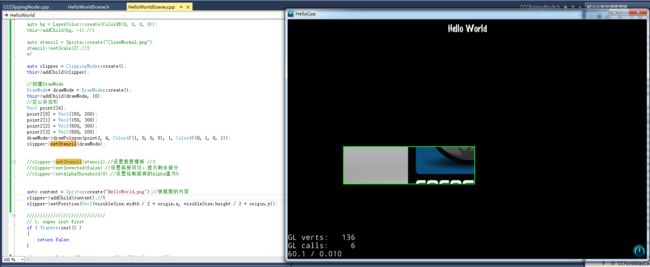
运行效果如图: