在做任何操作前,请先使用以下命令更新系统yum源
$ yum update -y
Apache服务器
本文档所安装的linux系统为CentOS 7.4。
安装Apache
直接使用以下命令安装apache服务器即可。此时apache只是安装成功了,系统并未启动apache服务。
$ yum install httpd
配置httpd.conf
一般首先要找到httpd.conf文件。使用find命令来查找httpd.conf来确定配置文件目录,一般老手都知道是安装在/etc/httpd/中,萌新不知道的话,只能使用find命令来查找下了。此处就无需问为什么是找这个文件了。这里列举下通过find命令找到的文件。
$ find / -name httpd*.*

/sys/fs/cgroup/systemd/system.slice/httpd.service
/run/httpd/httpd.pid
/etc/httpd/conf/httpd.conf ##这个就是apache的配置文件了。这个步骤的主要目的是找到httpd.conf 因为要配置下。
/usr/share/man/man8/httpd.8.gz
/usr/share/doc/httpd-tools-2.4.6
/usr/share/doc/httpd-2.4.6
/usr/share/doc/httpd-2.4.6/httpd-dav.conf
/usr/share/doc/httpd-2.4.6/httpd-multilang-errordoc.conf
/usr/share/doc/httpd-2.4.6/httpd-mpm.conf
/usr/share/doc/httpd-2.4.6/httpd-vhosts.conf
/usr/share/doc/httpd-2.4.6/httpd-default.conf
/usr/share/doc/httpd-2.4.6/httpd-info.conf
/usr/share/doc/httpd-2.4.6/httpd-manual.conf
/usr/share/doc/httpd-2.4.6/httpd-languages.conf
/usr/lib/tmpfiles.d/httpd.conf
/usr/lib/systemd/system/httpd.service
下面要做的事情就是配置httpd.conf文件。此处不过多介绍httpd.conf文件里面的内容。如果大家要要知道的可以查看鄙人写的另一篇文章《最新版 关于MacOs High Sierra(10.13.1)搭建 多版本php 开发环境 part 1》这里面已经做了详细的介绍。
配置完成后,鄙人强烈建议各位使用以下命令测试是否存在语法错误。
$ httpd -t
Syntax OK # 如果各位看到该语句,证明你的语法没有任何问题。
启动apache
启动apache时,各位可以先查看下apache 是否已经开启。
$ service httpd status

Redirecting to /bin/systemctl status httpd.service
● httpd.service - The Apache HTTP Server
   Loaded: loaded (/usr/lib/systemd/system/httpd.service; disabled; vendor preset: disabled)
   Active: inactive (dead) # 未开启apache服务
     Docs: man:httpd(8)
           man:apachectl(8)
此时启动apche服务使用下面的命令。
$ service httpd start # 启动apache
$ service httpd status # 查看服务状态
Redirecting to /bin/systemctl status httpd.service
● httpd.service - The Apache HTTP Server
   Loaded: loaded (/usr/lib/systemd/system/httpd.service; disabled; vendor preset: disabled)
   Active: active (running) since Thu 2018-06-21 23:46:42 CST; 7s ago;# 看到running 恭喜你,你已经成功启动了apache 服务。
     Docs: man:httpd(8)
           man:apachectl(8)
 Main PID: 21780 (httpd)
   Status: "Processing requests..."
   CGroup: /system.slice/httpd.service
           ├─21780 /usr/sbin/httpd -DFOREGROUND
           ├─21781 /usr/sbin/httpd -DFOREGROUND
           ├─21782 /usr/sbin/httpd -DFOREGROUND
           ├─21783 /usr/sbin/httpd -DFOREGROUND
           ├─21784 /usr/sbin/httpd -DFOREGROUND
           └─21785 /usr/sbin/httpd -DFOREGROUND

Jun 21 23:46:42 linux-CentOS-7.4 systemd[1]: Starting The Apache HTTP Server...
Jun 21 23:46:42 linux-CentOS-7.4 systemd[1]: Started The Apache HTTP Server.
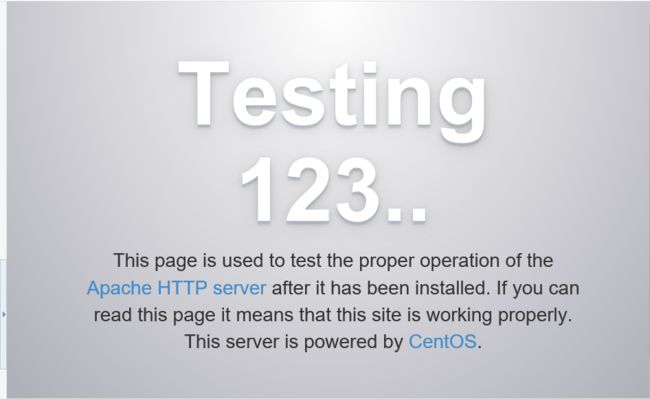
此时你可以打开的你浏览器,输入你的IP地址看看能不能看到如下界面,如果可以,apache则说明已经安装成功了。
如果没有看到这个页面,那你就惨了。你要去排错,不过每次排错,都是你成长的机遇。
一般错误都是80端口被占用或防火墙的问题等。你可以监听apache的错误日志,查看具体的错误信息,对症下药。文章就只提供解决的思路。如果,你要问哪里去看错误日志。我只能告诉你,看看之前写的httpd.conf。很多内容信息都已从配置文件中看到。所以,一定要仔细看配置信息。
安装PHP
安装EPEL源和Webtatic源
安装这两个源的目的在于CentOS7的yum库并不是最新最全,需要其他的安装源进行补充。官方的yum很多扩展都没有包文件。这么做也是为了减少不必要的繁琐工作。
EPEL源:
Extra Packages for Enterprise Linux (or EPEL)或者叫企业版 Linux 附加软件包, 是一个由特别兴趣小组创建、维护并管理的,针对红帽企业版 Linux(RHEL)及其衍生发行版 (比如 CentOS、 Scientific Linux)的一个高质量附加软件包项目。
EPEL 的软件包通常不会与企业版 Linux 官方源中的软件包发生冲突,或者互相替换文件。 EPEL 与 Fedora 项目基本一致,包含完整的构建系统、升级管理器、镜像管理器等等。
可以使用 EPEL 清华大学开源软件镜像站,点击可使用连接。
Webtatic源:
Webtatic源是CentOS / RHEL库包含更新 Web相关的包
$ sudo yum install -y epel-release
$ sudo rpm -Uvh https://mirror.webtatic.com/yum/el7/webtatic-release.rpm
这里附送一个错误的解决方法。因为我之前看一些博客,导致了一些错误的操作。这个时候,我安装的webtatic时出现了错误,只能google了,这里不得不说。大伙在找博客的时候千万不要盲目,动手操作,一定要看明白了在来操作。
我出现的错误是这样的:
$ sudo rpm -Uvh https://mirror.webtatic.com/yum/el7/webtatic-release.rpm
error: Failed dependencies:
        epel-release >= 7 is needed by webtatic-release-7-3.noarch
我是按照linuxhelp来解决的。别人是这样说的:
Though you have removed Epel it exists. Try removing epel using below command.
翻译:用下面的命令先把这个存在Epel给移除了。# yum remove epel*And check in
/etc/yum.repos.d/directory. If epel is there, remove it. And once all the setup is done again install epel as fresh and then try.
翻译:然后检查/etc/yum.repos.d/这个目录,如果epel还存在,用这个命令rm -rf eple*来删除下,最后再尝试安装下。就搞定了。
安装php
注意:安装php7.1版本时,一定要使用
yum list *php71w*;这是因为php7.1以后的安装方式不同,在安装php5.6时,有个安装文件php56w.x86_64,而php7.1以及7.2却没有。当使用上述命令搜索后,你会发现mod_php72w.x86_64和mod_php71w.x86_64而这个两个包所起到的作用是关联apache和php的,所以当你安装7.1是则yum install mod_php71w.x86_64而安装7.2时则安装yum install mod_php72w.x86_64。切记!!!
此处安装的PHP 5.6.36。根据自己的需要安装扩展库。下面提供有简装版本。这个地方要注意了,php56w-mysqlnd.x86_64所有版本的PHP,这个东西可以不用安装。
先查看下能安装那些PHP扩展。
$ yum list | grep php56w
php56w.x86_64                             5.6.36-1.w7                  @webtatic
php56w-bcmath.x86_64                      5.6.36-1.w7                  @webtatic
php56w-cli.x86_64                         5.6.36-1.w7                  @webtatic
php56w-common.x86_64                      5.6.36-1.w7                  @webtatic
php56w-dba.x86_64                         5.6.36-1.w7                  @webtatic
php56w-devel.x86_64                       5.6.36-1.w7                  @webtatic
php56w-embedded.x86_64                    5.6.36-1.w7                  @webtatic
php56w-enchant.x86_64                     5.6.36-1.w7                  @webtatic
php56w-fpm.x86_64                         5.6.36-1.w7                  @webtatic
php56w-gd.x86_64                          5.6.36-1.w7                  @webtatic
php56w-imap.x86_64                        5.6.36-1.w7                  @webtatic
php56w-interbase.x86_64                   5.6.36-1.w7                  @webtatic
php56w-intl.x86_64                        5.6.36-1.w7                  @webtatic
php56w-ldap.x86_64                        5.6.36-1.w7                  @webtatic
php56w-mbstring.x86_64                    5.6.36-1.w7                  @webtatic
php56w-mcrypt.x86_64                      5.6.36-1.w7                  @webtatic
php56w-mssql.x86_64                       5.6.36-1.w7                  @webtatic
php56w-mysql.x86_64                       5.6.36-1.w7                  @webtatic
php56w-odbc.x86_64                        5.6.36-1.w7                  @webtatic
php56w-opcache.x86_64                     5.6.36-1.w7                  @webtatic
php56w-pdo.x86_64                         5.6.36-1.w7                  @webtatic
php56w-pear.noarch                        1:1.10.4-1.w7                @webtatic
php56w-pecl-apcu.x86_64                   4.0.11-2.w7                  @webtatic
php56w-pecl-apcu-devel.x86_64             4.0.11-2.w7                  @webtatic
php56w-pecl-gearman.x86_64                1.1.2-1.w7                   @webtatic
php56w-pecl-geoip.x86_64                  1.1.1-1.w7                   @webtatic
php56w-pecl-igbinary.x86_64               2.0.5-1.w7                   @webtatic
php56w-pecl-igbinary-devel.x86_64         2.0.5-1.w7                   @webtatic
php56w-pecl-imagick.x86_64                3.4.3-1.w7                   @webtatic
php56w-pecl-imagick-devel.x86_64          3.4.3-1.w7                   @webtatic
php56w-pecl-libsodium.x86_64              1.0.6-1.w7                   @webtatic
php56w-pecl-memcache.x86_64               3.0.8-2.w7                   @webtatic
php56w-pecl-memcached.x86_64              2.2.0-1.w7                   @webtatic
php56w-pecl-mongodb.x86_64                1.4.1-1.w7                   @webtatic
php56w-pecl-redis.x86_64                  3.1.6-1.w7                   @webtatic
php56w-pecl-xdebug.x86_64                 2.5.5-2.w7                   @webtatic
php56w-pgsql.x86_64                       5.6.36-1.w7                  @webtatic
php56w-phpdbg.x86_64                      5.6.36-1.w7                  @webtatic
php56w-process.x86_64                     5.6.36-1.w7                  @webtatic
php56w-pspell.x86_64                      5.6.36-1.w7                  @webtatic
php56w-recode.x86_64                      5.6.36-1.w7                  @webtatic
php56w-snmp.x86_64                        5.6.36-1.w7                  @webtatic
php56w-soap.x86_64                        5.6.36-1.w7                  @webtatic
php56w-tidy.x86_64                        5.6.36-1.w7                  @webtatic
php56w-xml.x86_64                         5.6.36-1.w7                  @webtatic
php56w-xmlrpc.x86_64                      5.6.36-1.w7                  @webtatic
php56w-mysqlnd.x86_64                     5.6.36-1.w7                  webtatic
这个地方可以看出webtatic的安装源提供了多少扩展。
这个地方安装的都是扩展,php56能安装的扩展都安装了。
$ sudo yum install php56w.x86_64 php56w-cli.x86_64 php56w-common.x86_64 php56w-fpm.x86_64 php56w-gd.x86_64 php56w-ldap.x86_64 php56w-mbstring.x86_64 php56w-mcrypt.x86_64 php56w-mysql.x86_64 php56w-pdo.x86_64 php56w-bcmath.x86_64 php56w-dba.x86_64 php56w-devel.x86_64 php56w-embedded.x86_64 php56w-enchant.x86_64 php56w-imap.x86_64 php56w-interbase.x86_64 php56w-intl.x86_64 php56w-mssql.x86_64 php56w-odbc.x86_64 php56w-opcache.x86_64  php56w-pear.noarch php56w-pecl-apcu.x86_64 php56w-pecl-apcu-devel.x86_64 php56w-pecl-gearman.x86_64 php56w-pecl-geoip.x86_64 php56w-pecl-igbinary.x86_64 php56w-pecl-igbinary-devel.x86_64 php56w-pecl-imagick.x86_64 php56w-pecl-imagick-devel.x86_64 php56w-pecl-libsodium.x86_64 php56w-pecl-memcache.x86_64 php56w-pecl-memcached.x86_64 php56w-pecl-mongodb.x86_64 php56w-pecl-redis.x86_64 php56w-pecl-xdebug.x86_64 php56w-pgsql.x86_64 php56w-phpdbg.x86_64 php56w-process.x86_64 php56w-pspell.x86_64 php56w-recode.x86_64 php56w-snmp.x86_64 php56w-soap.x86_64 php56w-tidy.x86_64 php56w-xml.x86_64 php56w-xmlrpc.x86_64
# 也提供简版安装一些常规的扩展库
$ sudo yum install php56w php56w-mysql php56w-gd libjpeg* php56w-ldap php56w-odbc php56w-pear php56w-xml php56w-xmlrpc php56w-mbstring php56w-bcmath

$ sudo yum install php56w-fpm
安装其他版本的PHP则使用下面的命令(这里提供的是扩展比较少的方式)。
# PHP 5.5版本
$ yum install php55w.x86_64 php55w-cli.x86_64 php55w-common.x86_64 php55w-gd.x86_64 php55w-ldap.x86_64 php55w-mbstring.x86_64 php55w-mcrypt.x86_64 php55w-mysql.x86_64 php55w-pdo.x86_64
yum install php55w-fpm
# PHP 7.0版本
$ yum install php70w.x86_64 php70w-cli.x86_64 php70w-common.x86_64 php70w-gd.x86_64 php70w-ldap.x86_64 php70w-mbstring.x86_64 php70w-mcrypt.x86_64 php70w-mysql.x86_64 php70w-pdo.x86_64
yum install php70w-fpm
# 还有其他版本把70换71,即可。
此时安装完成后,一定要重启apache服务。重启完成后,到/var/www/html/中创建一个index.php。
$ service httpd restart;

$ vim /var/www/html/index.php

# 保存退出。
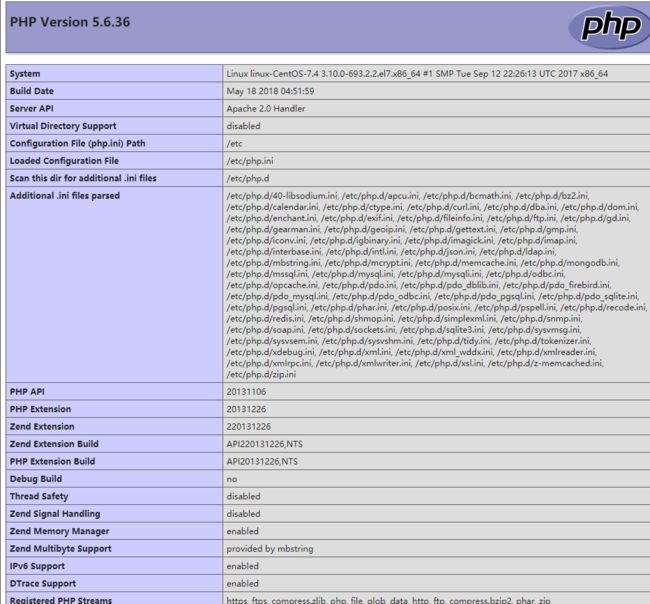
使用浏览器进入你的站点。看到下面的信息,恭喜你安装成功了,其次检查下你要的扩展是否已经都安装了。
安装MYSQL
可以参考《CentOS7.4安装Mysql》我觉得这篇文章还是比较全。
准备工作
我对下载的存放地方比较在意,所以我还是按照我的风格来。不在意的可以忽略这个步骤。
创建一个存放下载文件的地方。就这一步而已。
$ mkdir /home/download
$ cd /home/download
安装MYSQL源
下载mysql的YUM源;
$ wget -P /home/download http://dev.mysql.com/get/mysql57-community-release-el7-11.noarch.rpm
--2018-06-22 11:34:11--  http://dev.mysql.com/get/mysql57-community-release-el7-11.noarch.rpm
Resolving dev.mysql.com (dev.mysql.com)... 137.254.60.11
Connecting to dev.mysql.com (dev.mysql.com)|137.254.60.11|:80... connected.
HTTP request sent, awaiting response... 301 Moved Permanently
Location: https://dev.mysql.com/get/mysql57-community-release-el7-11.noarch.rpm [following]
--2018-06-22 11:34:11--  https://dev.mysql.com/get/mysql57-community-release-el7-11.noarch.rpm
Connecting to dev.mysql.com (dev.mysql.com)|137.254.60.11|:443... connected.
HTTP request sent, awaiting response... 302 Found
Location: https://repo.mysql.com//mysql57-community-release-el7-11.noarch.rpm [following]
--2018-06-22 11:34:12--  https://repo.mysql.com//mysql57-community-release-el7-11.noarch.rpm
Resolving repo.mysql.com (repo.mysql.com)... 104.77.36.72
Connecting to repo.mysql.com (repo.mysql.com)|104.77.36.72|:443... connected.
HTTP request sent, awaiting response... 200 OK
Length: 25680 (25K) [application/x-redhat-package-manager]
Saving to: ‘/home/download/mysql57-community-release-el7-11.noarch.rpm’

100%[=============================================================>] 25,680       166KB/s   in 0.2s

2018-06-22 11:34:13 (166 KB/s) - ‘/home/download/mysql57-community-release-el7-11.noarch.rpm’ saved [25680/25680]

$ ls #确认下结果
mysql57-community-release-el7-11.noarch.rpm
安装mysql的yum源;
$ rpm -ivh mysql57-community-release-el7-11.noarch.rpm

warning: mysql57-community-release-el7-11.noarch.rpm: Header V3 DSA/SHA1 Signature, key ID 5072e1f5: NOKEY
Preparing...                          ################################# [100%]
Updating / installing...
   1:mysql57-community-release-el7-11 ################################# [100%]
[root@linux-CentOS-7 download]# yum repolist enabled
Loaded plugins: fastestmirror
mysql-connectors-community                                                      | 2.5 kB  00:00:00
mysql-tools-community                                                           | 2.5 kB  00:00:00
mysql57-community                                                               | 2.5 kB  00:00:00
(1/3): mysql-connectors-community/x86_64/primary_db                             |  20 kB  00:00:00
(2/3): mysql-tools-community/x86_64/primary_db                                  |  41 kB  00:00:00
(3/3): mysql57-community/x86_64/primary_db                                      | 144 kB  00:00:01
Loading mirror speeds from cached hostfile
 * epel: mirrors.tongji.edu.cn
 * webtatic: us-east.repo.webtatic.com
repo id                                   repo name                                              status
base/7/x86_64                             CentOS-7                                                9,911
epel/x86_64                               Extra Packages for Enterprise Linux 7 - x86_64         12,590
extras/7/x86_64                           CentOS-7                                                  313
mysql-connectors-community/x86_64         MySQL Connectors Community                                 51
mysql-tools-community/x86_64              MySQL Tools Community                                      63
mysql57-community/x86_64                  MySQL 5.7 Community Server                                267
updates/7/x86_64                          CentOS-7                                                  695
webtatic/x86_64                           Webtatic Repository EL7 - x86_64                          793
repolist: 24,683
检查mysql的yum源是否成功。下面的enabled,是默认安装项,disabled是禁止安装的项目。看到下面的目录,就说明已经安装成功了。从下面的列表中可以看出mysql5.5、mysql5.6、mysql8.0默认是禁用的状态。
$ yum repolist enabled | grep mysql

mysql-cluster-7.5-community/x86_64 MySQL Cluster 7.5 Community   disabled
mysql-cluster-7.5-community-source MySQL Cluster 7.5 Community - disabled
mysql-cluster-7.6-community/x86_64 MySQL Cluster 7.6 Community   disabled
mysql-cluster-7.6-community-source MySQL Cluster 7.6 Community - disabled
mysql-connectors-community/x86_64  MySQL Connectors Community    enabled:     51
mysql-connectors-community-source  MySQL Connectors Community -  disabled
mysql-tools-community/x86_64       MySQL Tools Community         enabled:     63
mysql-tools-community-source       MySQL Tools Community - Sourc disabled
mysql-tools-preview/x86_64         MySQL Tools Preview           disabled
mysql-tools-preview-source         MySQL Tools Preview - Source  disabled
mysql55-community/x86_64           MySQL 5.5 Community Server    disabled
mysql55-community-source           MySQL 5.5 Community Server -  disabled
mysql56-community/x86_64           MySQL 5.6 Community Server    disabled
mysql56-community-source           MySQL 5.6 Community Server -  disabled
mysql57-community/x86_64           MySQL 5.7 Community Server    enabled:    267  ## 默认安装的是mysql5.7
mysql57-community-source           MySQL 5.7 Community Server -  disabled
mysql80-community/x86_64           MySQL 8.0 Community Server    disabled
mysql80-community-source           MySQL 8.0 Community Server -  disabled
选择mysql版本
选择要启用的mysql版本,通过修改vim /etc/yum.repos.d/mysql-community.repo`文件,修改默认安装的mysql版本。比如要安装5.6版本,将5.7源的enabled=1改成enabled=0,然后再将5.6源的enabled=0改成enabled=1即可。
注意: 任何时候,只能启用一个版本。
再次检查下可安装的版本是否正确。
$ yum repolist enabled | grep mysql

mysql-connectors-community/x86_64 MySQL Connectors Community                  51
mysql-tools-community/x86_64      MySQL Tools Community                       63
mysql56-community/x86_64          MySQL 5.6 Community Server                 395
安装mysql
$ yum install mysql-community-server
安装过程,一直输入y就可以了。由于控制台的信息太长了,就不这里显示了。这里就直接显示结果。
Installed:
  mysql-community-libs.x86_64 0:5.6.40-2.el7        mysql-community-server.x86_64 0:5.6.40-2.el7

Dependency Installed:
  libaio.x86_64 0:0.3.109-13.el7                     mysql-community-client.x86_64 0:5.6.40-2.el7
  mysql-community-common.x86_64 0:5.6.40-2.el7       perl-Compress-Raw-Bzip2.x86_64 0:2.061-3.el7
  perl-Compress-Raw-Zlib.x86_64 1:2.061-4.el7        perl-DBI.x86_64 0:1.627-4.el7
  perl-IO-Compress.noarch 0:2.061-2.el7              perl-Net-Daemon.noarch 0:0.48-5.el7
  perl-PlRPC.noarch 0:0.2020-14.el7

Replaced:
  mariadb-libs.x86_64 1:5.5.56-2.el7

Complete!
安装完成后,开启mysql服务即可
$ service mysql start
$ mysql -uroot # 即可进入mysql中
一般安装完成后,直接使用root账号即可进入mysql中。不用输入密码。但是,建议进入mysql后首先设置当前root账号的密码
mysql> set password=password('你的密码');
Query OK, 0 rows affected (0.00 sec)
mysql> flush privileges;# 刷新下权限;
Query OK, 0 rows affected (0.01 sec)
注意
设置 MySQL 根密码仅是保护数据库的最基本措施。在您构建或安装数据库驱动的应用程序时,您通常可以为该应用程序创建数据库服务用户,并避免使用根账户执行除数据库管理以外的操作。
安全起见,可以运行下以下命令
$ mysql_secure_installation ##以下是交互的情况

NOTE: RUNNING ALL PARTS OF THIS SCRIPT IS RECOMMENDED FOR ALL MySQL
      SERVERS IN PRODUCTION USE!  PLEASE READ EACH STEP CAREFULLY!
首先推荐运行该脚本给所有使用mysql的用户,并且别人要你仔细阅读每个步骤。

In order to log into MySQL to secure it, we'll need the current
password for the root user.  If you've just installed MySQL, and
you haven't set the root password yet, the password will be blank,
so you should just press enter here.
因为我们之前已经设置过了root账户的密码,
所以要求你再次输入账户的密码来确认是不是root账号进行该操作。
此时,你只需要输入你之前设置的密码即可。
切忌,为了安全,密码最好不要过于简单。特别是上云。本地还好。
如果,你之前没有设置root账号的密码,那么就在此处设置你的密码。
会要求你连续输入两次的。因为linux输入密码的时候,是看不到的,所以我喜欢先设置了。
本人有点手残,我选的密码都是用随机的。还带特殊符号。

Enter current password for root (enter for none):
OK, successfully used password, moving on...

Setting the root password ensures that nobody can log into the MySQL
root user without the proper authorisation.

You already have a root password set, so you can safely answer 'n'.

Change the root password? [Y/n] n
 ... skipping.
上面巴拉巴拉一大坨就是告诉你。
你已经设置了密码了。
是不是要重新设置,不需要,你可以输入N。

By default, a MySQL installation has an anonymous user, allowing anyone
to log into MySQL without having to have a user account created for
them.  This is intended only for testing, and to make the installation
go a bit smoother.  You should remove them before moving into a
production environment.

Remove anonymous users? [Y/n] y
 ... Success!
这面的就是在问你,要不要删除匿名账户。我就输入Y

Normally, root should only be allowed to connect from 'localhost'.  This
ensures that someone cannot guess at the root password from the network.

Disallow root login remotely? [Y/n] y
 ... Success!
禁用远程根登录,原因是可以用navicate登录SSH,再登录数据库,所以我就禁止了。

By default, MySQL comes with a database named 'test' that anyone can
access.  This is also intended only for testing, and should be removed
before moving into a production environment.

Remove test database and access to it? [Y/n] y
 - Dropping test database...
ERROR 1008 (HY000) at line 1: Can't drop database 'test'; database doesn't exist
 ... Failed!  Not critical, keep moving...
 - Removing privileges on test database...
 ... Success!
删除测试数据库。之所以报错,就是没有测试数据,所以报错了。可以忽略。

Reloading the privilege tables will ensure that all changes made so far
will take effect immediately.

Reload privilege tables now? [Y/n] y
 ... Success!
重新加载权限表并保存您的更改。

All done!  If you've completed all of the above steps, your MySQL
installation should now be secure.

Thanks for using MySQL!

Cleaning up...
上面就是说,所有步骤都完成了,你现在的数据库已经安全了。谢谢你使用MYSQL。
至于安不安全,我们只能做到的是尽量。
整个安装过程就完成了。接下来是做相应的配置。
相关配置以及相关服务安装
Apache配置
关闭apache测试页面
就是我们在调试的apache是否正常运行的时候看到的测试页面 图1 。
$ vim /etc/httpd/conf.d/welcome.conf

#
# This configuration file enables the default "Welcome" page if there
# is no default index page present for the root URL.  To disable the
# Welcome page, comment out all the lines below.
#
# NOTE: if this file is removed, it will be restored on upgrades.
# 将下面这些全部注释掉。
#
#    Options -Indexes
#    ErrorDocument 403 /.noindex.html
#

#
#    AllowOverride None
#    Require all granted
#

#Alias /.noindex.html /usr/share/httpd/noindex/index.html
#Alias /noindex/css/bootstrap.min.css /usr/share/httpd/noindex/css/bootstrap.min.css
#Alias /noindex/css/open-sans.css /usr/share/httpd/noindex/css/open-sans.css
#Alias /images/apache_pb.gif /usr/share/httpd/noindex/images/apache_pb.gif
#Alias /images/poweredby.png /usr/share/httpd/noindex/images/poweredby.png
指定Aapche用户以及用户组
一般Apache默认用户以及用户组为apache以及apache。
之所以变更是为了避免开发人员直接新增项目文件后,导致项目异常等异常情况的发生。
为Apache指定用户以及用户组一定可以指定为系统用户。
变更站点目录以及apache日志记录日志文件位置
是否变更站点目录以及apache日志记录日志文件位置这个全靠个人决定了,为了开发人员查询日志方便,我觉得还是有必要的。

