SIFT图像特征检测的Python代码实现
1.主要内容
利用Python调用VLFeat(官方下载地址)提供的SIFT接口对图像进行特征检测。如果CSDN中图片加载不出来,可移步知乎相关文章:https://zhuanlan.zhihu.com/p/34890676
2.参考资料
主要参考资料为由朱文涛和袁勇翻译的《python 计算机视觉》原书为《ProgrammingComputer Vision with Python》,该书主要内容包括Harris和sift的特征检测、图像到图像的映射、图像聚类、基于BoW的图像检索等。译本作者提供了全书实现的python代码,电子书及代码可在译者袁勇的个人主页中获取,也可由以下百度网盘获取:
链接:https://pan.baidu.com/s/1S2f1nbE6yMkEN6csH2-q1Q 密码:ishr
本文主要针对SIFT特征检测这一部分的代码进行了整理。
3.准备工作
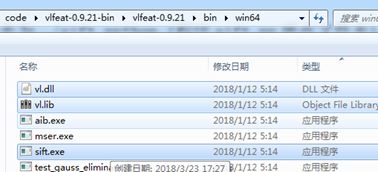
从VLFeat下载的文件的子文件bin中将
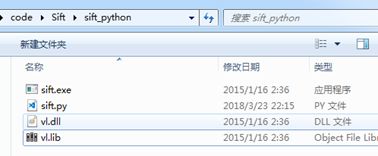
例如我的工程文件夹为../sift_python (程序sift.py所在文件夹),将上述三个文件拷贝到sift_python文件夹中。
4.代码
在工程文件中建立sift.py文件,将下述代码依次拷贝到sift.py文件中,在进行过简单的路径修改后即可运行。
以下为具体代码及注释:
4.1 相关库的导入
from PIL import Image
from numpy import *
from pylab import *
import os
4.2 SIFT调用函数的定义
(1) 利用PIL中的convert将图像转为灰度图
在PIL中,对于彩色图像,open后都会转换为“RGB”模式,然后该模式可以转换为其他模式,比如“1”、“L”、“P”和“RGBA”,这几种模式也可以转换为“RGB”模式。模式“RGB”转换为模式“1”以后,像素点变成黑白两种点,要么是0,要么是255。模式“RGB”转换为模式“L”以后,像素值为[0,255]之间的某个数值。模式“RGB”转换为模式“P”以后,像素值为[0,255]之间的某个数值,但它为调色板的索引值,其最终还是彩色图像。此处利用convert('L') 将RGB图像转为灰度值范围为[0,255]的灰度图,并以.pgm格式保存
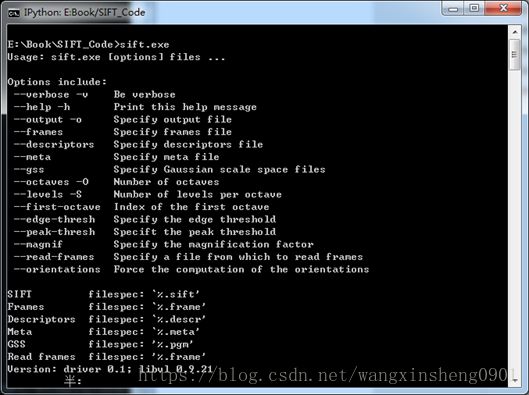
(2) 利用os.system()函数执行sift.exe文件,SIFT中相应的输入参数如下:
具体代码如下:
def process_image(imagename,resultname,params="--edge-thresh 10 --peak-thresh 5"):
    """ Process an image and save the results in a file. """

    if imagename[-3:] != 'pgm':
        # create a pgm file
        im = Image.open(imagename).convert('L')  #.convert('L') 将RGB图像转为灰度模式,灰度值范围[0,255]
        im.save('tmp.pgm')                       #将灰度值图像信息保存在.pgm文件中
        imagename = 'tmp.pgm'

    cmmd = str("E:\code\Sift\sift_python\sift.exe "+imagename+" --output="+resultname+
                " "+params)
    os.system(cmmd)                              #执行sift可执行程序,生成resultname(test.sift)文件
    print 'processed', imagename, 'to', resultname
4.3 其它函数的定义
def read_features_from_file(filename):
    """ Read feature properties and return in matrix form. """

    f = loadtxt(filename)
    return f[:,:4],f[:,4:] # feature locations, descriptors
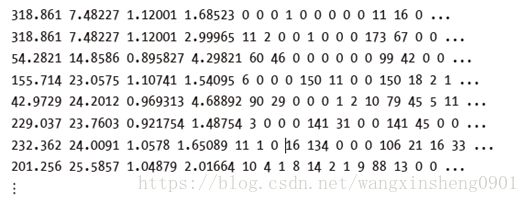
filename即为生成的test.sift文件,其内部保存格式为:
上面数据的每一行前4 个数值依次表示兴趣点的坐标、尺度和方向角度,后面紧接着的是对应描述符的128 维向量。
def plot_features(im,locs,circle=True):
    """ Show image with features. input: im (image as array),
        locs (row, col, scale, orientation of each feature). """

    def draw_circle(c,r):
        t = arange(0,1.01,.01)*2*pi
        x = r*cos(t) + c[0]
        y = r*sin(t) + c[1]
        plot(x,y,'b',linewidth=2)

    imshow(im)
    if circle:
        for p in locs:
            draw_circle(p[:2],p[2])
    else:
        plot(locs[:,0],locs[:,1],'ob')
    axis('off')
该函数在原始图像上使用蓝色的点绘制出SIFT 特征点的位置。将参数circle 的选项设置为True,该函数将使用draw_circle() 函数绘制出圆圈,圆圈的半径为特征的尺度。
4.4 主函数的定义
imname为待处理照片的路径,此处用的是绝对路径,此处更改为相应处理照片的路径即可:
if __name__ == '__main__':
    imname = ('E:\\code\\Sift\\library.jpg')               #待处理图像路径
    im=Image.open(imname)
    process_image(imname,'test.sift')
    l1,d1 = read_features_from_file('test.sift')           #l1为兴趣点坐标、尺度和方位角度 l2是对应描述符的128 维向
    figure()
    gray()
    plot_features(im,l1,circle = True)
    title('sift-features')
    show()
5. 运行结果
6.源代码下载
本文所涉及的代码及VLFeat相关文件均可在以下GitHub中获取:
https://github.com/ShawnWXS/SIFT-Python.git


