开篇之单例模式:
相信大家已经很熟悉单例模式了吧,特别是在保证某个类只有一个对象的场景下才会使用到。那有人会问什么时候用到单例模式呢,其实如果一个对象创建需要消耗过多资源时,正是单例模式用到之处。
看看单例模式的UML类图:
- 单例类里面有成员变量(当前实例自己)
- 暴露一个public类型的
getInstance方法 - 当前构造器不公开,private类型
样例代码:
public class SingletonDemo {
    private static SingletonDemo singletonDemo;
    private SingletonDemo(){}
    //懒汉式获取单例实例
    public static SingletonDemo getInstance() {
        if (singletonDemo == null) {
            synchronized (SingletonDemo.class) {
                if (singletonDemo == null) {
                    singletonDemo = new SingletonDemo();
                }
            }
        }
        return singletonDemo;
    }

   ***********************
    //饱汉式
    private static final SingletonDemo singletonDemo = new SingletonDemo();
    private SingletonDemo() {
    }
    public static SingletonDemo getInstance() {
        return SingletonDemo.singletonDemo;
    }
}
看到这个地方,可能大家还是觉得不好使用单例模式。想想你的项目中那些网络操作、对话框的管理、io文件的读取等等单一实例的地方是不是都可以去处理呢。但是单例模式由于是一直持有实例的,因此对于上下文(context)的地方,需要注意注意内存泄漏的情况了。
Builder模式:
builder设计模式的出现,是为了更好地为一些复杂对象进行分离处理。通俗点也就是类的功能太多了,将一些行为放到Builder类中间接处理。
UML类图:
样例代码:
public class Factory {
    Builder builder;

    public Factory() {
        builder = new Builder();
    }

    public void createEngine() {
        builder.createEngine();
    }

    public void createGearbox() {
        builder.createGearbox();
    }

    public void createSuspension() {
        builder.createSuspension();
    }

    public static class Builder {
        private Car car;

        public Builder() {
            car = new Car();
        }

        public Builder createEngine() {
            car.engine = "自然吸气";
            return this;
        }

        public Builder createGearbox() {
            car.gearbox = "at变速箱";
            return this;
        }

        public Builder createSuspension() {
            car.suspension = "独立悬架";
            return this;
        }
    }
}

public class Car {
    //发动机
    public String engine;
    //变速箱
    public String gearbox;
    //悬架
    public String suspension;

    //正规写法是提供set方法的,参数都是由外部提供的,为了省事,你懂的
}
上面事例代码,也正好说明了Builder模式的特点,将复杂对象的构成放到我们的内部类中进行处理。
还记得之前我们显示一个对话框的代码吗?
AlertDialog.Builder builder = new AlertDialog.Builder(context);
builder.setTitle("dialog title");
builder.setMessage("I am a dialog.");
builder.setPositiveButton("ok", new DialogInterface.OnClickListener() {
    @Override
    public void onClick(DialogInterface dialog, int which) {
        //// TODO: 17/12/26
    }
});
builder.setNegativeButton("cancel", new DialogInterface.OnClickListener() {
    @Override
    public void onClick(DialogInterface dialog, int which) {
        //// TODO: 17/12/26
    }
});
builder.show();
相信这段代码谁都会写了吧,以前总是一头雾水地写完这段代码,然后交给经理乐乐地说搞定了。现在不行啊,对源码得有点分析,下面就去看看源码吧:
首先是生成了一个AlertDialog.Builder对象,那咋们瞧瞧吧:
public class AlertDialog extends AppCompatDialog implements DialogInterface {
    ******省略AlertDialog类中代码******
    public static class Builder {
        private final AlertController.AlertParams P;
        private final int mTheme;
        /**
         * Creates a builder for an alert dialog that uses the default alert
         * dialog theme.
         *
         * The default alert dialog theme is defined by
         * {@link android.R.attr#alertDialogTheme} within the parent
         * {@code context}'s theme.
         *
         * @param context the parent context
         */
        public Builder(@NonNull Context context) {
            this(context, resolveDialogTheme(context, 0));
        }
        /**
         * Creates a builder for an alert dialog that uses an explicit theme
         * resource.
         *
         * The specified theme resource ({@code themeResId}) is applied on top
         * of the parent {@code context}'s theme. It may be specified as a
         * style resource containing a fully-populated theme, such as
         * {@link R.style#Theme_AppCompat_Dialog}, to replace all
         * attributes in the parent {@code context}'s theme including primary
         * and accent colors.
         *
         * To preserve attributes such as primary and accent colors, the
         * {@code themeResId} may instead be specified as an overlay theme such
         * as {@link R.style#ThemeOverlay_AppCompat_Dialog}. This will
         * override only the window attributes necessary to style the alert
         * window as a dialog.
         *
         * Alternatively, the {@code themeResId} may be specified as {@code 0}
         * to use the parent {@code context}'s resolved value for
         * {@link android.R.attr#alertDialogTheme}.
         *
         * @param context the parent context
         * @param themeResId the resource ID of the theme against which to infra
         *                   this dialog, or {@code 0} to use the parent
         *                   {@code context}'s default alert dialog theme
         */
        public Builder(@NonNull Context context, @StyleRes int themeResId) {
            P = new AlertController.AlertParams(new ContextThemeWrapper(
                    context, resolveDialogTheme(context, themeResId)));
            mTheme = themeResId;
        }
        /**
         * Returns a {@link Context} with the appropriate theme for dialogs area
         * Applications should use this Context for obtaining LayoutInflaters of
         * that will be used in the resulting dialogs, as it will cause views to
         * the correct theme.
         *
         * @return A Context for built Dialogs.
         */
        @NonNull
        public Context getContext() {
            return P.mContext;
        }
        /**
         * Set the title using the given resource id.
         *
         * @return This Builder object to allow for chaining of calls to set met
         */
        public Builder setTitle(@StringRes int titleId) {
            P.mTitle = P.mContext.getText(titleId);
            return this;
        }
        /**
         * Set the title displayed in the {@link Dialog}.
         *
         * @return This Builder object to allow for chaining of calls to set methods
         */
        public Builder setTitle(@Nullable CharSequence title) {
            P.mTitle = title;
            return this;
        }
        /**
         * Set the message to display using the given resource id.
         *
         * @return This Builder object to allow for chaining of calls to set methods
         */
        public Builder setMessage(@StringRes int messageId) {
            P.mMessage = P.mContext.getText(messageId);
            return this;
        }

        /**
         * Set the message to display.
         *
         * @return This Builder object to allow for chaining of calls to set methods
         */
        public Builder setMessage(@Nullable CharSequence message) {
            P.mMessage = message;
            return this;
        }
        /**
         * Set a listener to be invoked when the positive button of the dialog is pressed.
         * @param textId The resource id of the text to display in the positive button
         * @param listener The {@link DialogInterface.OnClickListener} to use.
         *
         * @return This Builder object to allow for chaining of calls to set methods
         */
        public Builder setPositiveButton(@StringRes int textId, final OnClickListener listener) {
            P.mPositiveButtonText = P.mContext.getText(textId);
            P.mPositiveButtonListener = listener;
            return this;
        }

        /**
         * Set a listener to be invoked when the positive button of the dialog is pressed.
         * @param text The text to display in the positive button
         * @param listener The {@link DialogInterface.OnClickListener} to use.
         *
         * @return This Builder object to allow for chaining of calls to set methods
         */
        public Builder setPositiveButton(CharSequence text, final OnClickListener listener) {
            P.mPositiveButtonText = text;
            P.mPositiveButtonListener = listener;
            return this;
        }

        /**
         * Set a listener to be invoked when the negative button of the dialog is pressed.
         * @param textId The resource id of the text to display in the negative button
         * @param listener The {@link DialogInterface.OnClickListener} to use.
         *
         * @return This Builder object to allow for chaining of calls to set methods
         */
        public Builder setNegativeButton(@StringRes int textId, final OnClickListener listener) {
            P.mNegativeButtonText = P.mContext.getText(textId);
            P.mNegativeButtonListener = listener;
            return this;
        }

        /**
         * Set a listener to be invoked when the negative button of the dialog is pressed.
         * @param text The text to display in the negative button
         * @param listener The {@link DialogInterface.OnClickListener} to use.
         *
         * @return This Builder object to allow for chaining of calls to set methods
         */
        public Builder setNegativeButton(CharSequence text, final OnClickListener listener) {
            P.mNegativeButtonText = text;
            P.mNegativeButtonListener = listener;
            return this;
        }
        /**
         * Creates an {@link AlertDialog} with the arguments supplied to this
         * builder and immediately displays the dialog.
         *
         * Calling this method is functionally identical to:
         *
         *     AlertDialog dialog = builder.create();
         *     dialog.show();
         *
         */
        public AlertDialog show() {
            final AlertDialog dialog = create();
            dialog.show();
            return dialog;
        }
        /**
         * Creates an {@link AlertDialog} with the arguments supplied to this
         * builder.
         *
         * Calling this method does not display the dialog. If no additional
         * processing is needed, {@link #show()} may be called instead to both
         * create and display the dialog.
         */
        public AlertDialog create() {
            // We can't use Dialog's 3-arg constructor with the createThemeContextWrapper param,
            // so we always have to re-set the theme
            final AlertDialog dialog = new AlertDialog(P.mContext, mTheme);
            P.apply(dialog.mAlert);
            dialog.setCancelable(P.mCancelable);
            if (P.mCancelable) {
                dialog.setCanceledOnTouchOutside(true);
            }
            dialog.setOnCancelListener(P.mOnCancelListener);
            dialog.setOnDismissListener(P.mOnDismissListener);
            if (P.mOnKeyListener != null) {
                dialog.setOnKeyListener(P.mOnKeyListener);
            }
            return dialog;
        }
    }
}
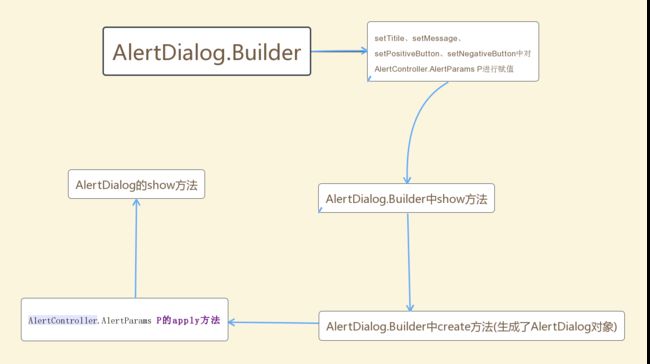
这里就是我们刚才显示对话框的时候,调的几个方法。可以看到Builder内部类中的setTitle、setMessage、setPositiveButton、
setNegativeButton方法都是给AlertController.AlertParams P变量赋值。看来AlertParams又是AlertController内部类了。接着就是调了show方法,show方法里面紧接着调了create方法。在create方法里面生成了一个AlertDialog,然后调用了
AlertController.AlertParams的apply方法,去看看做了些啥吧:
public void apply(AlertController dialog) {
    if (mCustomTitleView != null) {
        dialog.setCustomTitle(mCustomTitleView);
    } else {
        if (mTitle != null) {
            dialog.setTitle(mTitle);
        }
        if (mIcon != null) {
            dialog.setIcon(mIcon);
        }
        if (mIconId != 0) {
            dialog.setIcon(mIconId);
        }
        if (mIconAttrId != 0) {
            dialog.setIcon(dialog.getIconAttributeResId(mIconAttrId));
        }
    }
    if (mMessage != null) {
        dialog.setMessage(mMessage);
    }
    if (mPositiveButtonText != null) {
        dialog.setButton(DialogInterface.BUTTON_POSITIVE, mPositiveButtonText,
                mPositiveButtonListener, null);
    }
    if (mNegativeButtonText != null) {
        dialog.setButton(DialogInterface.BUTTON_NEGATIVE, mNegativeButtonText,
                mNegativeButtonListener, null);
    }
    if (mNeutralButtonText != null) {
        dialog.setButton(DialogInterface.BUTTON_NEUTRAL, mNeutralButtonText,
                mNeutralButtonListener, null);
    }
    // For a list, the client can either supply an array of items or an
    // adapter or a cursor
    if ((mItems != null) || (mCursor != null) || (mAdapter != null)) {
        createListView(dialog);
    }
    if (mView != null) {
        if (mViewSpacingSpecified) {
            dialog.setView(mView, mViewSpacingLeft, mViewSpacingTop, mViewSpacingRight,
                    mViewSpacingBottom);
        } else {
            dialog.setView(mView);
        }
    } else if (mViewLayoutResId != 0) {
        dialog.setView(mViewLayoutResId);
    }
    /*
    dialog.setCancelable(mCancelable);
    dialog.setOnCancelListener(mOnCancelListener);
    if (mOnKeyListener != null) {
        dialog.setOnKeyListener(mOnKeyListener);
    }
    */
}
看到了没,这里才是将上面builder中的赋值又传给了AlertController类,这里我们就看下AlertController的setTitle方法:
public void setTitle(CharSequence title) {
    mTitle = title;
    if (mTitleView != null) {
        mTitleView.setText(title);
    }
}
这里就把builder中传过来的title给了AlertController中的mTitleView。那咱们看看mTitleView是什么时候生成的吧:
private void setupTitle(ViewGroup topPanel) {
    if (mCustomTitleView != null) {
       //省略代码
    } else {
        mIconView = (ImageView) mWindow.findViewById(android.R.id.icon);
        final boolean hasTextTitle = !TextUtils.isEmpty(mTitle);
        if (hasTextTitle && mShowTitle) {
            // Display the title if a title is supplied, else hide it.
            mTitleView = (TextView) mWindow.findViewById(R.id.alertTitle);
            mTitleView.setText(mTitle);
            //省略代码
    }
}
可以看到实际上mTitleView是window对象的R.id.alertTitle布局了。这里可以自己去研究该window下是怎么生成的,这里就把create的过程屡了一遍了,最后就剩下了show。可以看到Builder中show方法最后调用了AlertDialog的show方法。
这里可以画张流程图更清晰:
关于builder模式就先说这么多了,总结下来就是将复杂对象的生成放到单独的一个类进行处理,对主类进行分离。
一直看好的工厂模式:
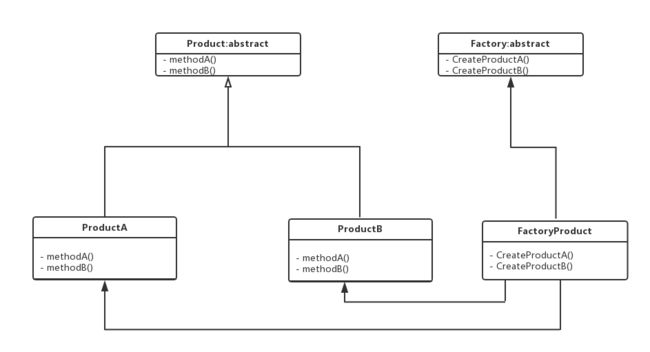
说到工厂模式其实大家可能没怎么留意,而且自己在写代码的时候,也很少知道自己写的是不是工厂模式了。工厂模式显著的特点是具体产品类专门由一个叫工厂类专门去构造,也就是new的过程。这样的模式好处是调用者无需关心具体构造产品的过程,而且对于一些复杂对象的构造,也起到了透明的效果。
UML类图:
事例代码也很简单:
//抽象的产品
public abstract class Product {
    public abstract void function();
}
//具体的产品
public class ProductA extends Product {
    @Override
    public void function() {
        //// TODO: 17/12/27
    }
}
//具体的产品
public class ProductB extends Product {
    @Override
    public void function() {
        //// TODO: 17/12/27
    }
}
//抽象工厂
public abstract class Factory {
    abstract Product createProductA();

    abstract Product createProductB();
}
//具体的工厂类
public class FactoryProduct extends Factory {
    @Override
    Product createProductA() {
        return new ProductA();
    }

    @Override
    Product createProductB() {
        return new ProductB();
    }
}
所以从上面结构看,标准的工厂模式是产品有各种各样的,而工厂就只有一个
下面通过另外一种方式去看下工厂类的写法(反射来获取具体产品):
//反射方式的抽象工厂类
public abstract class ReflexFactory {
    protected abstract  T createProduct(Class cl);
}
//具体的反射工厂类
public class ReflexFactoryProduct extends ReflexFactory {
    @Override
    protected  T createProduct(Class cl) {
        Product p = null;
        try {
            p = (Product) Class.forName(cl.getName()).newInstance();
        } catch (Exception e) {
            e.printStackTrace();
        }
        return (T) p;
    }
}
这里和普通的工厂类相比,少了创建不同product的方法,通过传入不同的class类型来获得不同的product。但是貌似只能调用到无参的product,这里尴尬了,要是构造器要传入属性就麻烦了,不就相当于new Object()了。
这里除了上面两种工厂类之外,还有种静态工厂类的形式:
public class StaticFactory {
    enum ProductType {
        ProductA, ProductB;
    }

    public static Product createProduct(ProductType type) {
        switch (type) {
            case ProductA:
                return new ProductA();
            case ProductB:
                return new ProductB();
        }
        return null;
    }
}
静态工厂类就一个类啊,通过分支创建不同的Product。缺点就是如果很多种product的话,那这个类就庞大了,而且这里如果每种product需要传参的话,那静态方法的参数也是不定的。好处就是一个类搞定了啊。
好了,说了几种工厂模式后,去看下android源码中有没有应用了:
AudioManager audioManager=context.getSystemService(Context.AUDIO_SERVICE)
相信大家都获取过****Manager了吧,那咱们去看看这句代码跟工厂模式有关系没。
是不是在activity中直接有getSystemService呢,那咱们去看下吧:
    @Override
    public Object getSystemService(@ServiceName @NonNull String name) {
        if (getBaseContext() == null) {
            throw new IllegalStateException(
                    "System services not available to Activities before onCreate()");
        }

        if (WINDOW_SERVICE.equals(name)) {
            return mWindowManager;
        } else if (SEARCH_SERVICE.equals(name)) {
            ensureSearchManager();
            return mSearchManager;
        }
        return super.getSystemService(name);
    }
直接看最后一行调用了父类的getSystemService方法:
那咱们去
ContextThemeWrapper中去找呗:
    @Override
    public Object getSystemService(String name) {
        if (LAYOUT_INFLATER_SERVICE.equals(name)) {
            if (mInflater == null) {
                mInflater = LayoutInflater.from(getBaseContext()).cloneInContext(this);
            }
            return mInflater;
        }
        return getBaseContext().getSystemService(name);
    }
看最后一行就行了,这里获取getBaseContext后,然后调了getSystemService。咱们看下getBseContext是什么鬼。又要去ContextThemeWrapper的父类去找getBaseContext了:
好吧,父类是
ContextWrapper,那咱们看下
getBaseContext是什么了:
    /**
     * @return the base context as set by the constructor or setBaseContext
     */
    public Context getBaseContext() {
        return mBase;
    }
这里是ContextWrapper中的mBase变量了:
    public ContextWrapper(Context base) {
        mBase = base;
    }

    /**
     * Set the base context for this ContextWrapper.  All calls will then be
     * delegated to the base context.  Throws
     * IllegalStateException if a base context has already been set.
     *
     * @param base The new base context for this wrapper.
     */
    protected void attachBaseContext(Context base) {
        if (mBase != null) {
            throw new IllegalStateException("Base context already set");
        }
        mBase = base;
    }
赋值就这两个地方了。那咱们就知道Activity中的context实际上就是ContextWrapper中的mBase变量了。这就要追溯到Activity创建的地方了,才能揭穿mBase的真面目了。这里需要知道点Android的应用启动流程了,咱们就直接看ActivityThread类了:
    private Activity performLaunchActivity(ActivityClientRecord r, Intent customIntent) {
        //省略代码
        Activity activity = null;
        try {
            java.lang.ClassLoader cl = r.packageInfo.getClassLoader();
            activity = mInstrumentation.newActivity(
                    cl, component.getClassName(), r.intent);
            StrictMode.incrementExpectedActivityCount(activity.getClass());
            r.intent.setExtrasClassLoader(cl);
            r.intent.prepareToEnterProcess();
            if (r.state != null) {
                r.state.setClassLoader(cl);
            }
        } catch (Exception e) {
            if (!mInstrumentation.onException(activity, e)) {
                throw new RuntimeException(
                    "Unable to instantiate activity " + component
                    + ": " + e.toString(), e);
            }
        }

        try {
            Application app = r.packageInfo.makeApplication(false, mInstrumentation);

            if (localLOGV) Slog.v(TAG, "Performing launch of " + r);
            if (localLOGV) Slog.v(
                    TAG, r + ": app=" + app
                    + ", appName=" + app.getPackageName()
                    + ", pkg=" + r.packageInfo.getPackageName()
                    + ", comp=" + r.intent.getComponent().toShortString()
                    + ", dir=" + r.packageInfo.getAppDir());

            if (activity != null) {
                Context appContext = createBaseContextForActivity(r, activity);
                CharSequence title = r.activityInfo.loadLabel(appContext.getPackageManager());
                Configuration config = new Configuration(mCompatConfiguration);
                if (r.overrideConfig != null) {
                    config.updateFrom(r.overrideConfig);
                }
                if (DEBUG_CONFIGURATION) Slog.v(TAG, "Launching activity "
                        + r.activityInfo.name + " with config " + config);
                Window window = null;
                if (r.mPendingRemoveWindow != null && r.mPreserveWindow) {
                    window = r.mPendingRemoveWindow;
                    r.mPendingRemoveWindow = null;
                    r.mPendingRemoveWindowManager = null;
                }
                activity.attach(appContext, this, getInstrumentation(), r.token,
                        r.ident, app, r.intent, r.activityInfo, title, r.parent,
                        r.embeddedID, r.lastNonConfigurationInstances, config,
                        r.referrer, r.voiceInteractor, window);
        //省略代码

        return activity;
    }
看到最后面调用了activity的attach方法,并且把创建的appContext传进了attach方法,那咱们看下创建这个context是什么了:
private Context createBaseContextForActivity(ActivityClientRecord r, final Activity activity) {
    //省略代码
    ContextImpl appContext = ContextImpl.createActivityContext(
            this, r.packageInfo, r.token, displayId, r.overrideConfig);
    appContext.setOuterContext(activity);
    Context baseContext = appContext;
    //省略代码
    return baseContext;
}
看到这的时候,基本就知道上面说的mBase其实就是ContextImpl了。Activity的attach的方法也正是把传进来的ContextImpl给了ContextWrapper中的mBase:
final void attach(Context context, ActivityThread aThread,
        Instrumentation instr, IBinder token, int ident,
        Application application, Intent intent, ActivityInfo info,
        CharSequence title, Activity parent, String id,
        NonConfigurationInstances lastNonConfigurationInstances,
        Configuration config, String referrer, IVoiceInteractor voiceInteractor,
        Window window) {
    //调用了父类ContextWrapper的attach方法
    attachBaseContext(context);
    //省略代码
}
到这里ContextWrapper中的mBase其实是一个ContextImpl了,下面就去看下ContextImp的getSystemService方法了:
@Override
public Object getSystemService(String name) {
    return SystemServiceRegistry.getSystemService(this, name);
}
好吧,又是走了一层了,去看下SystemServiceRegistry中的getSystemService方法吧:
public static Object getSystemService(ContextImpl ctx, String name) {
    ServiceFetcher fetcher = SYSTEM_SERVICE_FETCHERS.get(name);
    return fetcher != null ? fetcher.getService(ctx) : null;
}
这里就很清晰了,首先通过name去SYSTEM_SERVICE_FETCHERS中获取一个ServiceFetcher对象,然后调用了getService方法:
private static final HashMap> SYSTEM_SERVICE_FETCHERS =
        new HashMap>();
好吧,这里是个HashMap,那咱们看下什么时候put进去的ServiceFetcher:
private static  void registerService(String serviceName, Class serviceClass,
        ServiceFetcher serviceFetcher) {
    SYSTEM_SERVICE_NAMES.put(serviceClass, serviceName);
    SYSTEM_SERVICE_FETCHERS.put(serviceName, serviceFetcher);
}
这里是在registerService的时候将serviceFetcherput进去的:
static {
    registerService(Context.ACCESSIBILITY_SERVICE, AccessibilityManager.class,
            new CachedServiceFetcher() {
        @Override
        public AccessibilityManager createService(ContextImpl ctx) {
            return AccessibilityManager.getInstance(cox);
        }});
    registerService(Context.CAPTIONING_SERVICE, CaptioningManager.class,
            new CachedServiceFetcher() {
        @Override
        public CaptioningManager createService(ContextImpl ctx) {
            return new CaptioningManager(cox);
        }});
    registerService(Context.ACCOUNT_SERVICE, AccountManager.class,
            new CachedServiceFetcher() {
        @Override
        public AccountManager createService(ContextImpl ctx) {
            IBinder b = ServiceManager.getService(Context.ACCOUNT_SERVICE);
            IAccountManager service = IAccountManager.Stub.asInterface(b);
            return new AccountManager(ctx, service);
        }});
        //registerService太多了,我这里就罗列上面几个了
}
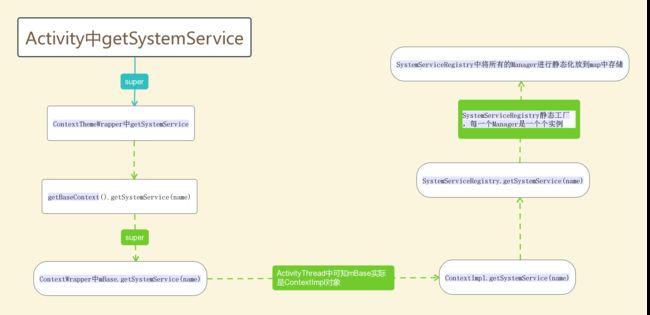
看到这的时候,才看到有工厂模式的影子啊,好多小伙伴都要哭了。源码真的是藏得深啊。这里简单说下在静态的时候,通过service的name构造出不同的ServiceFetcher,并存储在SYSTEM_SERVICE_FETCHERS中。然后在getSystemService过程中通过传进来的name获取不同的ServiceFetcher,最后调用getService方法获取相应的Manager了。不难看出这里的ServiceFetcher就是产品抽象类,SystemServiceRegistry就是一个生产***Manager的静态工厂类了。
下面画张图理解下Activity中getSystemService


