11.基于LAMP架构搭建博客站点
1、编译安装搭建wordpress
2、搭建php-admin
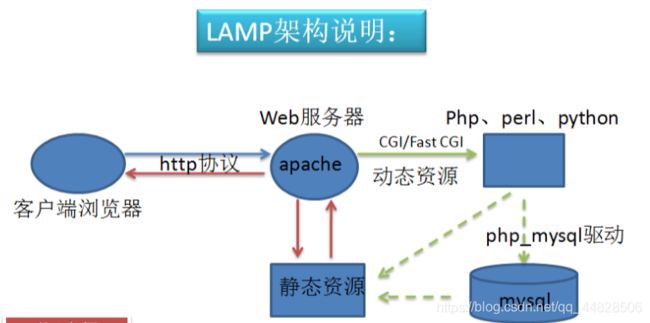
- LAMP:即基于Linux、apache、mariadb、PHP等服务组建起来的一个动态性处理站点,能够同时处理动态与静态资源的访问请求;


1.安装所需组件php、php-mysql、mariadb-server ,完成后启动上述服务
[root@xiaoping centos]# yum install php php-mysql mariadb-server -y
[root@localhost html]# systemctl start httpd.service
[root@localhost html]# systemctl start mariadb.service
[root@localhost html]# ss -tnl				//确认有3306和80端口则数据库与apache都启用成功
State      Recv-Q Send-Q      Local Address:Port                     Peer Address:Port
LISTEN     0      50                      *:3306                                *:*
LISTEN     0      128                     *:111                                 *:*
LISTEN     0      128                     *:6000                                *:*
LISTEN     0      5           192.168.122.1:53                                  *:*
LISTEN     0      128                     *:22                                  *:*
LISTEN     0      128             127.0.0.1:631                                 *:*
LISTEN     0      100             127.0.0.1:25                                  *:*
LISTEN     0      128                    :::111                                :::*
LISTEN     0      128                    :::6000                               :::*
LISTEN     0      128                    :::80                                 :::*
2.修改HTTP配置文件,完成后重启,可通过网页测试访问
[root@localhost centos]# vi /etc/httpd/conf/httpd.conf
要注意的几个重点:
重点是监听端口,Listen 80
服务器名称:ServerName 192.168.164.145
默认的访问路径:DocumentRoot "/var/www/html"
3.测试php是否可用,通过网页访问
在/var/www/html新建一个测试网页lamp.php
[root@localhost html]# vi lamp.php
<?php
echo "Hello world!
"
?>
[root@localhost html]# vi mysql.php
<?php
        $conn = mysql_connect('localhost','root','qazxc');
        if ($conn)
                echo "ok";
        else
                echo "faith";
?>
[root@localhost centos]# wget https://cn.wordpress.org/wordpress-4.7.2-zh_CN.tar.gz
[root@localhost centos]# tar -xf wordpress-4.7.2-zh_CN.tar.gz	//解压文件
[root@localhost centos]# chown -R root:root wordpress 	//修改文件
[root@localhost centos]# cp -rf wordpress /var/www/html/ 	//将wordpress目录文件复制到设定的站点目录下,默认是/var/www/html
6.设置mysql给主机开权限。创建一个mysql账户root ,密码passwd
MariaDB [(none)]> GRANT ALL ON wordpress.* TO "root"@"localhost" IDENTIFIED BY "passwd";
Query OK, 0 rows affected (0.01 sec)

 关闭主机解析在 配置文件里/etc/my.cnf 	skip-name-resolve=no
[root@localhost etc]# vi /etc/my.cnf

[root@localhost etc]# mysql -uuser -hlocalhost -p		测试账号能否登录
Enter password:
Welcome to the MariaDB monitor.  Commands end with ; or \g.
Your MariaDB connection id is 6
Server version: 5.5.64-MariaDB MariaDB Server

Copyright (c) 2000, 2018, Oracle, MariaDB Corporation Ab and others.

Type 'help;' or '\h' for help. Type '\c' to clear the current input statement.

后要在mysql环境下手动创建数据库creat databases+之前确定的数据库名称
MariaDB [(none)]> create database wpdb;
7.配置wordpress,进入/var/www/html/wordpress,从模板中复制一份出来直接修改就好了,完成后通过浏览器访问
[root@localhost wordpress]# cp wp-config-sample.php wp-config.php  	编辑wp-config.php  ,输入之前创建好的数据库名,用户名,密码,主机地址就行了
[root@localhost wordpress]# vi wp-config.php 	//修改为我们自己设置好的账号和密码
<?php
/**
 * WordPress基础配置文件。
 *
 * 这个文件被安装程序用于自动生成wp-config.php配置文件,
 * 您可以不使用网站,您需要手动复制这个文件,
 * 并重命名为“wp-config.php”,然后填入相关信息。
 *
 * 本文件包含以下配置选项:
 *
 * * MySQL设置
 * * 密钥
 * * 数据库表名前缀
 * * ABSPATH
 *
 * @link https://codex.wordpress.org/zh-cn:%E7%BC%96%E8%BE%91_wp-config.php
 *
 * @package WordPress
 */

// ** MySQL 设置 - 具体信息来自您正在使用的主机 ** //
/** WordPress数据库的名称 */
define('DB_NAME', 'wpdb');

/** MySQL数据库用户名 */
define('DB_USER', 'root');

/** MySQL数据库密码 */
"wp-config.php" [dos] 96L, 2899C
然后可以建立php_admin对站点数据库进行管理
1.下载phpMyadmin
2.解压后复制到服务器站点目录下
[root@localhost Downloads]# cp -rf phpMyAdmin-4.0.10.20-all-languages /var/www/html/
[root@localhost html]# cd phpMyAdmin-4.0.10.20-all-languages/
[root@localhost phpMyAdmin-4.0.10.20-all-languages]# cp config.sample.inc.php config.inc.php     //编辑配置文件
[root@localhost phpMyAdmin-4.0.10.20-all-languages]# vi config.inc.php 			修改config.inc.php 文件,添加一个新的cookie值
<?php
/* vim: set expandtab sw=4 ts=4 sts=4: */
/**
 * phpMyAdmin sample configuration, you can use it as base for
 * manual configuration. For easier setup you can use setup/
 *
 * All directives are explained in documentation in the doc/ folder
 * or at <http://docs.phpmyadmin.net/>.
 *
 * @package PhpMyAdmin
 */

/*
 * This is needed for cookie based authentication to encrypt password in
 * cookie
 */
$cfg['blowfish_secret'] = 'xdHuulqMfceO1IrNa8b7c6d'; /* YOU MUST FILL IN THIS FOR COOKIE AUTH! */			//将产生的cookie值加入里面字段
cookie值用来加密数据,可通过随机数产生
[root@localhost Downloads]# openssl rand -base64 20
7KSrar95Wz5tiWFMR1yfBkAlJOc=
最后要注意的是目录的权限
[root@localhost html]# ll
total 20
-rw-r--r--. 1 root root   45 May  2 15:48 lamp.php
-rw-r--r--. 1 root root  158 May  2 16:03 mysql.php
drwxr-xr-x. 9 root root 4096 May  2 22:23 phpmyadmin
drwxr-xr-x. 5 root root 4096 May  2 22:10 wordpress


