从源码的角度探究Activity的启动过程
一.概述
今天我们来搞一下底层一点的东西,大家可能对Activity的生命周期比较熟悉,但是一个Activity是如何启动起来的,你知道吗?今天就来探究一下。
二.分析
我们先随便写一个demo,然后在某个地方打开断点,debug模式运行程序,然后我们在Debug视图中把主线程暂停,我们可以看到调用栈,如下图所示,
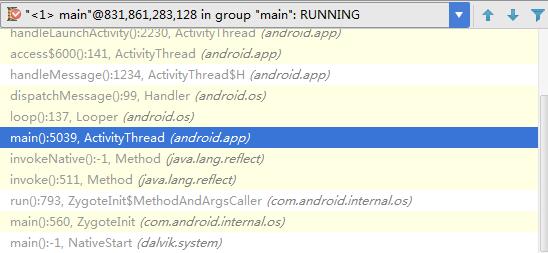
在android中,应用程序的入口是ActivityThead中的main函数。
于是我们先看android.app.ActivityThread的main()方法。我们进入到这个方法里面。
public static void main(String[] args) {
SamplingProfilerIntegration.start();
// CloseGuard defaults to true and can be quite spammy. We
// disable it here, but selectively enable it later (via
// StrictMode) on debug builds, but using DropBox, not logs.
CloseGuard.setEnabled(false);
Environment.initForCurrentUser();
// Set the reporter for event logging in libcore
EventLogger.setReporter(new EventLoggingReporter());
Security.addProvider(new AndroidKeyStoreProvider());
Process.setArgV0("" );
//获取Looper
Looper.prepareMainLooper();
ActivityThread thread = new ActivityThread();
thread.attach(false);
if (sMainThreadHandler == null) {
sMainThreadHandler = thread.getHandler();
}
AsyncTask.init();
if (false) {
Looper.myLooper().setMessageLogging(new
LogPrinter(Log.DEBUG, "ActivityThread"));
}
Looper.loop();
throw new RuntimeException("Main thread loop unexpectedly exited");main方法中先调用下面的方法对Looper进行初始化
Looper.prepareMainLooper();我们进入Looper中的这个方法
  public static void prepareMainLooper() {
        prepare(false);
        synchronized (Looper.class) {
            if (sMainLooper != null) {
                throw new IllegalStateException("The main Looper has already been prepared.");
            }
            sMainLooper = myLooper();
        }
    }
又调用了prepare方法
   private static void prepare(boolean quitAllowed) {
        if (sThreadLocal.get() != null) {
            throw new RuntimeException("Only one Looper may be created per thread");
        }
        //创建Looper对象,放入ThreadLocal中
        sThreadLocal.set(new Looper(quitAllowed));
    }
我们看看Looper的构造函数
 private Looper(boolean quitAllowed) {
        mQueue = new MessageQueue(quitAllowed);
        mRun = true;
        mThread = Thread.currentThread();
    }
然后调用了myLooper()方法
  public static Looper myLooper() {
        return sThreadLocal.get();
    }
这里从存放Looper的线程池里面取出一个Looper对象。
最后main方法里面调用Looper.loop()方法,我们看看
 public static void loop() {
         //取出当前线程对应的Looper对象
        final Looper me = myLooper();
        if (me == null) {
        //调用Looper.loop()方法前如果不掉用prepareMainLooper()方法就会抛出这个异常
            throw new RuntimeException("No Looper; Looper.prepare() wasn't called on this thread.");
        }
        //获得Looper对应的消息队列
        final MessageQueue queue = me.mQueue;

        // Make sure the identity of this thread is that of the local process,
        // and keep track of what that identity token actually is.
        Binder.clearCallingIdentity();
        final long ident = Binder.clearCallingIdentity();
        //死循环,不断从消息队列中取出消息,没有则阻塞
        for (;;) {
            Message msg = queue.next(); // might block
            if (msg == null) {
                // No message indicates that the message queue is quitting.
                return;
            }

            // This must be in a local variable, in case a UI event sets the logger
            Printer logging = me.mLogging;
            if (logging != null) {
                logging.println(">>>>> Dispatching to " + msg.target + " " +
                        msg.callback + ": " + msg.what);
            }
            //调用了msg.target的dispatchMessage方法处理消息,其实这个msg.target就是当前线程的Handler对象
            msg.target.dispatchMessage(msg);

            if (logging != null) {
                logging.println("<<<<< Finished to " + msg.target + " " + msg.callback);
            }

            // Make sure that during the course of dispatching the
            // identity of the thread wasn't corrupted.
            final long newIdent = Binder.clearCallingIdentity();
            if (ident != newIdent) {
                Log.wtf(TAG, "Thread identity changed from 0x"
                        + Long.toHexString(ident) + " to 0x"
                        + Long.toHexString(newIdent) + " while dispatching to "
                        + msg.target.getClass().getName() + " "
                        + msg.callback + " what=" + msg.what);
            }

            msg.recycle();
这里我们看下面这行代码
msg.target.dispatchMessage(msg);通过查看源码我们知道msg.target是一个Handler对象,于是我们进入到Handler中的dispatchMessage方法中去,
 public void dispatchMessage(Message msg) {
        if (msg.callback != null) {
            handleCallback(msg);
        } else {
            if (mCallback != null) {
                if (mCallback.handleMessage(msg)) {
                    return;
                }
            }
            handleMessage(msg);
        }
    }
最终我们可以看到,调用了handleMessage方法,而handleMessage方法在Handler里面是一个空的方法,因为我们需要自己来处理消息,这下大家明白了我们使用Handler时的handleMessage方法是如何被调用的了吧。
接下来回到正题,既然在main方法里面初始化了Looper,那么我们去找找和这个Looper相关联的Handler对象,经过漫长的寻找,我们终于找到了,
private class H extends Handler {
        public static final int LAUNCH_ACTIVITY         = 100;
        public static final int PAUSE_ACTIVITY          = 101;
        public static final int PAUSE_ACTIVITY_FINISHING= 102;
        public static final int STOP_ACTIVITY_SHOW      = 103;
        public static final int STOP_ACTIVITY_HIDE      = 104;
        public static final int SHOW_WINDOW             = 105;
        public static final int HIDE_WINDOW             = 106;
        public static final int RESUME_ACTIVITY         = 107;
        public static final int SEND_RESULT             = 108;
        public static final int DESTROY_ACTIVITY        = 109;
        public static final int BIND_APPLICATION        = 110;
        public static final int EXIT_APPLICATION        = 111;
这是一个内部类,名字叫做H,继承自Handler,然后我们去看它的handleMessage方法,
 public void handleMessage(Message msg) {
            if (DEBUG_MESSAGES) Slog.v(TAG, ">>> handling: " + codeToString(msg.what));
            switch (msg.what) {
                case LAUNCH_ACTIVITY: {
                    Trace.traceBegin(Trace.TRACE_TAG_ACTIVITY_MANAGER, "activityStart");
                    ActivityClientRecord r = (ActivityClientRecord)msg.obj;

                    r.packageInfo = getPackageInfoNoCheck(
                            r.activityInfo.applicationInfo, r.compatInfo);
                    handleLaunchActivity(r, null);
                    Trace.traceEnd(Trace.TRACE_TAG_ACTIVITY_MANAGER);
                } break;
那么这个消息是从哪发送过来的呢?是在ApplicationThread的scheduleLaunchActivity发送过来的
  public final void scheduleLaunchActivity(Intent intent, IBinder token, int ident,
                ActivityInfo info, Configuration curConfig, CompatibilityInfo compatInfo,
                Bundle state, List pendingResults,
                List pendingNewIntents, boolean notResumed, boolean isForward,
                String profileName, ParcelFileDescriptor profileFd, boolean autoStopProfiler) {
            ActivityClientRecord r = new ActivityClientRecord();

            r.token = token;
            r.ident = ident;
            r.intent = intent;
            r.activityInfo = info;
            r.compatInfo = compatInfo;
            r.state = state;

            r.pendingResults = pendingResults;
            r.pendingIntents = pendingNewIntents;

            r.startsNotResumed = notResumed;
            r.isForward = isForward;

            r.profileFile = profileName;
            r.profileFd = profileFd;
            r.autoStopProfiler = autoStopProfiler;

            updatePendingConfiguration(curConfig);

            queueOrSendMessage(H.LAUNCH_ACTIVITY, r);
           }
handleMessage中调用了一个重要的方法handleLaunchActivity,从名字上看我们觉得应该是处理Activity的启动的,进去看看,
  private void handleLaunchActivity(ActivityClientRecord r, Intent customIntent) {
        // If we are getting ready to gc after going to the background, well
        // we are back active so skip it.
        unscheduleGcIdler();

        if (r.profileFd != null) {
            mProfiler.setProfiler(r.profileFile, r.profileFd);
            mProfiler.startProfiling();
            mProfiler.autoStopProfiler = r.autoStopProfiler;
        }

        // Make sure we are running with the most recent config.
        handleConfigurationChanged(null, null);

        if (localLOGV) Slog.v(
            TAG, "Handling launch of " + r);
            //执行启动Activity的方法
        Activity a = performLaunchActivity(r, customIntent);

        if (a != null) {
            r.createdConfig = new Configuration(mConfiguration);
            Bundle oldState = r.state;
            //执行activity的resume操作
            handleResumeActivity(r.token, false, r.isForward,
                    !r.activity.mFinished && !r.startsNotResumed);

            if (!r.activity.mFinished && r.startsNotResumed) {

                try {
                    r.activity.mCalled = false;
                    mInstrumentation.callActivityOnPause(r.activity);

                    if (r.isPreHoneycomb()) {
                        r.state = oldState;
                    }
                    if (!r.activity.mCalled) {
                        throw new SuperNotCalledException(
                            "Activity " + r.intent.getComponent().toShortString() +
                            " did not call through to super.onPause()");
                    }

                } catch (SuperNotCalledException e) {
                    throw e;

                } catch (Exception e) {
                    if (!mInstrumentation.onException(r.activity, e)) {
                        throw new RuntimeException(
                                "Unable to pause activity "
                                + r.intent.getComponent().toShortString()
                                + ": " + e.toString(), e);
                    }
                }
                r.paused = true;
            }
        } else {
            // If there was an error, for any reason, tell the activity
            // manager to stop us.
            try {
                ActivityManagerNative.getDefault()
                    .finishActivity(r.token, Activity.RESULT_CANCELED, null);
            } catch (RemoteException ex) {
                // Ignore
            }
        }
这里调用了两个比较重要的方法,performLaunchActivity和handleResumeActivity。
我们先看performLaunchActivity做了什么事情,
  private Activity performLaunchActivity(ActivityClientRecord r, Intent customIntent) {
    //省去大量代码

        Activity activity = null;
        try {
            java.lang.ClassLoader cl = r.packageInfo.getClassLoader();
            //通过Activity的类名构建一个Activity对象,具体的创建Activity对象的操作在mInstrumentation中
            activity = mInstrumentation.newActivity(
                    cl, component.getClassName(), r.intent);
                    //省去一些代码
               if (activity != null) {
                Context appContext = createBaseContextForActivity(r, activity);
                CharSequence title = r.activityInfo.loadLabel(appContext.getPackageManager());
                Configuration config = new Configuration(mCompatConfiguration);
                if (DEBUG_CONFIGURATION) Slog.v(TAG, "Launching activity "
                        + r.activityInfo.name + " with config " + config);
                        //调用activity的attach方法
                activity.attach(appContext, this, getInstrumentation(), r.token,
                        r.ident, app, r.intent, r.activityInfo, title, r.parent,
                        r.embeddedID, r.lastNonConfigurationInstances, config);

//省去一些代码
 activity.mCalled = false;
//通过Instrumentation对象执行Activity的onCreate()方法,Activity的生命周期方法都是由Instrumentation对象来调用的。                mInstrumentation.callActivityOnCreate(activity, r.state);
                if (!activity.mCalled) {
                    throw new SuperNotCalledException(
                        "Activity " + r.intent.getComponent().toShortString() +
                        " did not call through to super.onCreate()");
                }
其实attach方法里面做了不少事情,我们看看
  final void attach(Context context, ActivityThread aThread,
            Instrumentation instr, IBinder token, int ident,
            Application application, Intent intent, ActivityInfo info,
            CharSequence title, Activity parent, String id,
            NonConfigurationInstances lastNonConfigurationInstances,
            Configuration config) {
        attachBaseContext(context);

        mFragments.attachActivity(this, mContainer, null);
          //给Window对象赋值
        mWindow = PolicyManager.makeNewWindow(this);
        mWindow.setCallback(this);
        mWindow.getLayoutInflater().setPrivateFactory(this);
        if (info.softInputMode != WindowManager.LayoutParams.SOFT_INPUT_STATE_UNSPECIFIED) {
            mWindow.setSoftInputMode(info.softInputMode);
        }
        if (info.uiOptions != 0) {
            mWindow.setUiOptions(info.uiOptions);
        }
        mUiThread = Thread.currentThread();

        mMainThread = aThread;
        mInstrumentation = instr;
        mToken = token;
        mIdent = ident;
        mApplication = application;
        mIntent = intent;
        mComponent = intent.getComponent();
        mActivityInfo = info;
        mTitle = title;
        mParent = parent;
        mEmbeddedID = id;
        mLastNonConfigurationInstances = lastNonConfigurationInstances;
        //给Window对象设置WindowManager
        mWindow.setWindowManager(
                (WindowManager)context.getSystemService(Context.WINDOW_SERVICE),
                mToken, mComponent.flattenToString(),
                (info.flags & ActivityInfo.FLAG_HARDWARE_ACCELERATED) != 0);
        if (mParent != null) {
            mWindow.setContainer(mParent.getWindow());
        }
        //给Activity的mWindowManager 赋值
        mWindowManager = mWindow.getWindowManager();
        mCurrentConfig = config;
mWindow是一个Window类型的变量,但实际上它是一个PhoneWindow对象,与Activity的内容显示相关。
上面的attach()方法调用完成后,就自然而然的调用了Activity的onCreate()方法了。在onCreate方法中,我们会调用setContentView方法,关于这个方法的讲解,请看
setContentView源码解析
当setContentView执行完毕以后,这个时候界面还没有显示出任何东西来,而仅仅是将mDecor->mContentParent->(customer layout)一个这样的树状结构给搭建好了而已。
假设setContentView()方法是onCreate()方法中唯一一个方法,那么onCreate()方法也执行完了,调用栈继续回退,就回到了android.app.ActivityThread.handleLaunchActivity()中,以上的所以就是刚刚执行完了android.app.ActivityThread.performLaunchActivity()。
接下来执行第二个关键性的方法handleResumeActivity()。
//省去一些代码
        ActivityClientRecord r = performResumeActivity(token, clearHide);

        if (r != null) {
            final Activity a = r.activity;

            if (localLOGV) Slog.v(
                TAG, "Resume " + r + " started activity: " +
                a.mStartedActivity + ", hideForNow: " + r.hideForNow
                + ", finished: " + a.mFinished);

            final int forwardBit = isForward ?
                    WindowManager.LayoutParams.SOFT_INPUT_IS_FORWARD_NAVIGATION : 0;

            // If the window hasn't yet been added to the window manager,
            // and this guy didn't finish itself or start another activity,
            // then go ahead and add the window.
            boolean willBeVisible = !a.mStartedActivity;
            if (!willBeVisible) {
                try {
                    willBeVisible = ActivityManagerNative.getDefault().willActivityBeVisible(
                            a.getActivityToken());
                } catch (RemoteException e) {
                }
            }
            if (r.window == null && !a.mFinished && willBeVisible) {
            //获取window
                r.window = r.activity.getWindow();
                //获取DecorView
                View decor = r.window.getDecorView();
                decor.setVisibility(View.INVISIBLE);
                //获取ViewManager,ViewManager是WindowManager的父类
                ViewManager vm = a.getWindowManager();
                WindowManager.LayoutParams l = r.window.getAttributes();
                a.mDecor = decor;
                l.type = WindowManager.LayoutParams.TYPE_BASE_APPLICATION;
                l.softInputMode |= forwardBit;
                if (a.mVisibleFromClient) {
                    a.mWindowAdded = true;
                    vm.addView(decor, l);//添加decorview到Activity中
                }
//省去海量代码
先是调用performResumeActivity方法,这个方法内就是通过Instrumentation调用Activity的onResume()方法。下面的addView方法非常关键,vm是上面的a.getWindowManager()获得的,a是activity对象,Activity中的getWindowManager返回的是mWindowManager,而WindowManager的实现类是WindowManagerImpl,于是我们看它里面的addView方法
    @Override
    public void addView(View view, ViewGroup.LayoutParams params) {
        mGlobal.addView(view, params, mDisplay, mParentWindow);
    }
又调用了mGlobal里面的addView方法,mGlobal是WindowManagerGlobal的对象,然后进去WindowManagerGlobal里面
  public void addView(View view, ViewGroup.LayoutParams params,
            Display display, Window parentWindow) {
      //省去大量代码

        ViewRootImpl root;
        View panelParentView = null;
//省去部分代码

            root = new ViewRootImpl(view.getContext(), display);

            view.setLayoutParams(wparams);

            if (mViews == null) {
                index = 1;
                mViews = new View[1];
                mRoots = new ViewRootImpl[1];
                mParams = new WindowManager.LayoutParams[1];
            } else {
                index = mViews.length + 1;
                Object[] old = mViews;
                mViews = new View[index];
                System.arraycopy(old, 0, mViews, 0, index-1);
                old = mRoots;
                mRoots = new ViewRootImpl[index];
                System.arraycopy(old, 0, mRoots, 0, index-1);
                old = mParams;
                mParams = new WindowManager.LayoutParams[index];
                System.arraycopy(old, 0, mParams, 0, index-1);
            }
            index--;

            mViews[index] = view;
            mRoots[index] = root;
            mParams[index] = wparams;
             try {
            root.setView(view, wparams, panelParentView);
        } catch (RuntimeException e) {
            // BadTokenException or InvalidDisplayException, clean up.
            synchronized (mLock) {
                final int index = findViewLocked(view, false);
                if (index >= 0) {
                    removeViewLocked(index, true);
                }
            }
            throw e;
        }
这里创建了ViewRootImpl对象,然后调用了setView方法
public void setView(View view, WindowManager.LayoutParams attrs, View panelParentView) {
    synchronized (this) {
        if (mView == null) {
            mView = view;//这个view是上面层层传递下来的decorview
            //省去大量代码
            requestLayout();
            //省去海量代码
            view.assignParent(this);//将viewParent标记为decorview的父类
            //省去部分代码
        }
    }
}
省略后的代码如上所示,首先将传进来的参数view赋值给mView,这里有一点要明确ViewRootImpl其实并不是一个View的子类……因此我认为,mView将是这个对象所认识的root节点,也是整个Activity的root的节点。
接下来调用了requestLayout()方法,这个方法是有效的!
最后设置DecorView的父类为ViewParent。终于终于,mDecor知道了自己父亲是谁,或者说,整个Activity设置了一个根节点,在此之前,我们setContentView()将自己的layout布局add到PhoneWindow.mContentParent的时候,mDecor都不知道自己的parent是哪个,现在整个view的树形结构中有了根节点,也就是ViewRootImpl,那么requestLayout()就有效了,就可以进行后面的measure,layout,draw三步操作了。
  @Override
    public void requestLayout() {
        if (!mHandlingLayoutInLayoutRequest) {
            checkThread();
            mLayoutRequested = true;
            scheduleTraversals();
        }
    }
该方法首先检查是否在主线程,然后就执行了scheduleTraversals()方法。看这个方法的名字,就知道是执行一次遍历,遍历的对象就是根节点开始的view tree。
void scheduleTraversals() {
        if (!mTraversalScheduled) {
            mTraversalScheduled = true;
            mTraversalBarrier = mHandler.getLooper().postSyncBarrier();
            mChoreographer.postCallback(
                    Choreographer.CALLBACK_TRAVERSAL, mTraversalRunnable, null);
            scheduleConsumeBatchedInput();
        }
    }
我们注意这个mTraversalRunnable对象,这时会调用run方法
final class TraversalRunnable implements Runnable {
        @Override
        public void run() {
            doTraversal();
        }
    }
run方法里面会调用doTraversal方法,
 void doTraversal() {
        if (mTraversalScheduled) {
            mTraversalScheduled = false;
            mHandler.getLooper().removeSyncBarrier(mTraversalBarrier);

            if (mProfile) {
                Debug.startMethodTracing("ViewAncestor");
            }

            Trace.traceBegin(Trace.TRACE_TAG_VIEW, "performTraversals");
            try {
                performTraversals();//开始绘制view
            } finally {
                Trace.traceEnd(Trace.TRACE_TAG_VIEW);
            }

            if (mProfile) {
                Debug.stopMethodTracing();
                mProfile = false;
            }
        }
这里又调用了performTraversals()方法,这个方法非常长,依次调用了performMeasure(),performLayout(),performDraw()三个方法,终于开始了控件层的测量,布局,绘制三个步骤。