echarts实现雷达图
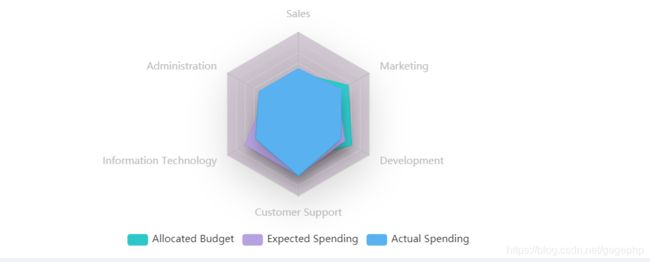
这里提供两种效果,都是对官网的demo进行一点的改进,这里放上官网链接,有不清楚的参数可直接查阅->echarts官网.话不多说,直接上代码:
//实现一
initChart() {
      this.chart = echarts.init(this.$el, 'macarons')
      this.chart.setOption({
        title : {
          text: ' 雷达图demo',     //这里的参数是整个图标的标题 后面也可以加注释
          subtext: '888'
        },
        tooltip : {
          trigger: 'item',
        },
        legend: {
          orient : 'vertical',              //这里主要是标识不同颜色代表不同的同学
          x : 'right',
          y : 'bottom',
          data:['A同学成绩 ', 'B同学成绩 ']
        },

        toolbox: {
          show : true,
          feature : {
            mark : {show: true},
            dataView : {show: true, readOnly: false},
            restore : {show: true},
            saveAsImage : {show: true},
          }
        },
        polar : [
          {
            indicator : [
              { text: '素质必修课 ', max: 5.0, color: 'red'},    //这里用于设置各轴的参数以及最大值
              { text: '核心必修课 ', max: 5.0},
              { text: '一般必修课 ', max: 5.0},
              { text: '通识必修课', max: 5.0},
              { text: '通识限选课', max: 5.0},
            ]
          }
        ],
        calculable : true,
        series : [
          {
            name: '预算 vs 开销(Budget vs spending)',
            type: 'radar',
            data : [
              {
                value : [3.5, 4.8, 3.2, 4.7, 4.5],
                name : 'A同学 '
              },
              {
                value : [4.2, 4.1, 3.9, 3.7, 3.5 ],
                name : 'B同学 '
              }
            ]
          }
        ]
      })
    }
//实现二
initChart() {
	  // 根据自己的id绑定echarts需要的div
      this.chart = echarts.init(this.$el, 'macarons')
      this.chart.setOption({
        tooltip: {
          trigger: 'axis',
          axisPointer: { // 坐标轴指示器,坐标轴触发有效
            type: 'shadow' // 默认为直线,可选为:'line' | 'shadow'
          }
        },
        radar: {
          radius: '66%',
          center: ['50%', '42%'],
          splitNumber: 8,
          splitArea: {
            areaStyle: {
              color: 'rgba(127,95,132,.3)',
              opacity: 1,
              shadowBlur: 45,
              shadowColor: 'rgba(0,0,0,.5)',
              shadowOffsetX: 0,
              shadowOffsetY: 15
            }
          },
          indicator: [
            { name: 'Sales', max: 10000 },
            { name: 'Administration', max: 20000 },
            { name: 'Information Technology', max: 20000 },
            { name: 'Customer Support', max: 20000 },
            { name: 'Development', max: 20000 },
            { name: 'Marketing', max: 20000 }
          ]
        },
        legend: {
          left: 'center',
          bottom: '10',
          data: ['Allocated Budget', 'Expected Spending', 'Actual Spending']
        },
        series: [{
          type: 'radar',
          symbolSize: 0,
          areaStyle: {
            normal: {
              shadowBlur: 13,
              shadowColor: 'rgba(0,0,0,.2)',
              shadowOffsetX: 0,
              shadowOffsetY: 10,
              opacity: 1
            }
          },
          data: [
            {
              value: [5000, 7000, 12000, 11000, 15000, 14000],
              name: 'Allocated Budget'
            },
            {
              value: [4000, 9000, 15000, 15000, 13000, 11000],
              name: 'Expected Spending'
            },
            {
              value: [5500, 11000, 12000, 15000, 12000, 12000],
              name: 'Actual Spending'
            }
          ],
          animationDuration: animationDuration
        }]
      })
    }

