TensorFlow_Object_Detection_API训练自己的数据集
记录一下自己的学习过程遇到的问题。参考链接
该目标检测API已经更新到tensorflow2.0时代,但是我没有成功实现,所以这里是旧版本实现过程。
1、环境配置及相关安装
操作系统:Windows10 64位
GPU:Nvidia RTX2080Ti
内存:128G
TensorFlow:1.14.0 GPU版本
python环境:Anaconda3.7
cuda:10.0.130
这里记录一下三种安装各种库的方法:
- 安装了anaconda的可以直接使用
conda install tensorflow-gpu==1.14.0
这里如果不指定版本,默认会安装最新版的 - 进入https://anaconda.org搜索tensorflow或者其他需要安装的库,点击需要的版本进入,使用给定的安装命令安装。
- 常规安装方法
pip install tensorflow-gpu==1.14.0
tensorflow-gpu与cuda、cudnn对应版本可参考这里
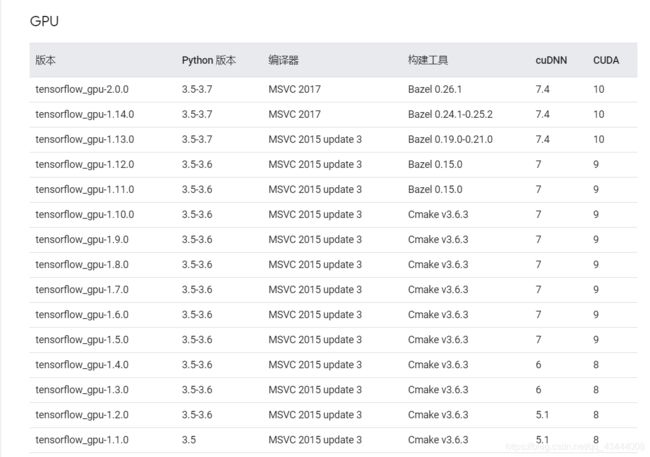
检查tensorflow是否安装成功:打开命令行(快捷键Windows+R,输入cmd,回车)。

这里的(base)是anaconda的默认环境,如果使用了虚拟环境,在进行某项操作时,一定不能忘了首先要激活该虚拟环境。具体可参考这里
测试是否启用了GPU加速,可以用以下两行代码测试:
from tensorflow.python.client import device_lib
print(device_lib.list_local_devices())
如果有以下输出:
Sample Output
[name: "/cpu:0" device_type: "CPU" memory_limit: 268435456 locality { } incarnation: 4402277519343584096,
name: "/gpu:0" device_type: "GPU" memory_limit: 6772842168 locality { bus_id: 1 } incarnation: 7471795903849088328 physical_device_desc: "device: 0, name: GeForce GTX 2080Ti, pci bus id: 0000:05:00.0" ]
说明GPU加速已经启用。
2、TensorFlow_Objectdetection_API下载
-
下载
https://github.com/tensorflow/models这里能下载到的是最新版的models,我实现的旧版本的models在百度网盘,可自取。链接:https://pan.baidu.com/s/1I9XSjOSlF9GXAeFSHLPkXw
提取码:ew8p -
Protobuf 安装与配置
首先在 https://github.com/google/protobuf/releases 网站中寻找protoc-3.4.0-win32,win32和win64位均适用。解压后将bin文件夹中的【protoc.exe】放到C:\Windows下。
然后在命令行中定位到models\research\目录下,输入
protoc object_detection/protos/*.proto --python_out=.
将.proto文件转成对应的.py文件。我这里是直接成功,如果失败,可以尝试将*.proto换成具体的文件名,一个一个运行。形如:
protoc object_detection/protos/anchor_generator.proto --python_out=. -
PYTHONPATH 环境变量设置
在 ‘此电脑’-‘属性’- ‘高级系统设置’ -‘环境变量’-‘系统变量’ 中新建名为‘PYTHONPATH’的变量,将models/research/ 及 models/research/slim 两个文件夹的完整目录添加进去,两者用分号隔开。如图。

3、测试API安装是否成功
在命令行中定位到models/research/ 文件夹下,输入
python object_detection/builders/model_builder_test.py
不报错说明运行成功。我这里是报错的,解决方法点击这里
4、测试自带demo
在命令行中定位到models\research\object_detection目录下,然后输入jupyter notebook,调用浏览器打开当前文件夹,点开 object_detection_tutorial.ipynb。点击上方Cell,run all。成功运行后的结果如图。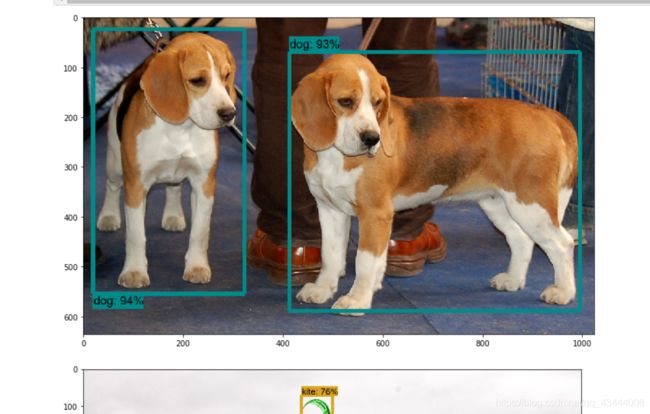
第一遍时,没报错,也没出结果,运行第二遍的时候就出结果了。
5、训练自己的数据集
准备数据集:我这里用的数据集标签是txt格式的,而该API要求格式为tfrecord格式,所以这里进行了几种格式的转换。转换链接参考这里
训练模型:这里我使用的预训练模型是faster_rcnn_resnet101_kitti,可以在object_detection/samples/configs文件夹中选择合适的预训练模型。
相关设置:
1、在object_detection中新建images文件夹,在其中新建train和val文件夹,放入相应的训练和验证图片。
2、在data文件夹下,有五个文件。一个.pbtxt的文件,内容如下:
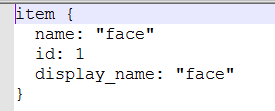
可以复制其他的.pbtxt文件,然后在其中修改属于自己的,最主要的是name和id,display_name可以删除。id从1开始,name应该和标签文件中的name保持一致。
剩下四个为,经过之前标签格式转换而来的两个.csv标签文件和产生的相应.record文件。
3、打开所选模型设置文件,我这里是samples/configs/faster_rcnn_resnet101_kitti.config。需要修改的地方有五处:
(1)将其中的 PATH_TO_BE_CONFIGURED 改为自己的路径,就是两个.record文件的路径。
(2)label_map_path的路径就是上面.pbtxt文件的路径。
(3)num_classes按自己的情况修改。
(4)batch_size 原本是24,运行的时候如果出现显存不足的问题,可相应改小。
(5)fine_tune_checkpoint: “PATH_TO_BE_CONFIGURED/model.ckpt” from_detection_checkpoint: true,这两句注释掉。
其他训练步数等参数,可酌情修改。以下是我的完整设置文件faster_rcnn_resnet101_kitti.config
#Faster R-CNN with Resnet-101 (v1)
#Trained on KITTI dataset (cars and pedestrian), initialized from COCO
#detection checkpoint.
#Users should configure the fine_tune_checkpoint field in the train config as
#well as the label_map_path and input_path fields in the train_input_reader and
#eval_input_reader. Search for "PATH_TO_BE_CONFIGURED" to find the fields that
#should be configured.
model {
  faster_rcnn {
    num_classes: 1
    image_resizer {
      keep_aspect_ratio_resizer {
        # Raw KITTI images have a resolution of 1242x375, if we wish to resize
        # them to have a height of 600 then their width should be
        # 1242/(375/600)=1987.2
        min_dimension: 600
        max_dimension: 1987
      }
    }
    feature_extractor {
      type: 'faster_rcnn_resnet101'
      first_stage_features_stride: 16
    }
    first_stage_anchor_generator {
      grid_anchor_generator {
        scales: [0.25, 0.5, 1.0, 2.0]
        aspect_ratios: [0.5, 1.0, 2.0]
        height_stride: 16
        width_stride: 16
      }
    }
    first_stage_box_predictor_conv_hyperparams {
      op: CONV
      regularizer {
        l2_regularizer {
          weight: 0.0
        }
      }
      initializer {
        truncated_normal_initializer {
          stddev: 0.01
        }
      }
    }
    first_stage_nms_score_threshold: 0.0
    first_stage_nms_iou_threshold: 0.7
    first_stage_max_proposals: 300
    first_stage_localization_loss_weight: 2.0
    first_stage_objectness_loss_weight: 1.0
    initial_crop_size: 14
    maxpool_kernel_size: 2
    maxpool_stride: 2
    second_stage_box_predictor {
      mask_rcnn_box_predictor {
        use_dropout: false
        dropout_keep_probability: 1.0
        fc_hyperparams {
          op: FC
          regularizer {
            l2_regularizer {
              weight: 0.0
            }
          }
          initializer {
            variance_scaling_initializer {
              factor: 1.0
              uniform: true
              mode: FAN_AVG
            }
          }
        }
      }
    }
    second_stage_post_processing {
      batch_non_max_suppression {
        score_threshold: 0.0
        iou_threshold: 0.6
        max_detections_per_class: 100
        max_total_detections: 300
      }
      score_converter: SOFTMAX
    }
    second_stage_localization_loss_weight: 2.0
    second_stage_classification_loss_weight: 1.0
  }
}

train_config: {
  batch_size: 1
  optimizer {
    momentum_optimizer: {
      learning_rate: {
        manual_step_learning_rate {
          initial_learning_rate: 0.0001
          schedule {
            step: 500000
            learning_rate: .00001
          }
          schedule {
            step: 700000
            learning_rate: .000001
          }
        }
      }
      momentum_optimizer_value: 0.9
    }
    use_moving_average: false
  }
  gradient_clipping_by_norm: 10.0
  #fine_tune_checkpoint: "PATH_TO_BE_CONFIGURED/model.ckpt"
  #from_detection_checkpoint: true
  num_steps: 100000
  data_augmentation_options {
    random_horizontal_flip {
    }
  }
}

train_input_reader: {
  label_map_path: "data/face.pbtxt"
  tf_record_input_reader: {
    input_path: "data/train.record"
  }
}

eval_config: {
  use_moving_averages: false
  num_examples: 500
}

eval_input_reader: {
  label_map_path: "data/face.pbtxt"
  tf_record_input_reader: {
    input_path: "data/val.record"
  }
}
之后将修改好的设置文件放入object_ddetection/training(新建)文件夹下。
训练:在命令行中定位到models\research\object_detection文件夹下,这里我先是用了model_main.py来训练,但是失败了,在网友们的讨论下发现可以使用legacy文件夹下的train.py来训练。具体命令如下:
python legacy/train.py --logtostderr --train_dir=training/ --pipeline_config_path=training/faster_rcnn_resnet101_kitti.config
出现如下训练过程。
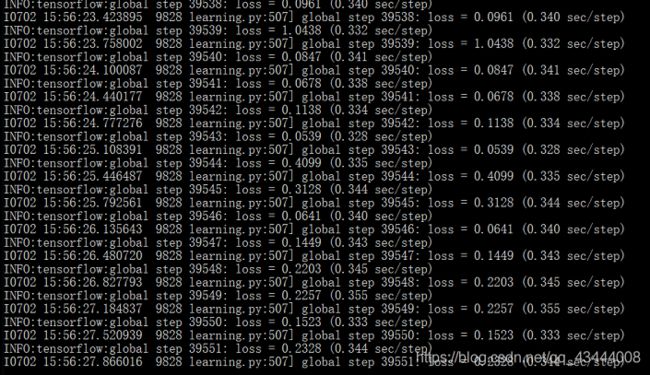
如果出现停电等导致训练中断,可以再次运行上述命令,训练会接着上次的checkpoint继续训练的。
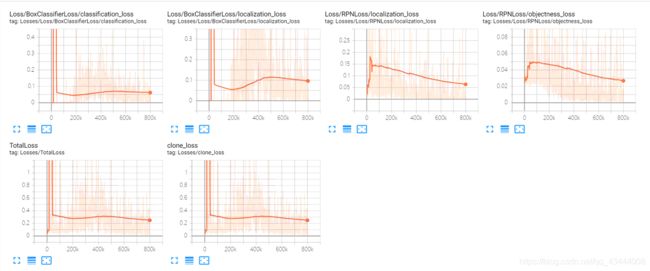
可视化:训练完成后,同样在命令行中定位到models\research\object_detection 文件夹下,运行
tensorboard --logdir=training
结果会返回一个网址,在浏览器中打开网址,可以看到训练过程中的损失等曲线。
测试:同样在命令行中定位到models\research\object_detection 文件夹下,运行:
python export_inference_graph.py \ --input_type image_tensor \ --pipeline_config_path training/faster_rcnn_resnet101_kitti.config \ --trained_checkpoint_prefix training/model.ckpt-31012 \ --output_directory face_inference_graph
其中的model.ckpt-31012,后面的数字应该是你的训练次数,如果没有寻训练完,则数字应该是training文件夹下model.ckpt-后面跟着的最大的数。输出的结果会在face_inference_graph文件夹下。
测试结果:注意相关文件和文件夹的修改
import time
start = time.time()
import numpy as np
import os
import six.moves.urllib as urllib
import sys
import tarfile
import tensorflow as tf
import zipfile
import cv2
from collections import defaultdict
from io import StringIO
from matplotlib import pyplot as plt
from PIL import Image
import pandas as pd
os.chdir('F:\\Users\\Administrator\\Anaconda3\\Lib\\site-packages\\tensorflow\\models\\research\\object_detection\\')

sys.path.append("..")
from object_detection.utils import label_map_util
from object_detection.utils import visualization_utils as vis_util

MODEL_NAME = 'face_inference_graph'
PATH_TO_CKPT = MODEL_NAME + '/frozen_inference_graph.pb'   #网络的结构和数据
PATH_TO_LABELS = os.path.join('data', 'face.pbtxt')
NUM_CLASSES = 1

detection_graph = tf.Graph()
with detection_graph.as_default():
  od_graph_def = tf.GraphDef()
  with tf.gfile.GFile(PATH_TO_CKPT, 'rb') as fid:
    serialized_graph = fid.read()
    od_graph_def.ParseFromString(serialized_graph)
    tf.import_graph_def(od_graph_def, name='')

# Loading label map
label_map = label_map_util.load_labelmap(PATH_TO_LABELS)
categories = label_map_util.convert_label_map_to_categories(label_map, max_num_classes=NUM_CLASSES, use_display_name=True)
category_index = label_map_util.create_category_index(categories)

# Helper code
def load_image_into_numpy_array(image):
  (im_width, im_height) = image.size
  return np.array(image.getdata()).reshape(
      (im_height, im_width, 3)).astype(np.uint8)

PATH_TO_TEST_IMAGES_DIR = r'F:\Users\Administrator\Anaconda3\Lib\site-packages\tensorflow\models\research\object_detection\test_images'
os.chdir(PATH_TO_TEST_IMAGES_DIR)
TEST_IMAGE_DIRS = os.listdir(PATH_TO_TEST_IMAGES_DIR)
# Size, in inches, of the output images.
IMAGE_SIZE = (12, 8)
output_image_path = ("output")
# 另外加了输出识别结果框的坐标,保存为.csv表格文件
output_csv_path = ("output_csv")

for image_folder in TEST_IMAGE_DIRS:
    with detection_graph.as_default():
      with tf.Session(graph=detection_graph) as sess:
        # Definite input and output Tensors for detection_graph
        image_tensor = detection_graph.get_tensor_by_name('image_tensor:0')
        # Each box represents a part of the image where a particular object was detected.
        detection_boxes = detection_graph.get_tensor_by_name('detection_boxes:0')
        detection_scores = detection_graph.get_tensor_by_name('detection_scores:0')
        detection_classes = detection_graph.get_tensor_by_name('detection_classes:0')
        num_detections = detection_graph.get_tensor_by_name('num_detections:0')
        TEST_IMAGE_PATHS = os.listdir(os.path.join(image_folder))
        os.makedirs(output_image_path+image_folder)
        data = pd.DataFrame()
        for image_path in TEST_IMAGE_PATHS:
          image = Image.open(image_folder + '//'+image_path)
          width, height = image.size
          image_np = load_image_into_numpy_array(image)
          image_np_expanded = np.expand_dims(image_np, axis=0)
          # Actual detection.
          (boxes, scores, classes, num) = sess.run(
              [detection_boxes, detection_scores, detection_classes, num_detections],
              feed_dict={image_tensor: image_np_expanded})
          # Visualization of the results of a detection.
          vis_util.visualize_boxes_and_labels_on_image_array(
              image_np,
              np.squeeze(boxes),
              np.squeeze(classes).astype(np.int32),
              np.squeeze(scores),
              category_index,
              use_normalized_coordinates=True,
              min_score_thresh=0.15,
              line_thickness=2)
          #write images
          cv2.imwrite(output_image_path+image_folder+'\\'+image_path.split('\\')[-1],image_np)

          s_boxes = boxes[scores > 0.5]
          s_classes = classes[scores > 0.5]
          s_scores=scores[scores>0.5]
          #write table
          #保存位置坐标结果到 .csv表格
          for i in range(len(s_classes)):
              newdata= pd.DataFrame(0, index=range(1), columns=range(7))
              newdata.iloc[0,0] = image_path.split("\\")[-1].split('.')[0]
              newdata.iloc[0,1] = s_boxes[i][0]*height  #ymin
              newdata.iloc[0,2] = s_boxes[i][1]*width     #xmin
              newdata.iloc[0,3] = s_boxes[i][2]*height    #ymax
              newdata.iloc[0,4] = s_boxes[i][3]*width     #xmax
              newdata.iloc[0,5] = s_scores[i]
              newdata.iloc[0,6] = s_classes[i]

              data = data.append(newdata)
          data.to_csv(output_csv_path+image_folder+'.csv',index = False)

end =  time.time()
print("Execution Time: ", end - start)
结果会输出一个文件夹,是经过检测后有标注的测试图片文件夹,还有一个测试图片坐标位置的.csv文件。
目前就这些,如果有什么问题,后续会继续补充。
补充:在训练的时候可能会出现Module Not Found Error Nomodule named pycocotools Windows的报错情况。这里需要下载安装一下pycocotools。可参考这里
成功后,需要把cocoapi/PythonApi中产生的pycocotools文件夹移动到object_detection文件夹下。