分布式全局唯一ID生成器(支持多种注册中心)的实现
在订单、支付的业务场景中,单号的生成规则与生成方式十分重要,实现有很多种,最简单的是基于mysql自增主键实现,方案优劣不多说,大家都清楚。我们今天实现一种分布式的、可扩展的并且在高并发场景能保证高性能的全局唯一ID生成方案(基于twitter的snowflake原理进行改编和扩展)。不多说直接上代码。
package com.zxm.adapter;

import org.apache.zookeeper.KeeperException;

/**
 * @Author zxm
 * @Description 注册适配器
 * @Date Create in 上午 9:45 2019/4/12 0012
 */
public interface RegistryAdapter {
    long getWorkerId() throws KeeperException, InterruptedException;
}
package com.zxm.adapter;
import lombok.extern.slf4j.Slf4j;
import org.apache.commons.lang3.StringUtils;
import org.apache.zookeeper.*;
import java.io.IOException;
/**
* @Author zxm
* @Description 基于zk的注册适配器
* @Date Create in 上午 9:44 2019/4/12 0012
*/
@Slf4j
public class ZkRegistryAdapter implements RegistryAdapter {
private static final int DEFAULT_SESSION_TIMEOUT = 3000;
private static final String ROOT_NODE = "/idWorker";
private static final int DEFAULT_MOD_VALUE = 1024;
private ZooKeeper zkClient;
public ZkRegistryAdapter(String connectString) throws Exception {
this(connectString, DEFAULT_SESSION_TIMEOUT);
}
public ZkRegistryAdapter(String connectString, int sessionTimeOut) throws Exception {
try {
zkClient = new ZooKeeper(connectString, sessionTimeOut, watchedEvent -> log.info("path:{}, state:{}", watchedEvent.getPath(), watchedEvent.getState()));
initRootNode(zkClient);
} catch (IOException e) {
log.error("zookeeper connect error,url:{},errorMsg:{}", connectString, e.getMessage());
throw e;
}
}
private void initRootNode(ZooKeeper zkClient) throws KeeperException, InterruptedException {
if (zkClient.exists(ROOT_NODE, false) == null) {
String path = zkClient.create(ROOT_NODE, "idWorker".getBytes(), ZooDefs.Ids.OPEN_ACL_UNSAFE, CreateMode.PERSISTENT);
if (StringUtils.isNotBlank(path)) {
log.info("root node init success,path:{}", path);
}
}
}
@Override
public long getWorkerId() throws KeeperException, InterruptedException {
String path = zkClient.create(ROOT_NODE + "/_", "idWorker".getBytes(), ZooDefs.Ids.OPEN_ACL_UNSAFE, CreateMode.EPHEMERAL_SEQUENTIAL);
if (StringUtils.isNotBlank(path)) {
log.info("node create success,path:{}", path);
return Long.valueOf(path.substring(ROOT_NODE.length() + 2, path.length())) % DEFAULT_MOD_VALUE;
}
return -1;
}
}package com.zxm.core;
import com.zxm.adapter.RegistryAdapter;
import lombok.extern.slf4j.Slf4j;
/**
* Id_Worker
* Id_Worker的结构如下(每部分用-分开):
* 0 - 0000000000 0000000000 0000000000 0000000000 0 - 00000 - 0000000000 - 0000000
* 1位标识,由于long基本类型在Java中是带符号的,最高位是符号位,正数是0,负数是1,所以id一般是正数,最高位是0
* 41位时间截(毫秒级),注意,41位时间截不是存储当前时间的时间截,而是存储时间截的差值(当前时间截 - 开始时间截)
* 得到的值),这里的的开始时间截,一般是我们的id生成器开始使用的时间,由我们程序来指定的(如下下面程序IdWorker类的startTime属性)。
* 41位的时间截,可以使用69年,年T = (1L << 41) / (1000L * 60 * 60 * 24 * 365) = 69
* 10位的机器位(最多支持1023台机器)
* 12位序列,毫秒内的计数,7位的计数顺序号支持每个节点每毫秒(同一机器,同一时间截)产生4096个ID序号
* 加起来刚好64位,为一个Long型。
*/
@Slf4j
public class IdWorker {
/**
* 开始时间截 (2018-01-01 00:00:00)
*/
private static final long twepoch = 1514736000000L;
/**
* 机器id所占的位数
*/
private static final long workerIdBits = 10L;
/**
* 序列在id中占的位数
*/
private static final long sequenceBits = 12L;
private static final long workerIdShift = sequenceBits;
/**
* 时间截向左移22位(12+10)
*/
private static final long timestampLeftShift = sequenceBits + workerIdBits;
/**
* 生成序列的掩码,这里为4095
*/
private static final long sequenceMask = -1L ^ (-1L << sequenceBits);
/**
* 工作机器ID(0~1023)
*/
private static long workerId;
/**
* 毫秒内序列(0~4095)
*/
private static long sequence = 0L;
/**
* 上次生成ID的时间截
*/
private static long lastTimestamp = -1L;
public IdWorker(RegistryAdapter registryAdapter) throws Exception {
if (null == registryAdapter) {
throw new Exception("registryAdapter init fail");
}
workerId = registryAdapter.getWorkerId();
log.info("GLOBAL_WORkER_ID INIT:" + workerId);
}
/**
* 获得下一个ID (该方法是线程安全的)
*
* @return id
*/
public synchronized long nextId() {
long timestamp = timeGen();
//如果当前时间小于上一次ID生成的时间戳,说明系统时钟回退过这个时候应当抛出异常
if (timestamp < lastTimestamp) {
throw new RuntimeException(
String.format("Clock moved backwards. Refusing to generate id for %d milliseconds", lastTimestamp - timestamp));
}
//如果是同一时间生成的,则进行毫秒内序列
if (lastTimestamp == timestamp) {
sequence = (sequence + 1) & sequenceMask;
//毫秒内序列溢出
if (sequence == 0) {
//阻塞到下一个毫秒,获得新的时间戳
timestamp = tilNextMillis(lastTimestamp);
}
}
//时间戳改变,毫秒内序列重置
else {
sequence = 0L;
}
//上次生成ID的时间截
lastTimestamp = timestamp;
//移位并通过或运算拼到一起组成64位的ID
return ((timestamp - twepoch) << timestampLeftShift) //
| (workerId << workerIdShift)
| exchangeSequence(sequence);
}
/**
* 阻塞到下一个毫秒,直到获得新的时间戳
*
* @param lastTimestamp 上次生成ID的时间截
* @return 当前时间戳
*/
protected static long tilNextMillis(long lastTimestamp) {
long timestamp = timeGen();
while (timestamp <= lastTimestamp) {
timestamp = timeGen();
}
return timestamp;
}
/**
* 返回以毫秒为单位的当前时间
*
* @return 当前时间(毫秒)
*/
protected static long timeGen() {
return System.currentTimeMillis();
}
/**
* 打乱自增序列
*
* @param sequence
* @return
* @since
*/
protected static long exchangeSequence(long sequence) {
String tmp = Long.toBinaryString(sequence | (1 << 12));
StringBuffer sb = new StringBuffer(tmp.substring(1));
long sqr = Long.parseLong(sb.reverse().toString(), 2) & sequenceMask;
return sqr;
}
}
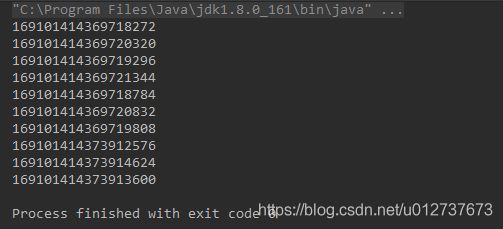
测试生成结果:
package com.zxm;

import com.zxm.adapter.RegistryAdapter;
import com.zxm.adapter.ZkRegistryAdapter;
import com.zxm.core.IdWorker;

/**
 * Hello world!
 */
public class App {
    public static void main(String[] args) throws Exception {
        RegistryAdapter registryAdapter = new ZkRegistryAdapter("10.10.4.17:2181", 3000);
        Thread.sleep(10 * 1000);
        IdWorker idWorker = new IdWorker(registryAdapter);

        for (int i = 0; i < 10; i++) {
            System.out.println(idWorker.nextId());
        }
    }
}
在spring项目中使用时配置如下:
@Configuration
 public class IdWorkerConfig {
     @Bean
     public RegistryAdapter registryAdapter() throws Exception{
         return new ZkRegistryAdapter("10.10.4.4:2181", 3000);
     }

     @Bean
     public IdWorker idWorker() throws Exception{
         return new IdWorker(registryAdapter());
     }
 }
测试用例:
public class IdWorkerTest{
    @Autowire
    private IdWorker idWorker;

    @Test
    public void test(){
        for (int i = 0; i < 10; i++) {
            System.out.println(idWorker.nextId());
        }
    }
}
执行结果同上。
项目地址:https://github.com/zhangxiaomin1993/id-worker
项目后续会逐渐完善,代码仅供大家学习参考!
