利用形态学检测边缘和角点
一、引言
形态学滤波器可以用于检测图像的不同特征,这一节,我们介绍利用形态学检测灰度级图像的边缘和角点。
二、原理介绍
形态学还是将图像的灰度级看成地理里面的“等高线”,亮的地方看成山峰,暗的地方看成低谷,中间部分就是峭壁。形态学中的腐蚀(eroded),会把山谷扩展,峭壁减少;相反的,膨胀(dilated)会把山谷减少,峭壁扩展。在两种情况下,中间(大块的山峰和低谷)不会改变太多。
利用形态学进行边界检测原理很简单,就是将一幅图片分别经过腐蚀和膨胀处理,然后图像相减,在进行门限处理,消除小的噪声。(当然也可以利用腐蚀或者膨胀后的图像和源图像相比,得到的边界会相对细些)当结构元素越大,得到的边界越粗。
利用形态学进行角点检测比较麻烦。角点检测分别使用十字角,菱形,X形,方形四种结构元素进行腐蚀和膨胀。(1)我们以方形图像为源图像介绍,第一步对图像进行结构元为十字角的膨胀,然后在进行结构元为菱形的腐蚀;第二步对源图像进行结构元为X形的膨胀,在进行结构元为方形的腐蚀。第一步的作用是检测直角角点,第二步的作用是检测斜45°的角点。
图1 源图像,图2 Dilate with a cross ,图3 Erode with a diamond,图4 Dilate with a X,图5 Erode with a square ,图6 Corner Image,图7 Corners on Image
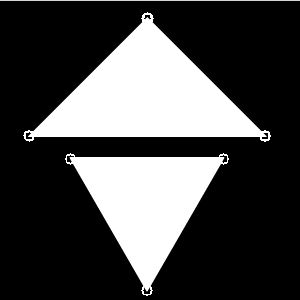
(2)选取等腰三角形和等边三角形作为源图像进行处理,可以看出与四个机构元处理的结果
图1 源图像,图2 Dilate with a cross ,图3 Erode with a diamond,图4 Dilate with a X,图5 Erode with a square ,图6 Corner Image,图7 Corners on Image
三、opencv函数介绍
头文件:#include
函数定义:
//! erodes the image (applies the local minimum operator)
CV_EXPORTS_W void erode( InputArray src, OutputArray dst, InputArray kernel,
                         Point anchor=Point(-1,-1), int iterations=1,
                         int borderType=BORDER_CONSTANT,
                         const Scalar& borderValue=morphologyDefaultBorderValue() );

//! dilates the image (applies the local maximum operator)
CV_EXPORTS_W void dilate( InputArray src, OutputArray dst, InputArray kernel,
                          Point anchor=Point(-1,-1), int iterations=1,
                          int borderType=BORDER_CONSTANT,
                          const Scalar& borderValue=morphologyDefaultBorderValue() );

//! applies an advanced morphological operation to the image
CV_EXPORTS_W void morphologyEx( InputArray src, OutputArray dst,
                                int op, InputArray kernel,
                                Point anchor=Point(-1,-1), int iterations=1,
                                int borderType=BORDER_CONSTANT,
                                const Scalar& borderValue=morphologyDefaultBorderValue() );
函数参数:
erode(腐蚀函数): InputArray src, 原图像
OutputArray dst, 结果输出图像
InputArray kernel, 结构元素
Point anchor=Point(-1,-1), 结构元素的原点
int iterations=1, 迭代次数
dilate(膨胀函数):InputArray src, 原图像
OutputArray dst, 结果输出图像
InputArray kernel, 结构元素
Point anchor=Point(-1,-1), 结构元素的原点
int iterations=1, 迭代次数
morphologyEx : InputArray src, 原图像
OutputArray dst, 结果输出图像
int op,cv::MORPH_OPEN(打开) cv::MORPH_CLOSE(关闭) cv::MORPH_GRADIENT(梯度)
InputArray kernel, 结构元素
Point anchor=Point(-1,-1), 结构元素的原点
int iterations=1, 迭代次数
四、例程
程序:
morphoFeatures.h
#if !defined MORPHOF
#define MORPHOF

#include
#include

class MorphoFeatures {

  private:

	  // threshold to produce binary image
	  int threshold;
	  // structuring elements used in corner detection
	  cv::Mat cross;
	  cv::Mat diamond;
	  cv::Mat square;
	  cv::Mat x;

	  void applyThreshold(cv::Mat& result) {

          // Apply threshold on result
		  if (threshold>0)
			cv::threshold(result, result, threshold, 255, cv::THRESH_BINARY_INV);
	  }

  public:

	  MorphoFeatures() : threshold(-1), cross(5,5,CV_8U,cv::Scalar(0)),
		                                diamond(5,5,CV_8U,cv::Scalar(1)),
										square(5,5,CV_8U,cv::Scalar(1)),
										x(5,5,CV_8U,cv::Scalar(0)){

		  // Creating the cross-shaped structuring element
		  for (int i=0; i<5; i++) {

			  cross.at(2,i)= 1;
			  cross.at(i,2)= 1;
		  }

		  // Creating the diamond-shaped structuring element
		  diamond.at(0,0)= 0;
		  diamond.at(0,1)= 0;
		  diamond.at(1,0)= 0;
		  diamond.at(4,4)= 0;
		  diamond.at(3,4)= 0;
		  diamond.at(4,3)= 0;
		  diamond.at(4,0)= 0;
		  diamond.at(4,1)= 0;
		  diamond.at(3,0)= 0;
		  diamond.at(0,4)= 0;
		  diamond.at(0,3)= 0;
		  diamond.at(1,4)= 0;

		  // Creating the x-shaped structuring element
		  for (int i=0; i<5; i++) {

			  x.at(i,i)= 1;
			  x.at(4-i,i)= 1;
		  }
	  }

	  void setThreshold(int t) {

		  threshold= t;
	  }

	  int getThreshold() const {

		  return threshold;
	  }

	  cv::Mat getEdges(const cv::Mat &image) {

		  // Get the gradient image
		  cv::Mat result;
		  cv::morphologyEx(image,result,cv::MORPH_GRADIENT,cv::Mat());

          // Apply threshold to obtain a binary image
		  applyThreshold(result);

		  return result;
	  }

	  cv::Mat getCorners(const cv::Mat &image) {

		  cv::Mat result;

		  // Dilate with a cross
		  cv::dilate(image,result,cross);

		  // Erode with a diamond
		  cv::erode(result,result,diamond);

		  cv::Mat result2;
		  // Dilate with a X
		  cv::dilate(image,result2,x);

		  // Erode with a square
		  cv::erode(result2,result2,square);

		  // Corners are obtained by differencing
		  // the two closed images
		  cv::absdiff(result2,result,result);

          // Apply threshold to obtain a binary image
		  applyThreshold(result);

		  return result;
	  }

	  void drawOnImage(const cv::Mat& binary, cv::Mat& image) {

		 // cv::Mat_::const_iterator it= binary.begin();
		//  cv::Mat_::const_iterator itend= binary.end();
		   cv::Mat_::const_iterator it= binary.begin();
		   cv::Mat_::const_iterator itend= binary.end();
		  // for each pixel
		  for (int i=0; it!= itend; ++it,++i) {
			  if (!*it)
				  cv::circle(image,cv::Point(i%image.step,i/image.step),5,cv::Scalar(255,0,0));
		  }
	  }
};


#endif
main.cpp
#include
#include
#include
#include "morphoFeatures.h"

int main()
{
	// Read input image
	cv::Mat image= cv::imread("../building.jpg",0);
	if (!image.data)
		return 0;

    // Display the image
	cv::namedWindow("Image");
	cv::imshow("Image",image);

	// Create the morphological features instance
	MorphoFeatures morpho;
	morpho.setThreshold(40);

	// Get the edges
	cv::Mat edges;
	edges= morpho.getEdges(image);

    // Display the edge image
	cv::namedWindow("Edge Image");
	cv::imshow("Edge Image",edges);

	// Get the corners
    morpho.setThreshold(-1);
	cv::Mat corners;
	corners= morpho.getCorners(image);
	cv::morphologyEx(corners,corners,cv::MORPH_TOPHAT,cv::Mat());
    cv::threshold(corners, corners, 40, 255, cv::THRESH_BINARY_INV);

    // Display the corner image
	cv::namedWindow("Corner Image");
	cv::imshow("Corner Image",corners);

    // Display the corner on the image
	morpho.drawOnImage(corners,image);
	cv::namedWindow("Corners on Image");
	cv::imshow("Corners on Image",image);

	cv::waitKey();

	return 0;
}
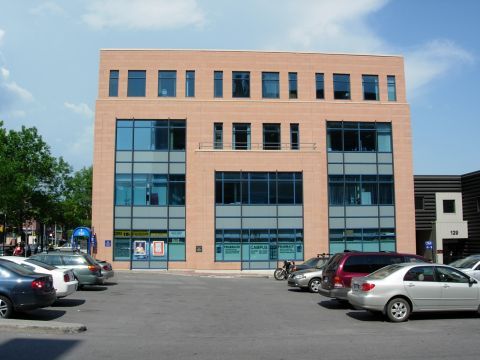
源图像 building.jpg
Edge Image.jpg
Corner Image.jpg
Corners on Image.jpg
参考资料:opencv cookbook 2 chapter 5
参考资料下载:http://download.csdn.net/detail/skeeee/5311512
程序下载:http://download.csdn.net/detail/skeeee/5584643


