基于yolov3的铁轨缺陷/裂纹检测
一、前言
基于上一篇的SSD对工件裂纹检测之后,又推出的准确率更高的模型yolov3。SSD虽然速度快,但是准确率实在不高,对非裂纹的区域容易错检。后面提出的RetinaNet和yolov3无论是在速度上还是准确率上都非常棒,准确率已经超过了Faster RCNN。在这里就以yolov3为准,进行裂纹的检测定位。
二、yolov3算法
yolov3是在yolov2和yolov1的基础上进行改进的,关于yolov2和yolov1算法请参考:
yolov1:
https://blog.csdn.net/hrsstudy/article/details/70305791
https://blog.csdn.net/zhangjunp3/article/details/80421814
yolov2:
https://blog.csdn.net/u014380165/article/details/77961414
其中yolov2是在yolov1的基础上进行改进的。
关于yolov3,写一下自己的理解。相比于yolov2,使用多尺度feature map上的特征进行预测,不再是单个feature map,使用DarkNet53而不是DarkNet19。
类别预测方面主要是将原来的单标签分类改进为多标签分类,因此网络结构上就将原来用于单标签多分类的softmax层换成用于多标签多分类的逻辑回归层。首先说明一下为什么要做这样的修改,原来分类网络中的softmax层都是假设一张图像或一个object只属于一个类别,但是在一些复杂场景下,一个object可能属于多个类,比如你的类别中有woman和person这两个类,那么如果一张图像中有一个woman,那么你检测的结果中类别标签就要同时有woman和person两个类,这就是多标签分类,需要用逻辑回归层来对每个类别做二分类。
逻辑回归层主要用到sigmoid函数,该函数可以将输入约束在0到1的范围内,因此当一张图像经过特征提取后的某一类输出经过sigmoid函数约束后如果大于0.5,就表示属于该类。
YOLO v3采用多个scale融合的方式做预测。原来的YOLO v2有一个层叫:passthrough layer,假设最后提取的feature map的size是 13 ∗ 13 13*13 13∗13,那么这个层的作用就是将前面一层的 26 ∗ 26 26*26 26∗26的feature map和本层的 13 ∗ 13 13*13 13∗13的feature map进行连接,有点像ResNet。当时这么操作也是为了加强YOLO算法对小目标检测的精确度。这个思想在YOLO v3中得到了进一步加强,在YOLO v3中采用类似FPN的upsample和融合做法(最后融合了3个scale,其他两个scale的大小分别是2626和5252),在多个scale的feature map上做检测,对于小目标的检测效果提升还是比较明显的。前面提到过在YOLO v3中每个grid cell预测3个bounding box,看起来比YOLO v2中每个grid cell预测5个bounding box要少,其实不是!因为YOLO v3采用了多个scale的特征融合,所以boundign box的数量要比之前多很多,以输入图像为 416 ∗ 416 416*416 416∗416为例: ( 13 ∗ 13 + 26 ∗ 26 + 52 ∗ 52 ) ∗ 3 (13*13+26*26+52*52)*3 (13∗13+26∗26+52∗52)∗3和 13 ∗ 13 ∗ 5 13*13*5 13∗13∗5相比哪个更多应该很清晰了。
关于bounding box的初始尺寸还是采用YOLO v2中的k-means聚类的方式来做,这种先验知识对于bounding box的初始化帮助还是很大的,毕竟过多的bounding box虽然对于效果来说有保障,但是对于算法速度影响还是比较大的。作者在COCO数据集上得到的9种聚类结果: ( 10 ∗ 13 ) ; ( 16 ∗ 30 ) ; ( 33 ∗ 23 ) ; ( 30 ∗ 61 ) ; ( 62 ∗ 45 ) ; ( 59 ∗ 119 ) ; ( 116 ∗ 90 ) ; ( 156 ∗ 198 ) ; ( 373 ∗ 326 ) (10*13); (16*30); (33*23); (30*61); (62*45); (59*119); (116*90); (156*198); (373*326) (10∗13);(16∗30);(33∗23);(30∗61);(62∗45);(59∗119);(116∗90);(156∗198);(373∗326),这应该是按照输入图像的尺寸是 416 ∗ 416 416*416 416∗416计算得到的。
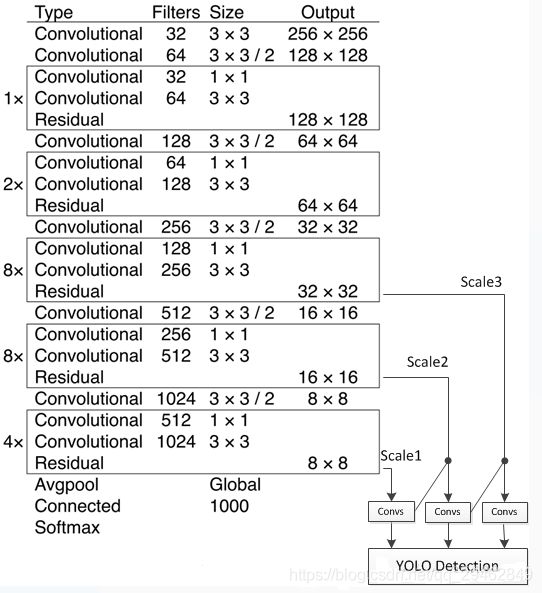
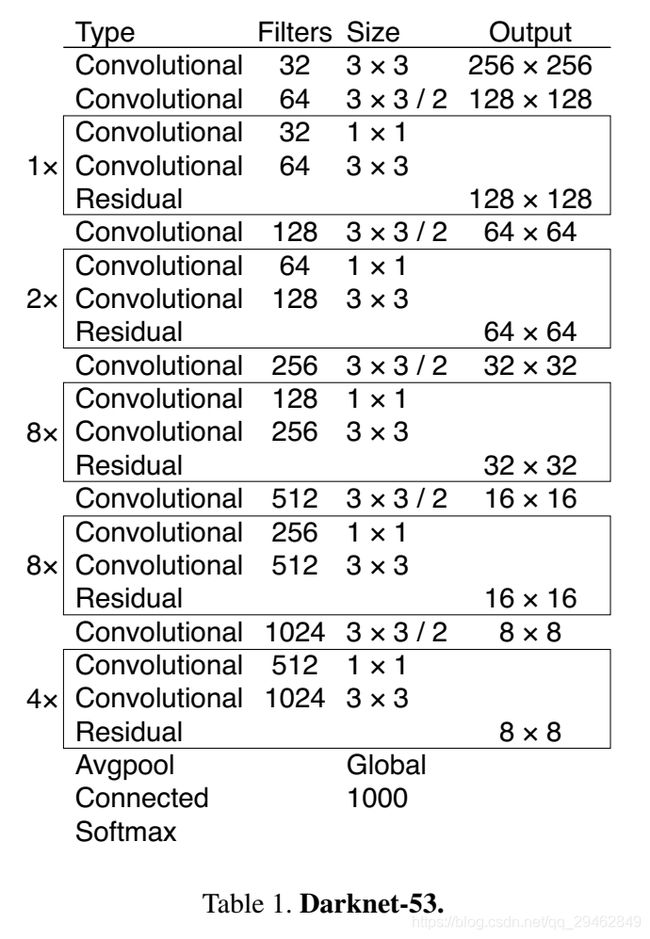
网络结构(Darknet-53)一方面基本采用全卷积(YOLO v2中采用pooling层做feature map的sample,这里都换成卷积层来做了),另一方面引入了residual结构(YOLO v2中还是类似VGG那样直筒型的网络结构,层数太多训起来会有梯度问题,所以Darknet-19也就19层,因此得益于ResNet的residual结构,训深层网络难度大大减小,因此这里可以将网络做到53层,精度提升比较明显)。Darknet-53只是特征提取层,源码中只使用了pooling层前面的卷积层来提取特征,因此multi-scale的特征融合和预测支路并没有在该网络结构中体现,具体信息可以看源码:https://github.com/pjreddie/darknet/blob/master/cfg/yolov3.cfg。
预测支路采用的也是全卷积的结构,其中最后一个卷积层的卷积核个数是255,是针对COCO数据集的80类:3*(80+4+1)=255,3表示一个grid cell包含3个bounding box,4表示框的4个坐标信息,1表示objectness score。模型训练方面还是采用原来YOLO v2中的multi-scale training。
三、数据集
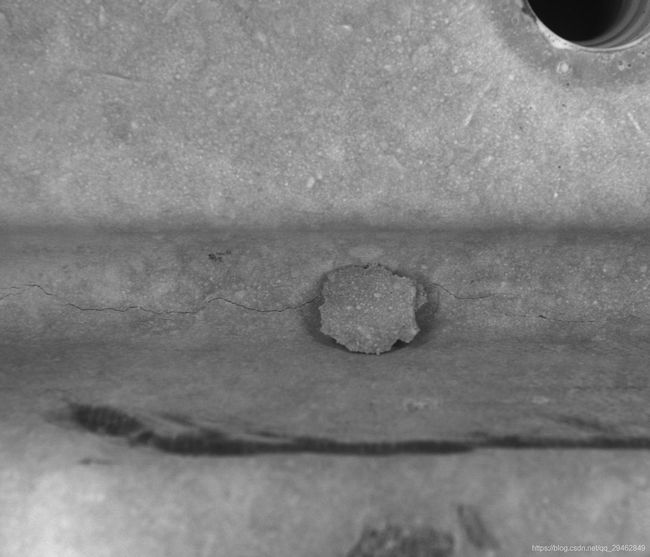
训练数据集有1000幅带裂纹的图像,30k正常图像,在这里,由于训练数据背景和前景差别还是挺大,而且状况比较复杂,不适合对整幅场景图像进行识别,在这里选择object detection方式来进行定位识别。


四、制作数据
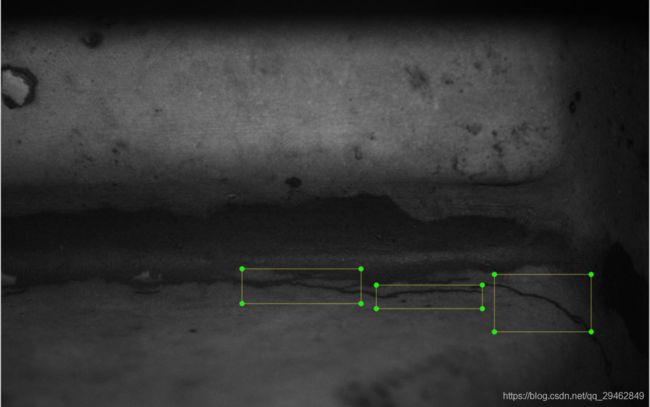
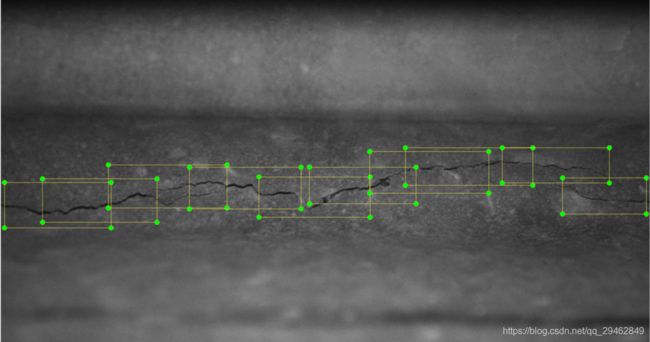
其实在一定程度上那些大佬们推出的模型没有啥问题,质量都是杠杠的,后期需要自己调节参数来适应自己的工况,还有一部分很重要就是数据集的制作。这里选用labelImg来制作数据,制作数据的时候,画框不能太大,也不能太小,太大的话,一幅图像采集的数据比较少,而且框内好多区域都是背景;太小的话,框内的特征经过网络处理后,会和背景上的杂质斑点相同,不能很好区分。在采集数据的时候一定要把前景和背景分开,这样模型就会记得背景和前景是怎么样的。
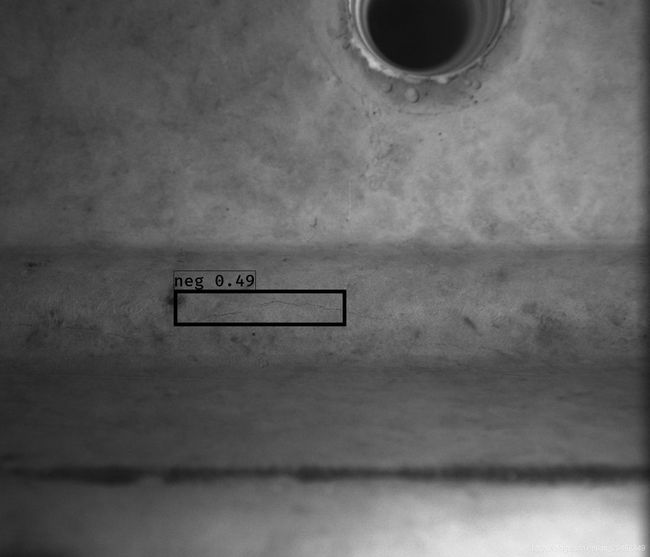
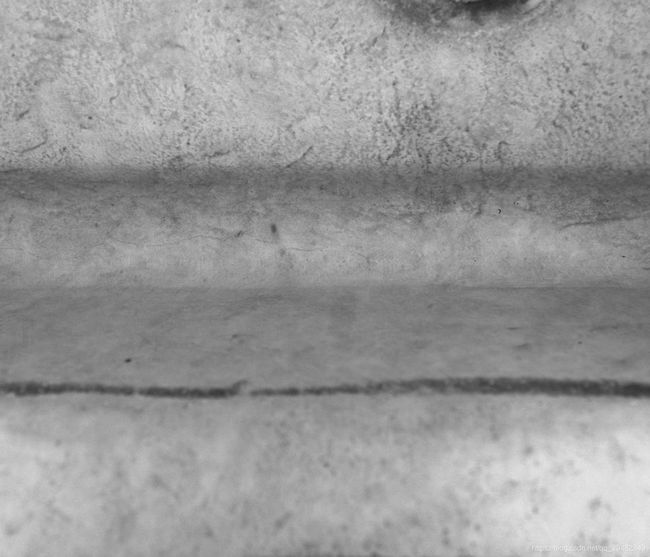
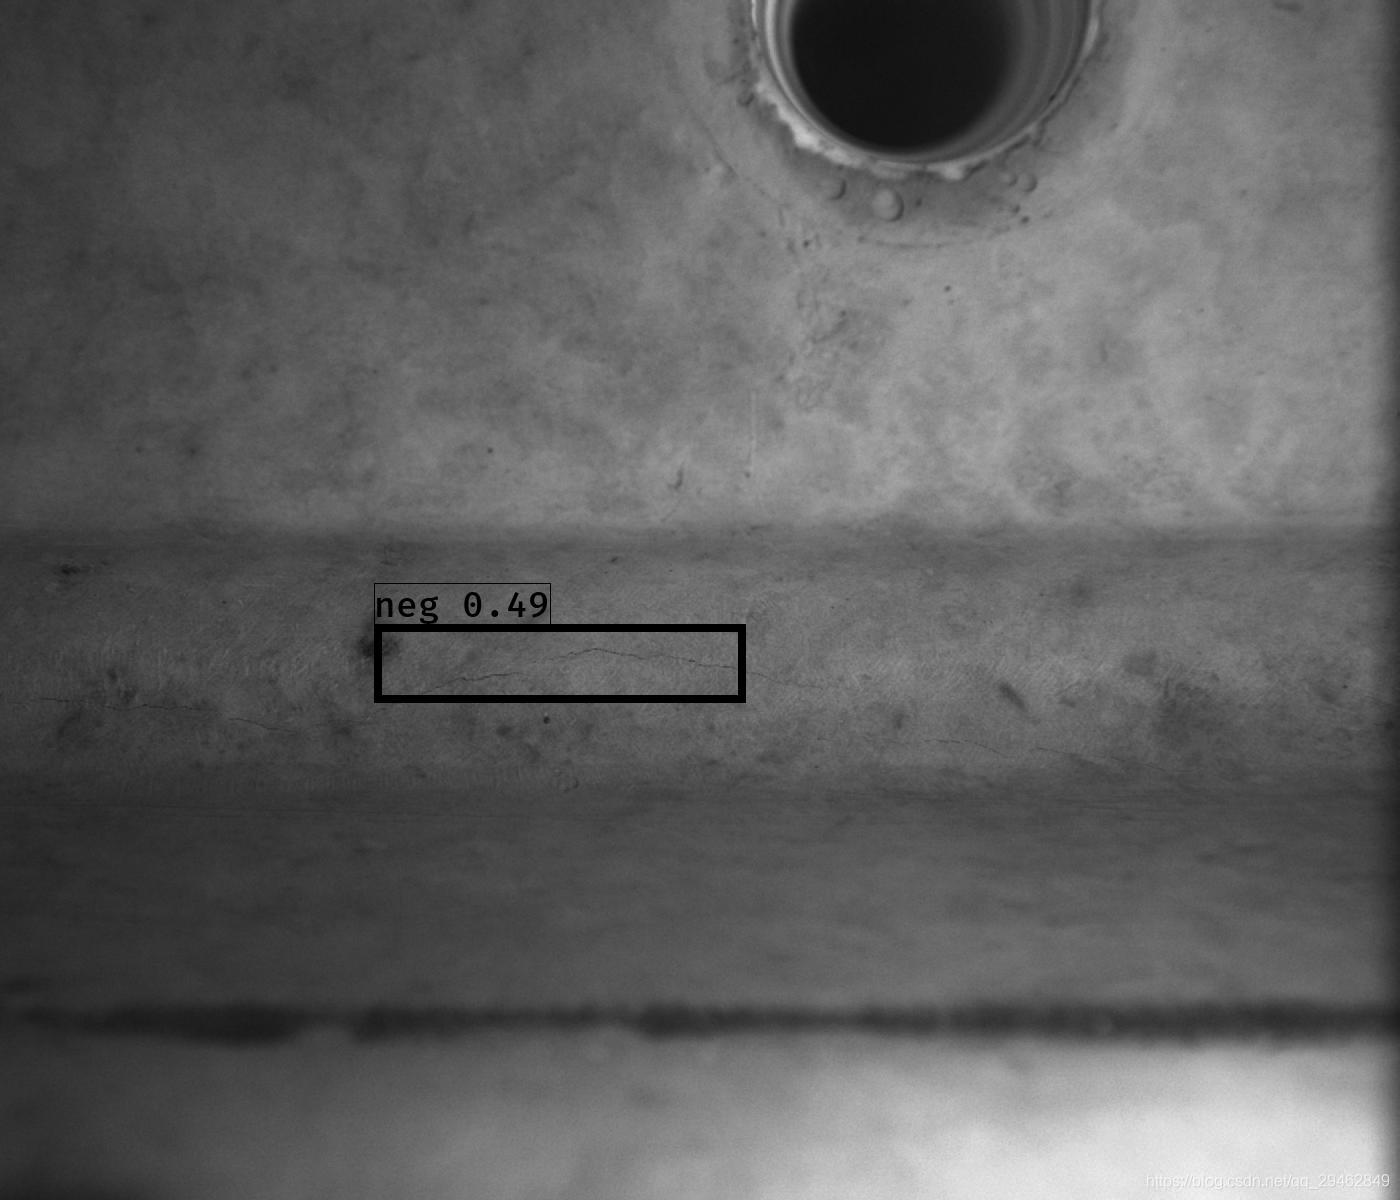
对于一些特别不明显的特征,如下图所示,此时模型已不能很好区分背景和前景(裂纹),这时就可直接把该图像删除,不加入到训练数据中。如果加入到训练中,训练后的模型将不能很好区分背景和前景,因为实在太相似了。
当然,为了增强多点数据,可以在制作数据的时候,把检测框画稠密些,如下图所示:
五、开始训练
建立VOCdevkit/VOC2007/文件夹,在train.py的同级目录,内部生成三个文件夹,Annotations、ImageSets、JPEGImages。把.jpg文件放到JPEGImage中,把.xml文件放到Annotations文件夹中。
labelImg生成的是.jpg文件和.xml文件,这里还需要生成txt文件,转换成标准的voc数据格式。
使用make_data.py
import os
import random

trainval_percent = 0.95
train_percent = 0.95
xmlfilepath = './VOCdevkit/VOC2007/Annotations'
txtsavepath = './VOCdevkit/VOC2007/ImageSets/Main'
total_xml = os.listdir(xmlfilepath)

num=len(total_xml)
list=range(num)
tv=int(num*trainval_percent)
tr=int(tv*train_percent)
trainval= random.sample(list,tv)
train=random.sample(trainval,tr)

ftrainval = open(txtsavepath+'/trainval.txt', 'w')
ftest = open(txtsavepath+'/test.txt', 'w')
ftrain = open(txtsavepath+'/train.txt', 'w')
fval = open(txtsavepath+'/val.txt', 'w')

for i  in list:
    name=total_xml[i][:-4]+'\n'
    if i in trainval:
        ftrainval.write(name)
        if i in train:
            ftrain.write(name)
        else:
            fval.write(name)
    else:
        ftest.write(name)

ftrainval.close()
ftrain.close()
fval.close()
ftest .close()
生成VOC格式的数据之后,还需要将其转换成coco数据格式。
转换代码voc_annotation.py如下所示:
# _*_ coding:utf-8 _*_
import xml.etree.ElementTree as ET
from os import getcwd

sets=[('2007', 'train'), ('2007', 'val'), ('2007', 'test')]

classes = ["neg", "bicycle", "bird", "boat", "bottle", "bus", "car", "cat", "chair", "cow", "diningtable", "dog", "horse", "motorbike", "person", "pottedplant", "sheep", "sofa", "train", "tvmonitor"]
#这个类别可以修改成自己的类别,比如我把第一项改成了‘neg’。
def convert_annotation(year, image_id, list_file):
    in_file = open('VOCdevkit/VOC%s/Annotations/%s.xml'%(year, image_id),encoding='UTF-8')
    tree=ET.parse(in_file)
    root = tree.getroot()

    for obj in root.iter('object'):
        difficult = obj.find('difficult').text
        cls = obj.find('name').text
        if cls not in classes or int(difficult)==1:
            continue
        cls_id = classes.index(cls)
        xmlbox = obj.find('bndbox')
        b = (int(xmlbox.find('xmin').text), int(xmlbox.find('ymin').text), int(xmlbox.find('xmax').text), int(xmlbox.find('ymax').text))
        list_file.write(" " + ",".join([str(a) for a in b]) + ',' + str(cls_id))

# wd = getcwd()
wd='F:/image/data'#根据自己的路径进行修改,这个地方同样也要放训练数据

for year, image_set in sets:
    image_ids = open('VOCdevkit/VOC%s/ImageSets/Main/%s.txt'%(year, image_set)).read().strip().split()
    list_file = open('%s_%s.txt'%(year, image_set), 'w')
    for image_id in image_ids:
        list_file.write('%s/VOCdevkit/VOC%s/JPEGImages/%s.jpg'%(wd, year, image_id))
        convert_annotation(year, image_id, list_file)
        list_file.write('\n')
    list_file.close()
运行改代码后会生成三个txt文件,分别对应train.txt、test.txt、val.txt。
当生成这三个文件后,可以直接运行train.py,开始训练,注意训练的时候调节好一些超参数,包括batch_size、epochs、输入图像的大小等。
def _main():
    annotation_path = '2007_train.txt'#train.txt文件,用来表示数据的信息
    log_dir = 'logs/000/'#模型保存的地方
    classes_path = 'model_data/voc_classes.txt'#分的类别
    anchors_path = 'model_data/yolo_anchors.txt'#anchor的定义
    class_names = get_classes(classes_path)
    num_classes = len(class_names)
    anchors = get_anchors(anchors_path)

    input_shape = (416,416) # multiple of 32, hw

    is_tiny_version = len(anchors)==6 # default setting
    if is_tiny_version:
        model = create_tiny_model(input_shape, anchors, num_classes,
            freeze_body=2, weights_path='model_data/tiny_yolo_weights.h5')
    else:
        model = create_model(input_shape, anchors, num_classes,
            freeze_body=2, weights_path='model_data/yolo.h5') # make sure you know what you freeze

    logging = TensorBoard(log_dir=log_dir)
    checkpoint = ModelCheckpoint(log_dir + 'ep{epoch:03d}-loss{loss:.3f}-val_loss{val_loss:.3f}.h5',
        monitor='val_loss', save_weights_only=True, save_best_only=True, period=3)
    reduce_lr = ReduceLROnPlateau(monitor='val_loss', factor=0.1, patience=3, verbose=1)
    early_stopping = EarlyStopping(monitor='val_loss', min_delta=0, patience=10, verbose=1)

    val_split = 0.15#在训练集中划分多少验证集
    with open(annotation_path) as f:
        lines = f.readlines()
    np.random.seed(10101)
    np.random.shuffle(lines)
    np.random.seed(None)
    num_val = int(len(lines)*val_split)
    num_train = len(lines) - num_val

    # Train with frozen layers first, to get a stable loss.
    # Adjust num epochs to your dataset. This step is enough to obtain a not bad model.
    if True:
        # sgd = optimizers.SGD(lr=0.001, decay=1e-6, momentum=0.9, nesterov=True)
        model.compile(optimizer=Adam(lr=1e-3), loss={
            # use custom yolo_loss Lambda layer.
            'yolo_loss': lambda y_true, y_pred: y_pred})
        # model.compile(optimizer=sgd, loss={
        #     # use custom yolo_loss Lambda layer.
        #     'yolo_loss': lambda y_true, y_pred: y_pred})
        batch_size = 4
        print('Train on {} samples, val on {} samples, with batch size {}.'.format(num_train, num_val, batch_size))
        model.fit_generator(data_generator_wrapper(lines[:num_train], batch_size, input_shape, anchors, num_classes),
                steps_per_epoch=max(1, num_train//batch_size),
                validation_data=data_generator_wrapper(lines[num_train:], batch_size, input_shape, anchors, num_classes),
                validation_steps=max(1, num_val//batch_size),
                epochs=15,
                initial_epoch=0,
                callbacks=[logging, checkpoint])
        model.save_weights(log_dir + 'trained_weights_stage_1.h5')

    # Unfreeze and continue training, to fine-tune.
    # Train longer if the result is not good.
    if True:
        # sgd = optimizers.SGD(lr=0.0001, decay=1e-6, momentum=0.9, nesterov=True)
        for i in range(len(model.layers)):
            model.layers[i].trainable = True
        model.compile(optimizer=Adam(lr=1e-4), loss={'yolo_loss': lambda y_true, y_pred: y_pred}) # recompile to apply the change
        # model.compile(optimizer=sgd, loss={'yolo_loss': lambda y_true, y_pred: y_pred})
        print('Unfreeze all of the layers.')

        batch_size = 2 # note that more GPU memory is required after unfreezing the body
        print('Train on {} samples, val on {} samples, with batch size {}.'.format(num_train, num_val, batch_size))
        model.fit_generator(data_generator_wrapper(lines[:num_train], batch_size, input_shape, anchors, num_classes),
            steps_per_epoch=max(1, num_train//batch_size),
            validation_data=data_generator_wrapper(lines[num_train:], batch_size, input_shape, anchors, num_classes),
            validation_steps=max(1, num_val//batch_size),
            epochs=40,
            initial_epoch=15,
            callbacks=[logging, checkpoint, reduce_lr, early_stopping])
        model.save_weights(log_dir + 'trained_weights_final.h5')

    # Further training if needed.
六、测试模型
把训练好的模型,放到model_data文件夹中,并改成把名字改成yolo.h5。然后运行yolo_viedo.py文件,最终会把结果图像都保存到指定文件夹中。
import sys
import argparse
from yolo import YOLO, detect_video
from PIL import Image
import glob
import os
def detect_img(yolo):
with open("result_11_25_2.txt","w") as f:
k = 0
for i in range(50803):
path = 'F:/比赛事宜/裂纹识别/复赛数据/challengedataset-semifinal/test/test/{}.jpg'.format(i + 1)
img = Image.open(path)
print(path)
img, boxes, scores,classes = yolo.detect_image(img)
print(boxes)
print("类别为:",classes)
print(str(i)+".jpg")
if (len(boxes) > 0):
if(len(boxes)==1):
w=boxes[0][3]-boxes[0][1]
h=boxes[0][2]-boxes[0][0]
ratio=w/h
print(ratio)
if(boxes[0][0]<200):#此步骤是为了抑制检测出的圆管
img.save('F:/image/test_result_11_26/{}.jpg'.format(i + 1))
f.write("{}.jpg {}\n".format(i + 1, 0))
k = k + 1
# elif(w*h<10000):#此步骤是为了抑制检测出较小检测框
# img.save('F:/image/test_result_11_25/{}.jpg'.format(i + 1))
# f.write("{}.jpg {}\n".format(i + 1, 0))
# k = k + 1
else:
img.save('F:/image/test_result_11_26/not/{}.jpg'.format(i + 1))
f.write("{}.jpg {}\n".format(i + 1, 1))
k = k + 1
else:
img.save('F:/image/test_result_11_26/not/{}.jpg'.format(i + 1))
f.write("{}.jpg {}\n".format(i + 1, 1))
k = k + 1
else:
img.save('F:/image/test_result_11_26/{}.jpg'.format(i + 1))
f.write("{}.jpg {}\n".format(i + 1,0))
k = k + 1
print(k)
yolo.close_session()
#这个代码可以进行单张图像的显示
# def detect_img(yolo):
# while True:
# img = input('Input image filename:')
# try:
# image = Image.open(img)
# except:
# print('Open Error! Try again!')
# continue
# else:
# r_image = yolo.detect_image(image)
# r_image.show()
# yolo.close_session()
FLAGS = None
if __name__ == '__main__':
# class YOLO defines the default value, so suppress any default here
parser = argparse.ArgumentParser(argument_default=argparse.SUPPRESS)
'''
Command line options
'''
parser.add_argument(
'--model', type=str,
help='path to model weight file, default ' + YOLO.get_defaults("model_path")
)
parser.add_argument(
'--anchors', type=str,
help='path to anchor definitions, default ' + YOLO.get_defaults("anchors_path")
)
parser.add_argument(
'--classes', type=str,
help='path to class definitions, default ' + YOLO.get_defaults("classes_path")
)
parser.add_argument(
'--gpu_num', type=int,
help='Number of GPU to use, default ' + str(YOLO.get_defaults("gpu_num"))
)
parser.add_argument(
'--image', default=True, action="store_true",
help='Image detection mode, will ignore all positional arguments'
)
'''
Command line positional arguments -- for video detection mode
'''
parser.add_argument(
"--input", nargs='?', type=str,required=False,default='1.mp4',
help = "Video input path"
)
parser.add_argument(
"--output", nargs='?', type=str, required=False,default="11.mp4",
help = "[Optional] Video output path"
)
 FLAGS = parser.parse_args()
if FLAGS.image:
"""
Image detection mode, disregard any remaining command line arguments
"""
print("Image detection mode")
if "input" in FLAGS:
print(" Ignoring remaining command line arguments: " + FLAGS.input + "," + FLAGS.output)
detect_img(YOLO(**vars(FLAGS)))
elif "input" in FLAGS:
detect_video(YOLO(**vars(FLAGS)), FLAGS.input, FLAGS.output)
else:
print("Must specify at least video_input_path. See usage with --help.")
七、源代码
本博文使用的源码:https://download.csdn.net/download/qq_29462849/10825269
本博文使用的数据:https://download.csdn.net/download/qq_29462849/10825309
把数据解压后,把VOC2007文件夹放到源码中的VOCdevkit文件夹中。
除此之外,还有两个模型,yolov3.h5和yolov3.weights,下载好两个模型之后,将其放在train.py文件的同级目录下,然后就可训练和预测。
八、一些总结
这个项目其实是一个比赛型的项目,最终的结果在50k幅图像上,准确率98.57%,top8,当然,这里面还是有技巧的,不是直接跑通代码就ok的。
下面来说下项目总结吧!
1、数据越多越好,数据越具有代表性越好。实验测试,从500幅增加到2000多幅训练图像,准确率在不断提升,更多的数据总是好的。
2、数据越有代表性越好,做数据的时候进行选择比较有代表性的裂纹,避免采集那些和背景差不多的裂纹。
3、生成的数据框不要太大,因为太大的数据框,内部包含的裂纹占的比例就会小很多。
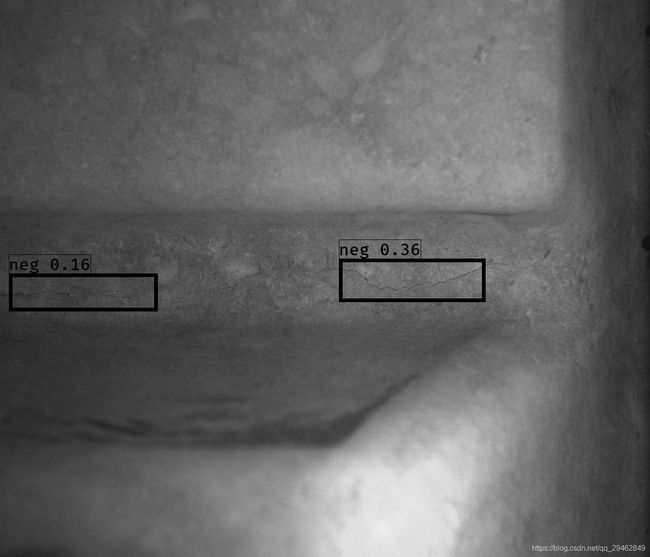
上面两幅图像中,均被误分,这个时候可以基于这些误分的图像做一些假数据,如下图所示,把裂纹直接贴到容易错分的图像上,并标注其位置,这样就可以把这些易错分的图像中的杂质斑点被强制性的转换为背景,加入到训练中,使其在推理阶段不会再犯类似的错误。


5、在比赛中还用到了RetinaNet,这样,两个网络关注的点不相同,可以做个并集,这样可以提升准确率,把那些容易分错的图像给过滤掉。
