1118 - 阅读iOS Core Animation: Advanced Techniques中文译本(下)动画
iOS Core Animation: Advanced Techniques中文译本
原文链接:https://zsisme.gitbooks.io/ios-/content/index.html
7. 隐式动画
● 动画是Core Animation库一个非常显著的特性,我们先来讨论框架自动完成的隐式动画(除非你明确禁用了这个功能)。
7.1事务
● Core Animation基于一个假设,说屏幕上的任何东西都可以(或者可能)做动画。动画并不需要你在Core Animation中手动打开,相反需要明确地关闭,否则他会一直存在。
● 当你改变
CALayer的一个可做动画的属性,它并不能立刻在屏幕上体现出来。相反,它是从先前的值平滑过渡到新的值。这一切都是默认的行为,你不需要做额外的操作。● 这其实就是所谓的隐式动画。之所以叫隐式是因为我们并没有指定任何动画的类型。我们仅仅改变了一个属性,然后Core Animation来决定如何并且何时去做动画。Core Animaiton同样支持显式动画,下章详细说明。
● 实际上 动画执行的时间 取决于当前事务的设置,动画类型取决于图层行为。
事务实际上是Core Animation用来包含一系列属性动画集合的机制,任何用 “指定事务” 去改变“可以做成动画的”图层属性都不会立刻发生变化,而是当事务一旦提交的时候开始用一个动画过渡到新值,而不是跳变。
● 事务是通过
CATransaction类来做管理,这个类的设计有些奇怪,不像你从它的命名预期的那样去管理一个简单的事务,而是管理了一叠你不能访问的事务。CATransaction没有属性或者实例方法,并且也不能用+alloc和-init方法创建它。但是可以用+begin和+commit分别来入栈或者出栈。● 任何“可以做动画的”图层属性都会被添加到栈顶的事务,你可以通过
+setAnimationDuration:方法设置当前事务的动画时间,或者通过+animationDuration方法来获取值(默认0.25秒)。● Core Animation在每个run loop周期中自动开始一次新的事务(run loop是iOS负责收集用户输入,处理定时器或者网络事件并且重新绘制屏幕的东西),即使你不显式的用
[CATransaction begin]开始一次事务,任何在一次run loop循环中属性的改变都会被集中起来,然后做一次0.25秒的动画。● 我们当然可以用当前事务的
+setAnimationDuration:方法来修改动画时间,但在这里我们首先起一个新的事务,于是修改时间就不会有别的副作用。因为修改当前事务的时间可能会导致同一时刻 别的动画(如屏幕旋转),所以最好还是在调整动画之前压入一个新的事务。修改动画时间关键代码:
- (IBAction)changeColor
{
    //begin a new transaction
    [CATransaction begin];
    //set the animation duration to 1 second
    [CATransaction setAnimationDuration:1.0];
    //randomize the layer background color
    CGFloat red = arc4random() / (CGFloat)INT_MAX;
    CGFloat green = arc4random() / (CGFloat)INT_MAX;
    CGFloat blue = arc4random() / (CGFloat)INT_MAX;
    self.colorLayer.backgroundColor = [UIColor colorWithRed:red green:green blue:blue alpha:1.0].CGColor;
    //commit the transaction
    [CATransaction commit];
}
●
UIView有两个这样的动画方法,+beginAnimations:context:和+commitAnimations。 和CATransaction的+begin和+commit方法类似。实际上在
+beginAnimations:context:和+commitAnimations之间所有视图或者图层属性的改变而做的动画都是由于设置了CATransaction的原因。
CATransaction的+begin和+commit方法在+animateWithDuration:animations:内部自动调用,这样block中所有属性的改变都会被事务所包含。这样也可以避免开发者由于对+begin和+commit匹配的失误造成的风险。● 在iOS4中,苹果对UIView添加了一种基于block的动画方法:
+animateWithDuration:animations:。这样写对做一堆的属性动画在语法上会更加简单,但实质上它们都是在做同样的事情。
7.2 完成块
● 基于
UIView的block的动画允许你在动画结束的时候提供一个完成的动作。
CATranscation接口提供的+setCompletionBlock:方法也有同样的功能。使用block的关键代码:
- (IBAction)changeColor
{
    //begin a new transaction
    [CATransaction begin];
    //set the animation duration to 1 second
    [CATransaction setAnimationDuration:1.0];
    //add the spin animation on completion
    [CATransaction setCompletionBlock:^{
        //rotate the layer 90 degrees
        CGAffineTransform transform = self.colorLayer.affineTransform;
        transform = CGAffineTransformRotate(transform, M_PI_2);
        self.colorLayer.affineTransform = transform;
    }];
    //randomize the layer background color
    CGFloat red = arc4random() / (CGFloat)INT_MAX;
    CGFloat green = arc4random() / (CGFloat)INT_MAX;
    CGFloat blue = arc4random() / (CGFloat)INT_MAX;
    self.colorLayer.backgroundColor = [UIColor colorWithRed:red green:green blue:blue alpha:1.0].CGColor;
    //commit the transaction
    [CATransaction commit];
}
图7.2 颜色渐变之完成之后再做一次旋转
注意旋转动画要比颜色渐变快得多,这是因为完成块是在颜色渐变的事务提交并出栈之后才被执行,于是,用默认的事务做变换,默认的时间也就变成了0.25秒。因为代码中颜色渐变的动画是设置了1.0秒
7.4 图层行为
● 试着直接对UIView关联的图层做动画而不是一个单独的图层。清单7.4是对清单7.2代码的一点修改,移除了
colorLayer,并且直接设置layerView关联图层的背景色。对UIView绑定的图层做动画,关键代码:
- (IBAction)changeColor
{
    //begin a new transaction
    [CATransaction begin];
    //set the animation duration to 1 second
    [CATransaction setAnimationDuration:1.0];
    //randomize the layer background color
    CGFloat red = arc4random() / (CGFloat)INT_MAX;
    CGFloat green = arc4random() / (CGFloat)INT_MAX;
    CGFloat blue = arc4random() / (CGFloat)INT_MAX;
    self.layerView.layer.backgroundColor = [UIColor colorWithRed:red green:green blue:blue alpha:1.0].CGColor;
    //commit the transaction
    [CATransaction commit];
}
● UIKit建立在Core Animation(默认对所有东西都做动画)之上,但是隐式动画是被UIKit禁用掉了。
我们把改变 属性 时
CALayer自动应用的动画称作 ★ 行为 ,当CALayer的属性被修改时候,它会调用-actionForKey:方法,传递属性的名称。剩下的操作都在CALayer的头文件中有详细的说明,实质上是如下几步:
- 图层首先 “检测” 它是否有 “委托” ,并且是否实现
CALayerDelegate协议 指定的-actionForLayer:forKey方法。如果有,直接调用并返回结果。- 如果没有委托,或者委托没有实现
-actionForLayer:forKey方法,图层接着 “检查 ” 包含属性名称对应行为映射的“actions字典”。- 如果
actions字典没有包含对应的属性,那么图层接着在它的style字典 接着搜索属性名。- 最后,如果在
style里面也找不到对应的行为,那么图层将会直接调用定义了每个属性的标准行为的-defaultActionForKey:方法。所以一轮完整的搜索结束之后,
-actionForKey:要么返回空(这种情况下将不会有动画发生),要么是CAAction协议对应的对象,最后CALayer拿这个结果去对先前和当前的值做动画。UIKit是如何禁用隐式动画的:每个
UIView对它关联的图层都扮演了一个委托,并且提供了-actionForLayer:forKey的实现方法。当 不在 一个动画块的实现中,UIView对所有图层行为返回nil,但是在动画block范围之内,它就返回了一个非空值。当属性在动画块之外发生改变,
UIView直接通过返回nil来禁用隐式动画。但如果在动画块范围之内,根据动画具体类型返回相应的属性● 当然返回
nil并不是 禁用隐式动画 唯一的办法,CATransacition有个方法叫做+setDisableActions:,可以用来对所有属性打开或者关闭隐式动画。如果在清单7.2的[CATransaction begin]之后添加下面的代码,同样也会阻止动画的发生:[CATransaction setDisableActions:YES];● 总结一下,我们知道了如下几点
UIView关联的图层禁用了隐式动画,对这种图层做动画的唯一办法就是使用UIView的动画函数(而不是依赖CATransaction),或者继承UIView,并覆盖-actionForLayer:forKey:方法,或者直接创建一个显式动画(具体细节见第八章)。- 对于单独存在的图层,我们可以通过实现图层的
-actionForLayer:forKey:委托方法,或者提供一个actions字典来控制隐式动画。● 我们来对颜色渐变的例子使用一个不同的行为,通过给
colorLayer设置一个★自定义的actions字典。结果很赞,不论在什么时候改变背景颜色,新的色块都是从左侧滑入,而不是默认的渐变效果。行为 通常 是 一个被Core Animation隐式调用的 显式动画对象。这里我们使用的是一个实现了
CATransaction的实例,叫做推进过渡。第八章中将会详细解释过渡,不过对于现在,知道CATransition响应CAAction协议 ,并且可以当做一个图层行为就足够了。清单7.6 实现 自定义行为 的代码:
@interface ViewController ()

@property (nonatomic, weak) IBOutlet UIView *layerView;
@property (nonatomic, weak) IBOutlet CALayer *colorLayer;/*热心人发现这里应该改为@property (nonatomic, strong)  CALayer *colorLayer;否则运行结果不正确。
*/

@end

@implementation ViewController

- (void)viewDidLoad
{
    [super viewDidLoad];

    //create sublayer
    self.colorLayer = [CALayer layer];
    self.colorLayer.frame = CGRectMake(50.0f, 50.0f, 100.0f, 100.0f);
    self.colorLayer.backgroundColor = [UIColor blueColor].CGColor;
    //add a custom action
    CATransition *transition = [CATransition animation];
    transition.type = kCATransitionPush;
    transition.subtype = kCATransitionFromLeft;
    self.colorLayer.actions = @{@"backgroundColor": transition};
    //add it to our view
    [self.layerView.layer addSublayer:self.colorLayer];
}

- (IBAction)changeColor
{
    //randomize the layer background color
    CGFloat red = arc4random() / (CGFloat)INT_MAX;
    CGFloat green = arc4random() / (CGFloat)INT_MAX;
    CGFloat blue = arc4random() / (CGFloat)INT_MAX;
    self.colorLayer.backgroundColor = [UIColor colorWithRed:red green:green blue:blue alpha:1.0].CGColor;
}

@end
图7.3 使用推进过渡的色值动画
7.4 呈现与模型
● 当你改变一个图层的属性,属性值的确是立刻更新的(如果你读取它的数据,你会发现它的值在你设置它的那一刻就已经生效了),但是屏幕上并没有马上发生改变。这是因为你设置的属性并没有直接调整图层的外观,相反,他只是定义了图层动画 结束之后 将要变化的外观。
● 当设置
CALayer的属性,实际上是在定义当前事务 结束之后 图层如何显示的模型。Core Animation扮演了一个控制器的角色,并且负责根据图层行为和事务设置去不断 更新 视图的这些属性在屏幕上的 状态。● 在iOS中,屏幕每秒钟重绘60次。如果动画时长比60分之一秒要长,Core Animation就需要在设置一次新值和新值生效之间,对屏幕上的图层进行重新组织。这意味着
CALayer除了“真实”值(就是你设置的值)之外,必须要知道当前显示在屏幕上的属性值的 记录。● 我们讨论的就是一个典型的微型MVC模式。
CALayer是一个连接用户界面(就是MVC中的view)虚构的类,但是在界面本身这个场景下,CALayer的行为更像是存储了视图如何显示和动画的 数据模型 。实际上,在苹果自己的文档中,图层树通常都是值的图层树模型。● 每个图层属性的“显示值”都被存储在一个叫做“呈现图层”的独立图层当中,他可以通过
-presentationLayer方法来访问。这个“呈现图层”实际上是模型图层的复制,但是它的属性值代表了在任何指定时刻当前外观效果。换句话说,你可以通过呈现图层的值来获取当前屏幕上真正显示出来的值(图7.4)。● 我们在第一章中提到除了图层树,另外还有“呈现树”。呈现树通过图层树中所有图层的呈现图层所形成。注意呈现图层仅仅当图层首次被提交(就是首次第一次在屏幕上显示)的时候创建,所以在那之前调用
-presentationLayer将会返回nil。● 你可能注意到有一个叫做
–modelLayer的方法。在呈现图层上调用–modelLayer将会返回它正在呈现所依赖的CALayer。通常在一个图层上调用-modelLayer会返回–self(实际上我们已经创建的原始图层就是一种数据模型)。图7.4 一个移动的图层是如何通过数据模型呈现的
两种情况下呈现图层会变得很有用,一个是同步动画,一个是处理用户交互。
- 如果你在实现一个基于定时器的动画(见第11章“基于定时器的动画”),而不仅仅是基于事务的动画,这个时候准确地知道在某一时刻图层显示在什么位置就会对正确摆放图层很有用了。
- 如果你想让你做动画的图层响应用户输入,你可以使用
-hitTest:方法(见第三章“图层几何学”)来判断指定图层是否被触摸,这时候对 呈现图层 而不是 模型图层 调用-hitTest:会显得更有意义,因为呈现图层代表了用户当前看到的图层位置,而不是当前动画结束之后的位置。关键代码:
if ([self.colorLayer.presentationLayer hitTest:point]) {
        //randomize the layer background color
        CGFloat red = arc4random() / (CGFloat)INT_MAX;
        CGFloat green = arc4random() / (CGFloat)INT_MAX;
        CGFloat blue = arc4random() / (CGFloat)INT_MAX;
        self.colorLayer.backgroundColor = [UIColor colorWithRed:red green:green blue:blue alpha:1.0].CGColor;
    }
8. 显式动画
● 显式动画,它能够对一些属性做指定的自定义动画,或者创建非线性动画,比如沿着任意一条曲线移动。
8.1 属性动画
●
CAAnimationDelegate在任何头文件中都找不到,但是可以在CAAnimation头文件或者苹果开发者文档中找到相关函数。在这个例子中,我们用-animationDidStop:finished:方法在动画结束之后来更新图层的backgroundColor。● 当更新属性的时候,我们需要设置一个新的事务,并且禁用图层行为。否则动画会发生两次,一个是因为 ★ 显式的
CABasicAnimation,另一次是因为隐式动画,具体实现见清单8.3。清单8.3 动画完成之后修改图层的背景色,关键代码:
@implementation ViewController


- (IBAction)changeColor
{

    UIColor *color = [UIColor colorWithRed:red green:green blue:blue alpha:1.0];
    //create a basic animation
    CABasicAnimation *animation = [CABasicAnimation animation];
    animation.keyPath = @"backgroundColor";
    animation.toValue = (__bridge id)color.CGColor;
    animation.delegate = self;
    //apply animation to layer
    [self.colorLayer addAnimation:animation forKey:nil];
}

- (void)animationDidStop:(CABasicAnimation *)anim finished:(BOOL)flag
{
    //set the backgroundColor property to match animation toValue
    [CATransaction begin];
    [CATransaction setDisableActions:YES];
    self.colorLayer.backgroundColor = (__bridge CGColorRef)anim.toValue;
    [CATransaction commit];
}

@end
● 对
CAAnimation而言,使用 “委托模式” 而不是 “一个完成块” 会带来一个问题,就是当你有多个动画的时候,无法在在回调方法中区分是哪一个动画结束。在一个视图控制器中创建动画的时候,通常会用控制器本身作为一个“委托”(如清单8.3所示),但是所有的动画都会调用同一个回调方法,所以你就需要判断到底是那个图层的调用。● 动画本身会作为一个参数传入委托的方法
-animationDidStop:finished:,也许你会认为可以控制器中把动画存储为一个属性,然后在回调用比较,但实际上并不起作用,因为委托传入的动画参数是原始值的一个深拷贝,从而不是同一个值。● 当使用
-addAnimation:forKey:把动画添加到图层,这里有一个到目前为止我们都设置为nil的key参数。这里的键是-animationForKey:方法找到对应动画的唯一标识符,而当前动画的所有键都可以用animationKeys获取。如果我们对每个动画都关联一个唯一的键,就可以对每个图层循环所有键,然后调用-animationForKey:来比对结果。尽管这不是一个优雅的实现。● 一种更加简单的方法 ,
CAAnimation实现了KVC(键-值-编码)协议,于是你可以用-setValue:forKey:和-valueForKey:方法来存取属性。但是CAAnimation有一个不同的性能:它更像一个NSDictionary,可以让你随意设置键值对,即使和你使用的动画类所声明的属性并不匹配。这意味着你可以对动画用任意类型打标签。清单8.4 使用KVC对动画打标签,关键代码:
//create transform animation
CABasicAnimation *animation = [CABasicAnimation animation];
[self updateHandsAnimated:NO];
animation.keyPath = @"transform";
animation.toValue = [NSValue valueWithCATransform3D:transform];
animation.duration = 0.5;
animation.delegate = self;
[animation setValue:handView forKey:@"handView"];
[handView.layer addAnimation:animation forKey:nil];
我们发现在
-animationDidStop:finished:委托方法调用之前,时钟的时针会迅速返回到原始值,这个清单8.3图层颜色发生的情况一样。问题在于,”回调方法“ 在动画完成之前 “已经被调用” 了,但不能保证 这发生在属性动画返回初始状态 之前。我们可以用一个
fillMode属性来解决这个问题,下一章会详细说明,这里知道在动画之前设置它比在动画结束之后更新属性更加方便。
关键帧动画
●
CAKeyframeAnimation是另一种UIKit没有暴露出来但功能强大的类。和CABasicAnimation类似,CAKeyframeAnimation同样是CAPropertyAnimation的一个子类,它依然作用于单一的一个属性,但是和CABasicAnimation不一样的是,它不限制于设置一个起始和结束的值,而是可以根据一连串随意的值来做动画。● 关键帧 起源于传动动画,意思是指主导的动画在显著改变发生时重绘当前帧(也就是关键帧),每帧之间剩下的绘制(可以通过关键帧推算出)将由熟练的艺术家来完成。
CAKeyframeAnimation也是同样的道理:你提供了显著的帧,然后Core Animation在每帧之间进行插入。● 我们可以用之前使用颜色图层的例子来演示,设置一个颜色的数组,然后通过关键帧动画播放出来(清单8.5)
清单8.5 使用
CAKeyframeAnimation应用一系列颜色的变化,关键代码:- (IBAction)changeColor { //create a keyframe animation CAKeyframeAnimation *animation = [CAKeyframeAnimation animation]; animation.keyPath = @"backgroundColor"; animation.duration = 2.0; animation.values = @[ (__bridge id)[UIColor blueColor].CGColor, (__bridge id)[UIColor redColor].CGColor, (__bridge id)[UIColor greenColor].CGColor, (__bridge id)[UIColor blueColor].CGColor ]; //apply animation to layer [self.colorLayer addAnimation:animation forKey:nil]; }因为
CAKeyframeAnimation并不能自动把当前值作为第一帧(就像CABasicAnimation那样把fromValue设为nil)。动画会在开始的时候突然跳转到第一帧的值,然后在动画结束的时候突然恢复到原始的值。所以为了动画的平滑特性,我们需要开始和结束的关键帧来匹配当前属性的值。● 提供一个数组的值就可以按照颜色变化做动画,但一般来说用数组来描述动画运动并不直观。
CAKeyframeAnimation有另一种方式去指定动画,就是使用CGPath。path属性可以用一种直观的方式,使用Core Graphics函数定义运动序列来绘制动画。● 三次贝塞尔曲线,它是一种使用开始点,结束点和另外两个控制点来定义形状的曲线,可以通过使用一个基于C的Core Graphics绘图指令来创建,不过用UIKit提供的
UIBezierPath类会更简单。我们这次用
CAShapeLayer来在屏幕上绘制曲线,尽管对动画来说并不是必须的,但这会让我们的动画更加形象。绘制完CGPath之后,我们用它来创建一个CAKeyframeAnimation,然后用它来应用到我们的宇宙飞船。代码见清单8.6,结果见图8.1。清单8.6 沿着一个贝塞尔曲线对图层做动画,关键代码:
@interface ViewController ()

@property (nonatomic, weak) IBOutlet UIView *containerView;

@end

@implementation ViewController

- (void)viewDidLoad
{
    [super viewDidLoad];
    //create a path
    UIBezierPath *bezierPath = [[UIBezierPath alloc] init];
    [bezierPath moveToPoint:CGPointMake(0, 150)];
    [bezierPath addCurveToPoint:CGPointMake(300, 150) controlPoint1:CGPointMake(75, 0) controlPoint2:CGPointMake(225, 300)];
    //draw the path using a CAShapeLayer
    CAShapeLayer *pathLayer = [CAShapeLayer layer];
    pathLayer.path = bezierPath.CGPath;
    pathLayer.fillColor = [UIColor clearColor].CGColor;
    pathLayer.strokeColor = [UIColor redColor].CGColor;
    pathLayer.lineWidth = 3.0f;
    [self.containerView.layer addSublayer:pathLayer];
    //add the ship
    CALayer *shipLayer = [CALayer layer];
    shipLayer.frame = CGRectMake(0, 0, 64, 64);
    shipLayer.position = CGPointMake(0, 150);
    shipLayer.contents = (__bridge id)[UIImage imageNamed: @"Ship.png"].CGImage;
    [self.containerView.layer addSublayer:shipLayer];
    //create the keyframe animation
    CAKeyframeAnimation *animation = [CAKeyframeAnimation animation];
    animation.keyPath = @"position";
    animation.duration = 4.0;
    animation.path = bezierPath.CGPath;
    [shipLayer addAnimation:animation forKey:nil];
}

@end
图8.1 沿着一个贝塞尔曲线移动的宇宙飞船图片
运行示例,你会发现飞船的动画有些不太真实,这是因为当它运动的时候永远指向右边,而不是指向曲线切线的方向。你可以调整它的
affineTransform来对运动方向做动画,但很可能和其它的动画冲突。幸运的是,苹果预见到了这点,并且给
CAKeyFrameAnimation添加了一个rotationMode的属性。设置它为常量kCAAnimationRotateAuto(清单8.7),图层将会根据曲线的切线自动旋转(图8.2)。清单8.7 通过
rotationMode自动对齐图层到曲线,关键代码:- (void)viewDidLoad { [super viewDidLoad]; //create a path ... //create the keyframe animation CAKeyframeAnimation *animation = [CAKeyframeAnimation animation]; animation.keyPath = @"position"; animation.duration = 4.0; animation.path = bezierPath.CGPath; animation.rotationMode = kCAAnimationRotateAuto; [shipLayer addAnimation:animation forKey:nil]; }图8.2 匹配曲线切线方向的飞船图层
虚拟属性
● 之前提到过属性动画实际上是针对于关键路径而不是一个键,这就意味着可以对子属性甚至是虚拟属性做动画。
● 考虑一个旋转的动画:如果想要对一个物体做旋转的动画,那就需要作用于
transform属性,因为CALayer没有显式提供角度或者方向之类的属性,代码如清单8.8所示清单8.8 使用
transform属性对图层做动画- (void)viewDidLoad { [super viewDidLoad]; //add the ship CALayer *shipLayer = [CALayer layer]; shipLayer.frame = CGRectMake(0, 0, 128, 128); shipLayer.position = CGPointMake(150, 150); shipLayer.contents = (__bridge id)[UIImage imageNamed: @"Ship.png"].CGImage; [self.containerView.layer addSublayer:shipLayer]; //animate the ship rotation CABasicAnimation *animation = [CABasicAnimation animation]; animation.keyPath = @"transform"; animation.duration = 2.0; animation.toValue = [NSValue valueWithCATransform3D: CATransform3DMakeRotation(M_PI, 0, 0, 1)]; [shipLayer addAnimation:animation forKey:nil]; }这么做是可行的,但看起来更因为是运气而不是设计的原因,如果我们把旋转的值从
M_PI(180度)调整到2 * M_PI(360度),然后运行程序,会发现这时候飞船完全不动了。这是因为这里的矩阵做了一次360度的旋转,和做了0度是一样的,所以最后的值根本没变。现在继续使用
M_PI,但这次用byValue而不是toValue。也许你会认为这和设置toValue结果一样,因为0 + 90度 == 90度,但实际上飞船的图片变大了,并没有做任何旋转,这是因为变换矩阵不能像角度值那样叠加。● 一个更好的解决方案:为了旋转图层,我们可以对
transform.rotation关键路径应用动画,而不是transform本身(清单8.9)。清单8.9 对虚拟的
transform.rotation属性做动画,关键代码:- (void)viewDidLoad { [super viewDidLoad]; //add the ship CALayer *shipLayer = [CALayer layer]; shipLayer.frame = CGRectMake(0, 0, 128, 128); shipLayer.position = CGPointMake(150, 150); shipLayer.contents = (__bridge id)[UIImage imageNamed: @"Ship.png"].CGImage; [self.containerView.layer addSublayer:shipLayer]; //animate the ship rotation CABasicAnimation *animation = [CABasicAnimation animation]; animation.keyPath = @"transform.rotation"; animation.duration = 2.0; animation.byValue = @(M_PI * 2); [shipLayer addAnimation:animation forKey:nil]; }结果运行的特别好,用
transform.rotation而不是transform做动画的好处如下:
- 我们可以不通过关键帧一步旋转多于180度的动画。
- 可以用相对值而不是绝对值旋转(设置
byValue而不是toValue)。- 可以不用创建
CATransform3D,而是使用一个简单的数值来指定角度。- 不会和
transform.position或者transform.scale冲突(同样是使用关键路径来做独立的动画属性)。
transform.rotation属性有一个奇怪的问题是它其实并不存在。这是因为CATransform3D并不是一个对象,它实际上是一个结构体,也没有符合KVC相关属性,transform.rotation实际上是一个CALayer用于处理动画变换的虚拟属性。● 你不可以直接设置
transform.rotation或者transform.scale,他们不能被直接使用。当你对他们做动画时,Core Animation自动地根据通过CAValueFunction来计算的值来更新transform属性。
CAValueFunction用于把我们赋给虚拟的transform.rotation简单浮点值转换成真正的用于摆放图层的CATransform3D矩阵值。●
CAValueFunction看起来似乎是对那些不能简单相加的属性(例如变换矩阵)做动画的非常有用的机制,但由于CAValueFunction的实现细节是私有的,所以目前不能通过继承它来自定义。你可以通过使用苹果目前已经提供的常量(目前都是和变换矩阵的虚拟属性相关,所以没太多使用场景了,因为这些属性都有了默认的实现方式)。
8.2 动画组
●
CAAnimationGroup是另一个继承于CAAnimation的子类,它添加了一个animations数组的属性,用来组合别的动画。CABasicAnimation和CAKeyframeAnimation仅仅作用于单独的属性,而CAAnimationGroup可以把这些动画组合在一起。清单8.10 组合关键帧动画和基础动画,关键代码:
- (void)viewDidLoad
{
    [super viewDidLoad];
    //create a path
    UIBezierPath *bezierPath = [[UIBezierPath alloc] init];
    [bezierPath moveToPoint:CGPointMake(0, 150)];
    [bezierPath addCurveToPoint:CGPointMake(300, 150) controlPoint1:CGPointMake(75, 0) controlPoint2:CGPointMake(225, 300)];
    //draw the path using a CAShapeLayer
    CAShapeLayer *pathLayer = [CAShapeLayer layer];
    pathLayer.path = bezierPath.CGPath;
    pathLayer.fillColor = [UIColor clearColor].CGColor;
    pathLayer.strokeColor = [UIColor redColor].CGColor;
    pathLayer.lineWidth = 3.0f;
    [self.containerView.layer addSublayer:pathLayer];
    //add a colored layer
    CALayer *colorLayer = [CALayer layer];
    colorLayer.frame = CGRectMake(0, 0, 64, 64);
    colorLayer.position = CGPointMake(0, 150);
    colorLayer.backgroundColor = [UIColor greenColor].CGColor;
    [self.containerView.layer addSublayer:colorLayer];
    //create the position animation
    CAKeyframeAnimation *animation1 = [CAKeyframeAnimation animation];
    animation1.keyPath = @"position";
    animation1.path = bezierPath.CGPath;
    animation1.rotationMode = kCAAnimationRotateAuto;
    //create the color animation
    CABasicAnimation *animation2 = [CABasicAnimation animation];
    animation2.keyPath = @"backgroundColor";
    animation2.toValue = (__bridge id)[UIColor redColor].CGColor;
    //create group animation
    CAAnimationGroup *groupAnimation = [CAAnimationGroup animation];
    groupAnimation.animations = @[animation1, animation2];
    groupAnimation.duration = 4.0;
    //add the animation to the color layer
    [colorLayer addAnimation:groupAnimation forKey:nil];
}
图8.3 关键帧路径和基础动画的组合
8.3 过渡
● 属性动画只对图层的可动画属性起作用,所以如果要改变一个不能动画的属性(比如图片),或者从层级关系中添加或者移除图层,属性动画将不起作用。
● 于是就有了过渡的概念。过渡并不像属性动画那样平滑地在两个值之间做动画,而是影响到整个图层的变化。过渡动画首先展示之前的图层外观,然后通过一个交换过渡到新的外观。
● 为了创建一个过渡动画,我们将使用
CATransition,同样是另一个CAAnimation的子类,和别的子类不同,CATransition有一个type和subtype来标识变换效果。type属性是一个NSString类型,可以被设置成如下类型:kCATransitionFade kCATransitionMoveIn kCATransitionPush kCATransitionReveal到目前为止你只能使用上述四种类型,但你可以通过一些别的方法来自定义过渡效果,后续会详细介绍。
默认的过渡类型是
kCATransitionFade,当你在改变图层属性之后,就创建了一个平滑的淡入淡出效果。
kCATransitionPush,它创建了一个新的图层,从边缘的一侧滑动进来,把旧图层从另一侧推出去的效果。
kCATransitionMoveIn从顶部滑动进入,但不像推送动画那样把老图层推走。
kCATransitionReveal把原始的图层滑动出去来显示新的外观,而不是把新的图层滑动进入。● 上述的后面三种过渡类型都有一个默认的动画方向,它们都从左侧滑入,但是你可以通过
subtype来控制它们的方向,提供了如下四种类型:kCATransitionFromRight kCATransitionFromLeft kCATransitionFromTop kCATransitionFromBottom● 一个简单的用
CATransition来对非动画属性做动画的例子如清单8.11所示。这里我们对
UIImage的image属性(非动画属性)做修改,但是 隐式动画 或者CAPropertyAnimation都不能对它做动画,因为Core Animation不知道如何在插入图片。清单8.11 使用
CATransition来对UIImageView做动画,关键代码@interface ViewController () @property (nonatomic, weak) IBOutlet UIImageView *imageView; @property (nonatomic, copy) NSArray *images; @end @implementation ViewController - (void)viewDidLoad { [super viewDidLoad]; //set up images self.images = @[[UIImage imageNamed:@"Anchor.png"], [UIImage imageNamed:@"Cone.png"], [UIImage imageNamed:@"Igloo.png"], [UIImage imageNamed:@"Spaceship.png"]]; } - (IBAction)switchImage { //set up crossfade transition CATransition *transition = [CATransition animation]; transition.type = kCATransitionFade; //apply transition to imageview backing layer [self.imageView.layer addAnimation:transition forKey:nil]; //cycle to next image UIImage *currentImage = self.imageView.image; NSUInteger index = [self.images indexOfObject:currentImage]; index = (index + 1) % [self.images count]; self.imageView.image = self.images[index]; } @end
和属性动画不同的是,对指定的图层一次只能使用一次
CATransition,因此,无论你对动画的键设置什么值,过渡动画都会对它的键设置成“transition”,也就是常量kCATransition。图8.4 使用CATransition对图像平滑淡入淡出
隐式过渡
● 当设置了
CALayer的content属性的时候,CATransition的确是默认的行为。但是对于“视图关联的图层”,或者是其他隐式动画的行为,这个特性依然是被禁用的,但是对于你自己创建的图层,这意味着对图层contents图片做的改动都会自动附上淡入淡出的动画。
对图层树的动画
●
CATransition并不作用于指定的图层属性,这就是说你可以在 “即使不能准确得知改变了什么的情况下” 对 图层做动画,例如,在不知道UITableView哪一行被添加或者删除的情况下,直接就可以平滑地刷新它,或者在不知道UIViewController内部的视图层级的情况下对两个不同的实例做过渡动画。● 这些例子和我们之前所讨论的情况完全不同,因为它们不仅涉及到图层的属性,而且是整个图层树的改变--我们在这种动画的过程中手动在层级关系中添加或者移除图层。
● 要确保
CATransition添加到的图层 ”在过渡动画发生时“ 不会在树状结构中被移除,否则CATransition将会和图层一起被移除。一般来说,你只需要将动画添加到被影响图层的superlayer。
● 这里我们建立了默认的标签应用程序模板,然后用
UITabBarControllerDelegate的-tabBarController:didSelectViewController:方法来应用过渡动画。我们把动画添加到UITabBarController的视图图层上,于是在标签被替换的时候动画不会被移除。清单8.12 对
UITabBarController做动画,关键代码:#import "AppDelegate.h" #import "FirstViewController.h" #import "SecondViewController.h" #import @implementation AppDelegate - (BOOL)application:(UIApplication *)application didFinishLaunchingWithOptions:(NSDictionary *)launchOptions { self.window = [[UIWindow alloc] initWithFrame: [[UIScreen mainScreen] bounds]]; UIViewController *viewController1 = [[FirstViewController alloc] init]; UIViewController *viewController2 = [[SecondViewController alloc] init]; self.tabBarController = [[UITabBarController alloc] init]; self.tabBarController.viewControllers = @[viewController1, viewController2]; self.tabBarController.delegate = self; self.window.rootViewController = self.tabBarController; [self.window makeKeyAndVisible]; return YES; } - (void)tabBarController:(UITabBarController *)tabBarController didSelectViewController:(UIViewController *)viewController { //set up crossfade transition CATransition *transition = [CATransition animation]; transition.type = kCATransitionFade; //apply transition to tab bar controller's view [self.tabBarController.view.layer addAnimation:transition forKey:nil]; } @end
自定义动画
● 苹果通过
UIView的 +transitionFromView:toView:duration:options:completion:和+transitionWithView:duration:options:animations:方法提供了Core Animation的过渡特性。但是这里的可用的过渡选项和CATransition的type属性提供的常量完全不同。
UIView过渡方法中options参数可以由如下常量指定:UIViewAnimationOptionTransitionFlipFromLeft UIViewAnimationOptionTransitionFlipFromRight UIViewAnimationOptionTransitionCurlUp UIViewAnimationOptionTransitionCurlDown UIViewAnimationOptionTransitionCrossDissolve UIViewAnimationOptionTransitionFlipFromTop UIViewAnimationOptionTransitionFlipFromBottom清单8.13 使用UIKit提供的方法来做过渡动画,关键代码:
@interface ViewController ()
@property (nonatomic, weak) IBOutlet UIImageView *imageView;
@property (nonatomic, copy) NSArray *images;
@end
@implementation ViewController
- (void)viewDidLoad
{
    [super viewDidLoad]; //set up images
    self.images = @[[UIImage imageNamed:@"Anchor.png"],
                    [UIImage imageNamed:@"Cone.png"],
                    [UIImage imageNamed:@"Igloo.png"],
                    [UIImage imageNamed:@"Spaceship.png"]];
- (IBAction)switchImage
{
    [UIView transitionWithView:self.imageView duration:1.0
                       options:UIViewAnimationOptionTransitionFlipFromLeft
                    animations:^{
                        //cycle to next image
                        UIImage *currentImage = self.imageView.image;
                        NSUInteger index = [self.images indexOfObject:currentImage];
                        index = (index + 1) % [self.images count];
                        self.imageView.image = self.images[index];
                    }
                    completion:NULL];
}

@end
● 自定义的过渡效果,就像之前提到的那样,过渡动画基础的原则就是对原始的图层外观截图,然后添加一段动画,平滑过渡到图层改变之后那个截图的效果。如果我们知道如何对图层截图,我们就可以使用属性动画来代替
CATransition或者是UIKit的过渡方法来实现动画。
CALayer有一个-renderInContext:方法,可以通过把它绘制到Core Graphics的上下文中捕获当前内容的图片,然后在另外的视图中显示出来。如果我们把这个截屏视图置于原始视图之上,就可以遮住真实视图的所有变化,于是重新创建了一个简单的过渡效果。
● 清单8.14演示了一个基本的实现。我们对当前视图状态截图,然后在我们改变原始视图的背景色的时候对截图快速转动并且淡出,图8.5展示了我们自定义的过渡效果。
为了让事情更简单,我们用
UIView的 -animateWithDuration:completion:方法来实现。虽然用CABasicAnimation可以达到同样的效果,但是那样的话我们就需要对图层的变换和不透明属性创建单独的动画,然后当动画结束的时候在CAAnimationDelegate中把coverView从屏幕中移除。清单8.14 用
renderInContext:创建自定义过渡效果,关键代码:@implementation ViewController - (IBAction)performTransition { //preserve the current view snapshot UIGraphicsBeginImageContextWithOptions(self.view.bounds.size, YES, 0.0); [self.view.layer renderInContext:UIGraphicsGetCurrentContext()]; UIImage *coverImage = UIGraphicsGetImageFromCurrentImageContext(); //insert snapshot view in front of this one UIView *coverView = [[UIImageView alloc] initWithImage:coverImage]; coverView.frame = self.view.bounds; [self.view addSubview:coverView]; //update the view (we'll simply randomize the layer background color) CGFloat red = arc4random() / (CGFloat)INT_MAX; CGFloat green = arc4random() / (CGFloat)INT_MAX; CGFloat blue = arc4random() / (CGFloat)INT_MAX; self.view.backgroundColor = [UIColor colorWithRed:red green:green blue:blue alpha:1.0]; //perform animation (anything you like) [UIView animateWithDuration:1.0 animations:^{ //scale, rotate and fade the view CGAffineTransform transform = CGAffineTransformMakeScale(0.01, 0.01); transform = CGAffineTransformRotate(transform, M_PI_2); coverView.transform = transform; coverView.alpha = 0.0; } completion:^(BOOL finished) { //remove the cover view now we're finished with it [coverView removeFromSuperview]; }]; } @end
图8.5 使用renderInContext:创建自定义过渡效果
有个警告:
-renderInContext:捕获了图层的图片和子图层,但是不能对子图层正确地处理变换效果,而且对视频和OpenGL内容也不起作用。但是用CATransition,或者用私有的截屏方式就没有这个限制了。
8.4 在动画过程中取消动画
● 你可以用
-addAnimation:forKey:方法中的key参数来在添加动画之后检索一个动画,使用如下方法:- (CAAnimation *)animationForKey:(NSString *)key;但并不支持在动画运行过程中修改动画,所以这个方法主要用来检测动画的属性,或者判断它是否被添加到当前图层中。
为了终止一个指定的动画,你可以用如下方法把它从图层移除掉:
- (void)removeAnimationForKey:(NSString *)key;或者移除所有动画:
- (void)removeAllAnimations;● 动画一旦被移除,图层的外观就立刻更新到当前的模型图层的值。一般说来,动画在结束之后被自动移除,除非设置
removedOnCompletion为NO,如果你设置动画在结束之后不被自动移除,那么当它不需要的时候你要手动移除它;否则它会一直存在于内存中,直到图层被销毁。● 我们来扩展之前旋转飞船的示例,这里添加一个按钮来停止或者启动动画。这一次我们用一个非
nil的值作为动画的键,以便之后可以移除它。-animationDidStop:finished:方法中的flag参数表明了动画是自然结束还是被打断,我们可以在控制台打印出来。如果你用停止按钮来终止动画,它会打印NO,如果允许它完成,它会打印YES。清单8.15 开始和停止一个动画,关键代码:
@interface ViewController ()

@property (nonatomic, weak) IBOutlet UIView *containerView;
@property (nonatomic, strong) CALayer *shipLayer;

@end

@implementation ViewController

- (void)viewDidLoad
{
    [super viewDidLoad];
    //add the ship
    self.shipLayer = [CALayer layer];
    self.shipLayer.frame = CGRectMake(0, 0, 128, 128);
    self.shipLayer.position = CGPointMake(150, 150);
    self.shipLayer.contents = (__bridge id)[UIImage imageNamed: @"Ship.png"].CGImage;
    [self.containerView.layer addSublayer:self.shipLayer];
}

- (IBAction)start
{
    //animate the ship rotation
    CABasicAnimation *animation = [CABasicAnimation animation];
    animation.keyPath = @"transform.rotation";
    animation.duration = 2.0;
    animation.byValue = @(M_PI * 2);
    animation.delegate = self;
    [self.shipLayer addAnimation:animation forKey:@"rotateAnimation"];
}

- (IBAction)stop
{
    [self.shipLayer removeAnimationForKey:@"rotateAnimation"];
}

- (void)animationDidStop:(CAAnimation *)anim finished:(BOOL)flag
{
    //log that the animation stopped
    NSLog(@"The animation stopped (finished: %@)", flag? @"YES": @"NO");
}

@end
图8.6 通过开始和停止按钮控制的旋转动画
9. 图层时间
● 动画的发生是需要持续一段时间的,所以计时对整个概念来说至关重要。在这一章中,我们来看看CAMediaTiming,看看Core Animation是如何跟踪时间的。
9.1 CAMediaTiming协议●
CAMediaTiming协议定义了 “在一段动画内” 用来控制逝去时间的属性的 集合,CALayer和CAAnimation都实现了这个协议,所以时间可以被任意基于一个图层或者一段动画的类控制。
持续和重复
●
CAMediaTiming另外还有一个属性叫做repeatCount,代表动画重复的迭代次数。如果duration是2,repeatCount设为3.5(三个半迭代),那么完整的动画时长将是7秒。●
duration和repeatCount默认都是0。但这不意味着动画时长为0秒,或者0次,这里的0仅仅代表了“默认”,也就是0.25秒和1次,你可以用一个简单的测试来尝试为这两个属性赋多个值。● 创建重复动画的另一种方式是使用
repeatDuration属性,它让动画重复一个指定的时间,而不是指定次数。你甚至设置一个叫做autoreverses的属性(BOOL类型)在每次间隔交替循环过程中自动回放。这对于播放一段连续非循环的动画很有用,例如打开一扇门,然后关上它(图9.2)。图9.2 摆动门的动画
对门进行摆动的代码见清单9.2。我们用了
autoreverses来使门在打开后自动关闭,在这里我们把repeatDuration设置为INFINITY,于是动画无限循环播放,设置repeatCount为INFINITY也有同样的效果。注意repeatCount和repeatDuration可能会相互冲突,所以你只要对其中一个指定非零值。对两个属性都设置非0值的行为没有被定义。清单9.2 使用
autoreverses属性实现门的摇摆,关键代码:- (void)viewDidLoad { [super viewDidLoad]; //add the door CALayer *doorLayer = [CALayer layer]; doorLayer.frame = CGRectMake(0, 0, 128, 256); doorLayer.position = CGPointMake(150 - 64, 150); doorLayer.anchorPoint = CGPointMake(0, 0.5); doorLayer.contents = (__bridge id)[UIImage imageNamed: @"Door.png"].CGImage; [self.containerView.layer addSublayer:doorLayer]; //apply perspective transform CATransform3D perspective = CATransform3DIdentity; perspective.m34 = -1.0 / 500.0; self.containerView.layer.sublayerTransform = perspective; //apply swinging animation CABasicAnimation *animation = [CABasicAnimation animation]; animation.keyPath = @"transform.rotation.y"; animation.toValue = @(-M_PI_2); animation.duration = 2.0; animation.repeatDuration = INFINITY; animation.autoreverses = YES; [doorLayer addAnimation:animation forKey:nil]; }
相对时间
● 每次讨论到Core Animation,时间都是相对的,每个动画都有它自己描述的时间,可以独立地加速,延时或者偏移。
beginTime指定了动画开始之前的的延迟时间。这里的延迟从动画添加到可见图层的那一刻开始测量,默认是0(就是说动画会立刻执行)。
speed是一个时间的倍数,默认1.0,减少它会减慢图层/动画的时间,增加它会加快速度。如果2.0的速度,那么对于一个duration为1的动画,实际上在0.5秒的时候就已经完成了。增加
timeOffset只是让动画快进到某一点,例如,对于一个持续1秒的动画来说,设置timeOffset为0.5意味着动画将从一半的地方开始。如果你把
speed设为2.0,把timeOffset设置为0.5,那么你的动画将从动画最后结束的地方开始,因为1秒的动画实际上被缩短到了0.5秒。这个动画仅仅是循环了一圈,然后从头开始播放。
fillMode
● 当动画开始之前和动画结束之后,被设置动画的属性将会是什么值呢?
一种可能是属性和动画没被添加之前保持一致,也就是在模型图层定义的值(见第七章“隐式动画”,模型图层和呈现图层的解释)。
另一种可能是保持动画开始之前那一帧,或者动画结束之后的那一帧。这就是所谓的填充,因为动画开始和结束的值用来填充开始之前和结束之后的时间。
这种行为就交给开发者了,它可以被
CAMediaTiming的fillMode来控制。fillMode是一个NSString类型,可以接受如下四种常量:kCAFillModeForwards kCAFillModeBackwards kCAFillModeBoth kCAFillModeRemoved默认是
kCAFillModeRemoved,当动画不再播放的时候就显示图层模型指定的值剩下的三种类型 “向前”,“向后”或者“向前又向后”去填充动画状态,使得动画在开始前或者结束后仍然保持开始和结束那一刻的值。这就对避免在动画结束的时候急速返回提供另一种方案(见第八章)。但是记住了,当用它来解决这个问题的时候,需要把
removeOnCompletion设置为NO,另外需要给动画添加一个非空的键,于是可以在不需要动画的时候把它从图层上移除。
9.2 层级关系时间
● 动画时间和“图层树的层级”类似,每个动画和图层在时间上都有它自己的层级概念,相对于它的父亲来测量。
对图层调整时间将会影响到它本身和子图层的动画,但不会影响到父图层。另一个相似点是所有的动画都被按照层级组合(使用
CAAnimationGroup实例)。● 对
CALayer或者CAGroupAnimation调整duration和repeatCount/repeatDuration属性并不会影响到子动画。但是
beginTime,timeOffset和speed属性将会影响到子动画。然而在层级关系中,
beginTime指定了父图层开始动画(或者组合关系中的父动画)和 对象自己 将要开始自己动画之间的偏移。类似的,调整CALayer和CAGroupAnimation的speed属性将会对动画以及子动画速度应用一个缩放的因子。
全局时间和本地时间
● CoreAnimation有一个全局时间的概念,也就是所谓的马赫时间(“马赫”实际上是iOS和Mac OS系统内核的命名)。马赫时间在设备上所有进程都是全局的--但是在不同设备上并不是全局的--不过这已经足够对动画的参考点提供便利了,你可以使用
CACurrentMediaTime函数来访问马赫时间:CFTimeInterval time = CACurrentMediaTime();这个函数返回的值其实无关紧要(它返回了设备自从上次启动后的秒数,并不是你所关心的),它真实的作用在于对动画的时间测量提供了一个相对值。
注意当设备休眠的时候马赫时间会暂停,也就是所有的
CAAnimations(基于马赫时间)同样也会暂停。● 每个
CALayer和CAAnimation实例都有自己本地时间的概念,是根据父图层/动画层级关系中的beginTime,timeOffset和speed属性计算。就和转换不同图层之间坐标关系一样,
CALayer同样也提供了方法来转换不同图层之间的本地时间。如下:- (CFTimeInterval)convertTime:(CFTimeInterval)t fromLayer:(CALayer *)l; - (CFTimeInterval)convertTime:(CFTimeInterval)t toLayer:(CALayer *)l;
暂停,倒回和快进
● 给图层添加一个
CAAnimation实际上是给动画对象做了一个不可改变的拷贝,所以对原始动画对象属性的改变对真实的动画并没有作用。★ 直接用
-animationForKey:来检索图层正在进行的动画可以返回正确的动画对象,但是修改它的属性将会抛出异常。
● 如果移除图层正在进行的动画,图层将会急速返回动画之前的状态。但如果在动画移除之前拷贝呈现图层到模型图层,动画将会看起来暂停在那里。但是不好的地方在于之后就不能再恢复动画了。
一个简单的方法是可以利用
CAMediaTiming来暂停图层本身。如果把图层的speed设置成0,它会暂停任何添加到图层上的动画。类似的,设置speed大于1.0将会快进,设置成一个负值将会倒回动画。通过增加主窗口图层的
speed,可以暂停整个应用程序的动画。self.window.layer.speed = 100;
9.3 手动动画
●
timeOffset一个很有用的功能在于你可以它可以让你手动控制动画进程,通过设置speed为0,可以禁用动画的自动播放,然后来使用timeOffset来“来回”显示动画序列。这可以使得运用手势来手动控制动画变得很简单。● 举个简单的例子:还是之前关门的动画,修改代码来用手势控制动画。我们给视图添加一个
UIPanGestureRecognizer,然后用timeOffset左右摇晃。因为在动画添加到图层之后不能再做修改了,我们来通过调整
layer的timeOffset达到同样的效果(清单9.4)。清单9.4 通过触摸手势手动控制动画,关键代码:
@interface ViewController ()

@property (nonatomic, weak) UIView *containerView;
@property (nonatomic, strong) CALayer *doorLayer;

@end

@implementation ViewController

- (void)viewDidLoad
{
    [super viewDidLoad];
    //add the door
    self.doorLayer = [CALayer layer];
    self.doorLayer.frame = CGRectMake(0, 0, 128, 256);
    self.doorLayer.position = CGPointMake(150 - 64, 150);
    self.doorLayer.anchorPoint = CGPointMake(0, 0.5);
    self.doorLayer.contents = (__bridge id)[UIImage imageNamed:@"Door.png"].CGImage;
    [self.containerView.layer addSublayer:self.doorLayer];
    //apply perspective transform
    CATransform3D perspective = CATransform3DIdentity;
    perspective.m34 = -1.0 / 500.0;
    self.containerView.layer.sublayerTransform = perspective;
    //add pan gesture recognizer to handle swipes
    UIPanGestureRecognizer *pan = [[UIPanGestureRecognizer alloc] init];
    [pan addTarget:self action:@selector(pan:)];
    [self.view addGestureRecognizer:pan];
    //pause all layer animations
    self.doorLayer.speed = 0.0;
    //apply swinging animation (which won't play because layer is paused)
    CABasicAnimation *animation = [CABasicAnimation animation];
    animation.keyPath = @"transform.rotation.y";
    animation.toValue = @(-M_PI_2);
    animation.duration = 1.0;
    [self.doorLayer addAnimation:animation forKey:nil];
}

- (void)pan:(UIPanGestureRecognizer *)pan
{
    //get horizontal component of pan gesture
    CGFloat x = [pan translationInView:self.view].x;
    //convert from points to animation duration //using a reasonable scale factor
    x /= 200.0f;
    //update timeOffset and clamp result
    CFTimeInterval timeOffset = self.doorLayer.timeOffset;
    timeOffset = MIN(0.999, MAX(0.0, timeOffset - x));
    self.doorLayer.timeOffset = timeOffset;
    //reset pan gesture
    [pan setTranslation:CGPointZero inView:self.view];
}

@end
这其实是个小诡计,也许相对于 “设置个动画然后每次再显示一帧” 而言,用移动手势来直接设置门的
transform会更简单。在这个例子中的确是这样,但是对于比如说“关键帧”这样更加复杂的情况,或者有多个图层的动画组,相对于“实时计算每个图层的属性”而言,这就显得方便的多了。
10. 缓冲
● 缓冲,用来 “使动画更加真实的操作时间” 的技术。Core Animation使用缓冲来使动画移动更平滑更自然,而不是看起来的那种机械和人工,在这一章我们将要研究如何对你的”动画控制“和“自定义缓冲曲线”。
10.1 动画速度
● 速率由以下公式计算而来:
velocity = change / time
● 假设速度在整个动画过程中都是恒定不变的(就如同第八章“显式动画”的情况),对于这种恒定速度的动画我们称之为“线性步调”,而且从技术的角度而言这也是实现动画最简单的方式,但也是完全不真实的一种效果。
● 如何动画中实现 ”物体在运动中“ 的 “加速度” 呢?一种方法是使用物理引擎来对运动物体的摩擦和动量来建模,然而这会使得计算过于复杂。我们称这种类型的方程为缓冲函数,幸运的是,Core Animation内嵌了一系列标准函数提供给我们使用。
CAMediaTimingFunction
● 那么该如何使用缓冲方程式呢?首先需要设置CAAnimation的timingFunction属性,是CAMediaTimingFunction类的一个对象。如果想改变隐式动画的计时函数,同样也可以使用CATransaction的+setAnimationTimingFunction:方法。
● 这里有一些方式来创建CAMediaTimingFunction,最简单的方式是调用+timingFunctionWithName:的构造方法。这里传入如下几个常量之一:
kCAMediaTimingFunctionLinear
kCAMediaTimingFunctionEaseIn
kCAMediaTimingFunctionEaseOut
kCAMediaTimingFunctionEaseInEaseOut
kCAMediaTimingFunctionDefault
kCAMediaTimingFunctionLinear选项创建了一个线性的计时函数,同样也是CAAnimation的timingFunction属性为空时候的默认函数。线性步调对于那些立即加速并且保持匀速到达终点的场景会有意义(例如射出枪膛的子弹)。
kCAMediaTimingFunctionEaseIn常量创建了一个慢慢加速然后突然停止的方法。对于之前提到的自由落体的例子来说很适合,或者比如对准一个目标的导弹的发射。
kCAMediaTimingFunctionEaseOut则恰恰相反,它以一个全速开始,然后慢慢减速停止。它有一个削弱的效果,应用的场景比如一扇门慢慢地关上,而不是砰地一声
kCAMediaTimingFunctionEaseInEaseOut创建了一个慢慢加速然后再慢慢减速的过程。这是现实世界大多数物体移动的方式,也是大多数动画来说最好的选择。实际上当使用UIView的动画方法时,他的确是默认的,但当创建CAAnimation的时候,就需要手动设置它了。
kCAMediaTimingFunctionDefault,它和kCAMediaTimingFunctionEaseInEaseOut很类似,但是加速和减速的过程都稍微有些慢。虽然它的名字说是默认的,但还是要记住当创建显式的CAAnimation它并不是默认选项(换句话说,默认的图层行为动画用kCAMediaTimingFunctionDefault作为它们的计时方法)。
清单10.1 缓冲函数的简单测试,关键代码:
- (void)touchesBegan:(NSSet *)touches withEvent:(UIEvent *)event
{
    //configure the transaction
    [CATransaction begin];
    [CATransaction setAnimationDuration:1.0];
    [CATransaction setAnimationTimingFunction:[CAMediaTimingFunction functionWithName:kCAMediaTimingFunctionEaseOut]];
    //set the position
    self.colorLayer.position = [[touches anyObject] locationInView:self.view];
    //commit transaction
    [CATransaction commit];
}UIView的动画缓冲
● UIKit的动画也同样支持这些缓冲方法的使用,尽管语法和常量有些不同,为了改变UIView动画的缓冲选项,给options参数添加如下常量之一:
UIViewAnimationOptionCurveEaseInOut
UIViewAnimationOptionCurveEaseIn
UIViewAnimationOptionCurveEaseOut
UIViewAnimationOptionCurveLinear
它们和CAMediaTimingFunction紧密关联,UIViewAnimationOptionCurveEaseInOut是默认值(这里没有kCAMediaTimingFunctionDefault相对应的值了)。
清单10.2 使用UIKit动画的缓冲测试工程,关键代码:
- (void)touchesBegan:(NSSet *)touches withEvent:(UIEvent *)event
{
    //perform the animation
    [UIView animateWithDuration:1.0 delay:0.0
                        options:UIViewAnimationOptionCurveEaseOut
                     animations:^{
                            //set the position
                            self.colorView.center = [[touches anyObject] locationInView:self.view];
                        }
                     completion:NULL];

}
缓冲和关键帧动画
● CAKeyframeAnimation有一个NSArray类型的timingFunctions属性,我们可以用它来对 “每次动画的步骤” 指定不同的计时函数。但是指定函数的个数一定要等于keyframes数组的元素个数减一,因为它是描述每一帧之间动画速度的函数。
●在这个例子中,我们自始至终想使用同一个缓冲函数,但我们同样需要一个函数的数组来告诉动画不停地重复每个步骤,而不是在整个动画序列只做一次缓冲,我们简单地使用包含多个相同函数拷贝的数组就可以了(见清单10.3)。
第八章里面颜色切换的关键帧动画由于线性变换的原因(见清单8.5)看起来有些奇怪,使得颜色变换非常不自然。为了纠正这点,我们来用更加合适的缓冲方法,例如kCAMediaTimingFunctionEaseIn,给图层的颜色变化添加一点脉冲效果,让它更像现实中的一个彩色灯泡。动画看起来更加自然。
清单10.3 对CAKeyframeAnimation使用CAMediaTimingFunction,关键代码:
@interface ViewController ()

@property (nonatomic, weak) IBOutlet UIView *layerView;
@property (nonatomic, weak) IBOutlet CALayer *colorLayer;

@end

@implementation ViewController

- (void)viewDidLoad
{
    [super viewDidLoad];
    //create sublayer
    self.colorLayer = [CALayer layer];
    self.colorLayer.frame = CGRectMake(50.0f, 50.0f, 100.0f, 100.0f);
    self.colorLayer.backgroundColor = [UIColor blueColor].CGColor;
    //add it to our view
    [self.layerView.layer addSublayer:self.colorLayer];
}

- (IBAction)changeColor
{
    //create a keyframe animation
    CAKeyframeAnimation *animation = [CAKeyframeAnimation animation];
    animation.keyPath = @"backgroundColor";
    animation.duration = 2.0;
    animation.values = @[
                         (__bridge id)[UIColor blueColor].CGColor,
                         (__bridge id)[UIColor redColor].CGColor,
                         (__bridge id)[UIColor greenColor].CGColor,
                         (__bridge id)[UIColor blueColor].CGColor ];
    //add timing function
    CAMediaTimingFunction *fn = [CAMediaTimingFunction functionWithName: kCAMediaTimingFunctionEaseIn];
    animation.timingFunctions = @[fn, fn, fn];
    //apply animation to layer
    [self.colorLayer addAnimation:animation forKey:nil];
}

@end
10.2 自定义缓冲函数
● 除了+functionWithName:之外,CAMediaTimingFunction同样有另一个构造函数,一个有四个浮点参数的+functionWithControlPoints::::(注意这里奇怪的语法,并没有包含具体每个参数的名称,这在objective-C中是合法的,但是却违反了苹果对方法命名的指导方针,而且看起来是一个奇怪的设计)。
了解一些CAMediaTimingFunction是如何工作的:
三次贝塞尔曲线
● CAMediaTimingFunction函数的主要原则在于它把 “输入的时间” 转换成起点和终点之间成 “比例”的改变。
我们可以用一个简单的图标来解释,横轴代表时间,纵轴代表改变的量,于是线性的缓冲就是一条从起点开始的简单的斜线(图10.1)。
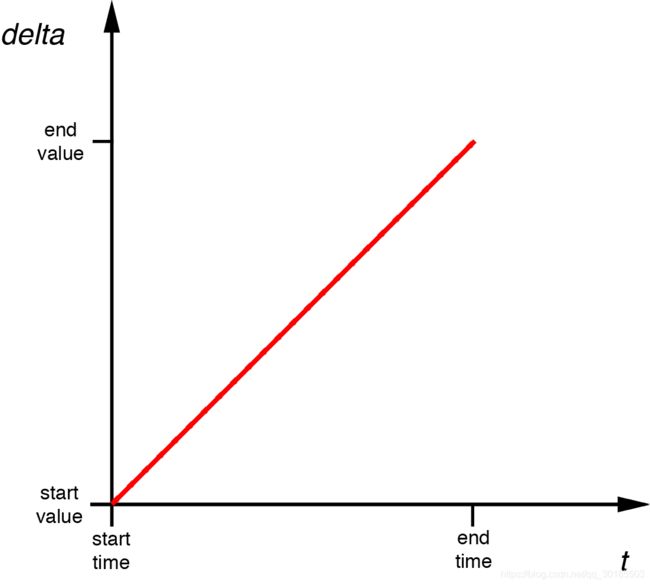 图10.1 线性缓冲函数的图像
一个三次贝塞尔曲线通过四个点来定义,第一个和最后一个点代表了曲线的起点和终点,剩下中间两个点叫做控制点,因为它们控制了曲线的形状,贝塞尔曲线的控制点其实是位于曲线之外的点,也就是说曲线并不一定要穿过它们。你可以把它们想象成吸引经过它们曲线的磁铁。
图10.2展示了一个三次贝塞尔缓冲函数的例子
 图10.2 三次贝塞尔缓冲函数
实际上它是一个很奇怪的函数,先加速,然后减速,最后快到达终点的时候又加速,那么标准的缓冲函数又该如何用图像来表示呢?
● CAMediaTimingFunction有一个叫做-getControlPointAtIndex:values:的方法,可以用来检索曲线的点,这个方法的设计的确有点奇怪(或许也就只有苹果能回答为什么不简单返回一个CGPoint),但是使用它我们可以找到标准缓冲函数的点,然后用UIBezierPath和CAShapeLayer来把它画出来
曲线的起始和终点始终是{0, 0}和{1, 1},于是我们只需要检索曲线的第二个和第三个点(控制点)。具体代码见清单10.4。所有的标准缓冲函数的图像见图10.3。
清单10.4 使用UIBezierPath绘制CAMediaTimingFunction,关键代码:
@interface ViewController ()

@property (nonatomic, weak) IBOutlet UIView *layerView;

@end

@implementation ViewController

- (void)viewDidLoad
{
    [super viewDidLoad];
    //create timing function
    CAMediaTimingFunction *function = [CAMediaTimingFunction functionWithName: kCAMediaTimingFunctionEaseOut];
    //get control points
    CGPoint controlPoint1, controlPoint2;
    [function getControlPointAtIndex:1 values:(float *)&controlPoint1];
    [function getControlPointAtIndex:2 values:(float *)&controlPoint2];
    //create curve
    UIBezierPath *path = [[UIBezierPath alloc] init];
    [path moveToPoint:CGPointZero];
    [path addCurveToPoint:CGPointMake(1, 1)
            controlPoint1:controlPoint1 controlPoint2:controlPoint2];
    //scale the path up to a reasonable size for display
    [path applyTransform:CGAffineTransformMakeScale(200, 200)];
    //create shape layer
    CAShapeLayer *shapeLayer = [CAShapeLayer layer];
    shapeLayer.strokeColor = [UIColor redColor].CGColor;
    shapeLayer.fillColor = [UIColor clearColor].CGColor;
    shapeLayer.lineWidth = 4.0f;
    shapeLayer.path = path.CGPath;
    [self.layerView.layer addSublayer:shapeLayer];
    //flip geometry so that 0,0 is in the bottom-left
    self.layerView.layer.geometryFlipped = YES;
}

@end
图10.3 标准CAMediaTimingFunction缓冲曲线
那么对于我们自定义时钟指针的缓冲函数来说,我们需要初始微弱,然后迅速上升,最后缓冲到终点的曲线,通过一些实验之后,最终结果如下:
[CAMediaTimingFunction functionWithControlPoints:1 :0 :0.75 :1];
如果把“上述代码”转换成缓冲函数的图像,最后如图10.4所示,如果把它添加到时钟的程序,就形成了之前一直期待的非常赞的效果(见代清单10.5)。
清单10.5 添加了自定义缓冲函数的时钟程序,关键代码:
- (void)setAngle:(CGFloat)angle forHand:(UIView *)handView animated:(BOOL)animated
{
    //generate transform
    CATransform3D transform = CATransform3DMakeRotation(angle, 0, 0, 1);
    if (animated) {
        //create transform animation
        CABasicAnimation *animation = [CABasicAnimation animation];
        animation.keyPath = @"transform";
        animation.fromValue = [handView.layer.presentationLayer valueForKey:@"transform"];
        animation.toValue = [NSValue valueWithCATransform3D:transform];
        animation.duration = 0.5;
        animation.delegate = self;
        animation.timingFunction = [CAMediaTimingFunction functionWithControlPoints:1 :0 :0.75 :1];
        //apply animation
        handView.layer.transform = transform;
        [handView.layer addAnimation:animation forKey:nil];
    } else {
        //set transform directly
        handView.layer.transform = transform;
    }
}
图10.4 自定义适合时钟的缓冲函数的图像
更加复杂的动画曲线
● 考虑一个橡胶球掉落到坚硬的地面的场景,当开始下落的时候,它会持续加速知道落到地面,然后经过几次反弹,最后停下来。如果用一张图来说明,它会如图10.5所示。
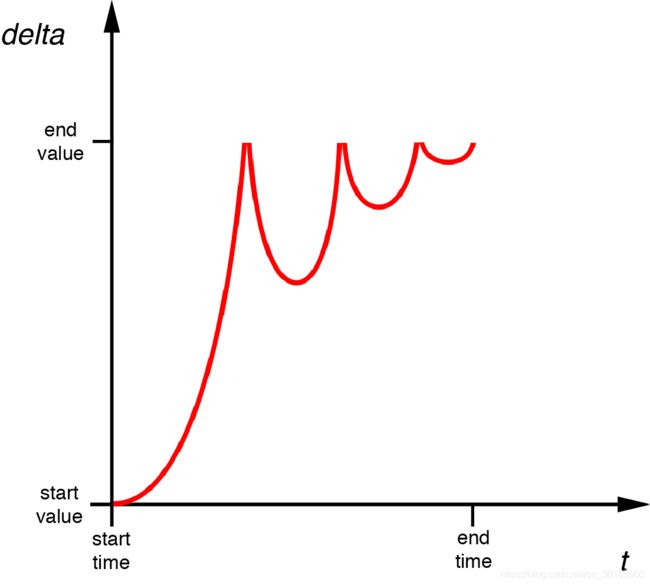 图10.5 一个没法用三次贝塞尔曲线描述的反弹的动画
这种效果没法用一个简单的三次贝塞尔曲线表示,于是不能用CAMediaTimingFunction来完成。但如果想要实现这样的效果,可以用如下几种方法:
- 用
CAKeyframeAnimation创建一个动画,然后分割成几个步骤,每个小步骤使用自己的计时函数(具体下节介绍)。 - 使用定时器逐帧更新实现动画(见第11章,“基于定时器的动画”)。
基于关键帧的缓冲
● 为了使用关键帧实现反弹动画,我们需要在缓冲曲线中对每一个显著的点创建一个关键帧(在这个情况下,关键点也就是每次反弹的峰值),然后应用缓冲函数把每段曲线连接起来。同时,我们也需要通过keyTimes来指定每个关键帧的时间偏移,由于每次反弹的时间都会减少,于是关键帧并不会均匀分布。
清单10.6 使用关键帧实现反弹球的动画,关键代码:
@interface ViewController ()
@property (nonatomic, weak) IBOutlet UIView *containerView;
@property (nonatomic, strong) UIImageView *ballView;
@end
@implementation ViewController
- (void)viewDidLoad
{
[super viewDidLoad];
//add ball image view
UIImage *ballImage = [UIImage imageNamed:@"Ball.png"];
self.ballView = [[UIImageView alloc] initWithImage:ballImage];
[self.containerView addSubview:self.ballView];
//animate
[self animate];
}
- (void)touchesBegan:(NSSet *)touches withEvent:(UIEvent *)event
{
//replay animation on tap
[self animate];
}
- (void)animate
{
//reset ball to top of screen
self.ballView.center = CGPointMake(150, 32);
//create keyframe animation
CAKeyframeAnimation *animation = [CAKeyframeAnimation animation];
animation.keyPath = @"position";
animation.duration = 1.0;
animation.delegate = self;
animation.values = @[
[NSValue valueWithCGPoint:CGPointMake(150, 32)],
[NSValue valueWithCGPoint:CGPointMake(150, 268)],
[NSValue valueWithCGPoint:CGPointMake(150, 140)],
[NSValue valueWithCGPoint:CGPointMake(150, 268)],
[NSValue valueWithCGPoint:CGPointMake(150, 220)],
[NSValue valueWithCGPoint:CGPointMake(150, 268)],
[NSValue valueWithCGPoint:CGPointMake(150, 250)],
[NSValue valueWithCGPoint:CGPointMake(150, 268)]
];
animation.timingFunctions = @[
[CAMediaTimingFunction functionWithName: kCAMediaTimingFunctionEaseIn],
[CAMediaTimingFunction functionWithName: kCAMediaTimingFunctionEaseOut],
[CAMediaTimingFunction functionWithName: kCAMediaTimingFunctionEaseIn],
[CAMediaTimingFunction functionWithName: kCAMediaTimingFunctionEaseOut],
[CAMediaTimingFunction functionWithName: kCAMediaTimingFunctionEaseIn],
[CAMediaTimingFunction functionWithName: kCAMediaTimingFunctionEaseOut],
[CAMediaTimingFunction functionWithName: kCAMediaTimingFunctionEaseIn]
];
animation.keyTimes = @[@0.0, @0.3, @0.5, @0.7, @0.8, @0.9, @0.95, @1.0];
//apply animation
self.ballView.layer.position = CGPointMake(150, 268);
[self.ballView.layer addAnimation:animation forKey:nil];
}
@end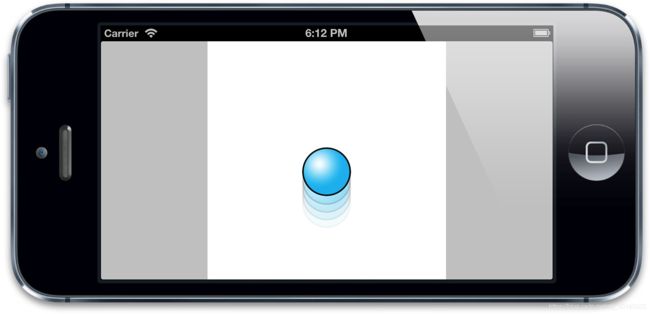 图10.6 使用关键帧实现的反弹球动画
这种方式还算不错,但是实现起来略显笨重(因为要不停地尝试计算各种关键帧和时间偏移)并且和动画强绑定了(因为如果要改变动画的一个属性,那就意味着要重新计算所有的关键帧)。那该如何写一个方法,用缓冲函数来把任何简单的属性动画转换成关键帧动画呢,下面我们来实现它。
流程自动化
● 在清单10.6中,我们把动画分割成相当大的几块,但如果我们把动画分割成更小的几部分,那么我们就可以用直线来拼接这些曲线(也就是线性缓冲,以直代曲)。为了实现自动化,我们需要知道如何做如下两件事情:
- 自动把任意属性动画分割成多个关键帧
- 用一个数学函数表示弹性动画,使得可以对帧做便宜
为了解决第一个问题,我们需要复制Core Animation的插值机制。这是一个传入起点和终点,然后在这两个点之间指定时间点产出一个新点的机制。对于简单的浮点起始值,公式如下(假设时间从0到1):
value = (endValue – startValue) × time + startValue;
一旦我们可以用代码获取属性动画的起始值之间的任意插值,我们就可以把动画分割成许多独立的关键帧,然后产出一个线性的关键帧动画。清单10.7展示了相关代码。
注意到我们用了60 x 动画时间(秒做单位)作为关键帧的个数,这时因为Core Animation按照每秒60帧去渲染屏幕更新,所以如果我们每秒生成60个关键帧,就可以保证动画足够的平滑(尽管实际上很可能用更少的帧率就可以达到很好的效果)。
我们在示例中仅仅引入了对CGPoint类型的插值代码。但是,从代码中很清楚能看出如何扩展成支持别的类型。作为不能识别类型的备选方案,我们仅仅在前一半返回了fromValue,在后一半返回了toValue。
清单10.7 使用插入的值创建一个关键帧动画,关键代码:
float interpolate(float from, float to, float time)
{
    return (to - from) * time + from;
}

- (id)interpolateFromValue:(id)fromValue toValue:(id)toValue time:(float)time
{
    if ([fromValue isKindOfClass:[NSValue class]]) {
        //get type
        const char *type = [fromValue objCType];
        if (strcmp(type, @encode(CGPoint)) == 0) {
            CGPoint from = [fromValue CGPointValue];
            CGPoint to = [toValue CGPointValue];
            CGPoint result = CGPointMake(interpolate(from.x, to.x, time), interpolate(from.y, to.y, time));
            return [NSValue valueWithCGPoint:result];
        }
    }
    //provide safe default implementation
    return (time < 0.5)? fromValue: toValue;
}

- (void)animate
{
    //reset ball to top of screen
    self.ballView.center = CGPointMake(150, 32);
    //set up animation parameters
    NSValue *fromValue = [NSValue valueWithCGPoint:CGPointMake(150, 32)];
    NSValue *toValue = [NSValue valueWithCGPoint:CGPointMake(150, 268)];
    CFTimeInterval duration = 1.0;
    //generate keyframes
    NSInteger numFrames = duration * 60;
    NSMutableArray *frames = [NSMutableArray array];
    for (int i = 0; i < numFrames; i++) {
        float time = 1 / (float)numFrames * i;
        [frames addObject:[self interpolateFromValue:fromValue toValue:toValue time:time]];
    }
    //create keyframe animation
    CAKeyframeAnimation *animation = [CAKeyframeAnimation animation];
    animation.keyPath = @"position";
    animation.duration = 1.0;
    animation.delegate = self;
    animation.values = frames;
    //apply animation
    [self.ballView.layer addAnimation:animation forKey:nil];
}
清单10.8 用关键帧实现自定义的缓冲函数,关键代码:
- (void)animate
{
    //reset ball to top of screen
    self.ballView.center = CGPointMake(150, 32);
    //set up animation parameters
    NSValue *fromValue = [NSValue valueWithCGPoint:CGPointMake(150, 32)];
    NSValue *toValue = [NSValue valueWithCGPoint:CGPointMake(150, 268)];
    CFTimeInterval duration = 1.0;
    //generate keyframes
    NSInteger numFrames = duration * 60;
    NSMutableArray *frames = [NSMutableArray array];
    for (int i = 0; i < numFrames; i++) {
        float time = 1/(float)numFrames * i;
        //apply easing
        time = bounceEaseOut(time);
        //add keyframe
        [frames addObject:[self interpolateFromValue:fromValue toValue:toValue time:time]];
    }
    //create keyframe animation
    CAKeyframeAnimation *animation = [CAKeyframeAnimation animation];
    animation.keyPath = @"position";
    animation.duration = 1.0;
    animation.delegate = self;
    animation.values = frames;
    //apply animation
    [self.ballView.layer addAnimation:animation forKey:nil];
}
缓冲背后的数学并不很简单,但是幸运的是我们不需要一一实现它。罗伯特·彭纳有一个网页关于缓冲函数(http://www.robertpenner.com/easing),包含了大多数普遍的缓冲函数的多种编程语言的实现的链接,包括C。这里是一个缓冲进入缓冲退出函数的示例(实际上有很多不同的方式去实现它)。
float quadraticEaseInOut(float t)
{
    return (t < 0.5)? (2 * t * t): (-2 * t * t) + (4 * t) - 1;
}
对我们的弹性球来说,我们可以使用bounceEaseOut函数:
float bounceEaseOut(float t)
{
    if (t < 4/11.0) {
        return (121 * t * t)/16.0;
    } else if (t < 8/11.0) {
        return (363/40.0 * t * t) - (99/10.0 * t) + 17/5.0;
    } else if (t < 9/10.0) {
        return (4356/361.0 * t * t) - (35442/1805.0 * t) + 16061/1805.0;
    }
    return (54/5.0 * t * t) - (513/25.0 * t) + 268/25.0;
}
11. 基于定时器的动画
● 允许我们精确地控制一帧一帧展示的基于定时器的动画。基于定时器的动画--给我们对动画更多控制的选择,并且实现对动画的实时操纵。
11.1 定时帧
● 动画看起来是用来显示一段连续的运动过程,但实际上当在固定位置上展示像素的时候并不能做到这一点。一般来说这种显示都无法做到连续的移动,能做的仅仅是足够快地展示一系列静态图片,只是看起来像是做了运动。
● 我们之前提到过iOS按照每秒60次刷新屏幕,然后CAAnimation计算出需要展示的新的帧,然后在每次屏幕更新的时候同步绘制上去,CAAnimation最机智的地方在于每次刷新需要展示的时候去计算插值和缓冲。
NSTimer
● 时钟那个例子,我们用了NSTimer来对钟表的指针做定时动画,一秒钟更新一次,但是如果我们把频率调整成一秒钟更新60次的话,原理是完全相同的。
● 我们来试着用NSTimer来修改第十章中弹性球的例子。由于现在我们在定时器启动之后连续计算动画帧,我们需要在类中添加一些额外的属性来存储动画的fromValue,toValue,duration和当前的timeOffset(见清单11.1)。
清单11.1 使用NSTimer实现弹性球动画,关键代码:
@interface ViewController ()

@property (nonatomic, weak) IBOutlet UIView *containerView;
@property (nonatomic, strong) UIImageView *ballView;
@property (nonatomic, strong) NSTimer *timer;
@property (nonatomic, assign) NSTimeInterval duration;
@property (nonatomic, assign) NSTimeInterval timeOffset;
@property (nonatomic, strong) id fromValue;
@property (nonatomic, strong) id toValue;

@end

@implementation ViewController

- (void)viewDidLoad
{
    [super viewDidLoad];
    //add ball image view
    UIImage *ballImage = [UIImage imageNamed:@"Ball.png"];
    self.ballView = [[UIImageView alloc] initWithImage:ballImage];
    [self.containerView addSubview:self.ballView];
    //animate
    [self animate];
}

- (void)touchesBegan:(NSSet *)touches withEvent:(UIEvent *)event
{
    //replay animation on tap
    [self animate];
}

float interpolate(float from, float to, float time)
{
    return (to - from) * time + from;
}

- (id)interpolateFromValue:(id)fromValue toValue:(id)toValue time:(float)time
{
    if ([fromValue isKindOfClass:[NSValue class]]) {
        //get type
        const char *type = [(NSValue *)fromValue objCType];
        if (strcmp(type, @encode(CGPoint)) == 0) {
            CGPoint from = [fromValue CGPointValue];
            CGPoint to = [toValue CGPointValue];
            CGPoint result = CGPointMake(interpolate(from.x, to.x, time), interpolate(from.y, to.y, time));
            return [NSValue valueWithCGPoint:result];
        }
    }
    //provide safe default implementation
    return (time < 0.5)? fromValue: toValue;
}

float bounceEaseOut(float t)
{
    if (t < 4/11.0) {
        return (121 * t * t)/16.0;
    } else if (t < 8/11.0) {
        return (363/40.0 * t * t) - (99/10.0 * t) + 17/5.0;
    } else if (t < 9/10.0) {
        return (4356/361.0 * t * t) - (35442/1805.0 * t) + 16061/1805.0;
    }
    return (54/5.0 * t * t) - (513/25.0 * t) + 268/25.0;
}

- (void)animate
{
    //reset ball to top of screen
    self.ballView.center = CGPointMake(150, 32);
    //configure the animation
    self.duration = 1.0;
    self.timeOffset = 0.0;
    self.fromValue = [NSValue valueWithCGPoint:CGPointMake(150, 32)];
    self.toValue = [NSValue valueWithCGPoint:CGPointMake(150, 268)];
    //stop the timer if it's already running
    [self.timer invalidate];
    //start the timer
    self.timer = [NSTimer scheduledTimerWithTimeInterval:1/60.0
                                                  target:self
                                                selector:@selector(step:)
                                                userInfo:nil
                                                 repeats:YES];
}

- (void)step:(NSTimer *)step
{
    //update time offset
    self.timeOffset = MIN(self.timeOffset + 1/60.0, self.duration);
    //get normalized time offset (in range 0 - 1)
    float time = self.timeOffset / self.duration;
    //apply easing
    time = bounceEaseOut(time);
    //interpolate position
    id position = [self interpolateFromValue:self.fromValue
                                     toValue:self.toValue
                                  time:time];
    //move ball view to new position
    self.ballView.center = [position CGPointValue];
    //stop the timer if we've reached the end of the animation
    if (self.timeOffset >= self.duration) {
        [self.timer invalidate];
        self.timer = nil;
    }
}

@end
● 了解NSTimer是如何工作的。
iOS上的每个线程都管理了一个NSRunloop,字面上看就是通过一个循环来完成一些任务列表。但是对主线程,这些任务包含如下几项:
- 处理触摸事件
- 发送和接受网络数据包
- 执行使用gcd的代码
- 处理计时器行为
- 屏幕重绘
当你设置一个NSTimer,他会被插入到当前任务列表中,然后直到指定时间过去之后才会被执行。但是何时启动定时器并没有一个时间上限,而且它只会在列表中上一个任务完成之后开始执行。这通常会导致有几毫秒的延迟,但是如果上一个任务过了很久才完成就会导致延迟很长一段时间。
★ 屏幕重绘的频率是一秒钟六十次,但是和定时器行为一样,如果列表中上一个执行了很长时间,它也会延迟。这些延迟都是一个随机值,于是就不能保证定时器精准地一秒钟执行六十次。有时候发生在屏幕重绘之后,这就会使得更新屏幕会有个延迟,看起来就是动画卡壳了。有时候定时器会在屏幕更新的时候执行两次,于是动画看起来就跳动了。
我们可以通过一些途径来优化:
- 我们可以用
CADisplayLink让更新频率严格控制在每次屏幕刷新之后。 - 基于真实帧的持续时间而不是假设的更新频率来做动画。
- 调整动画计时器的
run loop模式,这样就不会被别的事件干扰。
CADisplayLink
● CADisplayLink是CoreAnimation提供的另一个类似于NSTimer的类,它总是在屏幕完成一次更新之前启动,它的接口设计的和NSTimer很类似,所以它实际上就是一个内置实现的替代选择,但是和timeInterval以秒为单位不同,CADisplayLink有一个整型的frameInterval属性,指定了间隔多少帧之后才执行。
默认值是1,意味着每次屏幕更新之前都会执行一次。但是如果动画的代码执行起来超过了六十分之一秒,你可以指定frameInterval为2,就是说动画每隔一帧执行一次(一秒钟30帧)或者3,也就是一秒钟20次,等等。
★ 用CADisplayLink而不是NSTimer,会保证帧率足够连续,使得动画看起来更加平滑,但即使CADisplayLink也不能保证每一帧都按计划执行,一些失去控制的离散的任务或者事件(例如资源紧张的后台程序)可能会导致动画偶尔地丢帧。当使用NSTimer的时候,一旦有机会计时器就会开启,但是CADisplayLink却不一样:如果它丢失了帧,就会直接忽略它们,然后在下一次更新的时候接着运行。
计算帧的持续时间
● 由于我们不能够计算出一帧真实的持续时间,所以需要手动测量。我们可以在每帧开始刷新的时候用CACurrentMediaTime()记录当前时间,然后和上一帧记录的时间去比较。通过比较这些时间,我们就可以得到真实的每帧持续的时间,然后代替硬编码的六十分之一秒。
清单11.2 通过测量每帧持续的时间来使得动画更加平滑,关键代码:
@interface ViewController ()

@property (nonatomic, weak) IBOutlet UIView *containerView;
@property (nonatomic, strong) UIImageView *ballView;
@property (nonatomic, strong) CADisplayLink *timer;
@property (nonatomic, assign) CFTimeInterval duration;
@property (nonatomic, assign) CFTimeInterval timeOffset;
@property (nonatomic, assign) CFTimeInterval lastStep;
@property (nonatomic, strong) id fromValue;
@property (nonatomic, strong) id toValue;

@end

@implementation ViewController

...

- (void)animate
{
    //reset ball to top of screen
    self.ballView.center = CGPointMake(150, 32);
    //configure the animation
    self.duration = 1.0;
    self.timeOffset = 0.0;
    self.fromValue = [NSValue valueWithCGPoint:CGPointMake(150, 32)];
    self.toValue = [NSValue valueWithCGPoint:CGPointMake(150, 268)];
    //stop the timer if it's already running
    [self.timer invalidate];
    //start the timer
    self.lastStep = CACurrentMediaTime();
    self.timer = [CADisplayLink displayLinkWithTarget:self
                                             selector:@selector(step:)];
    [self.timer addToRunLoop:[NSRunLoop mainRunLoop]
                     forMode:NSDefaultRunLoopMode];
}

- (void)step:(CADisplayLink *)timer
{
    //calculate time delta
    CFTimeInterval thisStep = CACurrentMediaTime();
    CFTimeInterval stepDuration = thisStep - self.lastStep;
    self.lastStep = thisStep;
    //update time offset
    self.timeOffset = MIN(self.timeOffset + stepDuration, self.duration);
    //get normalized time offset (in range 0 - 1)
    float time = self.timeOffset / self.duration;
    //apply easing
    time = bounceEaseOut(time);
    //interpolate position
    id position = [self interpolateFromValue:self.fromValue toValue:self.toValue
                                        time:time];
    //move ball view to new position
    self.ballView.center = [position CGPointValue];
    //stop the timer if we've reached the end of the animation
    if (self.timeOffset >= self.duration) {
        [self.timer invalidate];
        self.timer = nil;
    }
}

@end
Run Loop 模式
● 注意到当创建CADisplayLink的时候,我们需要指定一个run loop和run loop mode,对于run loop来说,我们就使用了主线程的run loop,因为任何用户界面的更新都需要在主线程执行,但是模式的选择就并不那么清楚了,每个添加到run loop的任务都有一个指定了优先级的模式,为了保证用户界面保持平滑,iOS会提供和用户界面相关任务的优先级,而且当UI很活跃的时候的确会暂停一些别的任务。
● 一个典型的例子就是当是用UIScrollview滑动的时候,重绘滚动视图的内容会比别的任务优先级更高,所以标准的NSTimer和网络请求就不会启动,一些常见的run loop模式如下:
NSDefaultRunLoopMode- 标准优先级NSRunLoopCommonModes- 高优先级UITrackingRunLoopMode- 用于UIScrollView和别的控件的动画
但是要小心,因为如果动画在一个高帧率情况下运行,你会发现一些别的类似于定时器的任务或者类似于滑动的其他iOS动画会暂停,直到动画结束。
● 同样可以同时对CADisplayLink指定多个run loop模式,于是我们可以同时加入NSDefaultRunLoopMode和UITrackingRunLoopMode来保证它不会被滑动打断,也不会被其他UIKit控件动画影响性能,像这样:
self.timer = [CADisplayLink displayLinkWithTarget:self selector:@selector(step:)];
[self.timer addToRunLoop:[NSRunLoop mainRunLoop] forMode:NSDefaultRunLoopMode];
[self.timer addToRunLoop:[NSRunLoop mainRunLoop] forMode:UITrackingRunLoopMode];
● 和CADisplayLink类似,NSTimer同样也可以使用不同的run loop模式配置,通过别的函数,而不是+scheduledTimerWithTimeInterval:构造器
self.timer = [NSTimer timerWithTimeInterval:1/60.0
                                 target:self
                               selector:@selector(step:)
                               userInfo:nil
                                repeats:YES];
[[NSRunLoop mainRunLoop] addTimer:self.timer
                          forMode:NSRunLoopCommonModes];
11.2 物理模拟
● 即使使用了基于定时器的动画来复制第10章中关键帧的行为,但还是会有一些本质上的区别:在关键帧的实现中,我们提前计算了所有帧,但是在新的解决方案中,我们实际上实在按需要再计算。意义在于我们可以根据用户输入实时修改动画的逻辑,或者和别的实时动画系统例如物理引擎进行整合。
Chipmunk
● 我们来基于物理学创建一个真实的重力模拟效果来取代当前基于缓冲的弹性动画,但即使模拟2D的物理效果就已近极其复杂了,所以就不要尝试去实现它了,直接用开源的物理引擎库好了。
● 我们将要使用的物理引擎叫做Chipmunk。另外的2D物理引擎也同样可以(例如Box2D),但是Chipmunk使用纯C写的,而不是C++,好处在于更容易和Objective-C项目整合。
● Chipmunk完整的物理引擎相当巨大复杂,但是我们只会使用如下几个类:
cpSpace- 这是所有的物理结构体的容器。它有一个大小和一个可选的重力矢量cpBody- 它是一个固态无弹力的刚体。它有一个坐标,以及其他物理属性,例如质量,运动和摩擦系数等等。cpShape- 它是一个抽象的几何形状,用来检测碰撞。可以给结构体添加一个多边形,而且cpShape有各种子类来代表不同形状的类型。