Q88:全局光照(Global Illumination)——Path Tracing
88.1 引入(Introduction)
截至当前,回忆一下我们学过的针对直接光照和间接光照的不同反射模型。
直接光照:
Phong反射模型。包含漫反射部分和高光反射部分。
间接光照:
对于镜面材料,有镜面反射模型;
对于高光材料,有高光反射模型;
但是,对于粗糙表面(matte,漫射材料)呢?截至当前,除了ambient,我们尚未考虑漫射材料的其他间接光照。
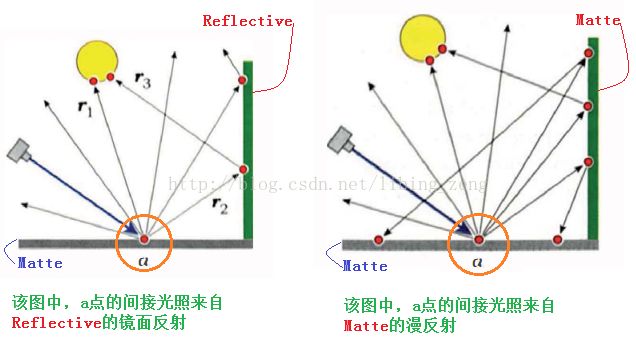
漫射材料的其他间接光照有两种情况:
1,间接光照来自其他漫射材料的漫反射;
2,间接光照来自其他反射镜面(或高光)材料的镜面(或高光)反射。
如下图示意:
很明显,对于Matte材料的物体,这些间接光照是不能被忽略的。
所谓“全局光照算法”,即是模拟图形中所有对图形产生效果的光线。我们这里将要学习的Path Tracing则是其中一种“全局光照算法”。
88.2 Path Tracing
Path Tracing是一种计算有面积光源的场景中的直接光照和间接光照的简单粗暴的概念上理想的技术。
之所以说其“简单”,是因为“原理简单”。
之所以说其“粗暴”,是因为“如要消除图形中可见的噪音,需要耗费的时间特别长”。
之所以说其“概念上理想”,是因为“其一,能够模拟所有光线,所以‘理想’;其二,费时,所以只能停留在‘概念上’”。
另外,先声明一点。
其中提到“面积光源”指的是发光材质的几何物体,在Path Tracing的过程中考虑的不是“光源”,而是“发光材质”。
这里的发光材质可以是任何几何物体,不必限制于球面、矩形、圆之类。
因为Path Tracing过程中用到的只是“发光材质”的特性,而不是“面积光源”的概念,所以不需要对其对应的几何物体进行采样。
Path Tracing的过程:
一条光线进入场景(如上图中黄色起点的光线),然后开始追踪这条光线。过程中光线会因为撞击到场景中的物体而发生反射(可能是任何BRDF)。一直追踪,一直追踪,直到:
光线撞击到发光材质的物体(如a图所示);
或者:达到最大反射次数(如b图所示);
或者:离开了场景(如c图所示)。
如上三种情况,只有“撞击到发光材质的物体”情况,返回的是发光材质的光;其他两种情况返回的是背景色(黑色)。
追踪过程中,光线在所有撞击点处是怎么反射的呢?
这个是根据撞击点处的材质的BRDF来确定的。所有的材质类中都需要添加一个sample_f()函数来计算发生撞击后反射光线的方向和相应的概率。(这里的“所有材质”不包括“发光材质”,因为当光线撞击到发光材质物体时,返回的是发光材质的光)。
我们再看看之前贴的那张图:
如左图。
原始光线和Matte材质物体相撞于a点,接下来,我们需要对a点进行着色。怎么着色?根据a点的Matte材质颜色、a点的直接光照、a点的间接光照。对于Path Tracing算法,是不考虑“直接光照”的。因为在Path Tracing算法中只有“发光材质的物体”,没有“光源”。或者说Path Tracing算法将“直接光照”也当作“间接光照”来处理。怎么处理?在撞击点a处,由于该处是Matte材质,所以会依据Matte的BRDF对a点处的上半球进行采样。然后根据采样点来确定反射光线的方向和概率。则有可能出现三种情况:1,反射光线离开了场景;2,反射光线如r1直接撞击到了发光材质物体;3,反射光线如r2撞击到了Reflective材质的物体。前面两种情况,返回的是背景色或者发光材质的光,追踪结束。对于第三种情况,当光线撞击到Reflective材质的物体时,接下来则会依据Reflective的BRDF确定后续的反射光线的方向和概率(Reflective反射的方向是确定的)。
如右图。
如果撞击点a处的反射光线撞击到的是Matte材质的物体,后续的的处理方式和a点处的处理方式一样的:撞击点处的上半球进行采样,然后根据采样点来确定后续反射光线的方向和概率。
88.3 C++代码实现
新建一个叫做“PathTrace”的Tracer子类。该类的trace_ray()方法如下:
接下来则是需要在各种材质中添加相应的path_shade()方法。(在这里,我们只添加Emissive、Matte、Reflective三种材质的path_shade())
88.4 测试图形
我们这里的测试图形是Cornell Box。
相关代码:
void
World::build(void) {
//      int num_samples = 1;                // for Figure 26.7(a)
//      int num_samples = 100;           // for Figure 26.7(b)
         int num_samples =1024;                  // for Figure26.7(c)
//      int num_samples =10000;      // for Figure 26.7(d)

         vp.set_hres(300);
         vp.set_vres(300);
         vp.set_samples(num_samples);
         vp.set_max_depth(10);

         background_color =black;

         tracer_ptr = newPathTrace(this);

         Pinhole* pinhole_ptr =new Pinhole;
         pinhole_ptr->set_eye(27.6,27.4, -80.0);
         pinhole_ptr->set_lookat(27.6,27.4, 0.0);
         pinhole_ptr->set_view_distance(400);
         pinhole_ptr->compute_uvw();
         set_camera(pinhole_ptr);


         Point3D p0;
         Vector3D a, b;
         Normal normal;

         // box dimensions

         double width = 55.28;        // x direction
         double height          = 54.88;          //y direction
         double depth = 55.92;   //z direction


         // the ceiling light -doesn't need samples

         Emissive* emissive_ptr= new Emissive;
         emissive_ptr->set_ce(1.0,0.73, 0.4);
         emissive_ptr->scale_radiance(100);

         p0 = Point3D(21.3,height - 0.001, 22.7);
         a = Vector3D(0.0, 0.0,10.5);
         b = Vector3D(13.0, 0.0,0.0);
         normal = Normal(0.0,-1.0, 0.0);
         Rectangle* light_ptr =new Rectangle(p0, a, b, normal);
         light_ptr->set_material(emissive_ptr);
         add_object(light_ptr);


         // left wall

         Matte* matte_ptr1 =new Matte;
         matte_ptr1->set_ka(0.0);
         matte_ptr1->set_kd(0.6);
         matte_ptr1->set_cd(0.57,0.025, 0.025);       // red
         matte_ptr1->set_sampler(newMultiJittered(num_samples));

         p0 = Point3D(width,0.0, 0.0);
         a = Vector3D(0.0, 0.0,depth);
         b = Vector3D(0.0,height, 0.0);
         normal = Normal(-1.0,0.0, 0.0);
         Rectangle*left_wall_ptr = new Rectangle(p0, a, b, normal);
         left_wall_ptr->set_material(matte_ptr1);
         add_object(left_wall_ptr);


         // right wall

         Matte* matte_ptr2 =new Matte;
         matte_ptr2->set_ka(0.0);
         matte_ptr2->set_kd(0.6);
         matte_ptr2->set_cd(0.37,0.59, 0.2);     // green   from Photoshop
         matte_ptr2->set_sampler(newMultiJittered(num_samples));

         p0 = Point3D(0.0, 0.0,0.0);
         a = Vector3D(0.0, 0.0,depth);
         b = Vector3D(0.0,height, 0.0);
         normal = Normal(1.0,0.0, 0.0);
         Rectangle*right_wall_ptr = new Rectangle(p0, a, b, normal);
         right_wall_ptr->set_material(matte_ptr2);
         add_object(right_wall_ptr);


         // back wall

         Matte* matte_ptr3 =new Matte;
         matte_ptr3->set_ka(0.0);
         matte_ptr3->set_kd(0.6);
         matte_ptr3->set_cd(1.0);        // white
         matte_ptr3->set_sampler(newMultiJittered(num_samples));

         p0 = Point3D(0.0, 0.0,depth);
         a = Vector3D(width,0.0, 0.0);
         b = Vector3D(0.0,height, 0.0);
         normal = Normal(0.0,0.0, -1.0);
         Rectangle*back_wall_ptr = new Rectangle(p0, a, b, normal);
         back_wall_ptr->set_material(matte_ptr3);
         add_object(back_wall_ptr);


         // floor

         p0 = Point3D(0.0, 0.0,0.0);
         a = Vector3D(0.0, 0.0,depth);
         b = Vector3D(width,0.0, 0.0);
         normal = Normal(0.0,1.0, 0.0);
         Rectangle* floor_ptr =new Rectangle(p0, a, b, normal);
         floor_ptr->set_material(matte_ptr3);
         add_object(floor_ptr);


         // ceiling

         p0 = Point3D(0.0,height, 0.0);
         a = Vector3D(0.0, 0.0,depth);
         b = Vector3D(width,0.0, 0.0);
         normal = Normal(0.0,-1.0, 0.0);
         Rectangle* ceiling_ptr= new Rectangle(p0, a, b, normal);
         ceiling_ptr->set_material(matte_ptr3);
         add_object(ceiling_ptr);


         // the two boxesdefined as 5 rectangles each

         // short box

         // top

         p0 = Point3D(13.0,16.5, 6.5);
         a = Vector3D(-4.8,0.0, 16.0);
         b = Vector3D(16.0,0.0, 4.9);
         normal = Normal(0.0,1.0, 0.0);
         Rectangle*short_top_ptr = new Rectangle(p0, a, b, normal);
         short_top_ptr->set_material(matte_ptr3);
         add_object(short_top_ptr);


         // side 1

         p0 = Point3D(13.0,0.0, 6.5);
         a = Vector3D(-4.8,0.0, 16.0);
         b = Vector3D(0.0,16.5, 0.0);
         Rectangle*short_side_ptr1 = new Rectangle(p0, a, b);
         short_side_ptr1->set_material(matte_ptr3);
         add_object(short_side_ptr1);


         // side 2

         p0 = Point3D(8.2, 0.0,22.5);
         a = Vector3D(15.8,0.0, 4.7);
         Rectangle*short_side_ptr2 = new Rectangle(p0, a, b);
         short_side_ptr2->set_material(matte_ptr3);
         add_object(short_side_ptr2);


         // side 3

         p0 = Point3D(24.2,0.0, 27.4);
         a = Vector3D(4.8, 0.0,-16.0);
         Rectangle* short_side_ptr3= new Rectangle(p0, a, b);
         short_side_ptr3->set_material(matte_ptr3);
         add_object(short_side_ptr3);


         // side 4

         p0 = Point3D(29.0,0.0, 11.4);
         a = Vector3D(-16.0,0.0, -4.9);
         Rectangle*short_side_ptr4 = new Rectangle(p0, a, b);
         short_side_ptr4->set_material(matte_ptr3);
         add_object(short_side_ptr4);


         // tall box

         // top

         p0 = Point3D(42.3,33.0, 24.7);
         a = Vector3D(-15.8,0.0, 4.9);
         b = Vector3D(4.9, 0.0,15.9);
         normal = Normal(0.0,1.0, 0.0);
         Rectangle*tall_top_ptr = new Rectangle(p0, a, b, normal);
         tall_top_ptr->set_material(matte_ptr3);
         add_object(tall_top_ptr);


         // side 1

         p0 = Point3D(42.3,0.0, 24.7);
         a = Vector3D(-15.8,0.0, 4.9);
         b = Vector3D(0.0,33.0, 0.0);
         Rectangle* tall_side_ptr1= new Rectangle(p0, a, b);
         tall_side_ptr1->set_material(matte_ptr3);
         add_object(tall_side_ptr1);


         // side 2

         p0 = Point3D(26.5,0.0, 29.6);
         a = Vector3D(4.9, 0.0,15.9);
         Rectangle*tall_side_ptr2 = new Rectangle(p0, a, b);
         tall_side_ptr2->set_material(matte_ptr3);
         add_object(tall_side_ptr2);


         // side 3

         p0 = Point3D(31.4,0.0, 45.5);
         a = Vector3D(15.8,0.0, -4.9);
         Rectangle*tall_side_ptr3 = new Rectangle(p0, a, b);
         tall_side_ptr3->set_material(matte_ptr3);
         add_object(tall_side_ptr3);


         // side 4

         p0 = Point3D(47.2,0.0, 40.6);
         a = Vector3D(-4.9,0.0, -15.9);
         Rectangle*tall_side_ptr4 = new Rectangle(p0, a, b);
         tall_side_ptr4->set_material(matte_ptr3);
         add_object(tall_side_ptr4);
}
输出图形:
单像素点的采样次数为1,耗时248s:
单像素点的采样次数为100,耗时976s:
单像素点的采样次数为1024,耗时6763s:
88.5 其他说明
如上测试图形,图形中很多噪声(黑点),这是因为原始光线撞击到该点后的反射光线没能撞击到发光材质。由于发光材质的面积有限,所以用Path Tracing算法生成的图形噪声较多,而且耗时较长。但是,Path Tracing算法模拟了场景中所有的光线传播机制,所以,只要采样次数足够多,时间足够长,Path Tracing算法生成的图形则是最接近现实的。所以,一般用Path Tracing算法所生成的图形作为参考图形,以用于验证其他算法的有效性。
完整的代码,参考:http://download.csdn.net/detail/libing_zeng/9783680
Referrance
[1]. Kevin Suffern, Ray Tracing from theGround Up, A K Peters Ltd, 2007.
[2]. https://en.wikipedia.org/wiki/Path_tracing


