SpringCloud组件
SpringCloud Alibaba
Nacos【做注册中心】
启动nacos
$ docker run --name nacos01 -d \
-p 8848:8848 \
--privileged=true \
--restart=always \
-e JVM_XMS=512m \
-e JVM_XMX=2048m \
-e MODE=standalone \
-e PREFER_HOST_MODE=hostname \
nacos/nacos-server:1.1.4
引入依赖
 <dependency>
   <groupId>com.alibaba.cloudgroupId>
   <artifactId>spring-cloud-starter-alibaba-nacos-configartifactId>
dependency>
编写配置文件将服务注册到nacos中
spring:
  # nacos
  cloud:
    nacos:
      discovery:
        server-addr: 192.168.1.10:8848
  # 不指定名字无法注册进nacos
  application:
    name: gulimall-coupon
在启动类上加上这个注解开启服务发现的功能
@SpringBootApplication
@EnableDiscoveryClient
public class GulimallCouponApplication {

    public static void main(String[] args) {
        SpringApplication.run(GulimallCouponApplication.class, args);
    }

}
Nacos【做配置中心】
引入依赖
 <dependency>
   <groupId>com.alibaba.cloudgroupId>
   <artifactId>spring-cloud-starter-alibaba-nacos-configartifactId>
dependency>
官方使用步骤
-
首先,修改 pom.xml 文件,引入 Nacos Config Starter。
com.alibaba.cloud spring-cloud-starter-alibaba-nacos-config -
在应用的 /src/main/resources/bootstrap.properties 配置文件中配置 Nacos Config 元数据
spring.application.name=nacos-config-example spring.cloud.nacos.config.server-addr=127.0.0.1:8848 -
完成上述两步后,应用会从 Nacos Config 中获取相应的配置,并添加在 Spring Environment 的 PropertySources 中。这里我们使用 @Value 注解来将对应的配置注入到 SampleController 的 userName 和 age 字段,并添加 @RefreshScope 打开动态刷新功能。配置的加载:如果配置中心和当前应用的配置文件中都配置了相同的项,优先使用配置中心的配置。
 @RefreshScope
 class SampleController {

 	@Value("${user.name}")
 	String userName;

 	@Value("${user.age}")
 	int age;
 }
默认读取配置中心的文件
# 这么配置默认找的是 public->DEFAULT->appName.properties 文件(命名空间、组、文件名)
spring.application.name=appName
spring.cloud.nacos.config.server-addr=127.0.0.1:8848
同时加载多个配置集
spring.application.name=gulimall-coupon
spring.cloud.nacos.config.server-addr=192.168.1.10:8848
spring.cloud.nacos.config.namespace=b4e817d4-8bdd-4e13-a917-14c8abef6296
# 这个是默认配置文件的加载,默认的DEFAULT ,加载的是组里面的 ${spring.application.name}.properties 文件
spring.cloud.nacos.config.group=prod

# 扩展配置

# 读取 b4e817d4-8bdd-4e13-a917-14c8abef6296->prood->datasource.yml
spring.cloud.nacos.config.ext-config[0].data-id=datasource.yml
spring.cloud.nacos.config.ext-config[0].group=prod
spring.cloud.nacos.config.ext-config[0].refresh=true

# 读取 b4e817d4-8bdd-4e13-a917-14c8abef6296->prood->mybatis.yml
spring.cloud.nacos.config.ext-config[1].data-id=mybatis.yml
spring.cloud.nacos.config.ext-config[1].group=prod
spring.cloud.nacos.config.ext-config[1].refresh=true

# 读取 b4e817d4-8bdd-4e13-a917-14c8abef6296->prood->other.yml
spring.cloud.nacos.config.ext-config[2].data-id=other.yml
spring.cloud.nacos.config.ext-config[2].group=prod
spring.cloud.nacos.config.ext-config[2].refresh=true
老师总结的知识点
2、细节
*  1)、命名空间:配置隔离;
*      默认:public(保留空间);默认新增的所有配置都在public空间。
*      1、开发,测试,生产:利用命名空间来做环境隔离。
*         注意:在bootstrap.properties;配置上,需要使用哪个命名空间下的配置,
*         spring.cloud.nacos.config.namespace=9de62e44-cd2a-4a82-bf5c-95878bd5e871
*      2、每一个微服务之间互相隔离配置,每一个微服务都创建自己的命名空间,只加载自己命名空间下的所有配置
*
*  2)、配置集:所有的配置的集合,说白了就是我们在nacos里面写个每一个配置文件。
*
*  3)、配置集ID:类似文件名。
*      Data ID:类似文件名
*
*  4)、配置分组:
*      默认所有的配置集都属于:DEFAULT_GROUP;
*      1111,618,1212
*
* 项目中的使用:每个微服务创建自己的命名空间,使用配置分组区分环境,dev,test,prod
*
* 3、同时加载多个配置集
* 1)、微服务任何配置信息,任何配置文件都可以放在配置中心中
* 2)、只需要在bootstrap.properties说明加载配置中心中哪些配置文件即可
* 3)、@Value,@ConfigurationProperties。。。
* 以前SpringBoot任何方法从配置文件中获取值,都能使用。
* 配置中心有的优先使用配置中心中的,
Sentinel
简介
熔断降级限流
什么是熔断:A服务调用B服务的某个功能,由于网络不稳定问题,或者B服务卡机,导致功能时间超长。如果这样子的次数太多。我们就可以直接将B断路了(A不再请求B接口),凡是调用B的直接返回降级数据,不必等待B的超长执行。这样 B的故障问题,就不会级联影响到A。
什么是降级:整个网站处于流量高峰期,服务器压力剧增,根据当前业务情况及流量,对一些服务和页面进行有策略的降级【停止服务,所有的调用直接返回降级数据】。以此缓解服务器资源的的压力,以保证核心业务的正常运行,同时也保持了客户和大部分客户的得到正确的相应。
相同点:

- 为了保证集群大部分服务的可用性和可靠性,防止崩溃,牺牲小我
- 用户最终都是体验到某个功能不可用

不同点:

- 熔断是被调用方故障,触发的系统主动规则。(一个远程服务多次出现问题,下一次调用这个服务时就直接触发熔断方法而不是去调用服务)
- 降级是基于全局考虑,停止一些正常服务,释放资源(每次请求都会到达服务提供方,但是降级之后就不进入业务代码而是直接最新降级的方法)
什么是限流:对打入服务的请求流量进行控制,使服务能够承担不超过自己能力的流量压力
好好理解这些话
-
熔断是被调用方的故障,A去调用B B由于自己的问题A等不及了A觉得他太慢了。A以后就有经验了,再次调用B的这个服务的时候就直接返回,A系统的主动规则。
-
降级:有可能是人工做的,人工关闭服务。
-
熔断一般都写在消费端,降级一般卸载服务提供方。
Sentinel简介
官方文档: https://github.com/alibaba/Sentinel/wiki/%E4%BB%8B%E7%BB%8D
项目地址: https://githab.com/alibaba/Sentinel
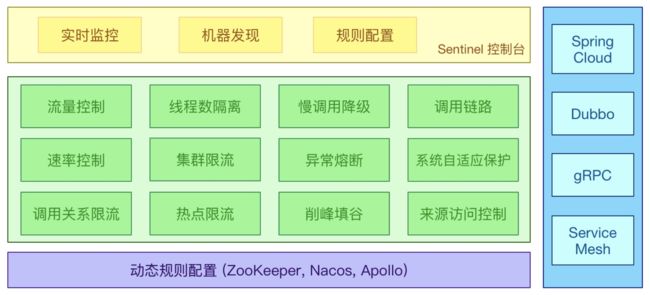
随着微服务的流行,服务和服务之间的稳定性变得越来越重要。Sentinel 以流量为切入点,从流量控制、熔断降级、系统负载保护等多个维度保护服务的稳定性。
Sentinel具有以下特征
- 丰富的应用场景: Sentine1 承接了阿里巴巴近10年的双十一大促流量的核心场景,例如秒杀(即突发流量控制在系统容量可以承受的范围)、消息削峰填谷、集群流量控制、实时熔断下游不可用应用等。
- 完备的实时监控: Sentinel同时提供实时的监控功能。您可以在控制台中看到接入应用的单台机器秒级数据,甚至500台以下规模的集群的汇总运行情况。
- 广泛的开源生态: Sentinel 提供开箱即用的与其它开源框架/库的整合模块,例如与Spring Cloud、Dubbo、 gRPC 的整合。您只需要引入相应的依赖并进行简单的配置即可快速地接入Sentinel。
- 完善的SPI 扩展点: Sentinel提供简单易用、完善的SPI 扩展接口。您可以通过实现扩展接口来快速地定制逻辑。例如定制规则管理、适配动态数据源等。
Sentinel分为两个部分:
- 核心库(Java 客户端)不依赖任何框架/库,能够运行于所有Java 运行时环境,同时对Dubbo / Spring Cloud等框架也有较好的支持。
- 控制台(Dashboard) 基于Spring Boot开发,打包后可以直接运行,不需要额外的Tomcat等应用容器。
Sentinel基本概念:
- 资源:资源是Sentinel 的关键概念。它可以是Java 应用程序中的任何内容,例如,由应用程序提供的服务,或由应用程序调用的其它应用提供的服务,甚至可以是一段代码。在接下来的文档中,我们都会用资源来描述代码块。
只要通过Sentinel API定义的代码,就是资源,能够被Sentinel 保护起来。大部分情况下,可以使用方法签名,URL, 甚至服务名称作为资源名来标示资源。 - 规则:围绕资源的实时状态设定的规则,可以包括流量控制规则、熔断降级规则以及系统保护规则。所有规则可以动态实时调整。
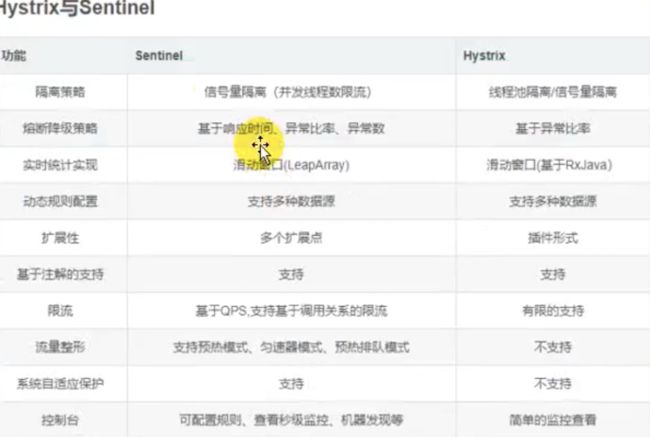
Hystric与Sentinel比较
整合Feign+Sentinel
-
整合sentinel
-
导入依赖
<dependency> <groupId>com.alibaba.cloudgroupId> <artifactId>spring-cloud-starter-alibaba-sentinelartifactId> dependency> -
下载sentinel控制台:主要是可视化监控
-
配置sentinel控制台地址信息:这样子我们的数据就会被dashboard监控到
# sentinel dashboard spring.cloud.sentinel.transport.dashboard=localhost:8080 spring.cloud.sentinel.transport.port=8719 -
在控制台调整参数。【默认所有的流控设置保存在应用的内存中(就是微服务的内存中),重启失效】
上面的规则配置,都是存在内存中的。即如果应用重启,这个规则就会失效。因此我们提供了开放的接口,您可以通过实现
DataSource接口的方式,来自定义规则的存储数据源。通常我们的建议有:- 整合动态配置系统,如 ZooKeeper、Nacos、Apollo 等,动态地实时刷新配置规则
- 结合 RDBMS、NoSQL、VCS 等来实现该规则
- 配合 Sentinel Dashboard 使用
更多详情请参考 动态规则配置。
-
-
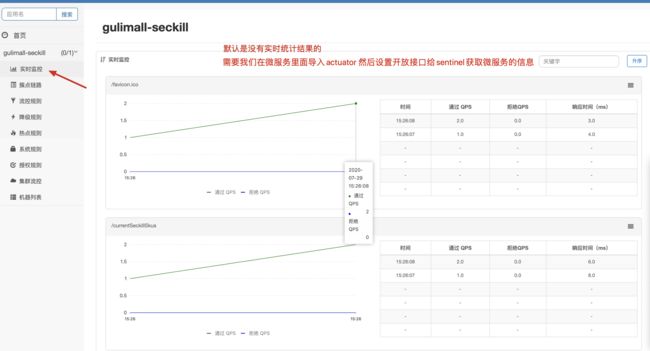
每个微服务都导入actuator 模块;并配置
management.endpoints.web.exposure.include=*<dependency> <groupId>org.springframework.bootgroupId> <artifactId>spring-boot-starter-actuatorartifactId> dependency> -
自定义sentinel 流控返回信息
@Configuration public class SeckillSentinelConfig { public SeckillSentinelConfig() { WebCallbackManager.setUrlBlockHandler(new UrlBlockHandler() { @Override public void blocked(HttpServletRequest request, HttpServletResponse response, BlockException ex) throws IOException { R error = R.error(BizCodeEnume.TO_MANY_REQUEST.getCode(), BizCodeEnume.TO_MANY_REQUEST.getMsg()); response.setCharacterEncoding("UTF-8"); response.setContentType("application/json"); response.getWriter().write(JSON.toJSONString(error)); } }); } } -
使用sentinel来保护feing远程调用:
- 调用方的熔断保护:
feign.sentinel.enabled=true - 调用方手动指定远程服务的降级策略。远程服务被降级处理。触发我们的熔断回调方法。
- 超大流量的时候,必须牺牲一些远程服务。在服务的提供方(远程服务)指定降级策略;提供方是在运行。但是不运行自己的业务逻辑,返回的是默认的降级数据(限流的数据)。
- 熔断一般设置在消费端。降级一般设置在提供方。因为熔断是有记忆的,一个服务经常调用失败就不走了,而是直接调用熔断的处理方法。或者实说,调用之前看看设置的规则,如果符合规则再去调用远程,不符合规则就直接调用熔断方法。
- 一般都是在服务消费方设置熔断和降级,因为知道出错之后就不会再去调用服务提供方,就不发送网络请求了。如果是在服务提供方设置的熔断和降级,服务消费方是每次都会发送网络请求到提供方,提供方才给他返回熔断、降级的响应,还是走了不必要的网络请求。
- 熔断数据(调用方)、降级数据(提供方)
- 调用方的熔断保护:
定义资源
网址
-
通过try-catch
// 1.5.0 版本开始可以利用 try-with-resources 特性(使用有限制) // 资源名可使用任意有业务语义的字符串,比如方法名、接口名或其它可唯一标识的字符串。 try (Entry entry = SphU.entry("resourceName")) { // 被保护的业务逻辑 // do something here... } catch (BlockException ex) { // 资源访问阻止,被限流或被降级 // 在此处进行相应的处理操作 } -
通过注解方式。
// 原本的业务方法. @SentinelResource(blockHandler = "blockHandlerForGetUser") public User getUserById(String id) { throw new RuntimeException("getUserById command failed"); } // blockHandler 函数,原方法调用被限流/降级/系统保护的时候调用 public User blockHandlerForGetUser(String id, BlockException ex) { return new User("admin"); } -
无论是1、2方式一定要配置被限流后的默认返回,否则会直接抛出异常。Url 资源可以在微服务中定义同一的返回数据。我们自定义资源需要自己写方法返回熔断数据。
@Configuration
public class SeckillSentinelConfig {
    public SeckillSentinelConfig() {
        WebCallbackManager.setUrlBlockHandler(new UrlBlockHandler() {
            @Override
            public void blocked(HttpServletRequest request, HttpServletResponse response, BlockException ex) throws IOException {
                R error = R.error(BizCodeEnume.TO_MANY_REQUEST.getCode(), BizCodeEnume.TO_MANY_REQUEST.getMsg());
                response.setCharacterEncoding("UTF-8");
                response.setContentType("application/json");
                response.getWriter().write(JSON.toJSONString(error));
            }
        });
    }
}
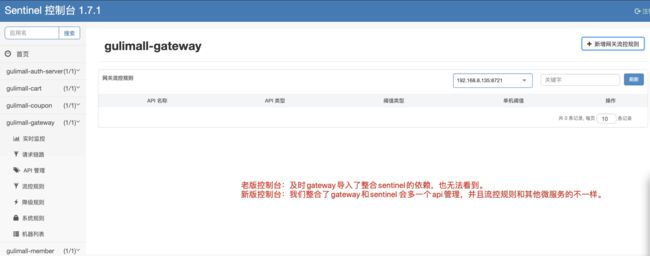
网关限流
网址
版本要和导入的spring-cloud-alibaba一致
<dependency>
  <groupId>com.alibaba.cloudgroupId>
  <artifactId>spring-cloud-alibaba-sentinel-gatewayartifactId>
  <version>2.1.0.RELEASEversion>
dependency>
自定义详细信息
您可以在 GatewayCallbackManager 注册回调进行定制:

setBlockHandler:注册函数用于实现自定义的逻辑处理被限流的请求,对应接口为 BlockRequestHandler。默认实现为 DefaultBlockRequestHandler,当被限流时会返回类似于下面的错误信息:Blocked by Sentinel: FlowException。

  // web flux 响应式编程

  @Configuration
public class SentinelGatewayConfig {
    public SentinelGatewayConfig() {
        GatewayCallbackManager.setBlockHandler(new BlockRequestHandler() {
            // 网关限流了请求,就会调用此回调 Mono Flux
            @Override
            public Mono<ServerResponse> handleRequest(ServerWebExchange exchange, Throwable t) {
                R error = R.error(BizCodeEnume.TO_MANY_REQUEST.getCode(), BizCodeEnume.TO_MANY_REQUEST.getMsg());
                String json = JSON.toJSONString(error);
                Mono<ServerResponse> body = ServerResponse.ok().body(Mono.just(json), String.class);
                return body;
            }
        });
    }

}
sentinel 是通过spring boot的统计信息从而实现实时监控。springboot的统计信息可以暴露接口供对外使用。需要导入spring-boot-starter-actuator
参考文档https://github.com/alibaba/spring-cloud-alibaba/wiki/Sentinel
### Endpoint 支持

在使用 Endpoint 特性之前需要在 Maven 中添加 `spring-boot-starter-actuator` 依赖,并在配置中允许 Endpoints 的访问。

- Spring Boot 1.x 中添加配置 `management.security.enabled=false`。暴露的 endpoint 路径为 `/sentinel`
- Spring Boot 2.x 中添加配置 `management.endpoints.web.exposure.include=*`。暴露的 endpoint 路径为 `/actuator/sentinel`
细节
Seata
seata文档
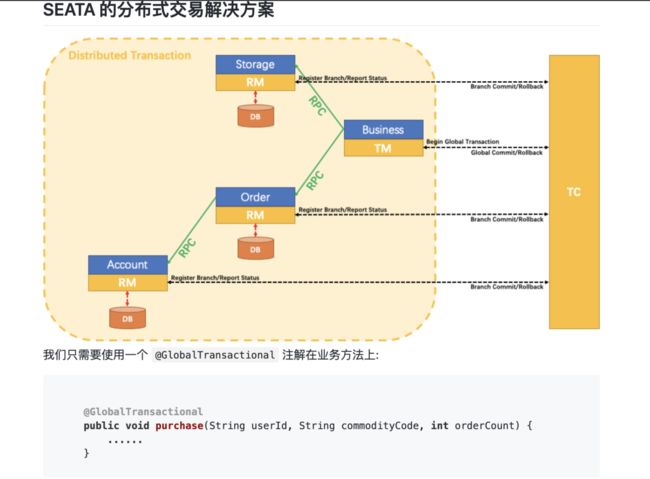
seata:Simple Extensible Autonomous Transaction Architecture,seata使用用在低并发的系统中比如后台管理系统,因为seata的实现是通过上各种各样的锁实现的。
seata架构
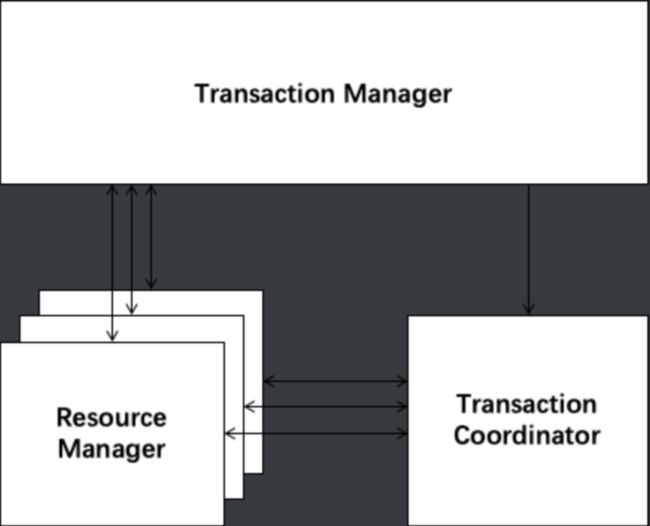
Seata有3个基本组件:
- Transaction Coordinator(TC):事务协调器,维护全局事务的运行状态,负责协调并驱动全局事务的提交或回滚。
- Transaction Manager™:事务管理器,控制全局事务的边界,负责开启一个全局事务,并最终发起全局提交或全局回滚的决议。
- Resource Manager(RM):资源管理器,控制分支事务,负责分支注册、状态汇报,并接收事务协调器的指令,驱动分支(本地)事务的提交和回滚。
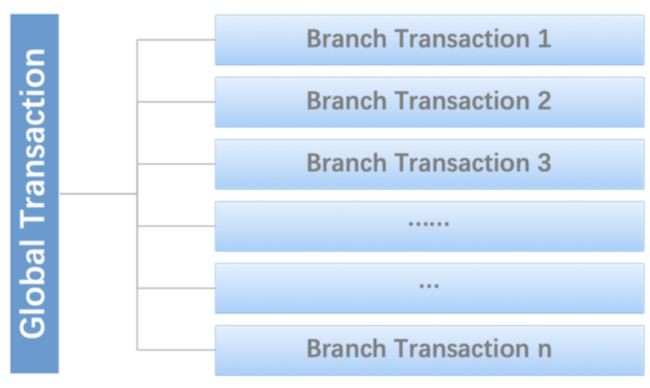
全局事务与分支事务:
a Distributed Transaction is a Global Transaction which is made up with a batch of Branch Transaction, and normally Branch Transaction is just Local Transaction.
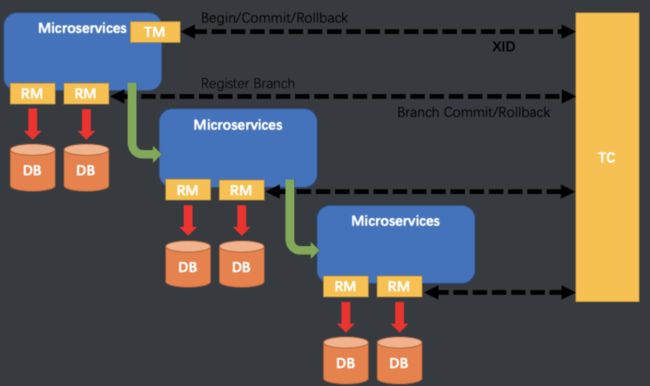
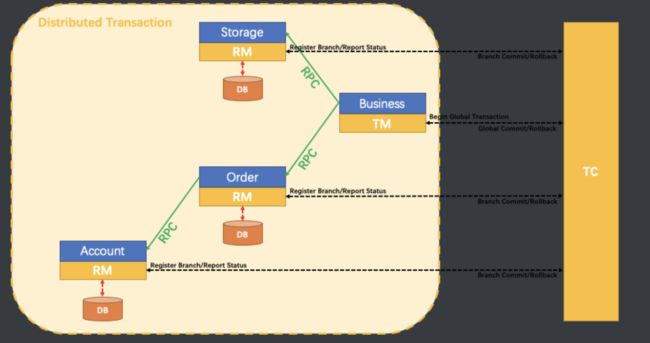
Seata管理分布式事务的典型生命周期:
- TM 向 TC 申请开启一个全局事务,全局事务创建成功并生成一个全局唯一的 XID。
- XID 在微服务调用链路的上下文中传播。
- RM 向 TC 注册分支事务,将其纳入 XID 对应全局事务的管辖。
- TM 向 TC 发起针对 XID 的全局提交或回滚决议。
- TC 调度 XID 下管辖的全部分支事务完成提交或回滚请求。
至此,seata的协议机制总体上看与 XA 是一致的。但是是有差别的:
架构图
XA 方案的 RM 实际上是在数据库层,RM 本质上就是数据库自身(通过提供支持 XA 的驱动程序来供应用使用)。
而 Fescar 的 RM 是以二方包的形式作为中间件层部署在应用程序这一侧的,不依赖于数据库本身对协议的支持,当然也不需要数据库支持 XA 协议。这点对于微服务化的架构来说是非常重要的:应用层不需要为本地事务和分布式事务两类不同场景来适配两套不同的数据库驱动。
这个设计,剥离了分布式事务方案对数据库在 协议支持 上的要求。
seata的核心概念
- TC (Transaction Coordinator) 事务协调者 :维护全局和分支事务的状态,驱动全局事务提交或回滚。
- TM (Transaction Manager) - 事务管理器:定义全局事务的范围:开始全局事务、提交或回滚全局事务。
- RM (Resource Manager) - 资源管理器:管理分支事务处理的资源,与TC交谈以注册分支事务和报告分支事务的状态,并驱动分支事务提交或回滚。
- Tm 开启全局事务、tc协调全局事务里面的各个分支事务。
使用流程
使用seata 控制分布式事务
-
每一个微服务先必须创建undo_log 表(需要连接到seata服务器就必须有这个表,需要实现全局事务的业务就加入这个表,seata server会往里面注入阶段的日志)
DROP TABLE IF EXISTS `mq_message`; CREATE TABLE `mq_message` ( `message_id` char(32) NOT NULL, `content` text, `to_exchane` varchar(255) DEFAULT NULL, `routing_key` varchar(255) DEFAULT NULL, `class_type` varchar(255) DEFAULT NULL, `message_status` int(1) DEFAULT '0' COMMENT '0-新建 1-已发送 2-错误抵达 3-已抵达', `create_time` datetime DEFAULT NULL, `update_time` datetime DEFAULT NULL, PRIMARY KEY (`message_id`) ) ENGINE=InnoDB DEFAULT CHARSET=utf8mb4; -
安装事务协调器:seata-server https://github.com/seata/seata/releases
-
整合
-
导入依赖
<dependency> <groupId>com.alibaba.cloudgroupId> <artifactId>spring-cloud-starter-alibaba-seataartifactId> dependency> -
启动seata-server
- registry.conf:注册中心配置(seata需要注册到注册中心中):修改registry type=nacos
- file.conf:配置文件
-
所有想要用到分布式事务的微服务使用 seata DataSourceProxy代理自己的数据源https://github.com/seata/seata-samples,查看jpa的配置数据源
public class WareConfig { @Bean public DataSource dataSource(DataSourceProperties dataSourceProperties) { HikariDataSource dataSource = dataSourceProperties.initializeDataSourceBuilder().type(HikariDataSource.class).build(); if (StringUtils.hasText(dataSourceProperties.getName())) { dataSource.setPoolName(dataSourceProperties.getName()); } // 最后在使用seata代理一下我们的数据源 return new DataSourceProxy(dataSource); } } -
每个微服务都必须导入file.conf 和 registry.conf (file.conf 里面的分组名字需要修改一下,这个名字就是作为注册到TC里面的,alibaba seata自动配置已经写好的分组名字、必须要与file.conf的一致,alibaba seata自动配置的名字是
${spring.application.name}-fescar-service-group) -
启动微服务
-
给分布式大事务的入口标注@GlobalTransactional
-
每一个远程的小事务用@Transactional
-
-
出现的问题
// 使用seata控制分布式事务 不能使用批处理,只能一个个操作
List<OrderItemEntity> orderItems = order.getOrderItems();
//        for (OrderItemEntity orderItem : orderItems) {
//            orderItemService.save(orderItem);
//        }
// exception Error updating database. Cause: io.seata.common.exception.NotSupportYetException
// io.seata.common.exception.NotSupportYetException: null
orderItemService.saveBatch(orderItems);
OSS
概述
这里使用阿里云对象存储(OSS)
官方文档:https://help.aliyun.com/document_detail/64041.html?spm=5176.87240.400427.54.1bfd4614VN7fDp
我们之前采用sdk的方式,图片–>后台服务器–>阿里云。
这样后台服务器面临并发压力,既然是上传给阿里云,可不可以直接传给阿里云服务器。
上传成功后,只需要给我一个图片地址保存到数据库即可。
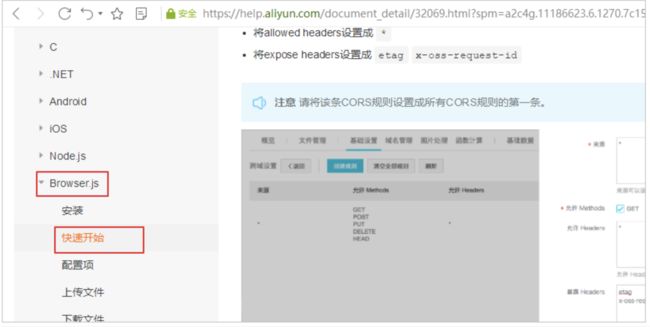
查看官方文档,发现提供了浏览器直接上传到阿里云的参考文档:
阿里云的配置
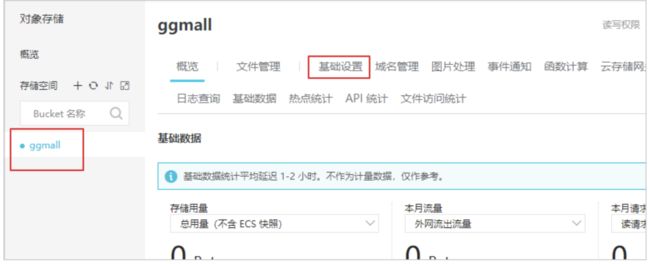
登录到个人阿里云控制台,并创建bucket。
找到基础设置–>跨域设置
点击设置–>创建规则–>如下填写表单–>点击确定
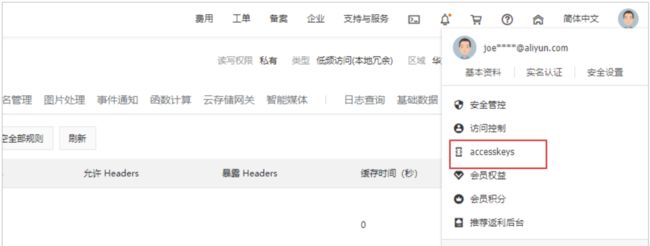
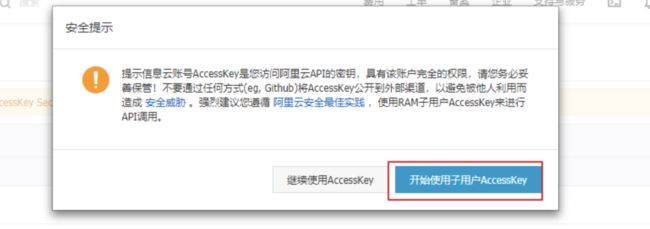
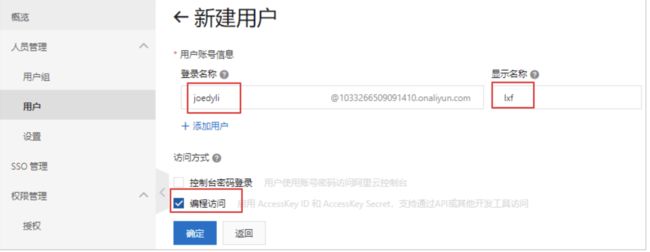
AccessKeyID及AccessKeySecret
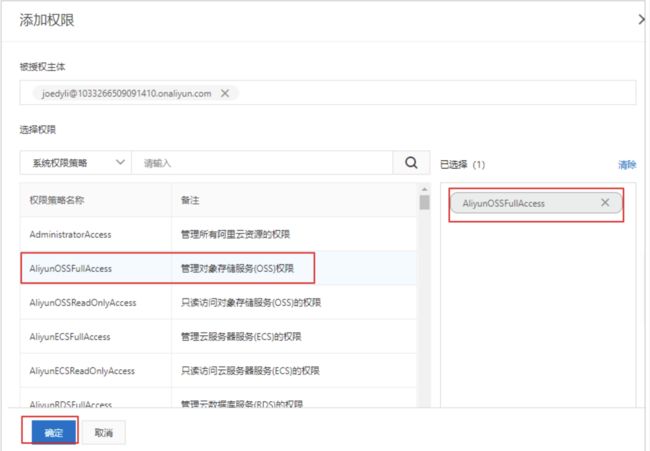
选择用户添加权限
选择OSS所有权限
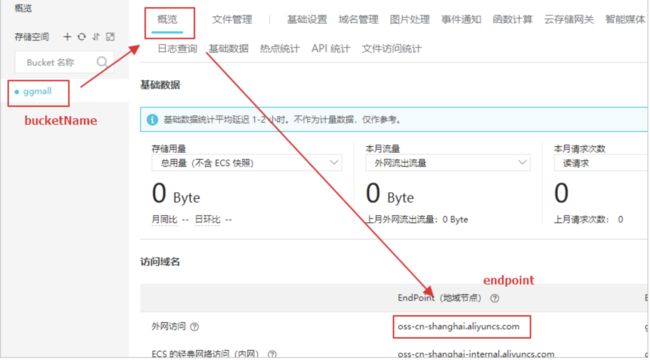
bucktName及EndPoint
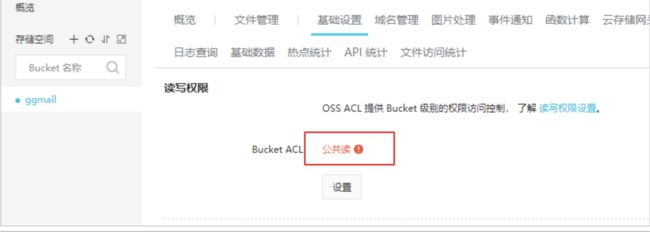
为了方便回显,需要把读写权限改为公共读
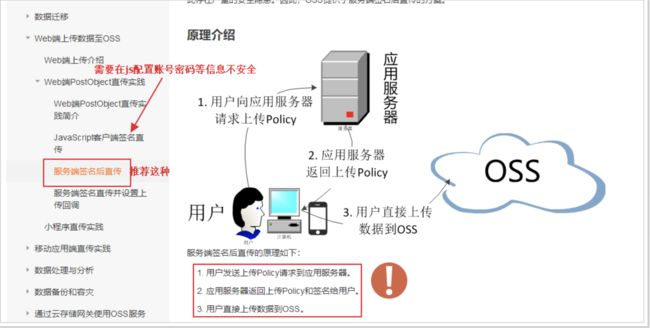
服务端签名后直传
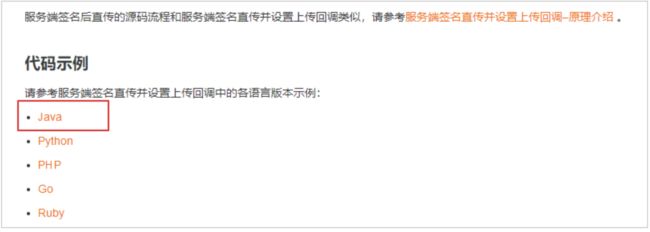
用户发送请求到应用服务端,服务端怎么返回policy和签名?官方文档再往下翻,有java示例:
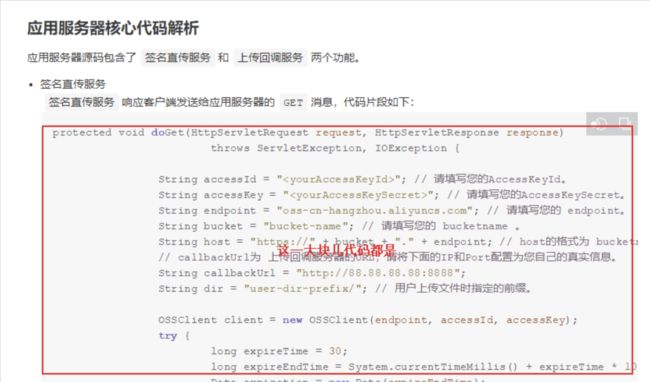
点进去就有示例代码:
编写代码实现签名获取
导入OSS的依赖
<dependency>
    <groupId>com.aliyun.ossgroupId>
    <artifactId>aliyun-sdk-ossartifactId>
    <version>3.5.0version>
dependency>
编写Controller方法
@RequestMapping("pms/oss")
@RestController
public class PmsOssController {

    String accessId = "LTAI4FuGwRrRAh1M8mRkndr6"; // 请填写您的AccessKeyId。
    String accessKey = "LvIZkyPyKqoBGcVTY2wABYhv4QJmYT"; // 请填写您的AccessKeySecret。
    String endpoint = "oss-cn-shanghai.aliyuncs.com"; // 请填写您的 endpoint。
    String bucket = "ggmall"; // 请填写您的 bucketname 。
    String host = "https://" + bucket + "." + endpoint; // host的格式为 bucketname.endpoint
    // callbackUrl为 上传回调服务器的URL,请将下面的IP和Port配置为您自己的真实信息。
    //String callbackUrl = "http://88.88.88.88:8888";
    // 图片目录,每天一个目录
    SimpleDateFormat sdf = new SimpleDateFormat("yyyy-MM-dd");
    String dir = sdf.format(new Date()); // 用户上传文件时指定的前缀。

    @GetMapping("policy")
    public ResponseVo<Object> policy() throws UnsupportedEncodingException {

        OSSClient client = new OSSClient(endpoint, accessId, accessKey);

        long expireTime = 30;
        long expireEndTime = System.currentTimeMillis() + expireTime * 1000;
        Date expiration = new Date(expireEndTime);
        PolicyConditions policyConds = new PolicyConditions();
        policyConds.addConditionItem(PolicyConditions.COND_CONTENT_LENGTH_RANGE, 0, 1048576000);
        policyConds.addConditionItem(MatchMode.StartWith, PolicyConditions.COND_KEY, dir);

        String postPolicy = client.generatePostPolicy(expiration, policyConds);
        byte[] binaryData = postPolicy.getBytes("utf-8");
        String encodedPolicy = BinaryUtil.toBase64String(binaryData);
        String postSignature = client.calculatePostSignature(postPolicy);

        Map<String, String> respMap = new LinkedHashMap<String, String>();
        respMap.put("accessid", accessId);
        respMap.put("policy", encodedPolicy);
        respMap.put("signature", postSignature);
        respMap.put("dir", dir);
        respMap.put("host", host);
        respMap.put("expire", String.valueOf(expireEndTime / 1000));
        // respMap.put("expire", formatISO8601Date(expiration));

        return ResponseVo.ok(respMap);
    }
}
SpringCloud
Feign声明式远程调用
概述
- openFeign 是基于面向接口的实现。我们只需要编写好接口,openFeign就能帮我们创建好接口调用的代理对象,我们直接使用这个代理对象即可。
- openFeign 集成了RestTemplate,真正帮我们发送rest请求的是RestTemplate。
- openFeign 还集成了ribbon,也就是具有负载均衡的效果。
- 注意:将微服务注册到注册中心中(服务的提供方和调用方都要注册)
引入依赖
<dependency>
  <groupId>org.springframework.cloudgroupId>
  <artifactId>spring-cloud-starter-openfeignartifactId>
dependency>
配置文件
spring:
  cloud:
    nacos:
      discovery:
        server-addr: 192.168.1.10:8848
  application:
    name: gulimall-member
编写接口
@FeignClient(name = "gulimall-coupon" )
public interface CouponFeignService {
    @GetMapping("/coupon/coupon/member/list" )
    public R memberCoupons();
}
开启feign的功能
@SpringBootApplication
@EnableDiscoveryClient
@EnableFeignClients(basePackages = "com.atguigu.gulimall.member.feign" )
public class GulimallMemberApplication {

    public static void main(String[] args) {
        SpringApplication.run(GulimallMemberApplication.class, args);
    }

}
远程接口调用的细节
-
定义一个接口,这个接口必须添加到IOC容器中。
-
使用@FeignClient 注解申明这是一个feign 接口
-
如果当前接口所在的包与主启动类同包或者子包下。就能被扫描然后加入IOC 容器中
-
但是为了省事,我们最好是在主启动类上特定指定一下feign接口的包路径
@EnableFeignClients(basePackages = {"com.atguigu.gulimall.product.feign"}) -
feign 接口远程调用服务过程中,是将数据放到请求体中,所以服务的提供放获取参数的使用必须使用@RequestBody 注解,表示从请求体中获取数据。
-
远程调用源码分析
流程:
- 调用代理对象的方法时会执行InvocationHandler里面的invoke方法(使用JDK的代理,
Proxy.newProxyInstance()) - Feign 的invoke方法的逻辑是先判断我们的方法是不是Object的方法,不是在执行
return dispatch.get(method).invoke(args); - 流程来到了另一个invoke方法,先构建RequestTemplate,然后while执行
return executeAndDecode(template, options); - 执行的流程会先构造请求体
Request request = targetRequest(template);} - targetRequest 里面就是遍历所有的feign的requestInterceptors属性
- Feign 在构建的时候会注入requestInterceptor,如果我们往IOC 容器添加了requestInterceptor会调用这个方法,加入到Feign里面的requestInterceptor属性中取。
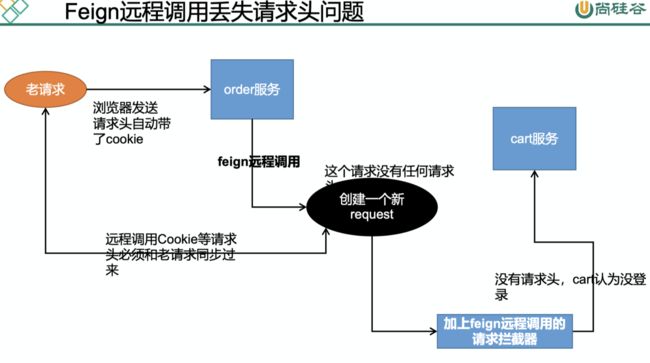
- 先IOC容器注入我们的 RequestInterceptor,实现使用feign调用的时候添加请求头信息。
1.
  List<MemberAddressVo> address = memberFeignService.getAddress(memberRespVo.getId());

2.
  public Object invoke(Object proxy, Method method, Object[] args) throws Throwable {
  if ("equals".equals(method.getName())) {
    try {
      Object otherHandler =
        args.length > 0 && args[0] != null ? Proxy.getInvocationHandler(args[0]) : null;
      return equals(otherHandler);
    } catch (IllegalArgumentException e) {
      return false;
    }
  } else if ("hashCode".equals(method.getName())) {
    return hashCode();
  } else if ("toString".equals(method.getName())) {
    return toString();
  }

  return dispatch.get(method).invoke(args);
}

3.
  public Object invoke(Object[] argv) throws Throwable {
  RequestTemplate template = buildTemplateFromArgs.create(argv);
  Options options = findOptions(argv);
  Retryer retryer = this.retryer.clone();
  while (true) {
    try {
      return executeAndDecode(template, options);

    }

  }
  4.
    Object executeAndDecode(RequestTemplate template, Options options) throws Throwable {
    Request request = targetRequest(template);}

  5.
    Request targetRequest(RequestTemplate template) {
    for (RequestInterceptor interceptor : requestInterceptors) {
      interceptor.apply(template);
    }
    return target.apply(template);
  }


  6.
    public Builder requestInterceptor(RequestInterceptor requestInterceptor) {
    this.requestInterceptors.add(requestInterceptor);
    return this;
  }
  7.
    @Configuration
    public class GuliFeignConfig {
      @Bean("requestInterceptor")
      public RequestInterceptor requestInterceptor() {
        return new RequestInterceptor() {
          @Override
          public void apply(RequestTemplate template) {
            System.out.println("RequestInterceptor...." + Thread.currentThread().getId());

            //1、RequestContextHolder拿到同一线程里面的request(这是spring为了简化我们的操作提供的,当然你可以直接从handler方法里面获取HttpServletRequest)
            ServletRequestAttributes requestAttributes = (ServletRequestAttributes) RequestContextHolder.getRequestAttributes();
            if (requestAttributes != null) {
              HttpServletRequest request = requestAttributes.getRequest();// 老请求
              // 同步请求头数据,Cookie
              String cookie = request.getHeader("Cookie");
              // 给请求同步老请求的cookie信息
              template.header("Cookie", cookie);
            }

          }
        };
      }
    }
Gateway
概述
网关的作用:鉴权、限流、日志输出、隐藏微服务
https://cloud.spring.io/spring-cloud-static/spring-cloud-gateway/2.2.3.RELEASE/reference/html/
- Route: The basic building block of the gateway. It is defined by an ID, a destination URI, a collection of predicates, and a collection of filters. A route is matched if the aggregate predicate is true.
- Predicate: This is a Java 8 Function Predicate. The input type is a Spring Framework
ServerWebExchange. This lets you match on anything from the HTTP request, such as headers or parameters. - Filter: These are instances of Spring Framework
GatewayFilterthat have been constructed with a specific factory. Here, you can modify requests and responses before or after sending the downstream request.
断言的编写
filter的编写
gateway:route、predicate、filter
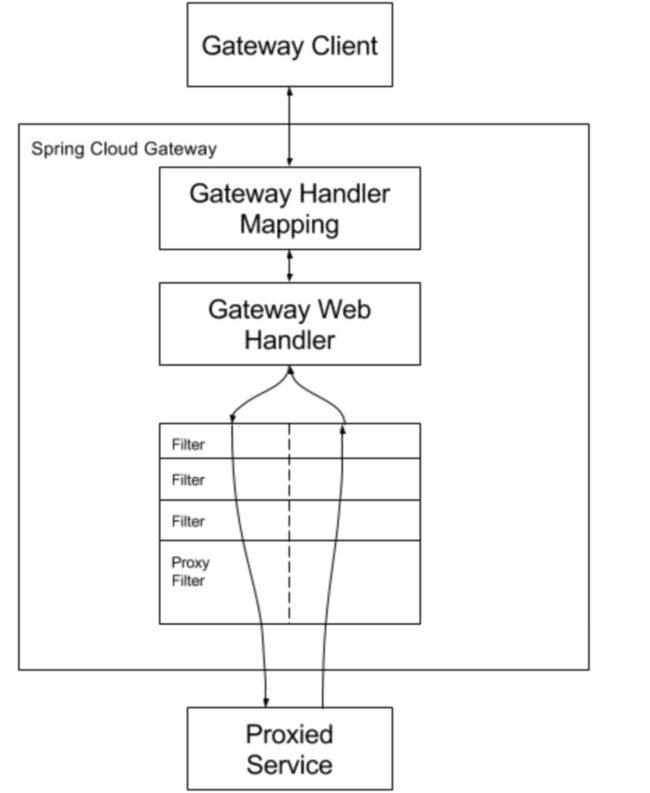
流程:请求到达网关,网关通过断言来判断我们的请求是否符合某个路由规则。如果符合了就按照路由规则路由到指定的地方。到指定地方的过程中我们可以进行过滤,请求的响应结果也会经过过滤。在过滤环节我们可以添加、修改请求体或者响应体的信息。
导入依赖
 <dependency>
   <groupId>org.springframework.cloudgroupId>
   <artifactId>spring-cloud-starter-gatewayartifactId>
dependency>
配置文件
spring:
  cloud:
    # 网关的配置
    gateway:
      routes:
        - id: admin_route
          uri: lb://renren-fast
          predicates:
            - Path=/api/**
          filters:
            - RewritePath=/api/(?>/?.*), /renren-fast/$\{segment}
Sleuth+Zipkin服务链路追踪
为什么用
微服务架构是一个分布式架构,它按业务划分服务单元,一个分布式系统往往有很多个服务单元。由于服务单元数量众多,业务的复杂性,如果出现了错误和异常,很难去定位。主要体现在,一个请求可能需要调用很多个服务,而内部服务的调用复杂性,决定了问题难以定位。所以微服务架构中,必须实现分布式链路追踪,去跟进一个请求到底有 哪些服务参与,参与的顺序又是怎样的,从而达到每个请求的步骤清晰可见,出了问题,很快定位。
链路追踪组件有Google的Dapper, Twitter 的Zipkin,以及阿里的Eagleeye (鹰眼) 等,它们都是非常优秀的链路追踪开源组件。
sleuth 官方
基本术语
-
Span (跨度) :基本工作单元,发送一个远程调度任务就会产生一个Span, Span 是一个64位ID唯一标识的,Trace是用另一个 64位ID唯一标识的,Span 还有其他数据信息,比如摘要、时间戳事件、Span的ID、以及进度ID.
-
Trace (跟踪) :一系列Span组成的一个树状结构。请求一个微服务系统的API接口,这个API接口,需要调用多个微服务,调用每个微服务都会产生一个新的Span,所有由这个请求产生的Span组成了这个Trace.
-
Annotation (标注) :用来及时记录一个事件的,一些核心注解用来定义一个请求的开始和结束。这些往解包括以下:
- cs-Client Sent客户端发送个请求,这个注解描述了这个Span的开始
- sr- Server Received 一服务端获得请求并准备开始处理它,如果将其sr减去cs时间戳便可得到网络传输的时间。
- ss-Server Sent (服务端发送响应) 一该注解表明请求处理的完成(当请求返回客户端),如果ss的时间戳减去sr时间戳,就可以得到服务器请求的时间。
- cr-Client Received (客 户端接收响应) 一此时Span的结束,如果cr. 的时间戳减去cs时间戳便可以得到整个请求所消耗的时间。
官方文档
整合Sleuth
1、服务提供者与消费者导入依赖
<dependency>
  <groupId>org.springframework.cloudgroupId>
  <artifactId>spring-cloud-starter-sleuthartifactId>
dependency>
2、打开debug日志
logging.level.org.springframework.cloud.openfeign=debug
logging.level.org.springframework.cloud.sleuth=debug
3、发起一次远程调用,观察控制台
# DEBUG[user-service,541450f08573ff5,541450f0857 3ff5,false]

user-service : 服务名
5414508573ff5:是Tranceld,一 条链路中,只有一个Tranceld
541450f08573fff5:是spanld,链路中的基本工作单元id
false:表示是否将数据输出到其他服务,true 则会把信息输出到其他可视化的服务上观察
整合zipkin可视化观察
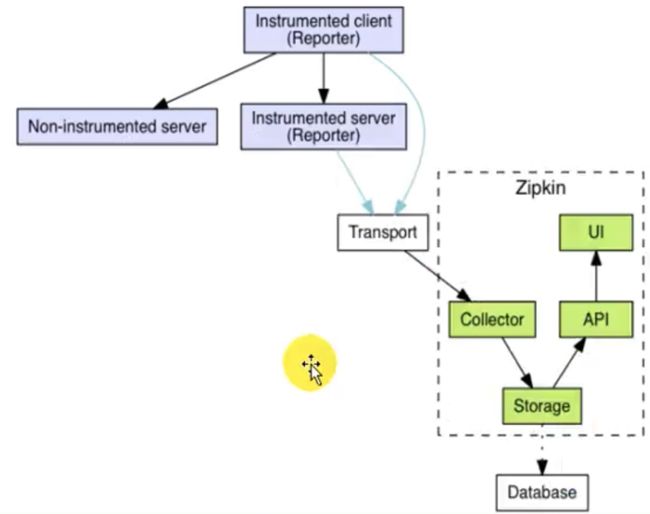
通过Sleuth产生的调用链监控信息,可以得知微服务之间的调用链路,但监控信息只输出到控制台不方便查看。我们需要一个图形化的工具zipkin。Zipkin 是Twitter 开源的分布式跟踪系统,主要用来收集系统的时序数据,从而追踪系统的调用问题。zipkin 官网地址
# 使用docker 安装zipkin
$ docker run -d -p 9411:9411 --name zipkin openzipkin/zipkin
<dependency>
  <groupId>org.springframework.cloudgroupId>
  <artifactId>spring-cloud-starter-zipkinartifactId>
dependency>
# zipkin服务的地址
spring.zipkin.base-url=http://192.168.1.10:9411/
# 关闭服务发现,否则Spring Cloud会把zipkin的url当做服务名称
spring.zipkin.discovery-client-enabled=false
# 设置使用http的方式传输数据
spring.zipkin.sender.type=web
# 设置抽样采集率为100%,默认为0.1,即10%
spring.sleuth.sampler.probability=1
Zipkin数据持久化
Zipkin默认是将监控数据存储在内存的,如果Zipkin挂掉或重启的话,那么监控数据就会丢失。所以如果想要搭建生产可用的Zipkin,就需要实现监控数据的持久化。而想要实现数据持久化,自然就是得将数据存储至数据库。好在Zipkin支持将数据存储至:
-  内存(默认)
-  MySQL
-  Elasticsearch(国内推荐使用这个)
-  Cassandra(国内很少人用)
Zipkin支持的这几种存储方式中,内存显然是不适用于生产的,这一点开始也说了。而使用MySQL的话,当数据量大时,查询较为缓慢,也不建议使用。Twitter官方使用的是Cassandra作为Zipkin的存储数据库,但国内大规模用Cassandra 的公司较少,而且Cassandra 相关文档也不多。
综上,故采用Elasticsearch是个比较好的选择,关于使用Elasticsearch 作为Zipkin 的存储数据库的官方文档如下:
zipkin-storage/elasticsearch
通过docker的方式
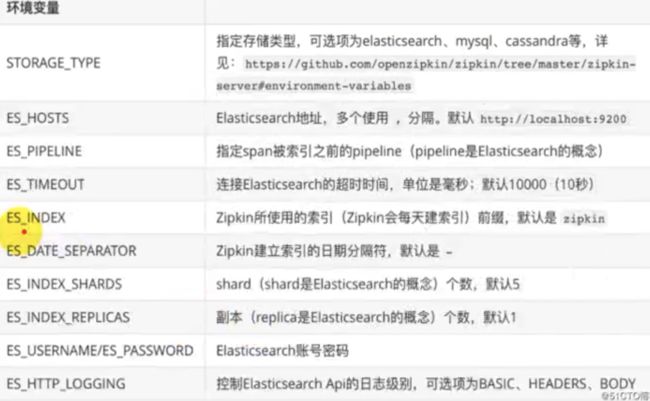
$ docker run -env STORAGE TYPE=elasticsearch -env ES_HOSTS=192.168.190.129:9200 openzipkin/zipkin-dependencies
