本文是Intermediate iOS 11 Programming with Swift 4系列 的 第 十 篇.
iOS SDK提供了多种框架,可以让你在应用中使用声音。你可以用来播放和录制音频文件的框架之一是AV Foundation框架。在这一章,我将带你通过基本的框架,并向你展示如何管理音频回放和录音.
AV Foundation为开发者提供了必要的api来处理iOS上的音频。在这个demo中,我们主要使用框架的这两个类:
AVAudioPlayer - 把它想象成一个播放声音文件的音频播放器。通过使用播放器,您可以在iOS中播放任何持续时间和音频格式的声音
AVAudioRecorder - 一个用来记录音频的录音机。
Demo
为了了解如何使用API,我们将构建一个简单的音频应用程序,允许用户录制和播放音频。我们的主要关注点是演示AVFoundation框架,这样应用程序的用户界面就会非常简单。
首先,使用 Single View Application 模板创建一个应用程序,并将其命名为RecordPro. 您可以自己设计一个类似于图10.1的用户界面。然而,要让您免于设置用户界面和自定义类,您可以从这里下载模板! 界面很简单, 只有3个按钮: 录音, 暂停, 和播放.
它也有一个计时器来显示录制期间经过的时间。这些按钮已经连接到RecordProController类中相应的动作方法,而RecordProController类是UIViewController的一个子类.
在我们进入到实现之前,让我给你一个更好的关于演示应用程序如何工作的想法:
* 当用户点击录制按钮时,应用程序启动计时器并开始录制音频。然后,记录按钮被暂停按钮取代。如果用户点击暂停按钮,应用程序将暂停录制,直到用户再次点击按钮。在编码方面,它调用记录操 作方法
* 当用户点击停止按钮时,应用程序会停止录制。我已经把按钮和RecordProController中的stop动作方法连接起来了。
* 要播放录音,用户可以点击播放按钮,这是与播放方法相关联的。
AVAudioRecorder
AVAudioRecorder类的AV Foundation框架允许您的应用程序提供音频录制功能。在iOS中,录制的音频来自iOS设备的内置麦克风或耳机麦克风。这些设备包括iPhone、iPad或iPod touch。
首先,让我们看看如何使用AVAudioRecorder类来记录音频。与SDK中的大多数api一样,AVAudioRecorder使用了delegate模式。您可以为音频记录器实现delegate对象,以响应音频中断并完成录制。AVAudioRecorder对象的委托必须采用AVAudioRecorderDelegate协议.
可以写个Extension:
extension RecorderProController: AVAudioRecorderDelegate {
}
记得导入AV Foundation 框架 !
声明 AVAudioRecorder 和 AVAudioPlayer的实例变量
var audioRecorder: AVAudioRecorder ?
var audioPlayer: AVAudioPlayer?
让我们先关注AVAudioRecorder。稍后我们将使用audioPlayer变量。AVAudioRecorder类提供了一种在应用程序中记录声音的简单方法。
* 指定一个声音文件URL
* 设置一个音频会话
* 配置录音机的初始状态
我们将创建一个名为configure()的私有方法来进行设置。将代码插入RecordProController类中
直接上代码:
private func configure() {
// Disable Stop/Play button when application launches
stopButton.isEnabled = false
playButton.isEnabled = false
// Get the document directory. If fails, just skip the rest of the code
guard let directoryURL = FileManager.default.urls(for: FileManager.SearchPathDirectory.documentDirectory, in: FileManager.SearchPathDomainMask.userDomainMask).first else {
let alertMessage = UIAlertController(title: "Error", message: "Failed to get the document directory for recording the “audio. Please try again later.", preferredStyle: .alert)
alertMessage.addAction(UIAlertAction(title: "OK", style: .default, handler: nil))
present(alertMessage, animated: true, completion: nil)
return
}
// Set the default audio file
let audioFileURL = directoryURL.appendingPathComponent("MyAudioMemo.m4a")
// Setup audio session
let audioSession = AVAudioSession.sharedInstance()
do {
try audioSession.setCategory(AVAudioSessionCategoryPlayAndRecord, with: AVAudioSessionCategoryOptions.defaultToSpeaker)
// Define the recorder setting
let recorderSetting: [String: Any] = [
AVFormatIDKey: Int(kAudioFormatMPEG4AAC),
“ AVSampleRateKey: 44100.0,
AVNumberOfChannelsKey: 2,
AVEncoderAudioQualityKey: AVAudioQuality.high.rawValue
]
// Initiate and prepare the recorder
audioRecorder = try AVAudioRecorder(url: audioFileURL, settings: recorderSetting)
audioRecorder.delegate = self
audioRecorder.isMeteringEnabled = true
audioRecorder.prepareToRecord()
} catch {
print(error)
}
}
接下来看一看 录音按钮的 实现
当用户点击录制按钮时,应用程序将开始录制。录制按钮将被更改为暂停按钮。如果用户点击暂停按钮,应用程序将暂停音频录制,直到再次点击按钮。当用户点击“停止”按钮时,录音就会停止
代码如下 :
@IBAction func record(sender: UIButton) {
// Stop the audio player before recording
if let player = audioPlayer, player.isPlaying {
player.stop()
}
if !audioRecorder.isRecording {
let audioSession = AVAudioSession.sharedInstance()
do {
try audioSession.setActive(true)
// Start recording
audioRecorder.record()
// Change to the Pause image
recordButton.setImage(UIImage(named: "Pause"), for: UIControlState.normal)
} catch {
print(error)
}
} else {
// Pause recording
audioRecorder.pause()
// Change to the Record image
recordButton.setImage(UIImage(named: "Record"), for: UIControlState.normal)
}
stopButton.isEnabled = true
playButton.isEnabled = false
}
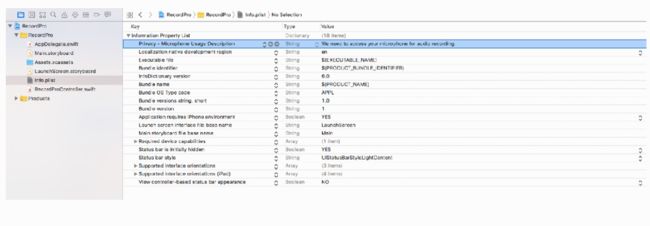
当然别忘 在 info.plist 里面 加入访问权限
暂停按钮的实现
当用户点击停止按钮时,会调用停止动作方法。这个方法很简单。我们首先重置按钮的状态,然后调用AVAudioRecorder对象的stop方法来停止录制。最后,我们关闭音频会话
代码如下 :
@IBAction func stop(sender: UIButton) {
recordButton.setImage(UIImage(named: "Record"), for: UIControlState.normal)
recordButton.isEnabled = true
stopButton.isEnabled = false
playButton.isEnabled = true
// Stop the audio recorder
audioRecorder?.stop()
let audioSession = AVAudioSession.sharedInstance()
do {
try audioSession.setActive(false)
} catch {
print(error)
}
}
实现 AVAudioRecorderDelegate 协议
你可以使用AVAudioRecorderDelegate协议来处理音频中断(比如,录音期间的电话)以及完成录音。在本例中,RecordProController是委托。AVAudioRecorderDelegate协议中定义的方法是可选的。为了演示目的,我们将只实现audioRecorderDidFinishRecording(_:successful:)方法来处理记录的完成.
代码如下 :
func audioRecorderDidFinishRecording(_ recorder: AVAudioRecorder, successfully flag: Bool) {
if flag {
let alertMessage = UIAlertController(title: "Finish Recording", message: "Successfully recorded the audio!", preferredStyle: .alert)
alertMessage.addAction(UIAlertAction(title: "OK", style: .default, handler: nil))
present(alertMessage, animated: true, completion: nil)
}
}
实现 AVAudioPlayerDelegate 协议
func audioPlayerDidFinishPlaying(_ player: AVAudioPlayer, successfully flag: Bool) {
playButton.isSelected = false
let alertMessage = UIAlertController(title: "Finish Playing", message: "Finish playing the recording!", preferredStyle: .alert)
alertMessage.addAction(UIAlertAction(title: "OK", style: .default, handler: nil))
present(alertMessage, animated: true, completion: nil)
}
最后实现 定时器
private var timer: Timer?
private var elapsedTimeInSecond: Int = 0
func startTimer() {
timer = Timer.scheduledTimer(withTimeInterval: 1.0, repeats: true, block: { (timer) in
self.elapsedTimeInSecond += 1
self.updateTimeLabel()
})
}
func pauseTimer() {
timer?.invalidate()
}
func resetTimer() {
timer?.invalidate()
elapsedTimeInSecond = 0
updateTimeLabel()
}
func updateTimeLabel() {
let seconds = elapsedTimeInSecond % 60
let minutes = (elapsedTimeInSecond / 60) % 60
timeLabel.text = String(format: "%02d:%02d", minutes, seconds)
}


