Flink Job提交流程(Dispatcher之后)
文章目录
- Flink Job提交流程(Dispatcher之后)
- 1 Dispatcher
- 2 ExecutionGraph
- 2.1 ExecutionJobVertex
- 2.2 ExecutionVertex
- 2.3 Execution
- 2.4 IntermediateResult
- 2.5 ExecutionEdge
- 3 Task调度
- 3.1 DataSourceTask
- 3.2 StreamTask
- 3.2.1 StreamOneInputProcessor
- 3.2.2 StreamTwoInputProcessor
- 3.2.3 StreamTwoInputSelectableProcessor
- 3.3 DataSinkTask
- 4 总结
- 参考文献
Flink Job提交流程(Dispatcher之后)
本篇主要介绍Dispatcher启动之后是如何将job提交并执行起来的,会先分析下Dispatcher这个类的作用,然后着重分析下ExecutionGraph的生成,最后介绍下Dispatcher之后的整个提交流程。
1 Dispatcher
Dispatcher服务提供REST接口来接收client的job提交,它负责启动JobManager和提交job,同时运行Web UI。Dispatcher的作用可在下图中体现:

Dispatcher是在AppMaster起来以后创建的,AppMaster的主类为YarnJobClusterEntrypoint(per-job模式)或YarnSessionClusterEntrypoint(session模式),最后通过AbstractDispatcherResourceManagerComponentFactory的create方法来创建并启动
// AbstractDispatcherResourceManagerComponentFactory
public DispatcherResourceManagerComponent<T> create(
		Configuration configuration,
		...) throws Exception {

		//创建webMonitorEndpoint并启动
		//创建resourceManager并启动

		//创建dispatcher并启动
		//Per-Job模式创建MiniDispatcher,Session模式创建StandaloneDispatcher
		dispatcher = dispatcherFactory.createDispatcher(
			configuration,
			rpcService,
			highAvailabilityServices,
			resourceManagerGatewayRetriever,
			blobServer,
			heartbeatServices,
			jobManagerMetricGroup,
			metricRegistry.getMetricQueryServiceGatewayRpcAddress(),
			archivedExecutionGraphStore,
			fatalErrorHandler,
			historyServerArchivist);
		//其实就是启动了rpc endpoint
		dispatcher.start();
	}
2 ExecutionGraph
我们知道,一个Flink应用的提交必须经过三张graph的转换:

1.首先是通过API会生成transformations,通过transformations会生成StreamGraph

2.因为有些节点可以打包放在一起被JobManage安排调度,所以可将StreamGraph的某些StreamNode Chain在一起生成JobGraph,前两步转换都是在客户端完成

3.最后会将JobGraph转换为ExecutionGraph,相比JobGraph会增加并行度的概念,这一步是在Jobmanager里完成的。
接下来主要介绍下ExecutionGraph以及它是如何生成的。
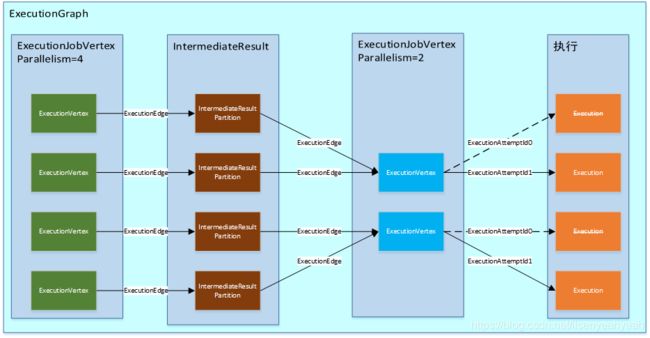
ExecutionGraph是由ExecutionJobVertex、ExecutionVertex以及Execution组成的
2.1 ExecutionJobVertex
ExecutionJobVertex一一对应JobGraph中的JobVertex
2.2 ExecutionVertex
一个ExecutionJobVertex对应n个ExecutionVertex,其中n就是算子的并行度。ExecutionVertex就是并行任务的一个子任务
2.3 Execution
Execution 是对 ExecutionVertex 的一次执行,通过 ExecutionAttemptId 来唯一标识。
2.4 IntermediateResult
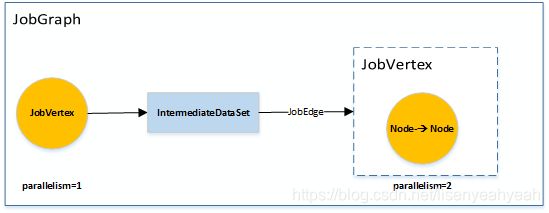
在 JobGraph 中用 IntermediateDataSet 表示 JobVertex 的对外输出,一个 JobGraph 可能有 n(n >=0) 个输出。在 ExecutionGraph 中,与此对应的就是 IntermediateResult。每一个 IntermediateResult 就有 numParallelProducers(并行度) 个生产者,每个生产者的在相应的 IntermediateResult 上的输出对应一个 IntermediateResultPartition。IntermediateResultPartition 表示的是 ExecutionVertex 的一个输出分区
2.5 ExecutionEdge
ExecutionEdge 表示 ExecutionVertex 的输入,通过 ExecutionEdge 将 ExecutionVertex 和 IntermediateResultPartition 连接起来,进而在不同的 ExecutionVertex 之间建立联系。
下面来介绍ExecutionGraph是如何构建出来的
1.构建JobInformation
2.构建ExecutionGraph
3.将JobGraph进行拓扑排序,获取sortedTopology顶点集合
4.构建ExecutionJobVertex,连接IntermediateResultPartition和ExecutionVertex
5.checkpointing、metrics相关设置
6.返回ExecutionGraph
// ExecutionGraphBuilder
	public static ExecutionGraph buildGraph(
		@Nullable ExecutionGraph prior,
		JobGraph jobGraph,
		...) throws JobExecutionException, JobException {
		// 构建JobInformation

		// 构建ExecutionGraph

		// 将JobGraph进行拓扑排序,获取sortedTopology顶点集合
		List<JobVertex> sortedTopology = jobGraph.getVerticesSortedTopologicallyFromSources();

		executionGraph.attachJobGraph(sortedTopology);

		// checkpointing相关设置

		// metrics相关设置

		return executionGraph;
	}
//ExecutionGraph
	public void attachJobGraph(List<JobVertex> topologiallySorted) throws JobException {
		for (JobVertex jobVertex : topologiallySorted) {
			// 构建ExecutionJobVertex
			ExecutionJobVertex ejv = new ExecutionJobVertex(
					this,
					jobVertex,
					1,
					maxPriorAttemptsHistoryLength,
					rpcTimeout,
					globalModVersion,
					createTimestamp);
			// 连接IntermediateResultPartition和ExecutionVertex
			ejv.connectToPredecessors(this.intermediateResults);
	}
// ExecutionJobVertex
	public void connectToPredecessors(Map<IntermediateDataSetID, IntermediateResult> intermediateDataSets) throws JobException {
		List<JobEdge> inputs = jobVertex.getInputs();

		for (int num = 0; num < inputs.size(); num++) {
			JobEdge edge = inputs.get(num);
			IntermediateResult ires = intermediateDataSets.get(edge.getSourceId());
			this.inputs.add(ires);
			int consumerIndex = ires.registerConsumer();

			for (int i = 0; i < parallelism; i++) {
				ExecutionVertex ev = taskVertices[i];
				ev.connectSource(num, ires, edge, consumerIndex);
			}
		}
	}
// ExecutionVertex
	public void connectSource(int inputNumber, IntermediateResult source, JobEdge edge, int consumerNumber) {

		final DistributionPattern pattern = edge.getDistributionPattern();
		final IntermediateResultPartition[] sourcePartitions = source.getPartitions();

		ExecutionEdge[] edges;

		switch (pattern) {
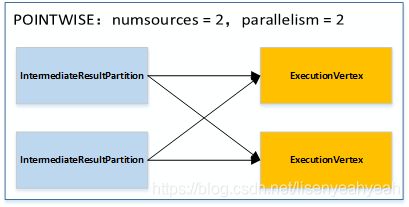
			// 下游 JobVertex 的输入 partition 算法,如果是 forward 或 rescale 的话为 POINTWISE
			case POINTWISE:
				edges = connectPointwise(sourcePartitions, inputNumber);
				break;
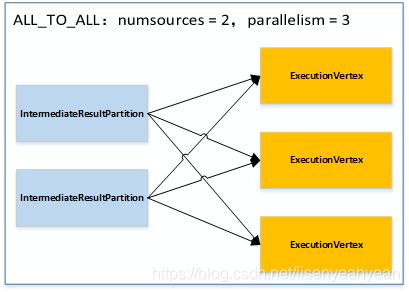
			// 每一个并行的ExecutionVertex节点都会链接到源节点产生的所有中间结果IntermediateResultPartition
			case ALL_TO_ALL:
				edges = connectAllToAll(sourcePartitions, inputNumber);
				break;

			default:
				throw new RuntimeException("Unrecognized distribution pattern.");

		}

		inputEdges[inputNumber] = edges;
		for (ExecutionEdge ee : edges) {
			ee.getSource().addConsumer(ee, consumerNumber);
		}
	}


	private ExecutionEdge[] connectPointwise(IntermediateResultPartition[] sourcePartitions, int inputNumber) {
		final int numSources = sourcePartitions.length;
		final int parallelism = getTotalNumberOfParallelSubtasks();

		// caseA 一对一进行连接
		if (numSources == parallelism) {
			return new ExecutionEdge[] { new ExecutionEdge(sourcePartitions[subTaskIndex], this, inputNumber) };
		}
		// caseB 一对多进行连接
		else if (numSources < parallelism) {

			int sourcePartition;

			if (parallelism % numSources == 0) {
				int factor = parallelism / numSources;
				sourcePartition = subTaskIndex / factor;
			}
			else {
				float factor = ((float) parallelism) / numSources;
				sourcePartition = (int) (subTaskIndex / factor);
			}

			return new ExecutionEdge[] { new ExecutionEdge(sourcePartitions[sourcePartition], this, inputNumber) };
		}
		// caseC 多对一进行连接
		else {
			if (numSources % parallelism == 0) {
				int factor = numSources / parallelism;
				int startIndex = subTaskIndex * factor;

				ExecutionEdge[] edges = new ExecutionEdge[factor];
				for (int i = 0; i < factor; i++) {
					edges[i] = new ExecutionEdge(sourcePartitions[startIndex + i], this, inputNumber);
				}
				return edges;
			}
			else {
				float factor = ((float) numSources) / parallelism;

				int start = (int) (subTaskIndex * factor);
				int end = (subTaskIndex == getTotalNumberOfParallelSubtasks() - 1) ?
						sourcePartitions.length :
						(int) ((subTaskIndex + 1) * factor);

				ExecutionEdge[] edges = new ExecutionEdge[end - start];
				for (int i = 0; i < edges.length; i++) {
					edges[i] = new ExecutionEdge(sourcePartitions[start + i], this, inputNumber);
				}

				return edges;
			}
		}
	}


	private ExecutionEdge[] connectAllToAll(IntermediateResultPartition[] sourcePartitions, int inputNumber) {
		ExecutionEdge[] edges = new ExecutionEdge[sourcePartitions.length];

		for (int i = 0; i < sourcePartitions.length; i++) {
			IntermediateResultPartition irp = sourcePartitions[i];
			edges[i] = new ExecutionEdge(irp, this, inputNumber);
		}

		return edges;
	}
POINTWISE模式:
(1) 源的并行度和目标并行度相等:

3 Task调度
从Client到Dispatcher,然后从Dispatcher到JobMaster,只是透传了JobGraph,同时起了一些服务,其实Task的调度关键是从JobMaster的startScheduling方法开始的,下面就从这里开始分析:
// JobMaster
	private void startScheduling() {
		checkState(jobStatusListener == null);
		jobStatusListener = new JobManagerJobStatusListener();
		schedulerNG.registerJobStatusListener(jobStatusListener);

		schedulerNG.startScheduling();
	}
// LegacyScheduler
	public void startScheduling() {
		executionGraph.scheduleForExecution();
	}
其中executionGraph的创建就是在LegacyScheduler的构造方法中完成的,最终的构建方法在ExecutionGraph已经介绍过。
// LegacyScheduler
	public LegacyScheduler(
			final Logger log,
			final JobGraph jobGraph,
			...) throws Exception {
		// ...
		this.executionGraph = createAndRestoreExecutionGraph(jobManagerJobMetricGroup, checkNotNull(shuffleMaster), checkNotNull(partitionTracker));
	}

	private ExecutionGraph createAndRestoreExecutionGraph(
			JobManagerJobMetricGroup currentJobManagerJobMetricGroup,
			ShuffleMaster<?> shuffleMaster,
			PartitionTracker partitionTracker) throws Exception {
		ExecutionGraph newExecutionGraph = createExecutionGraph(currentJobManagerJobMetricGroup, shuffleMaster, partitionTracker);
		// ...
		return newExecutionGraph;
	}

	private ExecutionGraph createExecutionGraph(
			JobManagerJobMetricGroup currentJobManagerJobMetricGroup,
			ShuffleMaster<?> shuffleMaster,
			final PartitionTracker partitionTracker) throws JobExecutionException, JobException {
		return ExecutionGraphBuilder.buildGraph(
			null,
			jobGraph,
			...);
	}
下面就来看看ExecutionGraph的scheduleForExecution方法
// ExecutionGraph
	public void scheduleForExecution() throws JobException {
		final long currentGlobalModVersion = globalModVersion;
		if (transitionState(JobStatus.CREATED, JobStatus.RUNNING)) {
			final CompletableFuture<Void> newSchedulingFuture = SchedulingUtils.schedule(
				scheduleMode,
				getAllExecutionVertices(),
				this);
		}
		else {
			throw new IllegalStateException("Job may only be scheduled from state " + JobStatus.CREATED);
		}
	}
接着会调用SchedulingUtils的schedule方法,根据scheduleMode来调度批作业或流作业
| scheduleMode | 描述 |
|---|---|
| LAZY_FROM_SOURCES/LAZY_FROM_SOURCES_WITH_BATCH_SLOT_REQUEST | 上游task准备好之后再调度下游task,适用于批作业 |
| EAGER | 所有task一起被调度起来,适用于流作业 |
// SchedulingUtils
	public static CompletableFuture<Void> schedule(
			ScheduleMode scheduleMode,
			final Iterable<ExecutionVertex> vertices,
			final ExecutionGraph executionGraph) {

		switch (scheduleMode) {
			// 上游task准备好之后再调度下游task,适用于批任务
			case LAZY_FROM_SOURCES:
			case LAZY_FROM_SOURCES_WITH_BATCH_SLOT_REQUEST:
				return scheduleLazy(vertices, executionGraph);
			// 所有task一起被调度起来,适用于流任务
			case EAGER:
				return scheduleEager(vertices, executionGraph);

			default:
				// IllegalStateException
		}
	}
这里我们主要分析scheduleMode = EAGER,即流作业的场景:
// SchedulingUtils
	public static CompletableFuture<Void> scheduleEager(
			final Iterable<ExecutionVertex> vertices,
			final ExecutionGraph executionGraph) {
		// 遍历vertices并申请slot

		//调度execution
		return allAllocationsFuture.thenAccept(
			(Collection<Execution> executionsToDeploy) -> {
				for (Execution execution : executionsToDeploy) {
					try {
						execution.deploy();
					} catch (Throwable t) {
						// CompletionException
					}
				}
			})
			// 异常处理
	}
// Execution
	public void deploy() throws JobException {
		final LogicalSlot slot  = assignedResource;

		ExecutionState previous = this.state;
		// 状态必须是SCHEDULED或CREATED
		if (previous == SCHEDULED || previous == CREATED) {
			// 将状态置为DEPLOYING
			if (!transitionState(previous, DEPLOYING)) {
				// IllegalStateException
			}
		}
		else {
			// IllegalStateException
		}

		try {
			// 构造TaskDeploymentDescriptor
			final TaskDeploymentDescriptor deployment = TaskDeploymentDescriptorFactory
				.fromExecutionVertex(vertex, attemptNumber)
				.createDeploymentDescriptor(
					slot.getAllocationId(),
					slot.getPhysicalSlotNumber(),
					taskRestore,
					producedPartitions.values());
			taskRestore = null;
			final TaskManagerGateway taskManagerGateway = slot.getTaskManagerGateway();

			final ComponentMainThreadExecutor jobMasterMainThreadExecutor =
				vertex.getExecutionGraph().getJobMasterMainThreadExecutor();
			CompletableFuture.supplyAsync(() -> taskManagerGateway.submitTask(deployment, rpcTimeout), executor)
				// maybe markFailed
		}
		catch (Throwable t) {
			// markFailed
		}
	}
通过RPC调用TaskExecutor的submitTask方法来提交Task
// RpcTaskManagerGateway
	public CompletableFuture<Acknowledge> submitTask(TaskDeploymentDescriptor tdd, Time timeout) {
		return taskExecutorGateway.submitTask(tdd, jobMasterId, timeout);
	}
(1) 加载jobInformation和taskInformation文件,初始化jobInformation和taskInformation
(2) 构造Task
(3) 启动Task线程
// TaskExecutor
	public CompletableFuture<Acknowledge> submitTask(
			TaskDeploymentDescriptor tdd,
			JobMasterId jobMasterId,
			Time timeout) {

		try {
			final JobID jobId = tdd.getJobId();
			final JobManagerConnection jobManagerConnection = jobManagerTable.get(jobId);

			try {
				// 加载jobInformation和taskInformation文件
				tdd.loadBigData(blobCacheService.getPermanentBlobService());
			} catch (IOException | ClassNotFoundException e) {
				// TaskSubmissionException
			}

			final JobInformation jobInformation;
			final TaskInformation taskInformation;
			try {
				jobInformation = tdd.getSerializedJobInformation().deserializeValue(getClass().getClassLoader());
				taskInformation = tdd.getSerializedTaskInformation().deserializeValue(getClass().getClassLoader());
			} catch (IOException | ClassNotFoundException e) {
				//TaskSubmissionException
			}

			// 加入TaskMetricGroup

			// 构造RpcInputSplitProvider

			TaskManagerActions taskManagerActions = jobManagerConnection.getTaskManagerActions();
			CheckpointResponder checkpointResponder = jobManagerConnection.getCheckpointResponder();
			GlobalAggregateManager aggregateManager = jobManagerConnection.getGlobalAggregateManager();

			LibraryCacheManager libraryCache = jobManagerConnection.getLibraryCacheManager();
			ResultPartitionConsumableNotifier resultPartitionConsumableNotifier = jobManagerConnection.getResultPartitionConsumableNotifier();
			PartitionProducerStateChecker partitionStateChecker = jobManagerConnection.getPartitionStateChecker();

			// 构造TaskStateManager

			// 构造Task
			Task task = new Task(
				jobInformation,
				taskInformation,
				tdd.getExecutionAttemptId(),
				tdd.getAllocationId(),
				tdd.getSubtaskIndex(),
				tdd.getAttemptNumber(),
				tdd.getProducedPartitions(),
				tdd.getInputGates(),
				tdd.getTargetSlotNumber(),
				taskExecutorServices.getMemoryManager(),
				taskExecutorServices.getIOManager(),
				taskExecutorServices.getShuffleEnvironment(),
				taskExecutorServices.getKvStateService(),
				taskExecutorServices.getBroadcastVariableManager(),
				taskExecutorServices.getTaskEventDispatcher(),
				taskStateManager,
				taskManagerActions,
				inputSplitProvider,
				checkpointResponder,
				aggregateManager,
				blobCacheService,
				libraryCache,
				fileCache,
				taskManagerConfiguration,
				taskMetricGroup,
				resultPartitionConsumableNotifier,
				partitionStateChecker,
				getRpcService().getExecutor());

			boolean taskAdded;

			try {
				// 加入taskSlotTable
				taskAdded = taskSlotTable.addTask(task);
			} catch (SlotNotFoundException | SlotNotActiveException e) {
				// TaskSubmissionException
			}

			if (taskAdded) {
				// 启动Task线程
				task.startTaskThread();

				setupResultPartitionBookkeeping(
					tdd.getJobId(),
					tdd.getProducedPartitions(),
					task.getTerminationFuture());
				return CompletableFuture.completedFuture(Acknowledge.get());
			} else {
				// TaskSubmissionException
			}
		} catch (TaskSubmissionException e) {
			return FutureUtils.completedExceptionally(e);
		}
	}
Task是执行在TaskExecutor进程里的一个线程,下面来看看其run方法
(1) 检测当前状态,正常情况为CREATED,如果是FAILED或CANCELING直接返回,其余状态将抛异常
(2) 读取DistributedCache文件
(3) 启动ResultPartitionWriter和InputGate
(4) 向taskEventDispatcher注册partitionWriter
(5) 根据nameOfInvokableClass加载对应的类并实例化
(6) 将状态置为RUNNING并执行invoke方法
// Task
	public void run() {
		doRun();
	}

	private void doRun() {
		// 循环判断当前状态,正常为CREATED
		while (true) {
			ExecutionState current = this.executionState;
			if (current == ExecutionState.CREATED) {
			// 如果当前状态为CREATED,转换为DEPLOYING,并跳出循环
				if (transitionState(ExecutionState.CREATED, ExecutionState.DEPLOYING)) {
					break;
				}
			}
			// 如果当前状态为FAILED,调用notifyFinalState并return
			else if (current == ExecutionState.FAILED) {
				notifyFinalState();
				return;
			}
			// 如果当前状态为CANCELING,转换为CANCELED,并调用notifyFinalState后return
			else if (current == ExecutionState.CANCELING) {
				if (transitionState(ExecutionState.CANCELING, ExecutionState.CANCELED)) {
					notifyFinalState();
					return;
				}
			}
			else {
				// IllegalStateException
			}
		}

		Map<String, Future<Path>> distributedCacheEntries = new HashMap<>();
		AbstractInvokable invokable = null;

		try {
			FileSystemSafetyNet.initializeSafetyNetForThread();

			blobService.getPermanentBlobService().registerJob(jobId);

			// 获取executionConfig
			userCodeClassLoader = createUserCodeClassloader();
			final ExecutionConfig executionConfig = serializedExecutionConfig.deserializeValue(userCodeClassLoader);

			// 用ExecutionConfig重新赋值taskCancellationInterval

			// 用ExecutionConfig重新赋值taskCancellationTimeout

			// 启动ResultPartitionWriter和InputGate
			setupPartitionsAndGates(consumableNotifyingPartitionWriters, inputGates);

			//向taskEventDispatcher注册partitionWriter
			for (ResultPartitionWriter partitionWriter : consumableNotifyingPartitionWriters) {
				taskEventDispatcher.registerPartition(partitionWriter.getPartitionId());
			}

			try {
				for (Map.Entry<String, DistributedCache.DistributedCacheEntry> entry :
						DistributedCache.readFileInfoFromConfig(jobConfiguration)) {
					Future<Path> cp = fileCache.createTmpFile(entry.getKey(), entry.getValue(), jobId, executionId);
					distributedCacheEntries.put(entry.getKey(), cp);
				}
			}
			catch (Exception e) {
				// Exception
			}

			TaskKvStateRegistry kvStateRegistry = kvStateService.createKvStateTaskRegistry(jobId, getJobVertexId());

			Environment env = new RuntimeEnvironment(
				jobId,
				vertexId,
				executionId,
				executionConfig,
				taskInfo,
				jobConfiguration,
				taskConfiguration,
				userCodeClassLoader,
				memoryManager,
				ioManager,
				broadcastVariableManager,
				taskStateManager,
				aggregateManager,
				accumulatorRegistry,
				kvStateRegistry,
				inputSplitProvider,
				distributedCacheEntries,
				consumableNotifyingPartitionWriters,
				inputGates,
				taskEventDispatcher,
				checkpointResponder,
				taskManagerConfig,
				metrics,
				this);

			executingThread.setContextClassLoader(userCodeClassLoader);
			// 根据nameOfInvokableClass加载对应的类并实例化
			invokable = loadAndInstantiateInvokable(userCodeClassLoader, nameOfInvokableClass, env);

			this.invokable = invokable;
			// 将状态由DEPLOYING转换为RUNNING
			if (!transitionState(ExecutionState.DEPLOYING, ExecutionState.RUNNING)) {
				// CancelTaskException
			}
			// 更新TaskExecution状态为RUNNING
			taskManagerActions.updateTaskExecutionState(new TaskExecutionState(jobId, executionId, ExecutionState.RUNNING));
			// 设置classLoader
			executingThread.setContextClassLoader(userCodeClassLoader);
			// 真正执行Task
			invokable.invoke();

			// 结束partitionWriter
			for (ResultPartitionWriter partitionWriter : consumableNotifyingPartitionWriters) {
				if (partitionWriter != null) {
					partitionWriter.finish();
				}
			}

			//将状态标记为FINISHED
			if (!transitionState(ExecutionState.RUNNING, ExecutionState.FINISHED)) {
				throw new CancelTaskException();
			}
		}
		catch (Throwable t) {
			// 异常处理,状态转换
		}
		finally {
			try {
				// invokable置为null
				this.invokable = null;
				// 释放资源
			}
			catch (Throwable t) {
				// notifyFatalError
			}
		}
	}
invokable.invoke()将根据nameOfInvokableClass的不同调度不同的任务,包括批任务、Source任务、Sink任务、流任务。下面我们主要对三种流任务做下介绍,批任务暂时不讨论。

3.1 DataSourceTask
DataSourceTask是数据源对应的Task,比如Kafka Source、File Source等
- 初始化format、output
- 获取序列化对象
- 获取splits
- 循环订阅split并读取数据发往下游
// DataSourceTask
private List<RecordWriter<?>> eventualOutputs;
	// 收集数据发往下游
	private Collector<OT> output;
	// 格式化实例
	private InputFormat<OT, InputSplit> format;
	// 类型序列化工厂
	private TypeSerializerFactory<OT> serializerFactory;
	// Task配置
	private TaskConfig config;
	// chain在一起的task
	private ArrayList<ChainedDriver<?, ?>> chainedTasks;
	// 退出标志
	private volatile boolean taskCanceled = false;

	public void invoke() throws Exception {
		// 初始化format
		initInputFormat();
		try {
			// 初始化output
			initOutputs(getUserCodeClassLoader());
		} catch (Exception ex) {
			// RuntimeException
		}
		// 创建运行时上下文
		RuntimeContext ctx = createRuntimeContext();

		// metrics

		if (RichInputFormat.class.isAssignableFrom(this.format.getClass())) {
			((RichInputFormat) this.format).setRuntimeContext(ctx);
			((RichInputFormat) this.format).openInputFormat();
		}

		ExecutionConfig executionConfig = getExecutionConfig();

		boolean objectReuseEnabled = executionConfig.isObjectReuseEnabled();
		// 获取序列化对象
		final TypeSerializer<OT> serializer = this.serializerFactory.getSerializer();

		try {
			BatchTask.openChainedTasks(this.chainedTasks, this);

			// 获取splits
			final Iterator<InputSplit> splitIterator = getInputSplits();

			// 循环订阅split
			while (!this.taskCanceled && splitIterator.hasNext())
			{
				// get start and end
				final InputSplit split = splitIterator.next();
				final InputFormat<OT, InputSplit> format = this.format;
				format.open(split);
				try {
					final Collector<OT> output = new CountingCollector<>(this.output, numRecordsOut);
					if (objectReuseEnabled) {
						OT reuse = serializer.createInstance();
						// as long as there is data to read
						while (!this.taskCanceled && !format.reachedEnd()) {
							OT returned;
							if ((returned = format.nextRecord(reuse)) != null) {
								// 读取数据并发往下游
								output.collect(returned);
							}
						}
					} else {
						// as long as there is data to read
						while (!this.taskCanceled && !format.reachedEnd()) {
							OT returned;
							if ((returned = format.nextRecord(serializer.createInstance())) != null) {
								// 读取数据并发往下游
								output.collect(returned);
							}
						}
					}
				} finally {
					format.close();
				}
				completedSplitsCounter.inc();
			} // end for all input splits
			this.output.close();
			BatchTask.closeChainedTasks(this.chainedTasks, this);
		}
		catch (Exception ex) {
			// exception
		} finally {
			BatchTask.clearWriters(eventualOutputs);
			if (this.format != null && RichInputFormat.class.isAssignableFrom(this.format.getClass())) {
				((RichInputFormat) this.format).closeInputFormat();
			}
		}
	}
3.2 StreamTask
StreamTask是除了source和sink以外中间处理对应的task
- checkpoint相关:创建执行异步checkpoint的线程池、创建stateBackend、创建checkpointStorage等
- 初始化timerService,初始化operatorChain,并获取第一个Operator
- task特殊的初始化
- 初始化state、open所有operator
- 执行task,处理record并发往下游
- 关闭和清理操作
// StreamTask
	public final void invoke() throws Exception {
		boolean disposed = false;
		try {
			// checkpoint相关:创建执行异步checkpoint的线程池、创建stateBackend、创建checkpointStorage等

			// 初始化timerService

			// 初始化operatorChain,并获取第一个Operator
			operatorChain = new OperatorChain<>(this, recordWriters);
			headOperator = operatorChain.getHeadOperator();

			// task特殊的初始化
			init();

			synchronized (lock) {
				// 初始化state、open所有operator
				initializeState();
				openAllOperators();
			}
			// 设置running标志位true
			isRunning = true;
			// 执行task
			run();

			// 标记isRunning为false
			// 关闭和释放operator
			// 公共清理
			// task特殊的清理
		}
		finally {
			// 标记isRunning为false
			// 关闭和释放operator
			// 清理
		}
	}

	private void run() throws Exception {
		final ActionContext actionContext = new ActionContext();
		while (true) {
			if (mailbox.hasMail()) {
				Optional<Runnable> maybeLetter;
				while ((maybeLetter = mailbox.tryTakeMail()).isPresent()) {
					Runnable letter = maybeLetter.get();
					if (letter == POISON_LETTER) {
						return;
					}
					letter.run();
				}
			}
			// 处理数据
			performDefaultAction(actionContext);
		}
	}

	protected void performDefaultAction(ActionContext context) throws Exception {
		// 调用inputProcessor的processInput来处理实际数据
		if (!inputProcessor.processInput()) {
			context.allActionsCompleted();
		}
	}
3.2.1 StreamOneInputProcessor
StreamOneInputProcessor是处理只有一个输入的处理器,对应OneInputStreamOperator,比如sort、project、map等operator。
StreamOneInputProcessor通过TwoInputStreamOperator的process方法来处理元素,包括Watermark、StreamStatus、LatencyMarker以及真正的Record数据。
3.2.2 StreamTwoInputProcessor
StreamTwoInputProcessor是处理有两个输入的处理器,对应TwoInputStreamOperator,比如join。
TwoInputStreamOperator里的process方法都对应两个,StreamTwoInputProcessor根据inputChannel index来选择TwoInputStreamOperator的对应的process方法来处理元素,包括Watermark、StreamStatus、LatencyMarker以及真正的Record数据。
3.2.3 StreamTwoInputSelectableProcessor
StreamTwoInputSelectableProcessor类似StreamTwoInputProcessor,但在选择元素处理上有差别,它会公平地选择两个输入之一进行读取当inputMask包括两个输入并且两个输入均可用,会选择其中之一。否则,选择可用的一个输入,或者等待其中一个输入可用。
3.3 DataSinkTask
DataSinkTask是输出的task,比如Kafka Sink、File Sink等
- 初始化outputFormat、初始化输入inputReaders
- 根据inputLocalStrategy初始化MutableObjectIterator,inputLocalStrategy可为NONE、SORT(排序)
- open OutputFormat
- 写出record
// DataSinkTask
public void invoke() throws Exception {
		// 初始化outputFormat
		initOutputFormat();

		try {
			// 初始化输入inputReaders
			initInputReaders();
		} catch (Exception e) {
			// RuntimeException
		}

		RuntimeContext ctx = createRuntimeContext();

		if(RichOutputFormat.class.isAssignableFrom(this.format.getClass())){
			((RichOutputFormat) this.format).setRuntimeContext(ctx);
		}

		ExecutionConfig executionConfig = getExecutionConfig();

		boolean objectReuseEnabled = executionConfig.isObjectReuseEnabled();

		try {
			MutableObjectIterator<IT> input1;
			switch (this.config.getInputLocalStrategy(0)) {
			case NONE:
				localStrategy = null;
				input1 = reader;
				break;
			// 排序
			case SORT:
				try {
					TypeComparatorFactory<IT> compFact = this.config.getInputComparator(0,
							getUserCodeClassLoader());
					if (compFact == null) {
						// Exception
					}

					UnilateralSortMerger<IT> sorter = new UnilateralSortMerger<IT>(
							getEnvironment().getMemoryManager(),
							getEnvironment().getIOManager(),
							this.reader, this, this.inputTypeSerializerFactory, compFact.createComparator(),
							this.config.getRelativeMemoryInput(0), this.config.getFilehandlesInput(0),
							this.config.getSpillingThresholdInput(0),
							this.config.getUseLargeRecordHandler(),
							this.getExecutionConfig().isObjectReuseEnabled());

					this.localStrategy = sorter;
					input1 = sorter.getIterator();
				} catch (Exception e) {
					// RuntimeException
				}
				break;
			default:
				// RuntimeException
			}

			final TypeSerializer<IT> serializer = this.inputTypeSerializerFactory.getSerializer();
			final MutableObjectIterator<IT> input = input1;
			final OutputFormat<IT> format = this.format;

			// open format
			format.open(this.getEnvironment().getTaskInfo().getIndexOfThisSubtask(), this.getEnvironment().getTaskInfo().getNumberOfParallelSubtasks());
			if (objectReuseEnabled) {
				IT record = serializer.createInstance();
				while (!this.taskCanceled && ((record = input.next(record)) != null)) {
					// 写出record
					numRecordsIn.inc();
					format.writeRecord(record);
				}
			} else {
				IT record;
				while (!this.taskCanceled && ((record = input.next()) != null)) {
					// 写出record
					numRecordsIn.inc();
					format.writeRecord(record);
				}
			}
		}
		catch (Exception ex) {
			// 异常处理
		}
		finally {
			// 关闭format
			// 关闭localStrategy
			// 清理readers
		}
	}
为了描述从Dispatcher到Task执行的整个流程,绘制了下面这张图,其中每个节点表示一个方法,大框表示所属类。从这张图应该可以对Flink的job提交流程有一个很清晰的认识。

4 总结
本篇主要介绍了Flink在Dispatcher之后的job提交流程,顺便提及了在客户端是通过API来生成StreamGraph和JobGraph,然后在JobMaster通过JobGraph来生成ExecutionGraph。最后通过ExecutionGraph来生成可执行的图并将Execution调度成真正执行的Task。
参考文献
http://jm.taobao.org/2017/07/06/20170706/
https://zhuanlan.zhihu.com/p/22736103
http://blog.jrwang.me/2019/flink-source-code-executiongraph/
https://www.jianshu.com/p/13070729289c
https://www.cnblogs.com/bethunebtj/p/9168274.html#24-executiongraph%E7%9A%84%E7%94%9F%E6%88%90


