BlobCache算法详解
BlobCache算法和LruCache算法是android中的图片缓存算法。LruCache算法在日常开发中用得比较多,但BlobCache却用得比较少,网上介绍的文章也是少得可怜。
跟LruCache不一样,BlobCache并不属于android的util,BlobCache最开始使用的地方是谷歌的Gallery,具体源码可以查看:BlobCache
一、BlobCache框架
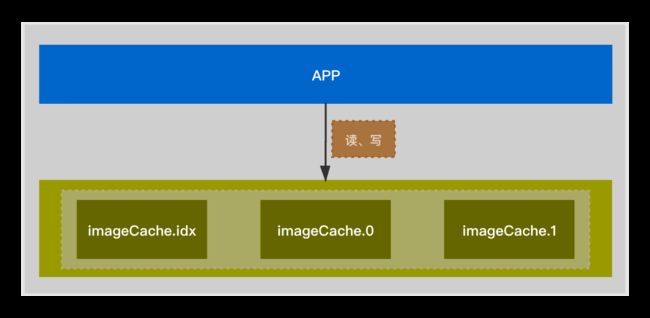
BlobCache会在本地保存三个文件imageCache.idx、imageCache.0、imageCache.1(后缀固定,但前缀名字可以自定义)。其中imageCache.idx是数据的索引文件,imageCache.0和imageCache.1是保存数据的文件。
BlobCache算法的核心就是将所有的缓存数据都保存在同一个data文件中(imageCache.0或imageCache.1),记录缓存数据的索引保存在imageCache.idx文件中,由于imageCache.idx文件内存占用较小,读写时会把整个imageCache.idx文件映射至内存,然后使用RandomAccessFile随机读取接口,像操作指针一样控制index的偏移量读写data文件对应位置的数据。由于缓存文件存储在同一个文件下,缓存数据只能增加不能删除,BlobCache巧妙通过两个data文件(active和inactive即imageCache.0和imageCache.1)的翻转来实现缓存数据的删除更新。
二、索引文件(imageCache.idx)
	// index header offset
    private static final int IH_MAGIC = 0;
    private static final int IH_MAX_ENTRIES = 4;
    private static final int IH_MAX_BYTES = 8;
    private static final int IH_ACTIVE_REGION = 12;
    private static final int IH_ACTIVE_ENTRIES = 16;
    private static final int IH_ACTIVE_BYTES = 20;
    private static final int IH_VERSION = 24;
    private static final int IH_CHECKSUM = 28;
    private static final int INDEX_HEADER_SIZE = 32;


	// Appends the data to the active file. It also updates the hash entry.
    // The proper hash entry (suitable for insertion or replacement) must be
    // pointed by mSlotOffset.
    private void insertInternal(long key, byte[] data, int length)
            throws IOException {
        byte[] header = mBlobHeader;
        int sum = checkSum(data);
        writeLong(header, BH_KEY, key);
        writeInt(header, BH_CHECKSUM, sum);
        writeInt(header, BH_OFFSET, mActiveBytes);
        writeInt(header, BH_LENGTH, length);
        mActiveDataFile.write(header);
        mActiveDataFile.write(data, 0, length);

		 // key:8个字节
        mIndexBuffer.putLong(mSlotOffset, key);
		 // offset 4个字节
        mIndexBuffer.putInt(mSlotOffset + 8, mActiveBytes);

        mActiveBytes += BLOB_HEADER_SIZE + length;
        writeInt(mIndexHeader, IH_ACTIVE_BYTES, mActiveBytes);
    }
    private void resetCache(int maxEntries, int maxBytes) throws IOException {
        mIndexFile.setLength(0);  // truncate to zero the index
        mIndexFile.setLength(INDEX_HEADER_SIZE + maxEntries * 12 * 2);
        mIndexFile.seek(0);
        byte[] buf = mIndexHeader;
        // MAGIC 4个字节
        writeInt(buf, IH_MAGIC, MAGIC_INDEX_FILE);
        // MAX_ENTRIES 4个字节
        writeInt(buf, IH_MAX_ENTRIES, maxEntries);
        // MAX_BYTES 4个字节
        writeInt(buf, IH_MAX_BYTES, maxBytes);
        writeInt(buf, IH_ACTIVE_REGION, 0);
        writeInt(buf, IH_ACTIVE_ENTRIES, 0);
        writeInt(buf, IH_ACTIVE_BYTES, DATA_HEADER_SIZE);
        writeInt(buf, IH_VERSION, mVersion);
        writeInt(buf, IH_CHECKSUM, checkSum(buf, 0, IH_CHECKSUM));
        mIndexFile.write(buf);
        // This is only needed if setLength does not zero the extended part.
        // writeZero(mIndexFile, maxEntries * 12 * 2);

        mDataFile0.setLength(0);
        mDataFile1.setLength(0);
        mDataFile0.seek(0);
        mDataFile1.seek(0);
        writeInt(buf, 0, MAGIC_DATA_FILE);
        mDataFile0.write(buf, 0, 4);
        mDataFile1.write(buf, 0, 4);
    }
BlobCache的索引文件(imageCache.idx)分成两部分,前面32字节为用于记录数据的头部,依次分别为:MAGIC、MAX_ENTRIES、MAX_BYTES、ACTIVE_REGION、ACTIVE_ENTRIES、ACTIVE_BYTES、VERSION、CHECKSUM,都是占4个字节;后面的是存储图片的key和该key对应的图片在数据文件中的起始位置,分别占8个字节和4个字节,总共12个字节。
三、数据文件(imageCache.0、imageCache.1)
    private void resetCache(int maxEntries, int maxBytes) throws IOException {
        mIndexFile.setLength(0);  // truncate to zero the index
        mIndexFile.setLength(INDEX_HEADER_SIZE + maxEntries * 12 * 2);
        mIndexFile.seek(0);
        byte[] buf = mIndexHeader;
        。。。。。。。
        。。。。。。。
        // This is only needed if setLength does not zero the extended part.
        // writeZero(mIndexFile, maxEntries * 12 * 2);

        mDataFile0.setLength(0);
        mDataFile1.setLength(0);
        mDataFile0.seek(0);
        mDataFile1.seek(0);
        writeInt(buf, 0, MAGIC_DATA_FILE);
        // MAGIC 4个字节
        mDataFile0.write(buf, 0, 4);
        mDataFile1.write(buf, 0, 4);
    }
    // blob header offset
    private static final int BH_KEY = 0;
    private static final int BH_CHECKSUM = 8;
    private static final int BH_OFFSET = 12;
    private static final int BH_LENGTH = 16;
    private static final int BLOB_HEADER_SIZE = 20;
BlobCache的数据文件(imageCache.0、imageCache.1)分成两部分,前面部分是MAGIC,占4个字节;后面部分是图片的所有数据,包括Blob头部和数据。Blob头部又包括KEY(8字节)、CHECKSUM(4字节)、OFFSET(4字节)、LENGTH(4字节),总共20字节;数据是指图片的数据,其长度是变化的,在Blob头部的LENGTH字段中存储。
四、写入图片数据流程
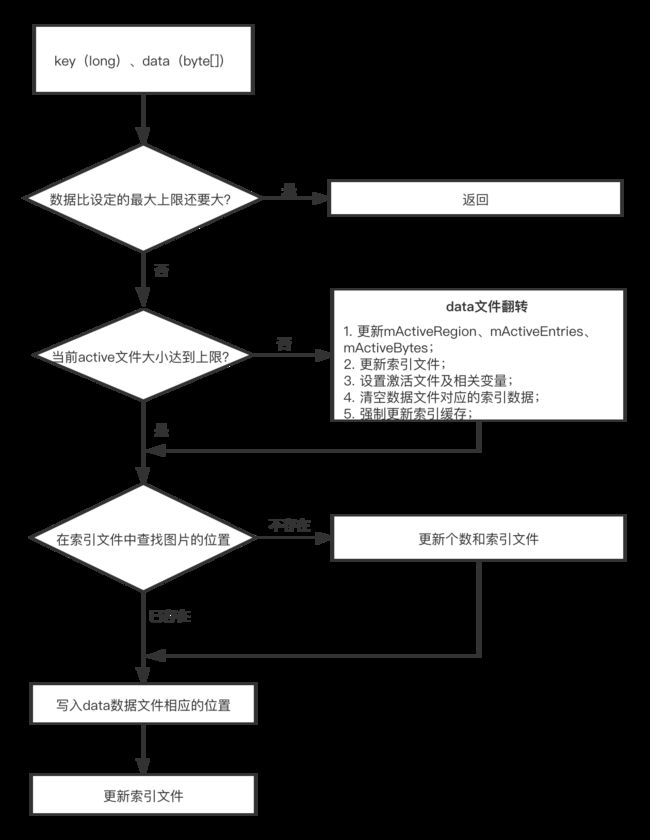
需要预先生成图片的key和data数据文件
    // Inserts a (key, data) pair into the cache.
    public void insert(long key, byte[] data) throws IOException {
        if (DATA_HEADER_SIZE + BLOB_HEADER_SIZE + data.length > mMaxBytes) {
            throw new RuntimeException("blob is too large!");
        }

        // 校验数据文件大小是否达到上限
        if (mActiveBytes + BLOB_HEADER_SIZE + data.length > mMaxBytes
                || mActiveEntries * 2 >= mMaxEntries) {
            // 翻转两个data文件(active和inactive即imageCache.0和imageCache.1)
            flipRegion();
        }

        // 根据key,在索引文件中查找是否存在文件,如果存在,则获取位置
        if (!lookupInternal(key, mActiveHashStart)) {
            // If we don't have an existing entry with the same key, increase
            // the entry count.
            mActiveEntries++;
            writeInt(mIndexHeader, IH_ACTIVE_ENTRIES, mActiveEntries);
        }

        // 插入数据
        insertInternal(key, data, data.length);
        // 更新索引文件
        updateIndexHeader();
    }
流程图:
五、读取图片数据流程
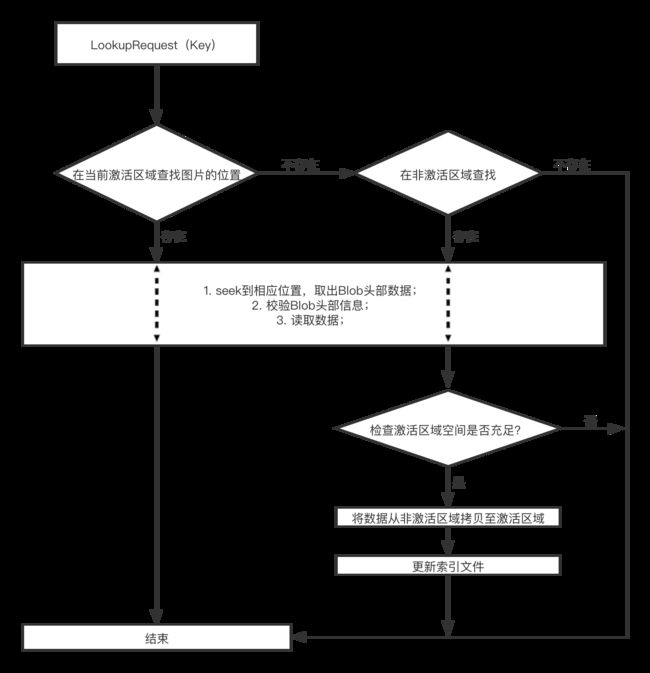
读取图片数据,需要关键的key。请求时,需要传入封装好的LookupRequest,也可以只传key,使用内部封装的LookupRequest。LookupRequest封装了key、buffer和length:
    public static class LookupRequest {
        public long key;        // input: the key to find
        public byte[] buffer;   // input/output: the buffer to store the blob
        public int length;      // output: the length of the blob
    }
读取到相应的图片数据则返回true,否则返回false:
    public boolean lookup(LookupRequest req) throws IOException {
        // Look up in the active region first.
        if (lookupInternal(req.key, mActiveHashStart)) {
            if (getBlob(mActiveDataFile, mFileOffset, req)) {
                return true;
            }
        }

        // We want to copy the data from the inactive file to the active file
        // if it's available. So we keep the offset of the hash entry so we can
        // avoid looking it up again.
        int insertOffset = mSlotOffset;

        // Look up in the inactive region.
        if (lookupInternal(req.key, mInactiveHashStart)) {
            if (getBlob(mInactiveDataFile, mFileOffset, req)) {
                // If we don't have enough space to insert this blob into
                // the active file, just return it.
                if (mActiveBytes + BLOB_HEADER_SIZE + req.length > mMaxBytes
                        || mActiveEntries * 2 >= mMaxEntries) {
                    return true;
                }
                // Otherwise copy it over.
                mSlotOffset = insertOffset;
                try {
                    insertInternal(req.key, req.buffer, req.length);
                    mActiveEntries++;
                    writeInt(mIndexHeader, IH_ACTIVE_ENTRIES, mActiveEntries);
                    updateIndexHeader();
                } catch (Throwable t) {
                    Log.e(TAG, "cannot copy over");
                }
                return true;
            }
        }

        return false;
    }
六、BlobCache、DiskLruCache读取时间对比
这部分放在下一篇文章中
七、BlobCache在开发中的使用
这部分也放在下下一篇文章中
参考文章:
1、https://blog.csdn.net/Zj090308/article/details/51346471
2、https://blog.csdn.net/leven98/article/details/106332411/


