一、前言
RecyclerView 是从5.0推出的 MD 风格的控件。RecyclerView 之前有 ListView、GridView,但是功能很有限,例如 ListView 只能实现垂直方向上的滑动等。但是存在则合理,ListView 却没有被官方标记为 @Deprecated,有兴趣的同学可以去找下相关资料,主要看下 RecyclerView 和 ListView 的布局重用机制。在 ListView 文档上可以发现一句话
For a more modern, flexible, and performant approach to displaying lists, use RecyclerView
翻译为:要获得更现代、更灵活、更高效的列表显示方法,请使用 RecyclerView
就是说 RecyclerView 很牛逼
A flexible view for providing a limited window into a large data set
本文主题是 RecyclerView#ItemDecoration。Decoration:装饰,装潢;装饰品;装饰器。顾名思义就是给 Item 一些打扮的。ItemDecoration 允许应用程序从适配器的数据集中为特定的 ItemViews 添加特殊的图形和布局偏移量。这对于在 Item 之间绘制分隔线,突出显示,分组等等非常有用。
下面进入主题。
二、效果
看图
描述:RecyclerView 最上面有一个块红色的条,滚动是红色条也跟着向上滚;除了最后一个每个 Item 都有一条分割线,并且分割线距离左边有一定的距离;前个 Item 右边有一个图标。
三、实现步骤
ItemDecoration 是一个抽象类一共有6个方法,其中三个标记为 @Deprecated, 所以真正用的方法是以下三个:
getItemOffsets(outRect: Rect, view: View, parent: RecyclerView, state: RecyclerView.State)onDraw(c: Canvas, parent: RecyclerView, state: RecyclerView.State)onDrawOver(c: Canvas, parent: RecyclerView, state: RecyclerView.State)
1、方法介绍
按照执行顺序先后:
1. getItemOffsets(outRect: Rect, view: View, parent: RecyclerView, state: RecyclerView.State)
为特定的 ItemView 设置偏移量,此方法在 RecyclerView 测量 ItemView 后执行。
参数说明:
1)outRect:ItemView 边界,可用理解为原来 ItemView padding。
例如:outRect.set(50, 50, 50, 50),参数顺序为 “左上右下”,原来的 ItemView 上下左右都会扩展 50 像素,如下图
2)view:RecyclerView 的 ItemView(将被装饰的View),outRect.set() 设置的边界针对的是这个 View
3)parent:RecyclerView
4)state:当前 RecyclerView 的状态
2. onDraw(c: Canvas, parent: RecyclerView, state: RecyclerView.State)
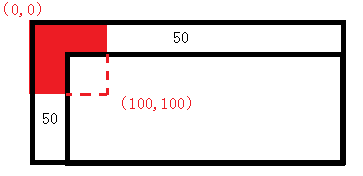
此方法在 RecyclerView 的 onDraw(Canvas c) 方法中调用,在 ItemView 下层绘制内容,绘制的内容可能会被 ItemView 遮挡住
1)c:画布,和自定义 View 那样把内容绘制在画布上。
如图:假设只有一个 ItemView, 红色区域是绘制的内容,大小是 100x100 像素从顶点开始绘制 c.drawRect(Rect(0, 0, 100, 100), mPaint),在 getItemOffsets 设置 outRect.set(50, 50, 0, 0)
3. onDrawOver(c: Canvas, parent: RecyclerView, state: RecyclerView.State)
此方法在 RecyclerView 的 draw(Canvas c) 方法中调用和 onDraw(Canvas c) 一样,区别在于此方法绘制的内容有可能会覆盖 ItemView。
还是上面的例子,如果 c.drawRect(Rect(0, 0, 100, 100), mPaint) 放在 onDrawOver() 效果如下图:
ItemView 的三个方法就简单讲到这里,下面上代码。
2、分割线代码
新建一个类 ItemLineDivider.kt, 贴出部分代码
class ItemLineDivider(@RecyclerView.Orientation var orientation: Int = VERTICAL) : RecyclerView.ItemDecoration() {

    //边界
    private val mBounds: Rect = Rect()
    private val mPaint = Paint()

    @ColorInt
    var dividerColor: Int = Color.GRAY
        set(value) {
            mPaint.color = value
        }

    private val defaultSize = 1//默认1像素

    var hasEndDivider = true//是否要最后一个item的分割线

    var dividerWidth = defaultSize//竖线宽度,单位px
    var dividerHeight = defaultSize//横线高度,单位px

    /**分割线左边间距*/
    var leftSpace: Int = 0
    /**分割线右边间距*/
    var topSpace: Int = 0
    /**分割线上方间距*/
    var rightSpace: Int = 0
    /**分割线下方间距*/
    var bottomSpace: Int = 0

    init {
        mPaint.color = dividerColor
        mPaint.isAntiAlias = true
    }

    /**
     * 分割线绘制在ItemView 的下层,
     * 如果 getItemOffsets 中 outRect 四个参数都是 0, 则 ItemView 有背景的情况会把分割线遮挡
     */
    override fun onDraw(c: Canvas, parent: RecyclerView, state: RecyclerView.State) {
        super.onDraw(c, parent, state)
        i("onDraw")
        if (orientation == VERTICAL) {
            drawVertical(c, parent)
        } else {
            drawHorizontal(c, parent)
        }
    }

    /**
     * 为分割线腾出位置
     * [outRect] ItemView 边距
     */
    override fun getItemOffsets(outRect: Rect, view: View, parent: RecyclerView, state: RecyclerView.State) {
        super.getItemOffsets(outRect, view, parent, state)
        i("getItemOffsets")
        if (orientation == VERTICAL) {
            outRect.set(0, 0, 0, dividerHeight)
        } else {
            outRect.set(0, 0, dividerWidth, 0)
        }
    }

    /**
     * 绘制水平分割线
     */
    private fun drawVertical(c: Canvas, parent: RecyclerView) {
        c.save()
        val left: Int
        val right: Int
        if (parent.clipToPadding) {
            left = parent.paddingLeft + leftSpace //左边坐标
            right = if (dividerWidth != defaultSize) {//右边坐标
                left + dividerWidth//设置宽度,以设置的宽度优先
            } else {
                parent.width - parent.paddingEnd - rightSpace
            }
            c.clipRect(left, parent.paddingTop, right, parent.height - parent.paddingBottom)
        } else {
            left = leftSpace
            right = if (dividerWidth != defaultSize) {
                left + dividerWidth
            } else {
                parent.width - rightSpace
            }
        }

        var childCount = parent.childCount
        if (!hasEndDivider) {//最后一个 Item 不绘制分割线
            childCount -= 1
        }
        for (i in 0 until childCount) {
            val child = parent.getChildAt(i)
            parent.getDecoratedBoundsWithMargins(child, mBounds)
            val bottom: Int = mBounds.bottom + Math.round(child.translationY)
            val top: Int = bottom - dividerHeight
            val rect = Rect(left, top, right, bottom)
            c.drawRect(rect, mPaint)
        }
        c.restore()
    }

}
3、顶部条块代码
新建一个类 VerticalItemStartLine.kt
class VerticalItemStartLine : RecyclerView.ItemDecoration() {

   private val mBound = Rect()
   private val mPaint = Paint()
   private val defaultSize = 1
   var lineWidth = defaultSize
   var lineHeight = defaultSize
   @ColorInt
   var color = Color.GRAY
       set(value) {
           mPaint.color = value
       }

   override fun onDraw(c: Canvas, parent: RecyclerView, state: RecyclerView.State) {
       drawVertical(c, parent)
   }

   private fun drawVertical(c: Canvas, parent: RecyclerView) {
       c.save()
       val child = parent.getChildAt(0)
       val childIndex = parent.getChildAdapterPosition(child)
       if (childIndex == 0) {
           parent.getDecoratedBoundsWithMargins(parent.getChildAt(0), mBound)
           val left = mBound.left
           val right = if (lineWidth == defaultSize) {
               parent.width
           } else {
               lineWidth
           }
           val top = mBound.top
           val bottom = lineHeight + top
           c.drawRect(Rect(left, top, right, bottom), mPaint)
           i(mBound.toShortString() + "\nleft=$left, top=$top, right=$right, bottom=$bottom")
       }
       c.restore()
   }

   override fun getItemOffsets(outRect: Rect, view: View, parent: RecyclerView, state: RecyclerView.State) {
       if (parent.getChildAdapterPosition(view) == 0) {//只在第一个头上添加
           outRect.set(0, lineHeight, 0, 0)
       }
   }

}
4、右边标签代码
新建一个类 TopThreeItemDrawOver.kt
class TopThreeItemDrawOver(val drawable: Drawable) : RecyclerView.ItemDecoration() {

    private val width = 100
    private val height = 100

    override fun onDrawOver(c: Canvas, parent: RecyclerView, state: RecyclerView.State) {
        i(drawable.bounds.toShortString())
        for (i in 0..2) {//把 drawable 画到前三个 itemView 上
            val child = parent.getChildAt(i)
            val index = parent.getChildAdapterPosition(child)
            val left = parent.width - 50 - width
            val right = left + width
            val space = (child.height - height) / 2
            val top = child.top + space
            val bottom = child.bottom - space
            if (index < 3) {
                drawable.setBounds(left, top, right, bottom)
                drawable.draw(c)
            }

        }

    }

}
5、把上面三个 ItemDecoration 添加到 RecyclerView
private fun init() {
        val myAdapter = MyAdapter(this, getData())

        val layoutManager = LinearLayoutManager(this)

        val itemDecoration = ItemLineDivider(RecyclerView.VERTICAL)

        itemDecoration.apply {
            dividerHeight = 5
            leftSpace = 140
            hasEndDivider = false
        }

        val startItemDecoration = VerticalItemStartLine()
        startItemDecoration.apply {
            lineHeight = 100
            color = Color.RED
        }

        val drawOver = TopThreeItemDrawOver(resources.getDrawable(R.drawable.ic_swap_horiz))

        recycler_view.apply {
            addItemDecoration(startItemDecoration)//头部条块
            addItemDecoration(itemDecoration)//分割线
            addItemDecoration(drawOver)//右边标签
            setHasFixedSize(true)
            setLayoutManager(layoutManager)
            adapter = myAdapter
        }

        myAdapter.notifyDataSetChanged()

 }
四、总结
通过一个简单的例子,可以很好的理解高大上的 ItemDecoration,什么分割线啊也不用在 xml 布局文件里设置了。ItemDecoration 还可以实现时间轴、黏附等效果,这里就不举例了,根据上面的方法解析和例子,再加上自己的想法,可以在 RecyclerView 实现很多效果。我觉得刚开始的话重点去理解 Rect,坐标,偏移量,就可以很好把一个内容绘制到指定位置了。
参考:
RecyclerView 文档


