老司机狂飙之路--EventBus原理简要分析
一、前言
正式开始之前,咱先说一说上一篇,说到的索引类,点进去查看,如是:
/** This class is generated by EventBus, do not edit. */

public class MyEventBusIndex implements SubscriberInfoIndex {

    private static final Map, SubscriberInfo> SUBSCRIBER_INDEX;

    static {

        SUBSCRIBER_INDEX = new HashMap, SubscriberInfo>();

        putIndex(new SimpleSubscriberInfo(MainActivity.class, true, new SubscriberMethodInfo[] {
            new SubscriberMethodInfo("onMessageEvent", cn.akitaka.www.textcode.event.MessageEvent.class,
                    ThreadMode.POSTING, 1, true),
        }));
    }

    private static void putIndex(SubscriberInfo info) {

        SUBSCRIBER_INDEX.put(info.getSubscriberClass(), info);
    }


    @Override
    public SubscriberInfo getSubscriberInfo(Class subscriberClass) {

        SubscriberInfo info = SUBSCRIBER_INDEX.get(subscriberClass);

        if (info != null) {
            return info;
        } else {
            return null;
        }
    }
}
一步一步分析:首先它是实现SubscriberInfoIndex接口 ,在addIndex方法中的参数,看看具体实现:
使用Map保存 SubscriberInfo,即所有订阅者的接受方法,然后 接口内定义的方法getSubscriberInfo,通过subscriberClass(key订阅者)去获得SubscriberInfo (value,也就是订阅方法集合);通俗的讲呢 就是以订阅者为单位,将订阅者类所有的订阅函数及相关参数,封装到SimpleSubscriberInfo中去了,方便EventBus在注册过程中使用;声明下SimpleSubscriberInfo是在编译时候生成的,这样运行的时候可直接用,省去了运行中反射操作的资源和时间消耗,高效运行!
走到这,突然多出个问题,他的生成过程呢?其实根据build.gradle的配置可以看出点端倪;
首先明确的是MyEventBusIndex是通过第三方的那个android-apt或者Gradle本身提供的annotationProcessor,与EventBus提供的 EventBusAnnotationProcessor合体,协同生产出的玩意, EventBus控制着 EventBusAnnotationProcessor-详情看源码( package org.greenrobot.eventbus.annotationprocessor;):
二、实战篇
步入正题;先来个整体的玩意
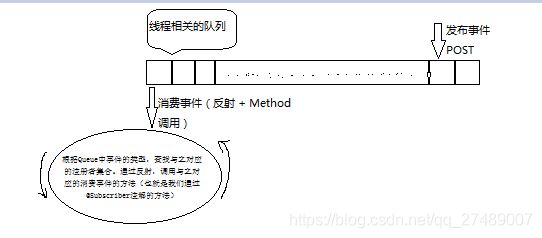
订阅者和事件的发布所在线程不固定,取决于ThreadMode,但是每个线程都有相关联的Queue。
首先从注册开始看,
EventBus.getDefault().register(this)

咱先看getDefault()里面有什么,如下
/** Convenience singleton for apps using a process-wide EventBus instance. */

public static EventBus getDefault() {

    if (defaultInstance == null) {
        synchronized (EventBus.class) {
            if (defaultInstance == null) {
                defaultInstance = new EventBus();
            }
        }
    }
    return defaultInstance;

}
再深入看new EventBus做了啥?咦?等等,上面的不是双重锁机制吗,https://blog.csdn.net/qq_27489007/article/details/84966680
/**
* Creates a new EventBus instance; each instance is a separate scope in which events are delivered. To use a central bus, consider {@link #getDefault()}.
*/

public EventBus() {

    this(DEFAULT_BUILDER);

}
传进去个变量?去瞅瞅 ,在这个过程中建造者模式蹦出来了,你有没有发现?
private static final EventBusBuilder DEFAULT_BUILDER = new EventBusBuilder();
发现各种初始化在构造中使用builder实现,回头看咱们上篇文章创建索引的时候使用
EventBus.builder().addIndex(new MyEventBusIndex()).installDefaultEventBus();
还是用buidler,异曲同工啊;继续代码点点点,深入深入,分析出流程:
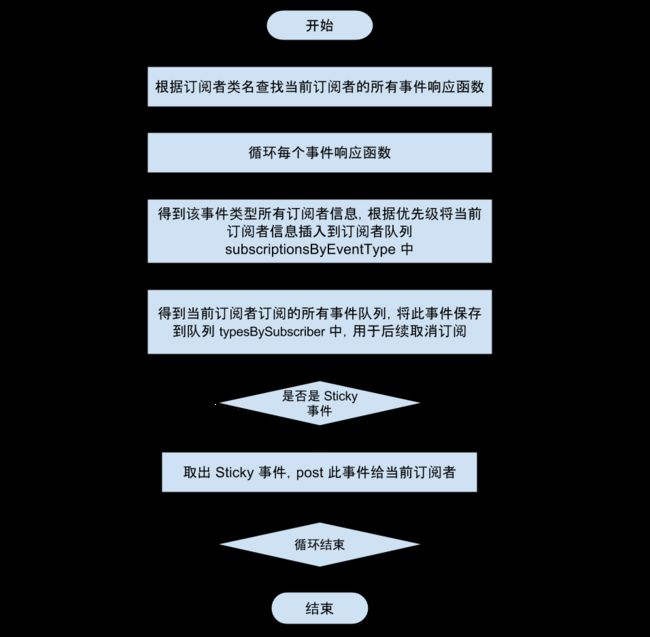
1.注册者和事件消费是1:N的关系,一个Event与注册者也是1:N的关系,即register(this)对比当前的消费事件是1:N,post()对比register也是1:N
2.注册的不可再注册
说完注册,我们再说一说那事件分发,我们先从post入手;
/** Posts the given event to the event bus. */
public void post(Object event) {
//1.获取当前线程postingstate
PostingThreadState postingState = currentPostingThreadState.get();
//2.获取线程的事件队列
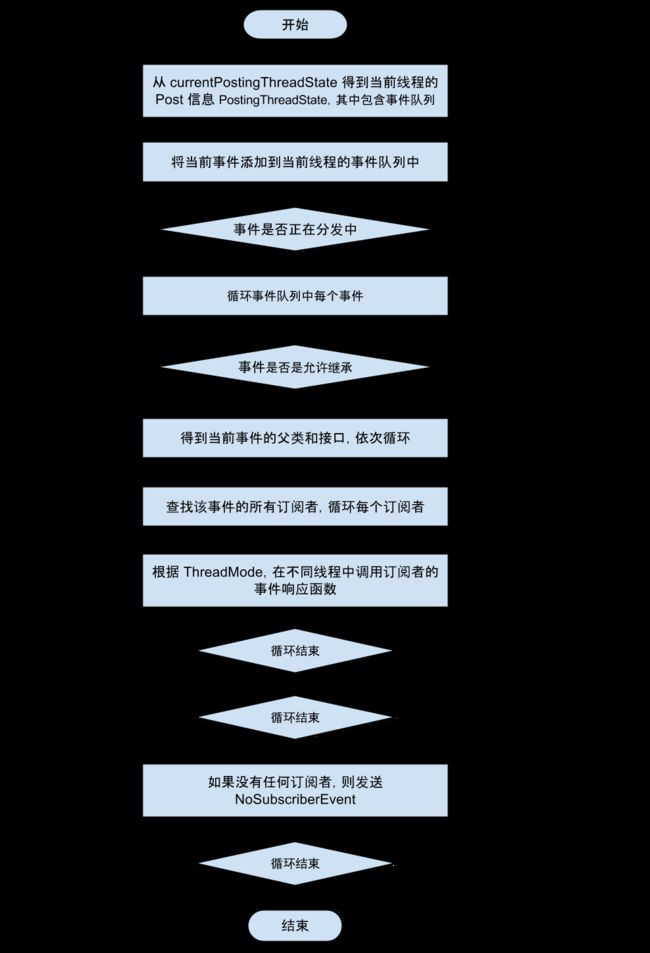
List那啥是PostingThreadState,他包含了当前事件队列,以及订阅者订阅事件等信息,拿到这些就可以去实现分发啦;可我明明看见上面使用的postSingleEvent呀,这有什么联系?我们进去瞅瞅
private void postSingleEvent(Object event, PostingThreadState postingState) throws Error {

    Class eventClass = event.getClass();
    boolean subscriptionFound = false;

    if (eventInheritance) {

        List> eventTypes = lookupAllEventTypes(eventClass);

        int countTypes = eventTypes.size();

        for (int h = 0; h < countTypes; h++) {
            Class clazz = eventTypes.get(h);
            subscriptionFound |= postSingleEventForEventType(event, postingState, clazz);
        }

    } else {

        subscriptionFound = postSingleEventForEventType(event, postingState, eventClass);
    }

    if (!subscriptionFound) {

        if (logNoSubscriberMessages) {

            logger.log(Level.FINE, "No subscribers registered for event " + eventClass);
        }

        if (sendNoSubscriberEvent && eventClass != NoSubscriberEvent.class &&
                eventClass != SubscriberExceptionEvent.class) {
            post(new NoSubscriberEvent(this, event));
        }
    }
}
发现又多了个postSingleEventForEventType() ,再深入,发现是 postToSubscription(),而这里面又是 invokeSubscriber();至此结束我们捋一捋:
这次该轮到取消注册unregister,这个代码少一些,直白一点如下:
/** Unregisters the given subscriber from all event classes. */

public synchronized void unregister(Object subscriber) {

    List> subscribedTypes = typesBySubscriber.get(subscriber);

    if (subscribedTypes != null) {
        for (Class eventType : subscribedTypes) {

            unsubscribeByEventType(subscriber, eventType);
        }

        typesBySubscriber.remove(subscriber);
    } else {

        logger.log(Level.WARNING, "Subscriber to unregister was not registered before: " + subscriber.getClass());
    }
}

/** Only updates subscriptionsByEventType, not typesBySubscriber! Caller must update typesBySubscriber. */

private void unsubscribeByEventType(Object subscriber, Class eventType) {

    List subscriptions = subscriptionsByEventType.get(eventType);
    if (subscriptions != null) {
        int size = subscriptions.size();
        for (int i = 0; i < size; i++) {
            Subscription subscription = subscriptions.get(i);
            if (subscription.subscriber == subscriber) {
                subscription.active = false;
                subscriptions.remove(i);
                i--;
                size--;
            }
        }
    }
}
unregister流程:
1.传进来需要取消的订阅者
2.遍历获得该订阅者的所有事件
3.使用unsubscribeByEventType去遍历事件,看看哪些订阅者都有这个事件,然后从集合删除订阅者,订阅者不再和事件有关联
https://www.jianshu.com/p/af2513fa1bdb
https://blog.csdn.net/gpf1320253667/article/details/84102691
https://blog.csdn.net/liu_jing_hui/article/details/78410773
关注我的微信公众号,欢迎撩我,随时都有技术,游戏,认知,职场/发展的优质文章推送!
微信扫一扫下方二维码即可关注:
![]()


