- print两种写法
- 打印pytorch权重
- python os.path glob
- np.unique(b) numpy 去重
- 根据标签图和颜色表显示标签图
print两种写法
print('[Epoch: %d, numImages: %5d]' % (epoch, i * self.args.batch_size + image.data.shape[0]))
  print("Acc:{}, Acc_class:{}, mIoU:{}, fwIoU: {}".format(Acc, Acc_class, mIoU, FWIoU))
  print('Loss: %.3f' % test_loss)
打印pytorch权重
model = model.cuda()
print("Model's state_dict:")
for param_tensor in model.state_dict():
    print(param_tensor, "\t", model.state_dict()[param_tensor].size())

print(model.state_dict()['backbone.layer1.0.conv1.weight'][0])
打印如下:
Model's state_dict:
backbone.conv1.weight 	 torch.Size([64, 3, 7, 7])
backbone.bn1.weight 	 torch.Size([64])
backbone.bn1.bias 	 torch.Size([64])
backbone.bn1.running_mean 	 torch.Size([64])
backbone.bn1.running_var 	 torch.Size([64])
backbone.bn1.num_batches_tracked 	 torch.Size([])
backbone.layer1.0.conv1.weight 	 torch.Size([64, 64, 1, 1])
backbone.layer1.0.bn1.weight 	 torch.Size([64])
backbone.layer1.0.bn1.bias 	 torch.Size([64])
backbone.layer1.0.bn1.running_mean 	 torch.Size([64])
backbone.layer1.0.bn1.running_var 	 torch.Size([64])
backbone.layer1.0.bn1.num_batches_tracked 	 torch.Size([])
backbone.layer1.0.conv2.weight 	 torch.Size([64, 64, 3, 3])
backbone.layer1.0.bn2.weight 	 torch.Size([64])
backbone.layer1.0.bn2.bias 	 torch.Size([64])
backbone.layer1.0.bn2.running_mean 	 torch.Size([64])
backbone.layer1.0.bn2.running_var 	 torch.Size([64])
backbone.layer1.0.bn2.num_batches_tracked 	 torch.Size([])
backbone.layer1.0.conv3.weight 	 torch.Size([256, 64, 1, 1])
backbone.layer1.0.bn3.weight 	 torch.Size([256])
backbone.layer1.0.bn3.bias 	 torch.Size([256])
backbone.layer1.0.bn3.running_mean 	 torch.Size([256])
backbone.layer1.0.bn3.running_var 	 torch.Size([256])
backbone.layer1.0.bn3.num_batches_tracked 	 torch.Size([])
backbone.layer1.0.downsample.0.weight 	 torch.Size([256, 64, 1, 1])
backbone.layer1.0.downsample.1.weight 	 torch.Size([256])
backbone.layer1.0.downsample.1.bias 	 torch.Size([256])
backbone.layer1.0.downsample.1.running_mean 	 torch.Size([256])
backbone.layer1.0.downsample.1.running_var 	 torch.Size([256])
backbone.layer1.0.downsample.1.num_batches_tracked 	 torch.Size([])
backbone.layer1.1.conv1.weight 	 torch.Size([64, 256, 1, 1])
backbone.layer1.1.bn1.weight 	 torch.Size([64])
backbone.layer1.1.bn1.bias 	 torch.Size([64])
backbone.layer1.1.bn1.running_mean 	 torch.Size([64])
...
tensor([[[-1.8738e-01]],

        [[ 2.3853e-02]],

        [[-2.1837e-02]],

        [[-5.4712e-02]],

        [[ 2.1917e-02]],

        [[ 1.4151e-09]],

        [[ 8.2899e-02]],

        [[-1.8761e-08]],

        [[-1.2909e-08]],
            ...

        [[ 5.3678e-02]],

        [[-1.3887e-08]],

        [[-5.2007e-02]]], device='cuda:0')
model.load_state_dict(checkpoint['state_dict'],strict=False)
strict=False表示名字对不上的就不加载,
默认是true,如果有名字不一致就报错
python os.path glob
directory = os.path.join(path_tmp, 'tmp', 'pascal')
aa = glob.glob(os.path.join(directory, 'experiment_*'))
print(directory)
# /data_2/everyday/0815/tmp/pascal
print(aa)
# ['/data_2/everyday/0815/tmp/pascal/experiment_7', '/data_2/everyday/0815/tmp/pascal/experiment_0', '/data_2/everyday/0815/tmp/pascal/experiment_1']

bb = sorted(glob.glob(os.path.join(directory, 'experiment_*')))
print(bb)
# ['/data_2/everyday/0815/tmp/pascal/experiment_0', '/data_2/everyday/0815/tmp/pascal/experiment_1', '/data_2/everyday/0815/tmp/pascal/experiment_7']

id = 7
experiment_dir = os.path.join(directory, 'experiment_{}'.format(str(id)))
print(experiment_dir)
# /data_2/everyday/0815/tmp/pascal/experiment_7
这里'experiment_{}'.format(str(id) 写法可以代替字符串
2.提取文件名
path = '/data_2/fengjing'
file_name = os.path.basename(path)
np.unique(b) numpy 去重
import numpy as np
b = np.array([(1.5, 2, 3), (3, 5, 6),(1,2,3),(4,5,6)])
print(b)
print(b.shape)

a = np.unique(b)
print(a)
打印如下:
[[1.5 2.  3. ]
 [3.  5.  6. ]
 [1.  2.  3. ]
 [4.  5.  6. ]]
(4, 3)
[1.  1.5 2.  3.  4.  5.  6. ]
这个可以用在:比如训练分割的时候数据检查。
例如:
标签图有16万,分割的标签图看起来都是黑的,里面的像素值代表类别,
说好的只有26个类别,但是训练的时候莫名其妙的报错,报cudnn的错误:
THCudaCheck FAIL file=/opt/conda/conda-bld/pytorch_1532581333611/work/aten/src/THC/THCCachingHostAllocator.cpp line=271 error=59 : device-side assert triggered
Traceback (most recent call last):
  File "/data_2/tmp_paper/image-segmentation/DeepLab/v3+/pytorch0.41/pytorch-deeplab-xception-master/train.py", line 339, in
    main()
  File "/data_2/tmp_paper/image-segmentation/DeepLab/v3+/pytorch0.41/pytorch-deeplab-xception-master/train.py", line 298, in main
    trainer.training(epoch)
  File "/data_2/tmp_paper/image-segmentation/DeepLab/v3+/pytorch0.41/pytorch-deeplab-xception-master/train.py", line 108, in training
    loss.backward()
  File "/data_1/Yang/software_install/Anaconda1105/envs/pytorch0.4.1/lib/python3.6/site-packages/torch/tensor.py", line 93, in backward
    torch.autograd.backward(self, gradient, retain_graph, create_graph)
  File "/data_1/Yang/software_install/Anaconda1105/envs/pytorch0.4.1/lib/python3.6/site-packages/torch/autograd/__init__.py", line 90, in backward
    allow_unreachable=True)  # allow_unreachable flag
RuntimeError: CuDNN error: CUDNN_STATUS_EXECUTION_FAILED
搜cudnn的,都是乱七八糟的,没有可用的。
但是仔细看上面还有一个提示:
line=271 error=59 : device-side assert triggered
这句话百度,有人解答说是标签超过类别数了。
于是我就开始怀疑我的16万数据里面是不是有超过类别数的标签,分割的标签图看起来都是黑的,里面的像素值代表类别,我是26类,那么标签范围是0-25,所以
我就用上了np.unique这个函数,检查数据的代码如下:
import os
from PIL import Image
import numpy as np

txt_list = '/data_2/2019biaozhushuju/seg-chewaiguan/seg_chewaigaun_ding/se_chewaiguan_data/20190618_new/train.txt'

with open(txt_list,'r')as fr:
    lines = fr.readlines()
    for line in lines:
        line = line.strip().split(' ')
        _target = Image.open(line[1]).convert('L')
        # _target.show()

        targe = np.array(_target)
        a = np.unique(targe)
        max_val = max(a)
        if max_val >= 26:
            print (max_val, "::", line[1])
!!!果真,有打印!!!原来真有几张图片超过标签,坑爹啊,这个错误排查了2-3个小时!!!
根据标签图和颜色表显示标签图

import numpy as np
import cv2
import os
from PIL import Image


mmm = cv2.imread("/data_2/fengjing.jpg")
cv2.imshow("m",mmm)
cv2.waitKey(0)


#BGR
color_segmentation=np.asarray([
    [0,0,0],            #[0]背景
    [180,120,120],
    [6,230,230],
    [80,50,50],
    [4,200,3],
    [120,120,80],
    [140,140,140],
    [204,5,255],
    [230,230,230],
    [4,250,7],
    [40,150,255],
    [235,255,7],
    [150,5,61],
    [120,120,70],
    [8,255,51],
    [255,6,82],
    [143,255,140],
    [204,255,4],
    [255,51,7],
    [204,70,3],
    [0,102,200],
    [61,230,250],
    [255,6,51],
    [11,102,255],
    [255,7,71],
    [255,9,224],
    [9,7,230],
    [220,220,220],
    [255, 9, 92]
],dtype=np.uint8)


def decode_segmap(label_mask,n_classes = 21):

    r = label_mask.copy()
    g = label_mask.copy()
    b = label_mask.copy()
    for ll in range(0, n_classes):
        # aaa = color_segmentation[ll, 1]
        # position = label_mask == ll
        b[label_mask == ll] = color_segmentation[ll, 0]
        g[label_mask == ll] = color_segmentation[ll, 1]
        r[label_mask == ll] = color_segmentation[ll, 2]
    rgb = np.zeros((label_mask.shape[0], label_mask.shape[1], 3))
    print(rgb[240][240])

    rgb[:, :, 0] = b
    rgb[:, :, 1] = g
    rgb[:, :, 2] = r

    # rgb[:, :, 0] = b / 255.0
    # rgb[:, :, 1] = g / 255.0
    # rgb[:, :, 2] = r /255.0

    rgb = rgb.astype(np.uint8)  ##重要! 要不然opencv显示有问题

    print(rgb[240][240])

    return rgb


root_dir = "/data_2/2019biaozhushuju/others/voc/VOCdevkit/VOC2012/SegmentationClassAug/"
list_gray_img = os.listdir(root_dir)
for img_name in list_gray_img:
    path_gray = root_dir + img_name
    laber_mask = cv2.imread(path_gray,0) ##灰度 单通道读取
    # print(laber_mask.shape)
    color_img = decode_segmap(laber_mask)
    # print(color_img.shape)

    # img1 = Image.fromarray(color_img.astype('uint8')).convert('RGB')
    # img1.show()

    cv2.imshow("laber_mask", laber_mask*20)
    cv2.imshow("color",color_img)
    cv2.waitKey()
这里直接放的正确的代码,一开始显示的图片有问题啊,没有颜色

找问题找了半天
aaa = color_segmentation[ll, 1]
print(rgb[240][240])
上面这个在代码里面打印出来的像素值是正常的,都是比如我上面的颜色表里面的,既然像素正常那显示为啥没有颜色呢?难道是我opencv出问题了吗。然后可以看开头我直接读取一张图片显示,是可以正常显示的,然后我加PIL库来显示,
img1 = Image.fromarray(color_img.astype('uint8')).convert('RGB')
显示出来的图像是彩色的,那为啥opencv显示有问题呢,然后我rgb[:, :, 0] = b / 255.0,然后发现opencv显示就正常了,好奇怪啊,/255就变为0-1之间了啊。。。反正很奇怪,找了很久,然后突然想到可以是数据格式的问题!果断打断点:
发现我加载的那张图片格式是:dtype=uint8格式的,而color这个图格式是float64格式的!所以问题就出现在这里!!
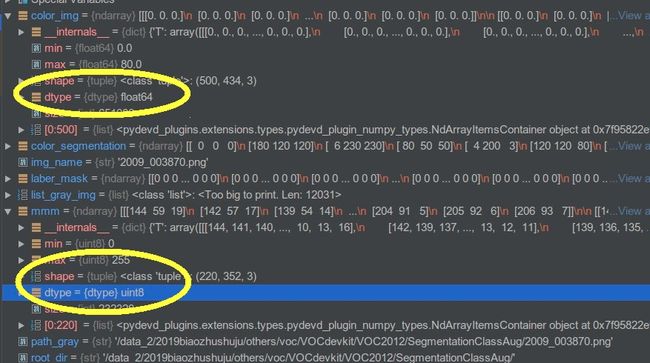
一定要加上这句话
rgb = rgb.astype(np.uint8) ##重要! 要不然opencv显示有问题好了,只是把我发现问题,解决问题的思路过程写在这里。
这里主要要学习numpy的几个操作:
1.
r = label_mask.copy()
g = label_mask.copy()
b = label_mask.copy()
 for ll in range(0, n_classes):
      b[label_mask == ll] = color_segmentation[ll, 0]
      g[label_mask == ll] = color_segmentation[ll, 1]
      r[label_mask == ll] = color_segmentation[ll, 2]
这里我一开始的直观理解就是label_mask == ll返回的是位置,b[label_mask == ll],比如图片像素值等于2的位置都填充后面的值。但是我
position = label_mask == ll
看了一下,其实不是,这里的position是和图一样大小,里面的值都是True或者False
明白了,其实返回的相当于一个mask,只在true的位置上填充后面的值
2.
rgb = np.zeros((label_mask.shape[0], label_mask.shape[1], 3))
rgb[:, :, 0] = b
rgb[:, :, 1] = g
rgb[:, :, 2] = r
这里rgb都是单通道的,就是把这三个合并一个图。首先就是申请了一个三通的。这里需要注意的是opencv的格式都是hwc。
rgb[:, :, 0]代表的第一个通道
还有上面我调试的代码
print(rgb[240][240])
这里打印出来的是这样的
[80. 50. 50.]
想想为啥吧!
@@@@@@@@@@
有个相反操作的,就是把colormap图映射为标签图
def encode_segmap(mask):
    """Encode segmentation label images as pascal classes
    Args:
        mask (np.ndarray): raw segmentation label image of dimension
          (M, N, 3), in which the Pascal classes are encoded as colours.
    Returns:
        (np.ndarray): class map with dimensions (M,N), where the value at
        a given location is the integer denoting the class index.
    """
    mask = mask.astype(int)
    label_mask = np.zeros((mask.shape[0], mask.shape[1]), dtype=np.int16)
    for ii, label in enumerate(get_pascal_labels()):
        label_mask[np.where(np.all(mask == label, axis=-1))[:2]] = ii
    label_mask = label_mask.astype(int)
    return label_mask