android:Handler MessageQueue Looper分析
一、Handler使用上需要注意的几点
1.1 handler使用不当造成的内存泄漏
public class MainActivity extends AppCompatActivity {

    private static final String TAG = MainActivity.class.getSimpleName()+">>>";
    private TextView textView;

    private Handler handler1 = new Handler(new Handler.Callback() {
        @Override
        public boolean handleMessage(@NonNull Message msg) {
            startActivity(new Intent(MainActivity.this,SecondActivity.class));
            return false;
        }
    });

    private Handler handler2 = new Handler() {
        @Override
        public void handleMessage(@NonNull Message msg) {
            super.handleMessage(msg);
            textView.setText(msg.obj.toString());
        }
    };

    @Override
    protected void onCreate(Bundle savedInstanceState) {
        super.onCreate(savedInstanceState);
        setContentView(R.layout.activity_main);

        textView = findViewById(R.id.tv_1);
        test();
    }

    private void test() {
        new Thread(new Runnable() {
            @Override
            public void run() {
                Message message = new Message();
                SystemClock.sleep(3000);
                message.what = 2;
                handler1.sendMessage(message);

            }
        }).start();

    }

    @Overridedui
    protected void onDestroy() {
        super.onDestroy();
        handler1.removeMessages(2);
        Log.e(TAG,"销毁");
    }
}
我们的测试是这样的,在子线程中先休眠3秒然后handler1发送一个消息,但我们在休眠的3秒内退出应用,按逻辑来说调用了onDestroy(),会将MainActivity销毁并移除了handler1的消息,就不会有 页面的跳转。先来看下运行效果
发现并不是我们预想的那样,查看logcat发现onDestory()的确执行了,但页面还是跳转了,这就间接的说明发生了内存泄漏,来我们有图有真相,通过内存分析工具可以清楚看到MainActivity并没有被销毁。

原因在于handler1.removeMessages(2);并没有将对应的消息从消息队列中移除,因为这个消息根本就没有被压入到消息队列中,回过头来看
Message message = new Message();
                SystemClock.sleep(3000);
                message.what = 2;
                handler1.sendMessage(message);
在休眠时还没有将消息发送到消息队列,这个问题可以通过以下方式解决。
     //先发送到消息队列,只不过是延时执行,handler1.removeMessages(2);就可以成功移除了
     Message message = new Message();
     message.what = 2;
     handler1.sendMessageDelayed(message,3000);
或者
Message message = new Message();
                SystemClock.sleep(3000);
                message.what = 2;
                if(handler1!=null){
                handler1.sendMessage(message);
                }


@Override
    protected void onDestroy() {
        super.onDestroy();
        handler1.removeMessages(2);
        //置空
        handler1 = null;
        Log.e(TAG,"销毁");
    }
1.2 不能在子线程中创建handler吗?
对于这个问题我们来测试一波,毕竟实践是检验真理的唯一标准
private void test() {
        new Thread(new Runnable() {
            @Override
            public void run() {
              //Looper.prepare()
                new Handler(new Handler.Callback() {
                    @Override
                    public boolean handleMessage(@NonNull Message msg) {
                        return false;
                    }
                });
            }
        }).start();

    }
像大家听说的那样果然报错了
AndroidRuntime: FATAL EXCEPTION: Thread-2
    Process: com.example.handlerdemo, PID: 26179
    java.lang.RuntimeException: Can't create handler inside thread Thread[Thread-2,5,main] that has not called Looper.prepare()
        at android.os.Handler.<init>(Handler.java:205)
        at android.os.Handler.<init>(Handler.java:132)
        at com.example.handlerdemo.MainActivity$4.run(MainActivity.java:67)
        at java.lang.Thread.run(Thread.java:764)
提示的也很明显,说是在线程中创建handler之前没有调用Looper.prepare(),那我们就在创建handler之前调用一下会怎样呢?果然,异常解决了。下面我们就来探讨下原因是什么。
首先我们先追踪下源码
    Handler.java

    public Handler(@Nullable Callback callback, boolean async) {
    ......

        mLooper = Looper.myLooper();
        if (mLooper == null) {
            throw new RuntimeException(
                "Can't create handler inside thread " + Thread.currentThread()
                        + " that has not called Looper.prepare()");
        }
        //抛出的异常就在这里,当我们通过Looper取不到mLooper时
        mQueue = mLooper.mQueue;
        mCallback = callback;
        mAsynchronous = async;
    }
既然这样我们就来看下这个取Looper的方法
 /**
     * Return the Looper object associated with the current thread.  Returns
     * null if the calling thread is not associated with a Looper.
     */
    public static @Nullable Looper myLooper() {
        return sThreadLocal.get();
    }
方法注解说的很明确,这个会返回当前线程中的Looper,如果当前线程中没有Looper就返回null。至于 s T h r e a d L o c a l . g e t ( ) \color{red}{sThreadLocal.get()} sThreadLocal.get()是怎样的逻辑,以及当我们在子线程外创建hanler就没有问题是为什么,我们放到1.5小节进行探索。
1.3 textview.setText()只能在UI线程执行吗?
1.4 new Handler的两种方式有何区别
   private Handler handler1 = new Handler(new Handler.Callback() {
        @Override
        public boolean handleMessage(@NonNull Message msg) {

            return false;
        }
    });

    private Handler handler2 = new Handler() {
        @Override
        public void handleMessage(@NonNull Message msg) {
            super.handleMessage(msg);
        }
    };
先来进行一个简单地对比,不同之处在于handleMessage()方法前者是重写的Callback接口的方法,而后者是重写的Handler中的方法,那我们来跟下源码有何区别
    /**
     * Callback interface you can use when instantiating a Handler to avoid
     * having to implement your own subclass of Handler.
     */
    public interface Callback {
        /**
         * @param msg A {@link android.os.Message Message} object
         * @return True if no further handling is desired
         */
        boolean handleMessage(@NonNull Message msg);
    }

    /**
     * Subclasses must implement this to receive messages.
     */
    public void handleMessage(@NonNull Message msg) {
    }

    /**
     * Handle system messages here.
     */
    public void dispatchMessage(@NonNull Message msg) {
        if (msg.callback != null) {
        //这里处理的是handler.Post(Runnable)方法发送的消息,只是把runnable对象封装成了message对象进行处理。
            handleCallback(msg);
        } else {
            if (mCallback != null) {
                if (mCallback.handleMessage(msg)) {
                    return;
                }
            }
            handleMessage(msg);
        }
    }
可以看出前者是优先使用的后者只是个备胎,大家可能会有疑惑,我们来看看官方提示是怎么说的,我们在后者调用处可以看到警告信息
Since this Handler is declared as an inner class, it may prevent the outer class from being garbage collected. If the Handler is using a Looper or MessageQueue for a thread other than the main thread, then there is no issue. If the Handler is using the Looper or MessageQueue of the main thread, you need to fix your Handler declaration, as follows: Declare the Handler as a static class; In the outer class, instantiate a WeakReference to the outer class and pass this object to your Handler when you instantiate the Handler; Make all references to members of the outer class using the WeakReference object.

Handler类应该是静态的,否则可能会发生泄漏(匿名android.os.Handler)由于此Handler被声明为内部类,因此可能会阻止外部类被垃圾回收。如果Handler使用Looper或MessageQueue作为主线程以外的线程,则没有问题。如果Handler正在使用主线程的Looper或MessageQueue,则需要修复Handler声明,如下所示:将Handler声明为静态类;在外部类中,实例化外部类的WeakReference,并在实例化Handler时将此对象传递给Handler;使用WeakReference对象对外部类的成员进行所有引用
由此我们得到结论就是尽量用第一种方式创建handler。
1.5 ThreadLocal的用法和原理
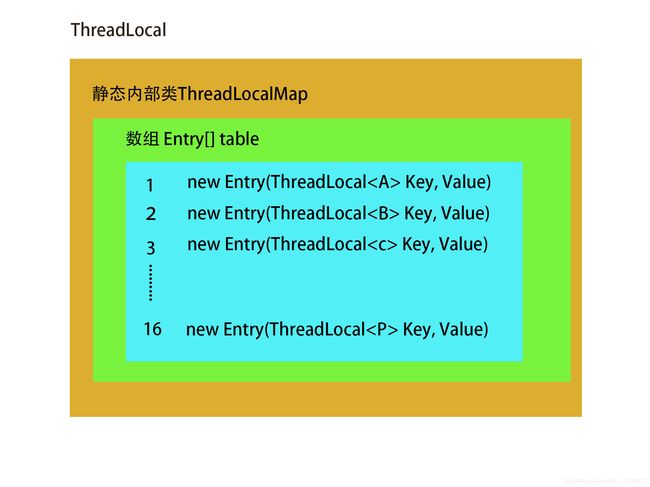
首先我们先来了解一下ThreadLocal是什么,我在之前看过这位老哥的文章介绍ThreadLocal写的非常好《ThreadLocal》,大家可以看下,我就不赘述了(主要是我感觉我写的很难超过这位老哥O(∩_∩)O哈哈~)上一张图来表示下ThreadLocal的存储结构

其中我们比较关心的是 get()和set()这两个方法,看下源码
  public T get() {
        //得到当前线程
        Thread t = Thread.currentThread();
        //根据当前线程获取对应的ThreadLocalMap
        ThreadLocalMap map = getMap(t);
        //map存在就返回map的value
        if (map != null) {
            ThreadLocalMap.Entry e = map.getEntry(this);
            if (e != null) {
                @SuppressWarnings("unchecked")
                T result = (T)e.value;
                return result;
            }
        }
        //否则执行此方法
        return setInitialValue();
    }

///
//设置初始值
private T setInitialValue() {
        T value = initialValue();

        Thread t = Thread.currentThread();
        ThreadLocalMap map = getMap(t);
        if (map != null)
            map.set(this, value);
        else
            createMap(t, value);
        return value;
    }
    /
    //这就是1.2小节中  sThreadLocal.get()=null的原因,在取之前并没有设置value
     protected T initialValue() {
        return null;
    }
还记得1.2小节提到在创建handler之前先调用 Looper.prepare(); 就不会抛出异常吗吗?这是因为在Looper.prepare();中调用了
sThreadLocal.set(new Looper(quitAllowed));
我们再来看下set()方法
  public void set(T value) {
        Thread t = Thread.currentThread();
        ThreadLocalMap map = getMap(t);
        if (map != null)  //map存在就存入value
            map.set(this, value);
        else
            createMap(t, value);  //否则就先创建map再存入value
    }
那为什么在主线程(UI线程,即Activity)中不用我们Looper.prepare()或者进行set()方法呢?因为在创建Activity前已经设置过了,我们在ActivityThread的main()方法中看到。我们知道ActivityThread是程序的入口。
public static void main(String[] args) {
       ......
        AndroidOs.install();
        Looper.prepareMainLooper();
        ......
        }
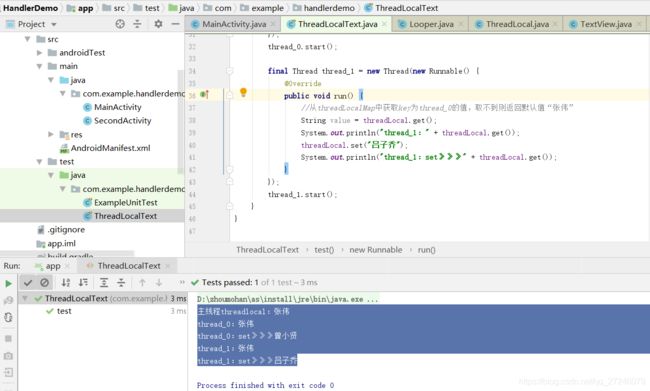
接下来我们就来实践下ThreadLocal是怎么用的,以下面demo为例:
public class ThreadLocalText {

    @Test
    public void test() {
        //创建本地线程(主线程)
        final ThreadLocal<String> threadLocal = new ThreadLocal<String>() {
            @Nullable
            @Override
            protected String initialValue() {
                //重写初始化方法,默认返回null,如果ThreadLocalMap拿不到值再调用初始化方法
                return "张伟";
            }
        };
        System.out.println("主线程threadlocal:" + threadLocal.get());

        final Thread thread_0 = new Thread(new Runnable() {
            @Override
            public void run() {
                //从threadLocalMap中获取key为thread_0的值,取不到则返回默认值“张伟”
                String value = threadLocal.get();
                System.out.println("thread_0:" + threadLocal.get());
                threadLocal.set("曾小贤");
                System.out.println("thread_0:set》》》" + threadLocal.get());
                 threadLocal.remove();
            }
        });
        thread_0.start();

        final Thread thread_1 = new Thread(new Runnable() {
            @Override
            public void run() {
                //从threadLocalMap中获取key为thread_0的值,取不到则返回默认值“张伟”
                String value = threadLocal.get();
                System.out.println("thread_1:" + threadLocal.get());
                threadLocal.set("吕子乔");
                System.out.println("thread_1:set》》》" + threadLocal.get());
                 threadLocal.remove();
            }
        });
        thread_1.start();
    }


}
二、Handler、MessageQueue、Looper的工作流程及源码分析
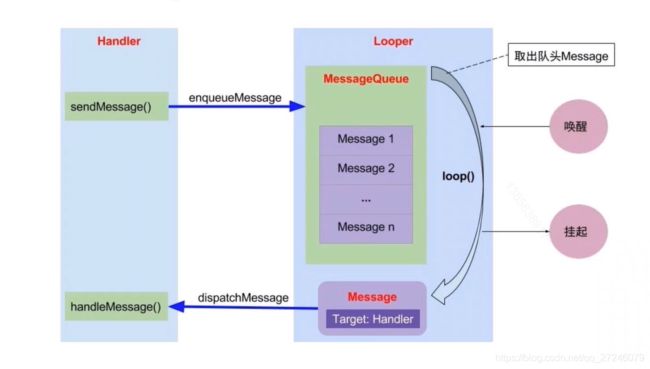
先看一张原理图,这就是handle将Message压入消息队列到handle消费message的全部流程。

2.1Looper和MessageQueue的初始化
整个流程的源头我们要从ActivityThread说起,
ActivityThread.java

public static void main(String[] args) {
        ......
        //创建主线程(UI线程)的looper
        Looper.prepareMainLooper();
        ......
        ActivityThread thread = new ActivityThread();
        thread.attach(false, startSeq);
        if (sMainThreadHandler == null) {
            sMainThreadHandler = thread.getHandler();
        }
        ......
        //轮询器,不停的从MessageQueue中去message
        Looper.loop();

        throw new RuntimeException("Main thread loop unexpectedly exited");
    }
跟进Looper看一下
Looper.java
/**
     * Initialize the current thread as a looper, marking it as an
     * application's main looper. The main looper for your application
     * 初始化应用的主线程的Looper
     * is created by the Android environment, so you should never need
     * 这个方法我们不应使用
     * to call this function yourself.  See also: {@link #prepare()}
     */
    public static void prepareMainLooper() {
        //创建主线程Looper
        prepare(false);
        synchronized (Looper.class) {
            if (sMainLooper != null) {
                throw new IllegalStateException("The main Looper has already been prepared.");
            }
            sMainLooper = myLooper();
        }
    }

private static void prepare(boolean quitAllowed) {
        if (sThreadLocal.get() != null) {
            throw new RuntimeException("Only one Looper may be created per thread");
        }
        //将创建的Looper存储到sThreadLocal(ThreadLocalMAp)
        sThreadLocal.set(new Looper(quitAllowed));
    }

//在初始化Looper时,也创建了一个MessageQueue对象,与Looper是一一对应的关系
 private Looper(boolean quitAllowed) {
        mQueue = new MessageQueue(quitAllowed);
        mThread = Thread.currentThread();
    }
主线程Looper的创建在1.5小节中已经提到过了,在此需要提的是:
- 每个线程(包括主线程和所有子线程)都可以有自己的Looper及MessageQueue且是相互绑定的
- 线程间的Looper和MessageQueue是相互隔离的,不同的是主线程的Looper及MessageQueue是Android环境创建好的,而子线程需要我们自己创建(在上文也提到过,在子线程中调用Looper.prepare()方法,之后的Looper.loop()方法也是同理)。
2.2 handle发送消息

首先要说明的是以上所有涉及到发送message的方法都会走到底enqueueMessage()这个方法
Handler.java
private boolean enqueueMessage(@NonNull MessageQueue queue, @NonNull Message msg,
            long uptimeMillis) {
        //这里也是要注意的一点,将自己赋值给Message的target
        msg.target = this;
        msg.workSourceUid = ThreadLocalWorkSource.getUid();

        if (mAsynchronous) {
            msg.setAsynchronous(true);
        }
        return queue.enqueueMessage(msg, uptimeMillis);
    }
继续跟进来到MessageQueue.java
boolean enqueueMessage(Message msg, long when) {
     synchronized (this) {
            ......
            msg.when = when;
            Message p = mMessages;
            boolean needWake;
            if (p == null || when == 0 || when < p.when) {
                // New head, wake up the event queue if blocked.
                msg.next = p;
                //在这里发送的message保存到mMessages变量
                mMessages = msg;
                needWake = mBlocked;
            } else {

                needWake = mBlocked && p.target == null && msg.isAsynchronous();
                Message prev;
                for (;;) {
                    prev = p;
                    p = p.next;
                    if (p == null || when < p.when) {
                        break;
                    }
                    if (needWake && p.isAsynchronous()) {
                        needWake = false;
                    }
                }
                msg.next = p; // invariant: p == prev.next
                prev.next = msg;
            }
        }
        return true;
    }
到此发送消息并将消息压入到消息对列就完成了。
2.3 通过Looper取message,并进行message消息分发,最终消费了message
这个操作在应用的入口方法ActivityThread的main()中就已经开始了,我们来看下是怎么来取message的来到Looper.loop()方法
    public static void loop() {
    //从ThreadLocalMap中取出主线程的looper
        final Looper me = myLooper();
        if (me == null) {
            throw new RuntimeException("No Looper; Looper.prepare() wasn't called on this thread.");
        }
        //拿到主线程中Looper的消息对列
        final MessageQueue queue = me.mQueue;

        //对下面死循环的优化处理的底层方法,不会出现ANR
        Binder.clearCallingIdentity();
        final long ident = Binder.clearCallingIdentity();

        //一直循环从消息对列里取消息
        for (;;) {
            Message msg = queue.next(); // might block
            if (msg == null) {
                // No message indicates that the message queue is quitting.
                return;
            }
             //拿到message后进行消息分发,msg.target就是发送消息的handler,而dispatchMessage()这个方法在上文我们已经分析过了,最终调用了我们在创建handler时重写的方法。
             msg.target.dispatchMessage(msg);
           ......
            }

            msg.recycleUnchecked();
        }
    }


