1.准备工作
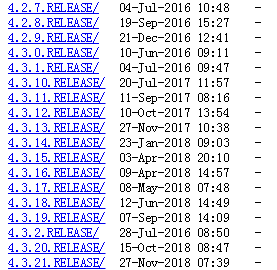
下载Spring:http://repo.spring.io/libs-release-local/org/springframework/spring/
选择需要下载的版本
![]() 选择dist.zip结尾的下载即可。
选择dist.zip结尾的下载即可。
下载完后将其解压,进入libs文件夹,libs文件夹下有很多jar文件.
目前阶段只需要将 spring-core-x.x.x.RELEASE.jar 、spring-beans-x.x.x.RELEASE.jar
spring-context-x.x.x.RELEASE.jar、 spring-expression-x.x.x.RELEASE.jar导入到项目中。
要是想全部导入也可以。
下载commons-Logging.jar
下载地址:http://commons.apache.org/proper/commons-logging/download_logging.cgi
将解压后的commons-logging.jar导入项目。
2.核心容器(BeanFactory,ApplicationContext)
BeanFactory:BeanFactory是org.springframework.beans.facytory . BeanFactory 接口定义.是基础的IOC(控制反转)容器。
控制反转即控制权发生了反转,例如创建一个对象,一般都是我们通过new来创建,而发生控制反转后创建由
容器来创建(容器会根据配置文件进行创建),不用我们显示的new一个对象。
可以将BeanFactory看作一个管理bena的工厂类,负责初始化等操作。
ApplicationContext:ApplicationContext是BeanFactory的子接口,除了包含BeanFactory中所有功能外还包含
国际化、资源访问、事件传播等方面的支持。
ApplicationContext实例创建方法:
2.1.ClassPathXmlApplication
ClasspathXmlApplication会从类路径中寻找指定的xml文件并加载。(一般采用这种方式)
ApplicationContext applicationContext = new ClassPathApplicationContext("xxx.xml");
2.2.FileSystemXmlApplicationContext
FileSystemXmlApplication是指定绝对路径来进行查找,这种方式不灵活使用较少。
ApplicationContext ac = new FileSystemXmlApplicationContext("C:text/.../xxx.xml");
ApplicationContext中有一个方法:Object getBean(String name);通过name(xml文件中的id属性)获取指定类。
2.3 小例子
首先创建一个web项目。
2.3.1我们创建一个Animal接口,并定义一个say()方法。
public interface Animal {
    public void say();
}
2.3.2再创建一个类Cat实现Animal接口
public class Cat implements Animal{

    @Override
    public void say() {
        // TODO Auto-generated method stub
        System.out.println("喵喵喵");
    }
}
2.3.3在src目录下创建beans.xml文件(一般命名为beans.xml,也有叫applicatinContex.xml的)
xml  version="1.0"  encoding="UTF-8"?>
<beans  xmlns="http://www.springframework.org/schema/beans"
        xmlns:xsi = "http://www.w3.org/2001/XMLSchema-instance"
              xsi:schemaLocation="http://www.springframework.org/schema/beans
http://www.springframework.org/schema/beans/spring-beans-4.3.xsd">

    <bean id = "cat" class = "com.ioc.Cat"> bean>
beans>
2.3.4测试IOC容器实例化对象
import org.springframework.context.ApplicationContext;
import org.springframework.context.support.ClassPathXmlApplicationContext;

public class Main {
    public static void main(String[] args) {
        ApplicationContext ac = new ClassPathXmlApplicationContext("beans.xml");
        Animal cat = (Animal)ac.getBean("cat");//cat为配置文件中id属性的值,通过配置文件的id获取对应类
        cat.say();
    }
}
运行结果:
二月 09, 2019 5:07:47 下午 org.springframework.context.support.ClassPathXmlApplicationContext prepareRefresh
信息: Refreshing org.springframework.context.support.ClassPathXmlApplicationContext@46f7f36a: startup date [Sat Feb 09 17:07:47 CST 2019]; root of context hierarchy
二月 09, 2019 5:07:47 下午 org.springframework.beans.factory.xml.XmlBeanDefinitionReader loadBeanDefinitions
信息: Loading XML bean definitions from class path resource [beans.xml]
喵喵喵
上例我们没有显示的new,而是通过容器创建了一个对象,控制发生了反转从自己控制变成了容器控制。
容器创建时默认是单例模式,即每次获取的都是一个对象。要想每次获取的对象都是不同的对象可按如下设置:
class = "com.ioc.Cat" scope = "prototype”>
3.依赖注入
问题引出:假如当前有一个Person类,person要养宠物,于是我们可以这样写;
public Person{
        Dog dog;
        Cat cat;
            ...
            ...
}
person每想养一个宠物就要修改代码为其添加一个宠物,这样很麻烦,而且扩展性解耦性都不好。
于是我们首先可以将Dog、Cat改为Animal,这样比之前好一些了,所有宠物都是Animal。
但这样在需求有变时还是需要修改一些内容,这样的确比之前的想法方便了一些,但有没有更方便的方法呢?
如果Animal的属性是通过.xml文件中的设置来进行赋值的呢?这样是不是更方便了,当需求改变时在xml修改即可。
我们就在原有例子的基础上来进行这个实验:
3.1创建一个Dog类,实现Animal接口
public class Dog implements Animal{

    @Override
    public void say() {
        // TODO Auto-generated method stub
        System.out.println("汪汪汪");
    }
}
3.2创建Person类
public class Person {
    private Animal animal;//养的宠物

    public Animal getAnimal() {
        return animal;
    }

    public void setAnimal(Animal animal) {//set方法一定要有
        this.animal = animal;
    }

    public void palyAnimal() {//设置一个玩宠物的方法
        animal.say();//玩宠物宠物发出来对应的声音
    }
}
3.3beans.xml文件配置
xml  version="1.0"  encoding="UTF-8"?>
<beans  xmlns="http://www.springframework.org/schema/beans"
        xmlns:xsi = "http://www.w3.org/2001/XMLSchema-instance"
              xsi:schemaLocation="http://www.springframework.org/schema/beans
http://www.springframework.org/schema/beans/spring-beans-4.3.xsd">

    <bean id = "cat" class = "com.ioc.Cat"> bean>
    <bean id = "person" class = "com.ioc.Person">
        <property name="animal" ref="cat">property>
    bean>
beans>
3.4测试
import org.springframework.context.ApplicationContext;
import org.springframework.context.support.ClassPathXmlApplicationContext;

public class Main {
    public static void main(String[] args) {
        ApplicationContext ac = new ClassPathXmlApplicationContext("beans.xml");
        Person person = (Person)ac.getBean("person");
        person.palyAnimal();
    }
}
运行结果:
二月 09, 2019 5:31:01 下午 org.springframework.context.support.ClassPathXmlApplicationContext prepareRefresh
信息: Refreshing org.springframework.context.support.ClassPathXmlApplicationContext@46f7f36a: startup date [Sat Feb 09 17:31:01 CST 2019]; root of context hierarchy
二月 09, 2019 5:31:01 下午 org.springframework.beans.factory.xml.XmlBeanDefinitionReader loadBeanDefinitions
信息: Loading XML bean definitions from class path resource [beans.xml]
喵喵喵
如果不想养猫了,只需将beans.xml文件中的ref修改下即可。
