Android Bitmap 研究与思考(上篇)
做Android 6年来,一直都没有对 Bitmap 做过深入研究。最近的工作需要,我认真的研究了一下Bitmap , 了却了多年的心愿。
本次研究的东西比较多,建议先收藏,再看。
文章目录
- 一:Bitmap 是什么?
- 二:bitmap 到底占用多少内存?
- 内存计算
- 三:Bitmap 尺寸怎么算?
- 实验1:
- 实验2
- 实验3
- 实验4
- 四:什么是 DPI ?
- 五:什么是 PPI ?
- 六:Android 系统 DPI 分级
一:Bitmap 是什么?
从字面的意思上可以理解为 位图 。
在Android中是一种存储像素的数据结构,通过这个对象可以得到一系列的图像属性。还可以对图像进行旋转,切割,放大,缩小等操作。
我画了一张像素图,大家理解一下。
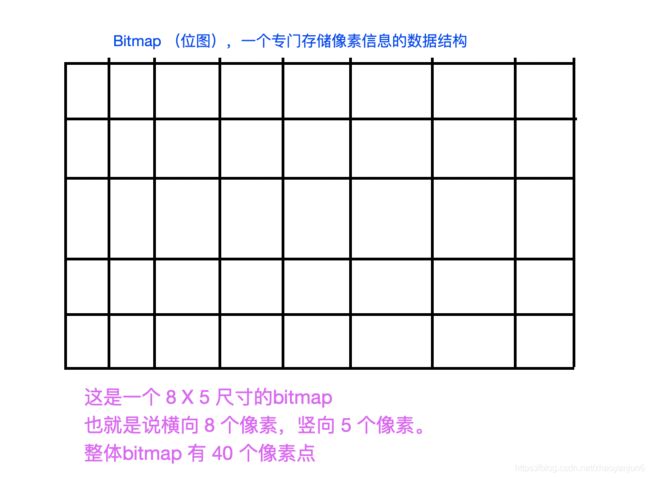
我们一般说说的手机分辨率 1080 * 1920 , 就代表手机屏幕横向是 1080 个像素点,竖向是 1920 个像素点,整个手机的像素点是两者相乘为 2073600 个像素点。
从代码上来讲 ,Bitmap 是一个 final 类,实现了 Parcelable 接口,因此不能被继承。Bitmap只有一个构造方法,且该构造方法是私有的,所以无法通过 new 的方式来建一个 Bitmap。
在 Android 中,bitmap 只是一个存储像素信息的对象,是内存虚构出来的。
二:bitmap 到底占用多少内存?
首先我们先来看看怎么创建一个 bitmap ,上面我们已经提到过,无法通过 new 的方式创建Bitmap 对象 。 幸运的是 Bitmap 提供了多个静态方法。
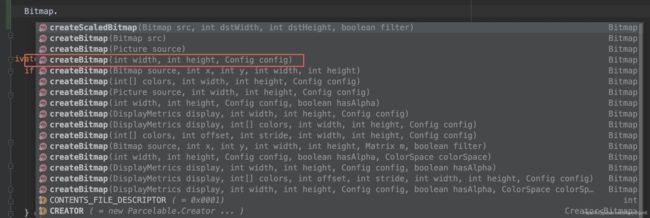
可以看到除了createBitmap(Bitmap src) 和 createBitmap( Picture source) 这两个方法外,其他的方法都是需要一个 Config 参数。
Bitmap.Config google官方描述为:
Possible bitmap configurations. A bitmap configuration describes how pixels are stored. This affects the quality (color depth) as well as the ability to display transparent/translucent colors.
Bitmap.Config 描述了像素的存储方式,这会影响质量(颜色深度)以及显示透明/半透明颜色的能力。在Bitmap.Config文档中我们看到四个枚举变量。
 public enum Config {

        ALPHA_8     (1),

        /**
         * Each pixel is stored on 2 bytes and only the RGB channels are
         * encoded: red is stored with 5 bits of precision (32 possible
         * values), green is stored with 6 bits of precision (64 possible
         * values) and blue is stored with 5 bits of precision.
         *
         * This configuration can produce slight visual artifacts depending
         * on the configuration of the source. For instance, without
         * dithering, the result might show a greenish tint. To get better
         * results dithering should be applied.
         *
         * This configuration may be useful when using opaque bitmaps
         * that do not require high color fidelity.
         *
         * Use this formula to pack into 16 bits:
         *
         * short color = (R & 0x1f) << 11 | (G & 0x3f) << 5 | (B & 0x1f);
         *
         */
        RGB_565     (3),

        /**
         * Each pixel is stored on 2 bytes. The three RGB color channels
         * and the alpha channel (translucency) are stored with a 4 bits
         * precision (16 possible values.)
         *
         * This configuration is mostly useful if the application needs
         * to store translucency information but also needs to save
         * memory.
         *
         * It is recommended to use {@link #ARGB_8888} instead of this
         * configuration.
         *
         * Note: as of {@link android.os.Build.VERSION_CODES#KITKAT},
         * any bitmap created with this configuration will be created
         * using {@link #ARGB_8888} instead.
         *
         * @deprecated Because of the poor quality of this configuration,
         *             it is advised to use {@link #ARGB_8888} instead.
         */
        @Deprecated
        ARGB_4444   (4),

        /**
         * Each pixel is stored on 4 bytes. Each channel (RGB and alpha
         * for translucency) is stored with 8 bits of precision (256
         * possible values.)
         *
         * This configuration is very flexible and offers the best
         * quality. It should be used whenever possible.
         *
         * Use this formula to pack into 32 bits:
         *
         * int color = (A & 0xff) << 24 | (B & 0xff) << 16 | (G & 0xff) << 8 | (R & 0xff);
         *
         */
        ARGB_8888   (5),

        /**
         * Each pixels is stored on 8 bytes. Each channel (RGB and alpha
         * for translucency) is stored as a
         * {@link android.util.Half half-precision floating point value}.
         *
         * This configuration is particularly suited for wide-gamut and
         * HDR content.
         *
         * Use this formula to pack into 64 bits:
         *
         * long color = (A & 0xffff) << 48 | (B & 0xffff) << 32 | (G & 0xffff) << 16 | (R & 0xffff);
         *
         */
        RGBA_F16    (6),

        /**
         * Special configuration, when bitmap is stored only in graphic memory.
         * Bitmaps in this configuration are always immutable.
         *
         * It is optimal for cases, when the only operation with the bitmap is to draw it on a
         * screen.
         */
        HARDWARE    (7);

        final int nativeInt;

        private static Config sConfigs[] = {
            null, ALPHA_8, null, RGB_565, ARGB_4444, ARGB_8888, RGBA_F16, HARDWARE
        };

        Config(int ni) {
            this.nativeInt = ni;
        }

        static Config nativeToConfig(int ni) {
            return sConfigs[ni];
        }
    }
- ALPHA_8 :
每个像素都存储为单个半透明(alpha)通道。
这对于例如有效存储蒙版非常有用。
不存储颜色信息。
使用此配置,每个像素需要1个字节的内存。
说白了就是:这种模式每个像素只存储一个透明度值,不会存储其他颜色信息。所以我们在创建蒙版的时候,推荐使用这种模式。每个像素占 8 位,也就是 1 个字节。
- ARGB_4444 :
即A=4,R=4,G=4,B=4,那么一个像素点占4+4+4+4=16位 , 也就是每个像素占 2 个字节。
- ARGB_8888 :
即A=8,R=8,G=8,B=8,那么一个像素点占8+8+8+8=32位, 也就是一个像素占 4 个字节。
- RGB_565 :
即R=5,G=6,B=5,没有透明度,那么一个像素点占5+6+5=16位, 也就是一个像素占 2 个字节。
内存计算
我们知道了,每种模式下,每个像素所占用的内存,就能很清楚的算清楚,每个bitmap 所占用的内存。比如:
Bitmap bitmap = Bitmap.createBitmap(1024,1024, Bitmap.Config.ARGB_8888);
我们创建了一个 bitmap ,宽 1024 个像素,高 1024 个像素,模式 ARGB_8888 。所以我们很容易算出:
这个bitmap 总共像素总量为:1024 x 1024每个像素占用的内存为 4 个 byte整个bitmap 占用内存为 :1024 x 1024 x 4 , 单位字节 byte 。 换算为 (1024 x 4 ) kb = 4 M
最后算出这个bigmap 占用内存为 4 M 。
总结:
-
在 bitmap 存储模式相同的情况下,尺寸越大,占用内存越大。因为尺寸越大,bigmap 总像素点越多。
-
在 bitmap 尺寸相同的情况下,ARGB_8888 占用内存 > ARGB_4444 占用内存 = RGB_565 占用内存 > ARGB_4444 占用内存。
三:Bitmap 尺寸怎么算?
在第二部分,我们知道了 bitmap 占用的内存 = bitmap 总像素个数 x 单个像素占用的内存。
其中,单个像素占用的内存由存储模式决定,比如 Config.ARGB_8888 。
而 bitmap 的总像素 = bitmap 宽度 x bitmap 高度 。
现在我们要弄清楚 bitmap 尺寸怎么计算?
首先上一段代码,计算ImageView中加载图片的具体尺寸和内存占用大小。
import android.graphics.Bitmap;
import android.graphics.drawable.BitmapDrawable;
import android.graphics.drawable.Drawable;
import android.util.Log;
import android.widget.ImageView;

/**
 * @author yanjun.zhao
 * @time 2020/8/13 7:51 PM
 * @desc
 */
class Util {

    /***
     * 计算ImageView中加载图片的具体尺寸和内存占用大小
     * @param imageView
     */
    public static void calculateBitmapInfo(ImageView imageView) {
        Drawable drawable = imageView.getDrawable();
        if (drawable != null) {
            BitmapDrawable bitmapDrawable = (BitmapDrawable) drawable;
            Bitmap bitmap = bitmapDrawable.getBitmap();
            Log.d("bitmap--", " bitmap width = " + bitmap.getWidth() + " bitmap height = " + bitmap.getHeight());
            Log.d("bitmap--", " memory usage = " + bitmap.getAllocationByteCount());/**bitmap.getByteCount()方法不再使用*/
        } else {
            Log.d("bitmap--", "drawable is null!");
        }
    }
}
实验1:
我们做个试验,现在布局中定义个 ImageView , 尺寸是 100 dp x 100 dp
 <ImageView
            android:id="@+id/image"
            android:layout_width="100dp"
            android:layout_height="100dp" />
给 imageView 设置一个图片,名字是 image.png , 尺寸是 300 x 300 。
 <ImageView
            android:id="@+id/image"
            android:src="@drawable/image"
            android:layout_width="100dp"
            android:layout_height="100dp" />
然后输出 bitmap 宽高和占用内存。
import androidx.appcompat.app.AppCompatActivity
import com.example.myview.util.Utils
import kotlinx.android.synthetic.main.activity_main.*

class MainActivity : AppCompatActivity() {

    override fun onCreate(savedInstanceState: Bundle?) {
        super.onCreate(savedInstanceState)
        setContentView(R.layout.activity_main)

        //计算bitmap 宽高和占用内存
        Util.calculateBitmapInfo(image)

    }
}
在 红米4 手机上输出:
bitmap--:  bitmap width = 1200 bitmap height = 1200
bitmap--:  memory usage = 5760000
在我的杂牌手机上输出:
bitmap--:  bitmap width = 600 bitmap height = 600
bitmap--:  memory usage = 1440000
至此,我们可以得出结论:
- 使用相同尺寸的图片放在 drawable 目录下,用 ImageView 加载出来。在不同的手机上,获取的 bitmap 宽高是不一样的,bitmap 所占用的内存也是不一样的。
查阅 ImageView 源码,发现 ImageView 中图片是以 Bitmap 形式保存在内存中;查阅 Bitmap源码,发现图像在内存中的实际 bitmap 尺寸和图像的原始尺寸(withPixel * heightPixel),资源文件像素密度(sourcedensity)以及目标手机的像素密度(targetDensity)有密不可分的关系。

其中 sourceDensity>>1 部分是为了对 targetDensity/sourceDensity 进行四舍五入
综上,
结论1: ImageView中显示图像对内存的占用与原始图像尺寸,资源文件的dpi,以及实际设备的dpi有密切的关系,与图像在UI上实际显示的尺寸无关。只放置单 dpi 资源文件,对不同设备加载过程中的内存占用无影响。
实验2
测试方案:将将尺寸为图片A(尺寸60*60 大小2.02K)放入drawable和drawable-xxhdpi文件夹,图片显示尺寸采用wrap_content,分别用mate 9手机进行测试;
测试结果:内存占用分别为129600Byte和14400Byte,图片在ImageView中的bitmap尺寸为180 * 180和 60 * 60;
结果分析:相同的图片放在不同的 drawable 目录下,bitmap 宽高不一样,bitmap 占用的内存也不一样。内存占用与图片的原始尺寸没有关系,与 bitmap尺寸有密切的关系。
实验3
测试方案:将尺寸为图片A(尺寸60*60 大小2.02K)放入drawable-xxhdpi文件夹,图片显示尺寸设置为30dp * 30dp和 60dp * 60dp,分别用mate 9手机进行测试;
测试结果:内存占用均为14400Byte,bitmap尺寸均为60*60;
结果分析:说明内存占用与图片的实际显示尺寸没有关系。
实验4
测试方案:将尺寸为图片A(尺寸6060 大小2.02K),图片B(尺寸6060 大小1.63K),将图片均放入drawable-xxhdpi文件夹,图片显示尺寸采用wrap_content,用华为mate 9(xxhdpi)手机进行测试;
测试结果:二者内存占用均为14400Byte,bitmap尺寸为60*60;
结果分析:说明内存占用单独与图片原始大小没有关系。
四:什么是 DPI ?
先放一个维基百科 链接 DPI
DPI(英语:Dots Per Inch,每英寸点数)是一个量度单位,用于点阵数字图像,意思是指每一英寸长度中,取样或可显示或输出点的数目。如:打印机输出可达600DPI的分辨率,表示打印机可以在每一平方英寸的面积中可以输出600X600=360000个输出点。
打印机所设置之分辨率的DPI值越高,印出的图像会越精细。打印机通常可以调校分辨率。例如撞针打印机,分辨率通常是60至90 DPI。喷墨打印机则可达1200 DPI,甚至9600 DPI。激光打印机则有600至1200 DPI。
一般显示器为96 DPI,印刷所需位图的DPI数则视印刷网线数而定。一般150线印刷质量需要350 DPI的位图。而这里的D(dot)就是像素(pixel)。
五:什么是 PPI ?
每英寸像素(英语:Pixels Per Inch,缩写:PPI),又被称为像素密度,是一个表示打印图像或显示器单位面积上像素数量的指数。一般用来计量电脑显示器,电视机和手持电子设备屏幕的精细程度。通常情况下,每英寸像素值越高,屏幕能显示的图像也越精细。
电脑与手机屏幕的每英寸像素值取决于尺寸和分辨率,通常指的就是每英寸上的像素点数。同样的一台显示器,如果分辨率设置的不同,像素点数也不同。分辨率越高,每英寸像素值也越高。
六:Android 系统 DPI 分级
根据屏幕每英寸像素值的不同,Android系统的开发者将平板电脑和手机的屏幕分成五类:

随着屏幕技术的发展,出现了比 xxhdpi 更高密度的屏幕 xxxhdpi
| 名称 | 显示等级 | 每英寸像素 |
|---|---|---|
| XXXHDPI | 超超高像素密度 | 每英寸大约640像素 (192 x 192 px ) |