大纲:
1.首先,搭建起来一个最基础的Grid组件;
2.其次,利用前边MVC架构将代码重构;
3.再者,介绍下Grid的一些特性。
一、搭建基础的Grid组件
在文章的开始,我们首先简单的搭建一个Grid项目,感受下Grid的样子和其吸引众人的魅力所在。
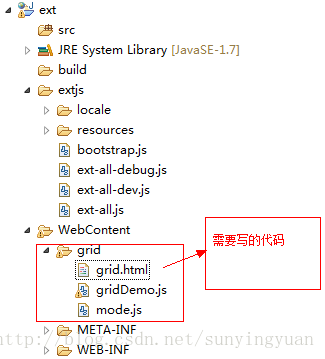
架构如图:
代码分别如下,注释写的比较清楚,按照以上搭建可以正常运行:
grid.html代码如下:
EXTJS4.0
gridDemo.js代码如下:
(function(){
	Ext.onReady(function(){
		//初始化
		Ext.QuickTips.init();//类似于title,用于显示ext:qtip设定的值
		//创建表格时候要 用表格的面板
		var grid = Ext.create("Ext.grid.Panel",{
			title : 'Grid Demo',//标题
			frame : true,//面板渲染,使表格更加饱满
			//forceFit : true,//自动填充panel空白处
			width : 600,
			height: 280,
			columns : [ //列模式
				{text:"Name",dataIndex:'name',width:100},//text列名,表头信息
				{text:"age",dataIndex:'age',width:100},//dataIndex从store/model中找到相应的记录
				{text:"email",dataIndex:'email',width:350,
					//重构列模式
					field:{
						xtype:'textfield',//编辑方式
						allowBlank:false//
					}
				}
			],
			tbar :[
				{xtype:'button',text:'添加',iconCls:'table_add'},//这个地方iconCls是一些图标组件,大家可以自行添加
				{xtype:'button',text:'删除',iconCls:'table_remove',
					handler:function(o){
						//var gird = o.findParentByType("gridpanel");
						var gird = o.ownerCt.ownerCt;//ownerCt是拥有这个组件的组件
						var data = gird.getSelectionModel().getSelection();
						//getSelectionModel得到Ext.selection.Model对象,得到选择模式
						//Ext.selection.Model中有getSelection方法得到选中对象的数组
						if(data.length == 0){
							Ext.Msg.alert("提示","您最少要选择一条数据");
						}else{
							//1.先得到ID的数据(name)
							var st = gird.getStore();//得到store
							var ids = [];
							Ext.Array.each(data,function(record){
								ids.push(record.get('name'));
							})
							//2.后台操作(delete)
							Ext.Ajax.request({
								url:'/extjs/extjs!deleteData.action',
								params:{ids:ids.join(",")},
								method:'POST',
								timeout:2000,//延迟显示
								success:function(response,opts){
									Ext.Array.each(data,function(record){
										st.remove(record);
									})
								}
							})
							//3.前端操作DOM进行删除(ExtJs)
						}
					}
				  },
				{xtype:'button',text:'修改',iconCls:'table_edit'},
				{xtype:'button',text:'查看',iconCls:'table_comm'}
			],
			dockedItems :[{//控制组件在什么位置,随便定位
				xtype:'pagingtoolbar',//分页组件
				store:Ext.data.StoreManager.lookup('s_user'),//分页也跟数据、挂钩
				dock:'bottom',//位置
				displayInfo:true
			}],
			plugins:[//Ext 4.0用的是 插件的形式来和form表单配合使用的
				Ext.create("Ext.grid.plugin.CellEditing",{
					clicksToEdit : 1
				})
			],
			selType:'checkboxmodel',//设定选择模式,前边会加选择框
			multiSelect:true,//运行多选
			renderTo :'gridDemo',//把这个组件渲染到一个div上
			store : Ext.data.StoreManager.lookup('s_user')//通过StoreManager读取数据
		});
	});
})();
mode.js代码如下:
//User类,创立一个模型类
Ext.define("user",{
	extend:"Ext.data.Model",
	fields:[
		{name:'name',type:'string',sortable:true},
		{name:'age',type:'int',sortable:true},
		{name:'email',type:'string',sortable:true}
	]
});
//User对象
var user = Ext.create("user",{});
Ext.create("Ext.data.Store",{
	model:'user',//这个地方user不是一个对象,而是一个类
	storeId:'s_user',//写了以后就可以把store用StroeManager进行管理
	proxy:{//代理
		type:'ajax',
		url:'获取数据的url,后台请大家自己实现',
		reader:{//读取器
			type:'json',//类型
			root:'topics'//根节点
		},
		writer:{
			type:'json'
		}
	},
	autoLoad:true
});
二、利用MVC架构将以上代码重构
代码在项目中的组织架构如下图,有图有真相啊:
grid.html代码如下:
EXTJS4.0
app.js代码如下:
//application会初始化面板
Ext.onReady(function(){
	//Ext初始化
	Ext.QuickTips.init();
	//Ext规范,HTML只会加载一个类,就是Application这个类
	//启用Loader
	Ext.Loader.setConfig({
		enabled:true
	});
	Ext.application({//初始化一个应用
		name : 'AM',//应用的名字
		appFolder : "app",//应用的目录
		launch:function(){//当前页面加载完成执行的函数
	        Ext.create('Ext.container.Viewport', { //简单创建一个视图
	        	layout:'auto',//自动填充布局
	            items: {
	            	xtype: 'userlist',//要初始化哪个面板,将userlist展示出来
	                title: 'Users',
	                html : 'List of users will go here'
	            }
	        });
		},
		controllers:[//控制器
			'Users'
		]
	});
})//controller层目的一:将Model层和View层相融合
//controller层目的二:控制View层相应的事件触发
Ext.define('AM.controller.Users', {
extend: 'Ext.app.Controller',
init:function(){//初始化的方法
this.control({//controller的核心方法
'userlist button[id=delete]':{
click:function(o){
var gird = o.ownerCt.ownerCt;
var data = gird.getSelectionModel().getSelection();
if(data.length == 0){
Ext.Msg.alert("提示","您最少要选择一条数据");
}else{
//1.先得到ID的数据(name)
var st = gird.getStore();
var ids = [];
Ext.Array.each(data,function(record){
ids.push(record.get('name'));
})
//2.后台操作(delet)
Ext.Ajax.request({
url:'/extjs/extjs!deleteData.action',
params:{ids:ids.join(",")},
method:'POST',
timeout:2000,
success:function(response,opts){
Ext.Array.each(data,function(record){
st.remove(record);
})
}
})
//3.前端操作DOM进行删除(ExtJs)
}
}
}
});
},
views:[
'List'
],
stores :[
"Users"
],
models :[
"User"
]
});model下User.js代码如下:
//Model层中的User,相当于java中的Class 就是java中的类
//User类
Ext.define('AM.model.User', {
    extend: 'Ext.data.Model',
	fields: [
		{name: 'name',  type: 'string',sortable : true},
	    {name: 'age',   type: 'int',sortable : true},
	    {name: 'email',   type: 'string',sortable : true}
	]
});
store下Users.js代码如下:
//Model 2 代表数据集合
//User数据集合
Ext.define('AM.store.Users', {
	extend: 'Ext.data.Store',
	model: 'AM.model.User',
	storeId: 's_user',
	proxy:{
	    type:'ajax',
	    url:'/extjs/extjs!getUserList.action',
	    reader: {
	        type: 'json',
	        root: 'topics'
	    },writer:{
			type:'json'
		}
	},
	autoLoad: true //很关键
});
view下List.js代码如下:
Ext.define("AM.view.List",{
	extend:'Ext.grid.Panel',
	title : 'Grid Demo',//标题
	alias: 'widget.userlist',//别名
	frame : true,//面板渲染
	width : 600,
	height: 280,
	columns : [ //列模式
				{text:"Name",dataIndex:'name',width:100},
				{text:"age",dataIndex:'age',width:100},
				{text:"email",dataIndex:'email',width:350,
					field:{
						xtype:'textfield',
						allowBlank:false
					}
				}
	],
	tbar :[
				{xtype:'button',text:'添加',iconCls:'table_add'},
				{xtype:'button',id:'delete',text:'删除',iconCls:'table_remove'},
				{xtype:'button',text:'修改',iconCls:'table_edit'},
				{xtype:'button',text:'查看',iconCls:'table_comm'}
	],
	dockedItems :[{
				xtype:'pagingtoolbar',
				store:'Users',
				dock:'bottom',
				displayInfo:true
	}],
	plugins:[
				Ext.create("Ext.grid.plugin.CellEditing",{
					clicksToEdit : 2
				})
	],
	selType:'checkboxmodel',//设定选择模式
	multiSelect:true,//运行多选
	store : 'Users',
	initComponent:function(){//用到继承,一般都会初始化这个函数
		this.callParent(arguments);
	}
});
三、Grid组件特性简介
1.列模式:
列模式的主类
Ext.grid.column.Action xtype: actioncolumn
在表格中渲染一组图标按钮,并且为他赋予某种功能
altText : String 设置应用image元素上的alt
handler : function(view,rowindex,collndex,item,e);
icon : 图标资源地址
iconCls : 图标样式
items : 多个图标的数组 //在使用MVC的时候建议不要用 如果大家有好得放大请与uspcat联系
function(o,item,rowIndex,colIndex ,e)
stopSelection : 设置是否单击选中不选中
2.把写到view的代码写到控制层
Ext.grid.column.Boolean xtype: booleancolumn
falseText,trueText
Ext.grid.column.Date xtype: datecolumn
format:'Y年m月的日'
Ext.grid.column.Number xtype: numbercolumn
format:'0,000'
Ext.grid.column.Template xtype: templatecolumn
xtype:'templatecolumn',
tpl :""
2.选择模式
选择模式的根类Ext.selection.Model
重要方法
1.1撤销选择 deselect( Ext.data.Model/Index records, Boolean suppressEvent ) : void
1.2得到选择的数据getSelection( ) : Array
1.3得到最后被选择数据getLastSelected( ) : void
1.4判断你指定的数据是否被选择上isSelected( Record/Number record ) : Boolean
1.5选择你指定的行selectRange( Ext.data.Model/Number startRow, Ext.data.Model/Number endRow, [Boolean keepExisting], Object dir ) : void
keepExisting true保持已选则的,false重新选择
---------------------------------------------------------------------------------------------
隐藏了一个单元格的选择模式 selType: 'cellmodel'(从这发现的Ext.grid.plugin.CellEditing)
重要方法
2.1得到被选择的单元格getCurrentPosition() Object
Ext.JSON.encode()
itemclick( Ext.view.View this, Ext.data.Model record, HTMLElement item, Number index, Ext.EventObject e, Object options )
2.2selectByPosition({"row":5,"column":6})
很实用选择你要特殊处理的数据
---------------------------------------------------------------------------------------------
Ext.selection.CheckboxModel 多选框选择器
重要方法
---------------------------------------------------------------------------------------------
Ext.selection.RowModel rowmodel 行选择器
重要属性
3.1multiSelect 允许多选
3.2simpleSelect 单选选择功能
3.3enableKeyNav 允许使用键盘
3.Grid的特性Ext.grid.feature.Feature
Ext.grid.feature.RowBody 表格的行体
重要方法
1.1getAdditionalData( Object data, Number idx, Ext.data.Model record, Object orig ) : void
1.如果你要展示这个面板那么必须复写这个方法
features: [
Ext.create("Ext.grid.feature.RowBody",{
getAdditionalData:function(data,idx,record,orig){
......
}
})
],
2.必须返回行体的对象
var headerCt = this.view.headerCt,
colspan = headerCt.getColumnCount();
return {
rowBody: "",
rowBodyCls: this.rowBodyCls,
rowBodyColspan: colspan
};
---------------------------------------------------------------------------------------------
Ext.grid.feature.AbstractSummary
Ext.grid.feature.Summary
2.1实用方法是在
1.第一步
features: [{
ftype: 'summary'
}],
2.第二步
columns中配置summaryType: 'count', (count,sum,min,max,average)
summaryRenderer: function(value, summaryData, dataIndex) {
return Ext.String.format(' : '+value);
}
---------------------------------------------------------------------------------------------
Ext.grid.feature.Grouping
1.在store中设置可以分组的属性
groupField : ''
2.在view中增加代码
Ext.create("Ext.grid.feature.Grouping",{
groupByText : "职业分组",
groupHeaderTpl : "职业{name} 一共{rows.length}人",
showGroupsText : "展示分组",
startCollapsed : true//是否收起
}
重要事件
groupclick
groupdblclick
groupcontextmenu
groupexpand
groupcollapse
4.可编辑插件
可编辑插件的根 Ext.grid.plugin.Editing
Ext.grid.plugin.Editing
Ext.grid.plugin.CellEditing 这个不讲(之前课程讲过)
(1)保存修改的两种办法
1.设立保存按钮,用户单击的时候保存数据
st.sync();
var records = st.getUpdatedRecords();
Ext.Array.each(records,function(model){
model.commit();
});
2.注册edit事件
e.record.commit();
Ext.grid.plugin.RowEditing
使用方法:(个人推荐4.0.1a版本还是不要用这个功能)
Ext.create('Ext.grid.plugin.RowEditing', {
clicksToEdit: 1
})
5.表格拖拽
Ext.grid.plugin.DragDrop 表格拖拽 //表格前端排序,首先不能有分页
//其次有index排序的字段 同时也有保存的效果了
//再者不能有多选框的功能
主意:配置有变化
viewConfig:{
plugins:[
Ext.create('Ext.grid.plugin.DragDrop', {
ddGroup:'ddTree', //拖放组的名称 //如果拖动和释放的组件在同一个拖放组中,就可以从一个拖到
//另一个中
dragGroup :'userlist', //拖拽组名称
dropGroup :'userlist' //释放租名称
enableDrag:true, //是否启用
enableDrop:true
})]
}
处理事件
listeners: {
drop: function(node, data, dropRec, dropPosition) {
var st = this.getStore();
for(i=0;i
}
}
}
6.分页组件
Ext.toolbar.Paging 分页组件
dockedItems: [{
xtype: 'pagingtoolbar',
store: store,
dock: 'bottom',
displayInfo: true
}],
//第二种分页的形式
1.app.js中添加
Ext.Loader.setPath('Ext.ux', '../../../extjs4/examples/ux');
2.
Ext.require([
'Ext.ux.data.PagingMemoryProxy',
'Ext.ux.SlidingPager'
]);
3. view中添加
bbar: Ext.create('Ext.PagingToolbar', {
pageSize: 10,
store: store,
displayInfo: true,
plugins: Ext.create('Ext.ux.SlidingPager', {}) ---- 重点是这 //分页组件插件最下边
})

