Opencv图像的腐蚀与膨胀总结
首先,这是一种形态学操作
erode (腐蚀)
dilate(膨胀)
关于什么是形态学,有兴趣的同学可以到图像处理基本算法-形态学瞧瞧
作用:分割(isolate)独立的图像元素,以及连接(join)相邻的元素。
寻找图像中的明显的极大值区域或极小值区域。
一.erode:
@param src input image; the number of channels can be arbitrary, but the depth should be one of
CV_8U, CV_16U, CV_16S, CV_32F or CV_64F.
@param dst output image of the same size and type as src.
@param kernel structuring element used for erosion; if `element=Mat()`, a `3 x 3` rectangular
structuring element is used. Kernel can be created using getStructuringElement.
@param anchor position of the anchor within the element; default value (-1, -1) means that the
anchor is at the element center.
@param iterations number of times erosion is applied.
@param borderType pixel extrapolation method, see cv::BorderTypes
@param borderValue border value in case of a constant border
@sa  dilate, morphologyEx, getStructuringElement
CV_EXPORTS_W void erode( InputArray src, OutputArray dst, InputArray kernel,
                         Point anchor = Point(-1,-1), int iterations = 1,
                         int borderType = BORDER_CONSTANT,
                         const Scalar& borderValue = morphologyDefaultBorderValue() );
二.dilate
@param src input image; the number of channels can be arbitrary, but the depth should be one of
CV_8U, CV_16U, CV_16S, CV_32F or CV_64F.
@param dst output image of the same size and type as src.
@param kernel structuring element used for dilation; if elemenat=Mat(), a 3 x 3 rectangular
structuring element is used. Kernel can be created using getStructuringElement
@param anchor position of the anchor within the element; default value (-1, -1) means that the
anchor is at the element center.
@param iterations number of times dilation is applied.
@param borderType pixel extrapolation method, see cv::BorderTypes
@param borderValue border value in case of a constant border
@sa  erode, morphologyEx, getStructuringElement
CV_EXPORTS_W void dilate( InputArray src, OutputArray dst, InputArray kernel,
                          Point anchor = Point(-1,-1), int iterations = 1,
                          int borderType = BORDER_CONSTANT,
                          const Scalar& borderValue = morphologyDefaultBorderValue() );
**可以看到上面的的参数说明都有一句
Kernel can be created using getStructuringElement
-what is getStructuringElement ?
//下面是opencv3.0中的函数声明**
/** @brief Returns a structuring element of the specified size and shape for morphological operations.

The function constructs and returns the structuring element that can be further passed to cv::erode,
cv::dilate or cv::morphologyEx. But you can also construct an arbitrary binary mask yourself and use it as
the structuring element.

@param shape Element shape that could be one of cv::MorphShapes
@param ksize Size of the structuring element.
@param anchor Anchor position within the element. The default value \f$(-1, -1)\f$ means that the
anchor is at the center. Note that only the shape of a cross-shaped element depends on the anchor
position. In other cases the anchor just regulates how much the result of the morphological
operation is shifted.
 */
CV_EXPORTS_W Mat getStructuringElement(int shape, Size ksize, Point anchor = Point(-1,-1));
关于这个shape的枚举可以在getStructuringElement的官方文档中找到
Parameters:

    shape – The element shape, one of:

    MORPH_RECT - rectangular structuring element

    E_{ij}=1

    MORPH_ELLIPSE - elliptic structuring element, i.e. a filled ellipse inscribed into the rectangle

    Rect(0, 0, esize.width, 0.esize.height)

    MORPH_CROSS - cross-shaped structuring element:
即有三种可选:
矩形: MORPH_RECT
椭圆形: MORPH_ELLIPSE
交叉形: MORPH_CROSS
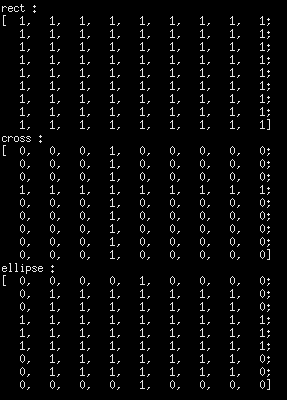
下面演示getStructuringElement的作用 从某种意义上说他就是生成一个内核的函数,不过他更方便
    Mat rect = getStructuringElement(MORPH_RECT,Size(9,9),Point(-1,-1));
    Mat cross = getStructuringElement(MORPH_CROSS,Size(9,9),Point(3,3));//锚点的改变只对十字有作用
    Mat ellipse = getStructuringElement(MORPH_ELLIPSE,Size(9,9),Point(1,1));

cout <<"rect : "<cout <<"cross : "<cout <<"ellipse : "< 1:膨胀
此操作将图像 A 与任意形状的内核 (B),通常为正方形或圆形,进行卷积。

内核 B 有一个可定义的 锚点, 通常定义为内核中心点。

进行膨胀操作时,将内核 B 划过图像,将内核 B 覆盖区域的最大相素值提取,并代替锚点位置的相素。显然,这一最大化操作将会导致图像中的亮区开始”扩展” (因此有了术语膨胀 dilation )。
2:腐蚀
腐蚀在形态学操作家族里是膨胀操作的孪生姐妹。它提取的是内核覆盖下的相素最小值。

进行腐蚀操作时,将内核 B 划过图像,将内核 B 覆盖区域的最小相素值提取,并代替锚点位置的相素。
从字面上看就是一个覆盖查找替换的过程,下面用一段代码演示一下
    Mat src = (Mat_<double>(3,3) << 1,2,3,4,5,6,7,8,9);
    Mat kernel = getStructuringElement(MORPH_CROSS,Size(3,3),Point(-1,-1));
    Mat dst;
    dilate(src,dst,kernel);
    cout << "src:"<cout << "kernel:"<cout << "dst:"<
dilate运行结果是:

*注意kernel中为零的不会参与比较,而且此内核的描点是Point(-1,-1)即中心点;
同样若把膨胀函数改为腐蚀函数
erode(src,dst,kernel);结果就是:
按照这样的结论,我们只需要在 erode || dilate中传入三个参数即可
下面献上Learning opencv中的大作
#include "opencv2/imgproc/imgproc.hpp"
#include "opencv2/highgui/highgui.hpp"
#include "highgui.h"
#include
#include

using namespace cv;

/// 全局变量
Mat src, erosion_dst, dilation_dst;

int erosion_elem = 0;
int erosion_size = 0;
int dilation_elem = 0;
int dilation_size = 0;
int const max_elem = 2;
int const max_kernel_size = 21;

/** Function Headers */
void Erosion( int, void* );
void Dilation( int, void* );

/** @function main */
int main( int argc, char** argv )
{
  /// Load 图像
  src = imread( argv[1] );

  if( !src.data )
  { return -1; }

  /// 创建显示窗口
  namedWindow( "Erosion Demo", CV_WINDOW_AUTOSIZE );
  namedWindow( "Dilation Demo", CV_WINDOW_AUTOSIZE );
  cvMoveWindow( "Dilation Demo", src.cols, 0 );

  /// 创建腐蚀 Trackbar
  createTrackbar( "Element:\n 0: Rect \n 1: Cross \n 2: Ellipse", "Erosion Demo",
                  &erosion_elem, max_elem,
                  Erosion );

  createTrackbar( "Kernel size:\n 2n +1", "Erosion Demo",
                  &erosion_size, max_kernel_size,
                  Erosion );

  /// 创建膨胀 Trackbar
  createTrackbar( "Element:\n 0: Rect \n 1: Cross \n 2: Ellipse", "Dilation Demo",
                  &dilation_elem, max_elem,
                  Dilation );

  createTrackbar( "Kernel size:\n 2n +1", "Dilation Demo",
                  &dilation_size, max_kernel_size,
                  Dilation );

  /// Default start
  Erosion( 0, 0 );
  Dilation( 0, 0 );

  waitKey(0);
  return 0;
}

/**  @function Erosion  */
void Erosion( int, void* )
{
  int erosion_type;
  if( erosion_elem == 0 ){ erosion_type = MORPH_RECT; }
  else if( erosion_elem == 1 ){ erosion_type = MORPH_CROSS; }
  else if( erosion_elem == 2) { erosion_type = MORPH_ELLIPSE; }

  Mat element = getStructuringElement( erosion_type,
                                       Size( 2*erosion_size + 1, 2*erosion_size+1 ),
                                       Point( erosion_size, erosion_size ) );

  /// 腐蚀操作
  erode( src, erosion_dst, element );
  imshow( "Erosion Demo", erosion_dst );
}

/** @function Dilation */
void Dilation( int, void* )
{
  int dilation_type;
  if( dilation_elem == 0 ){ dilation_type = MORPH_RECT; }
  else if( dilation_elem == 1 ){ dilation_type = MORPH_CROSS; }
  else if( dilation_elem == 2) { dilation_type = MORPH_ELLIPSE; }

  Mat element = getStructuringElement( dilation_type,
                                       Size( 2*dilation_size + 1, 2*dilation_size+1 ),
                                       Point( dilation_size, dilation_size ) );
  ///膨胀操作
  dilate( src, dilation_dst, element );
  imshow( "Dilation Demo", dilation_dst );
}
其中只是添加了一个滑动条以增加显示种类 看到这相信对于腐蚀(erode)于膨胀(dilate)都有了一个很好的了解

